Author: Imolaza
Last update: 2024-11-18 08:58
Author: admin
Last update: 2022-07-30 03:57
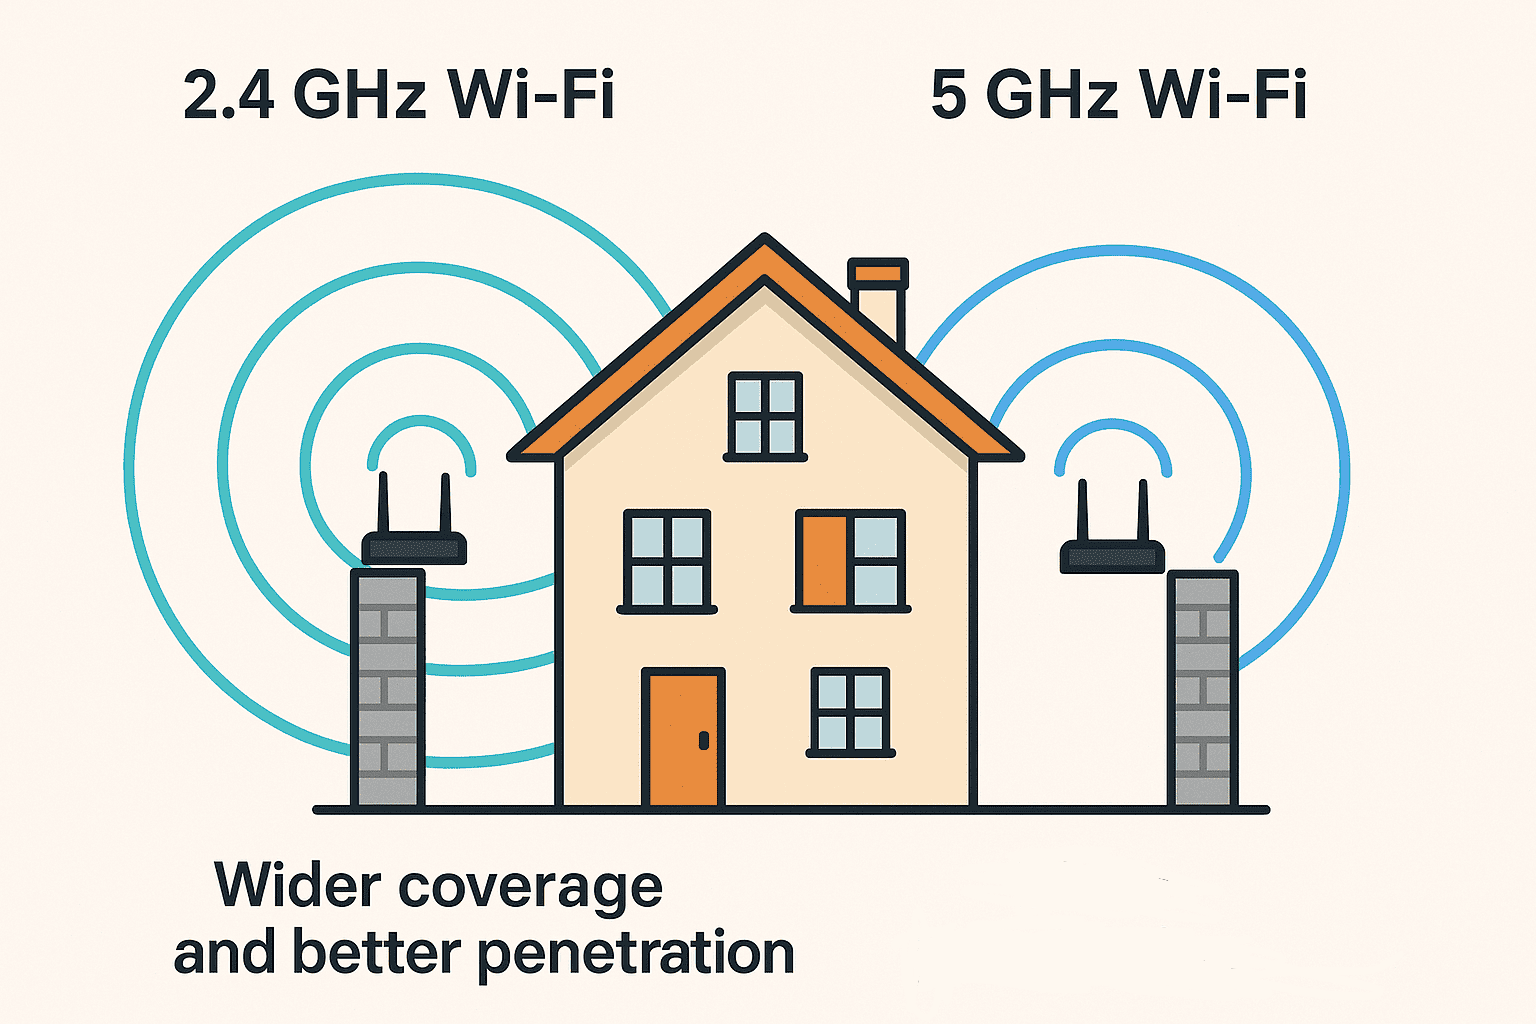
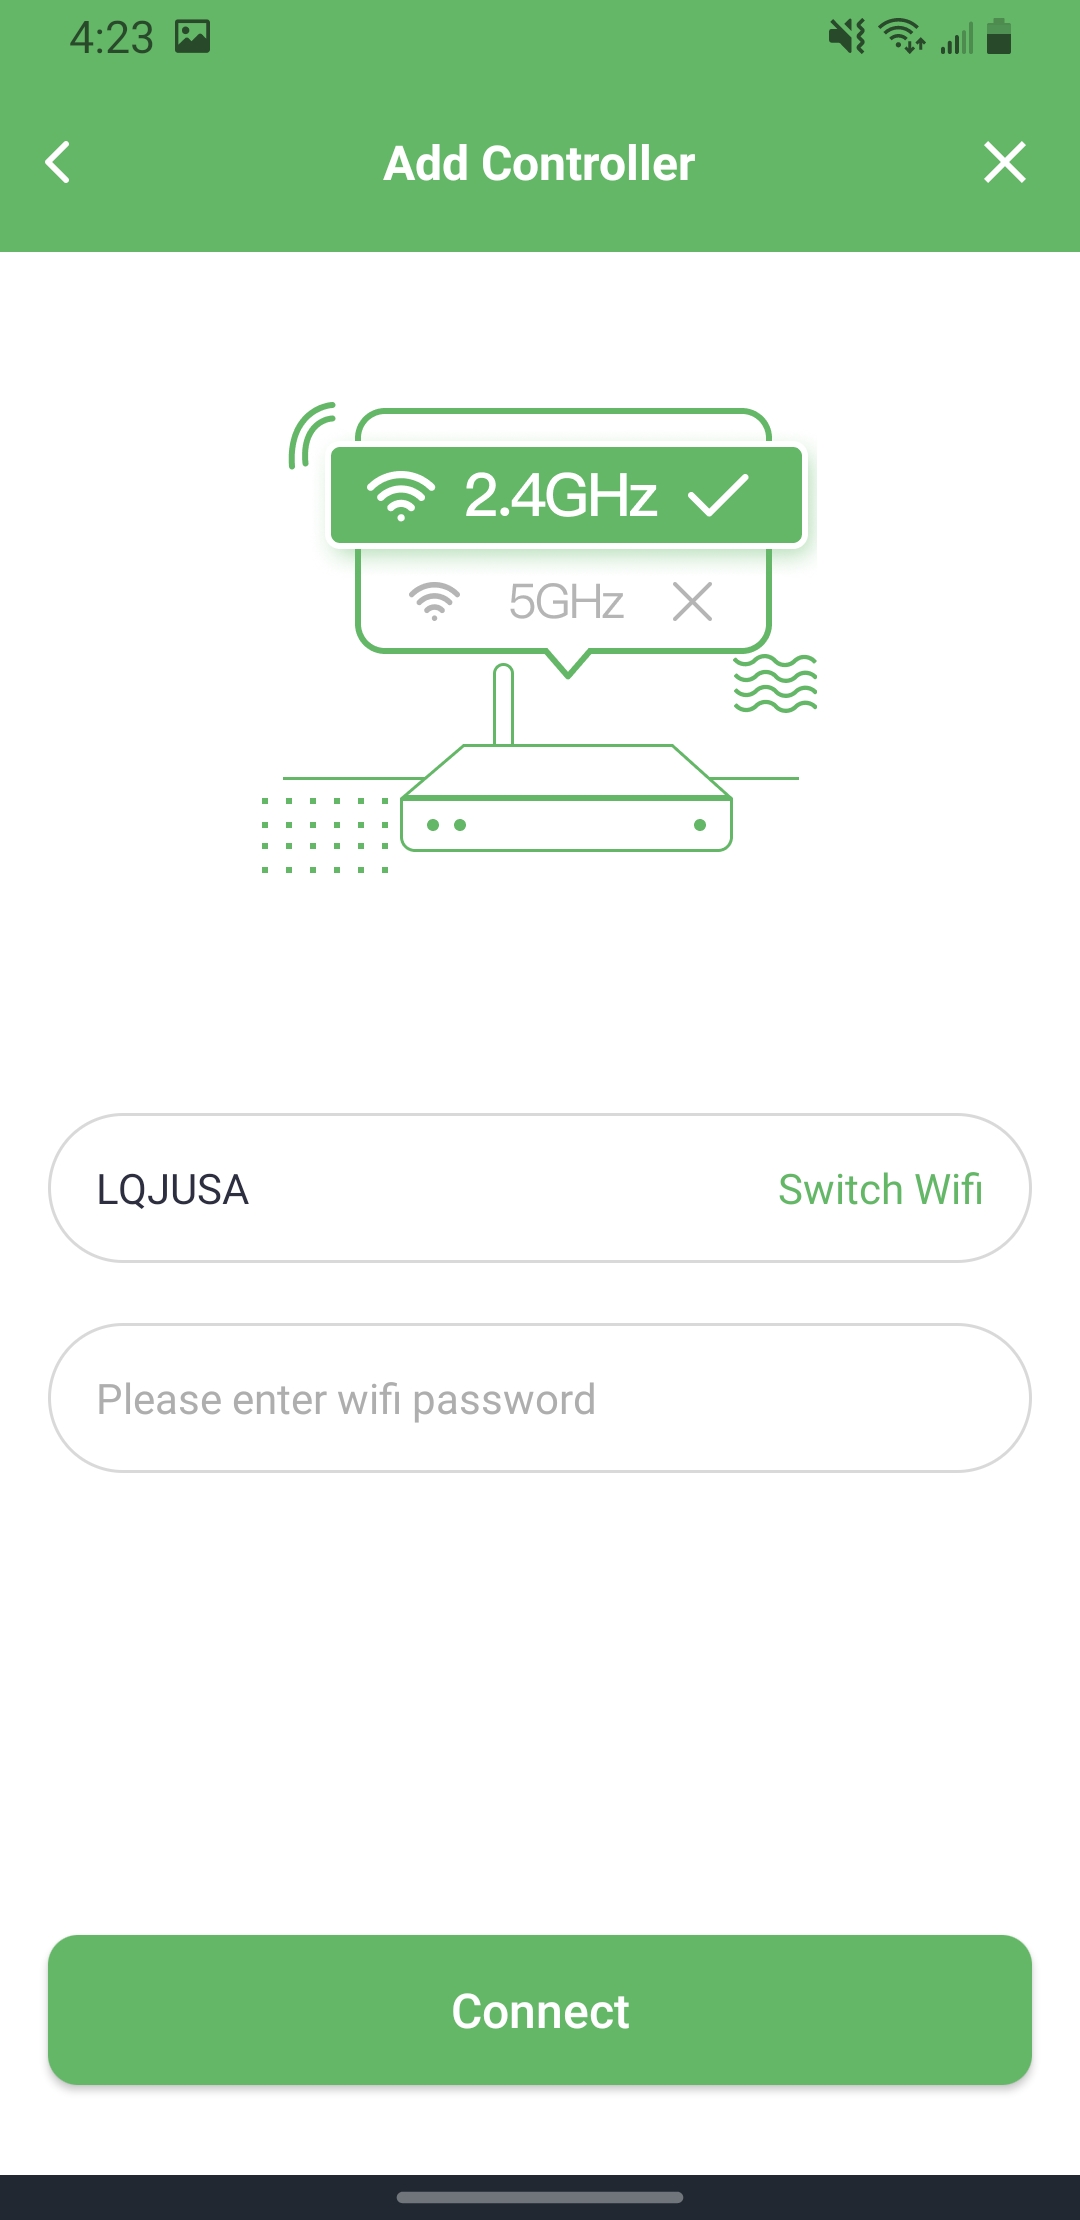
ImoLaza devices are compatible exclusively with 2.4GHz WiFi networks and do not support 5GHz. While 5GHz offers faster speeds, the 2.4GHz band provides wider coverage, better wall penetration, and more reliable connectivity over longer distances—making it ideal for smart home devices like ImoLaza.
Using a Dual-Band or Tri-Band Router?
Many modern routers support both 2.4GHz and 5GHz frequencies (often labeled as "dual-band" or "tri-band"). ImoLaza will work seamlessly as long as the 2.4GHz band is enabled.
Troubleshooting Connection Issues
By default, multi-band routers often merge frequencies into a single network name (SSID). If your ImoLaza device experiences:
Slow or failed connections
Interference from other frequency bands
Try these steps:
Split your WiFi bands: Separate the 2.4GHz and 5GHz networks in your router settings.
Assign distinct names (e.g., "Home_WiFi_2.4G" and "Home_WiFi_5G").
Connect ImoLaza to the 2.4GHz network for optimal stability and range.
This ensures uninterrupted performance with broader coverage and stronger signal penetration.
In case the above method doesn’t work for you, please contact our technical support team directly using the contact information below. We will respond to you by email within 12h after your message reaches us.
Email: Support@imolaza.com
Author: admin
Last update: 2025-03-28 04:15
When you have some changes on your home Wi-Fi like a name change or password change, or you just get a new router. You will need to update your Wi-Fi network within the ImoLaza App. Here are the steps.
Change Wi-Fi when the device is online.
Step1: Click the "Controller Settings" tab on the "Setting" screen.
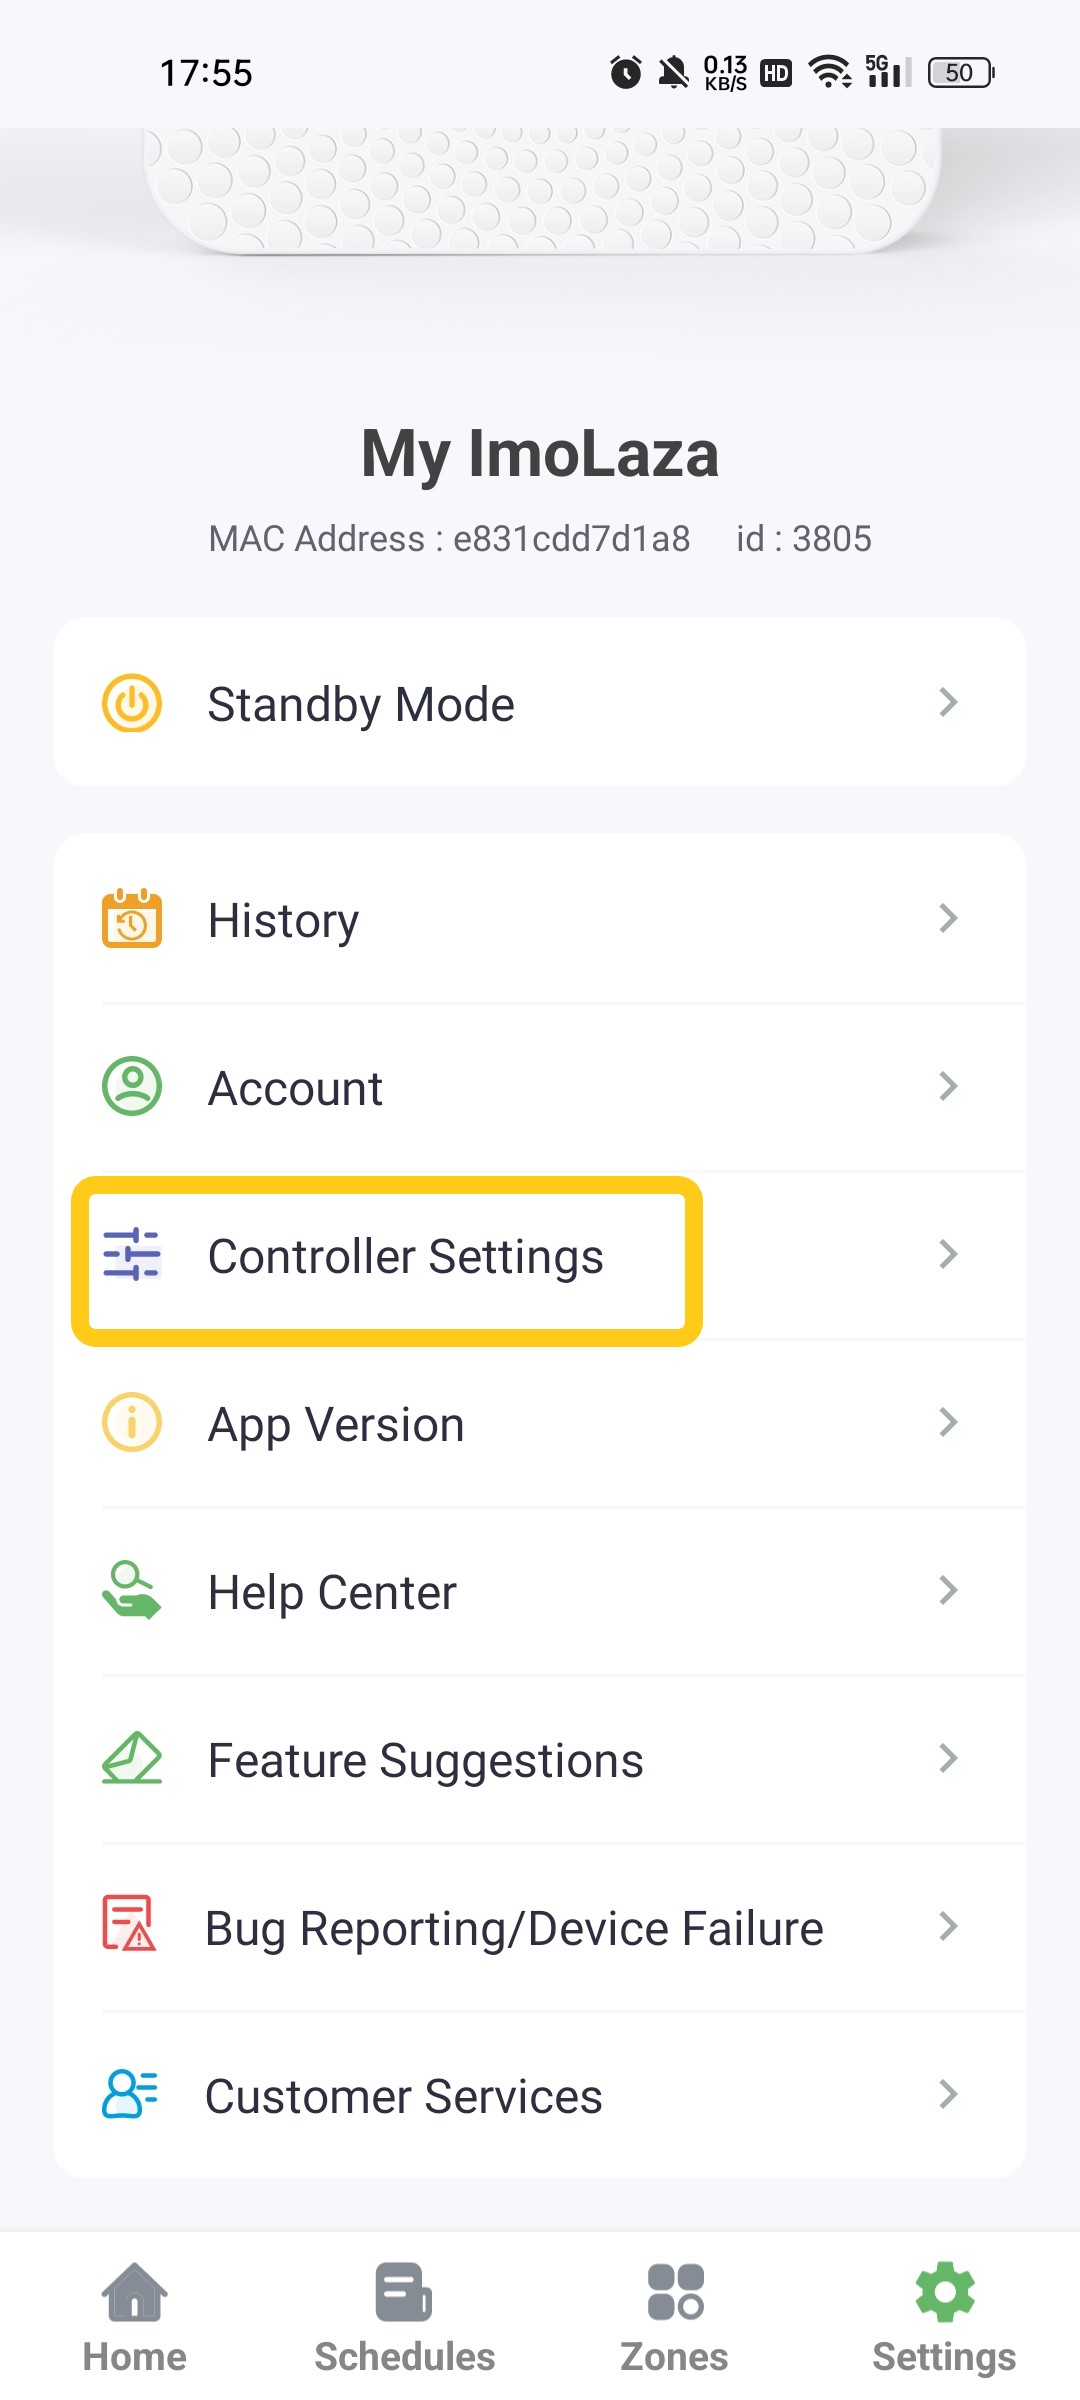
Step2: Select "Update Wi-Fi Network".
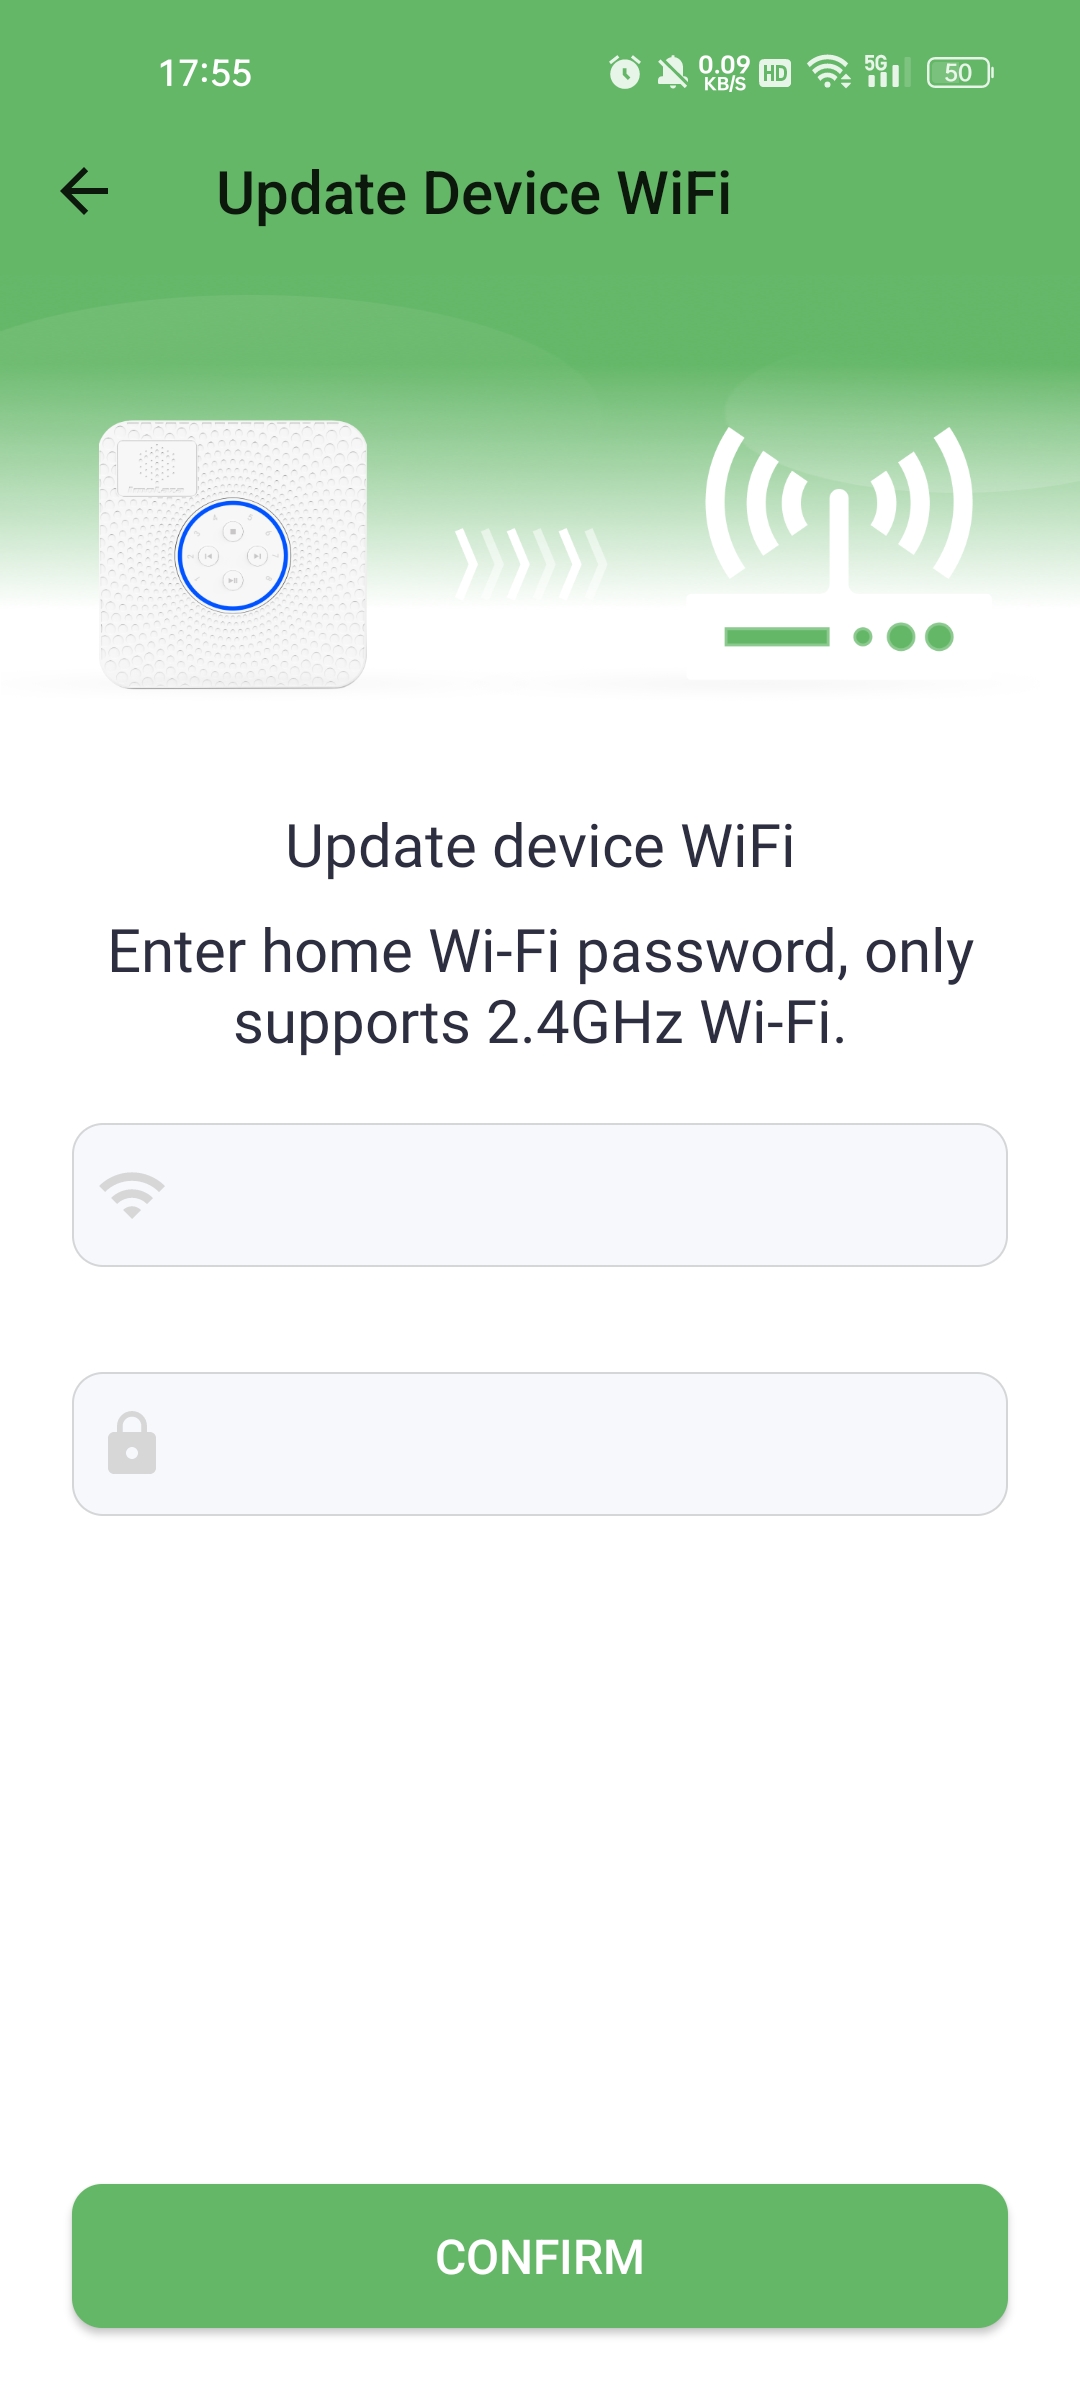
Step3: Enter the new Wi-Fi name and password. Then confirm it.
Change Wi-Fi when the device is offline.
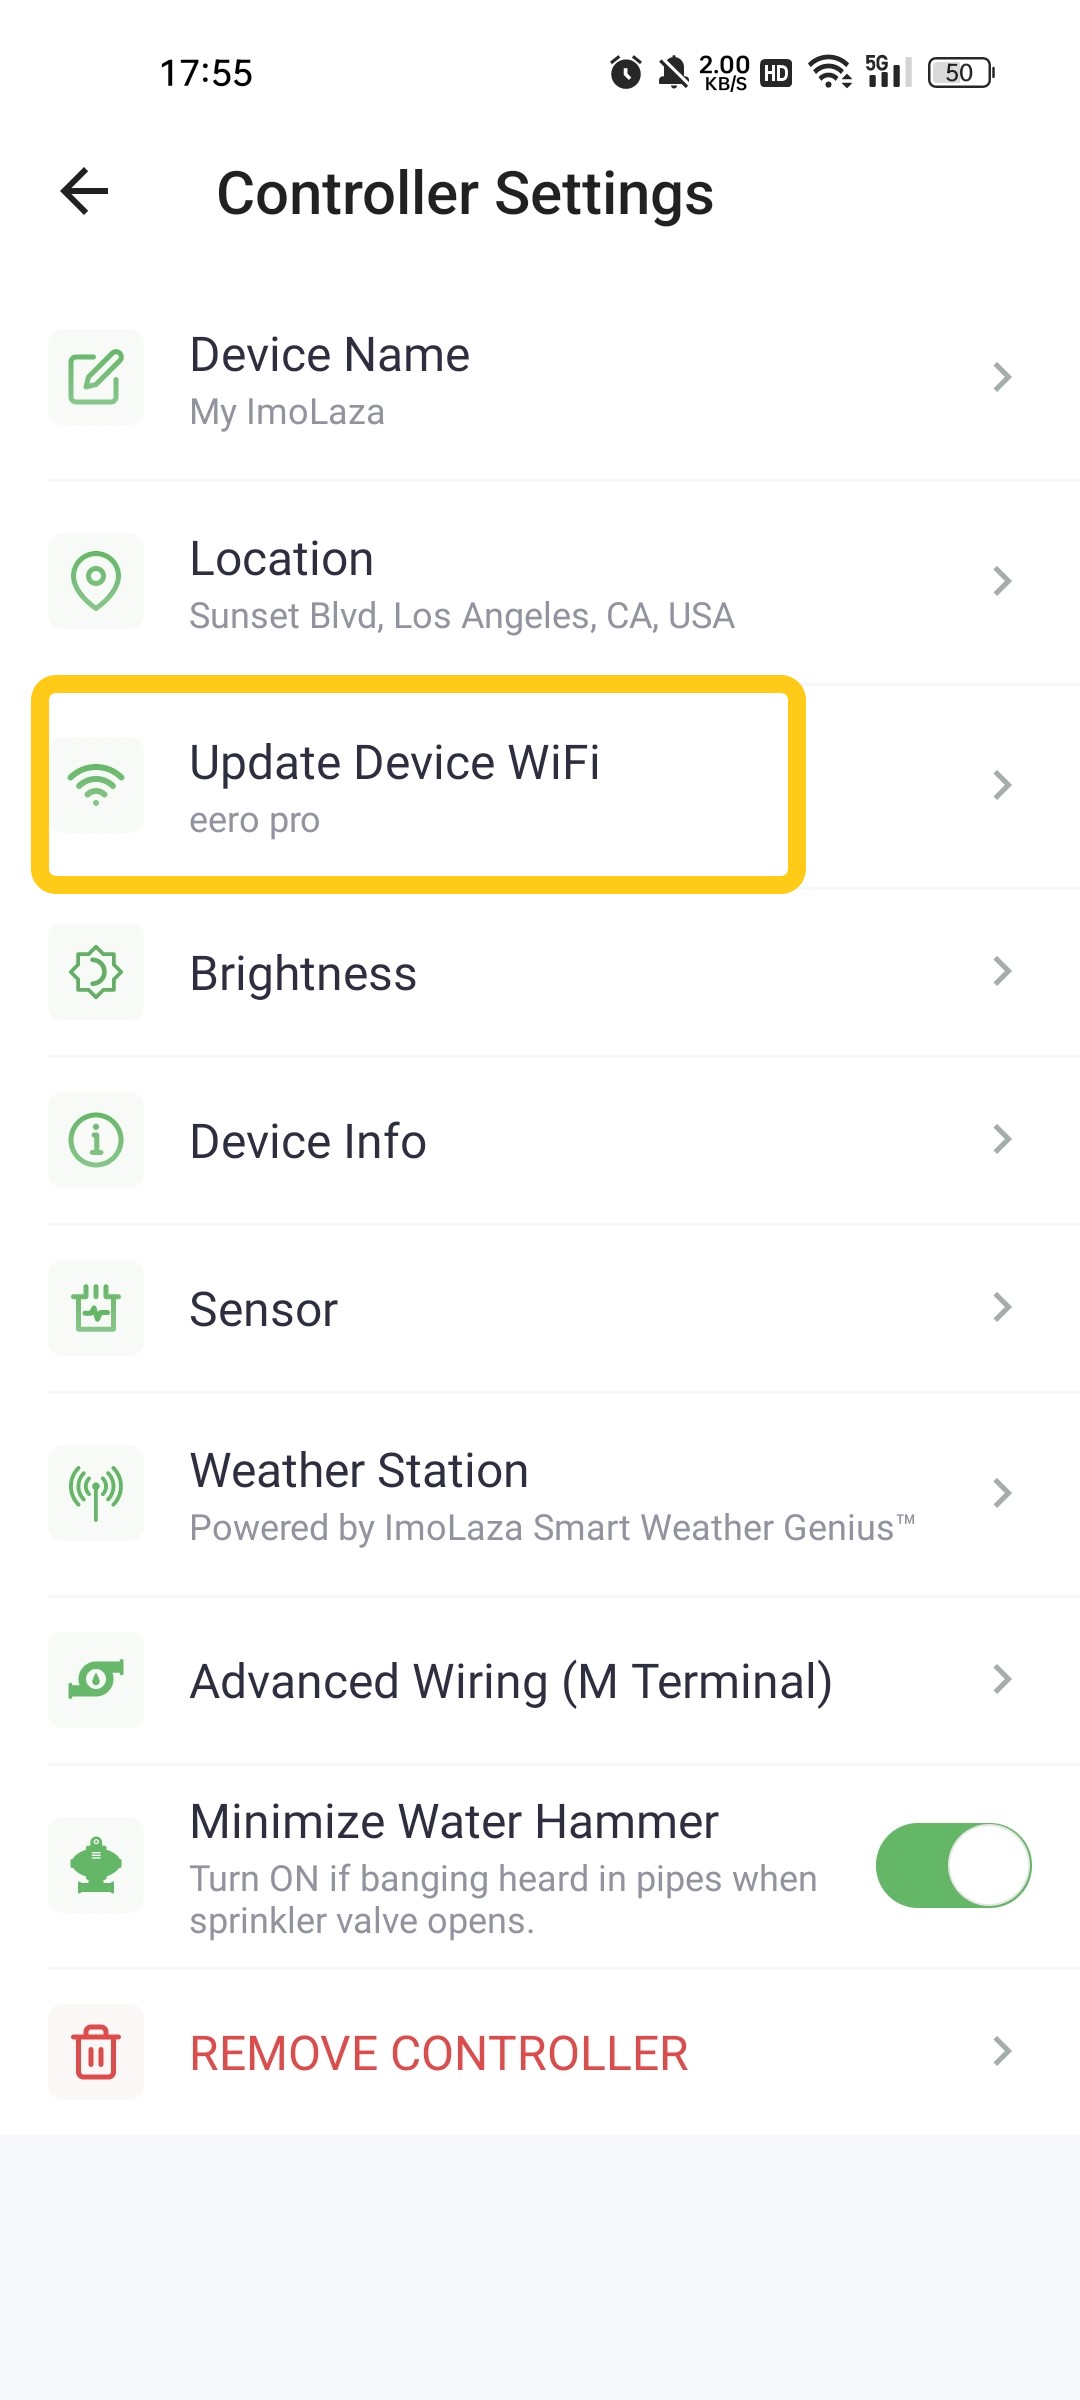
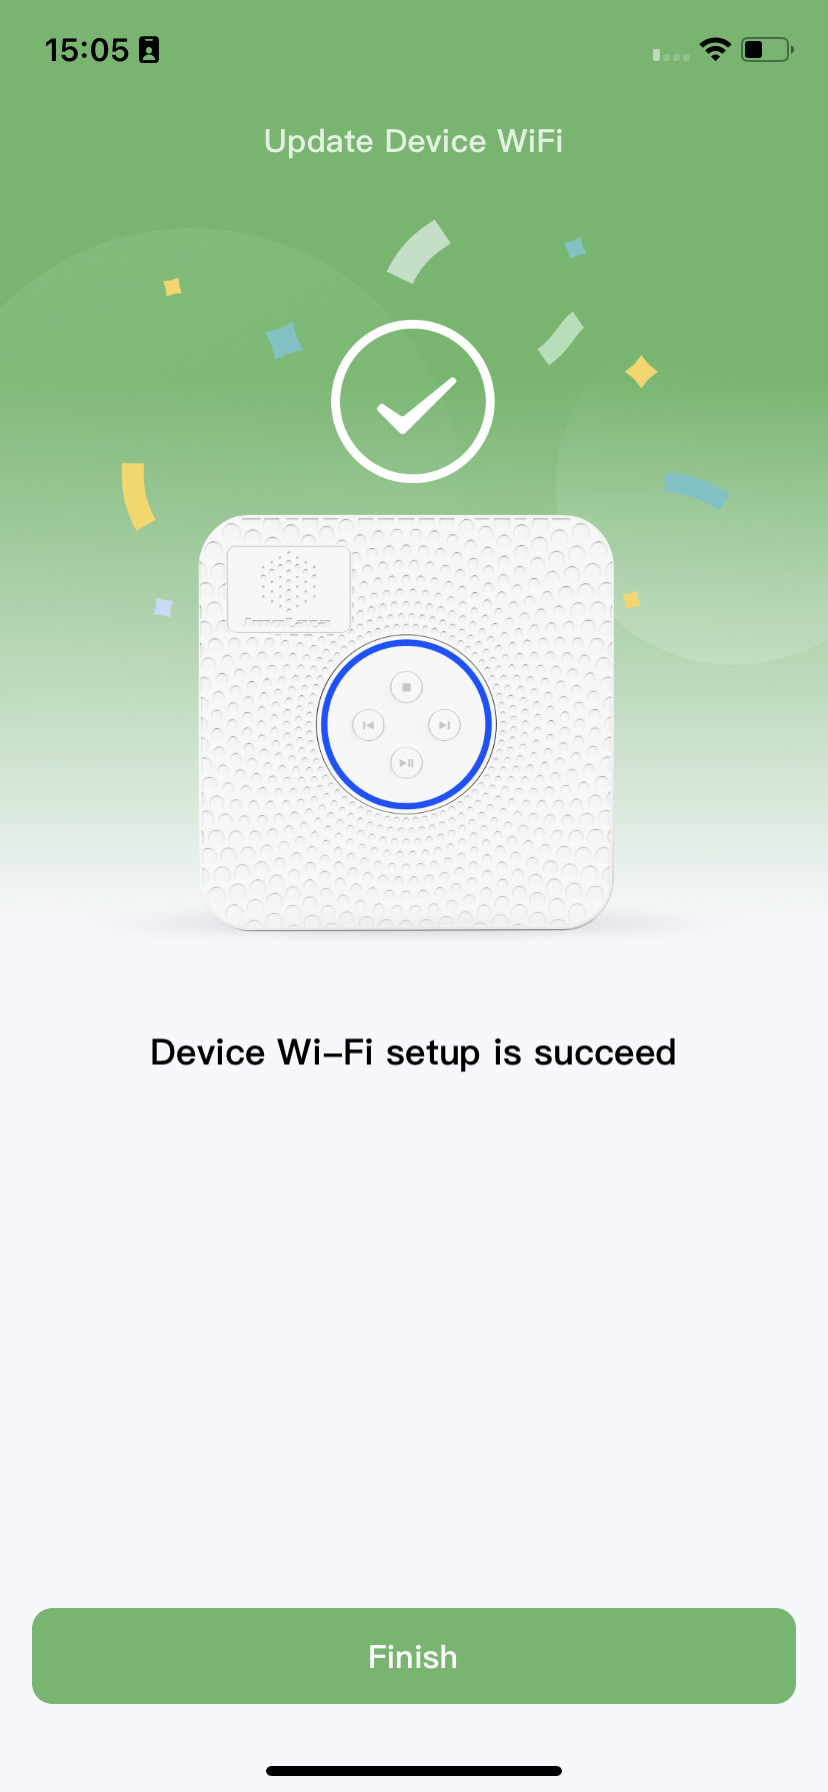
Step1: Go to the “Settings” screen. Then tap “Controller Settings” and “Update Device WiFi”.
Step2: Follow the prompts in the app to reset the controller.


Step3: Choose the new wifi to connect with.
For IOS, connect your phone to the new WiFi in advance. Make sure it is a 2.4GHz WiFi. Then enter the password and tap “Connect”.
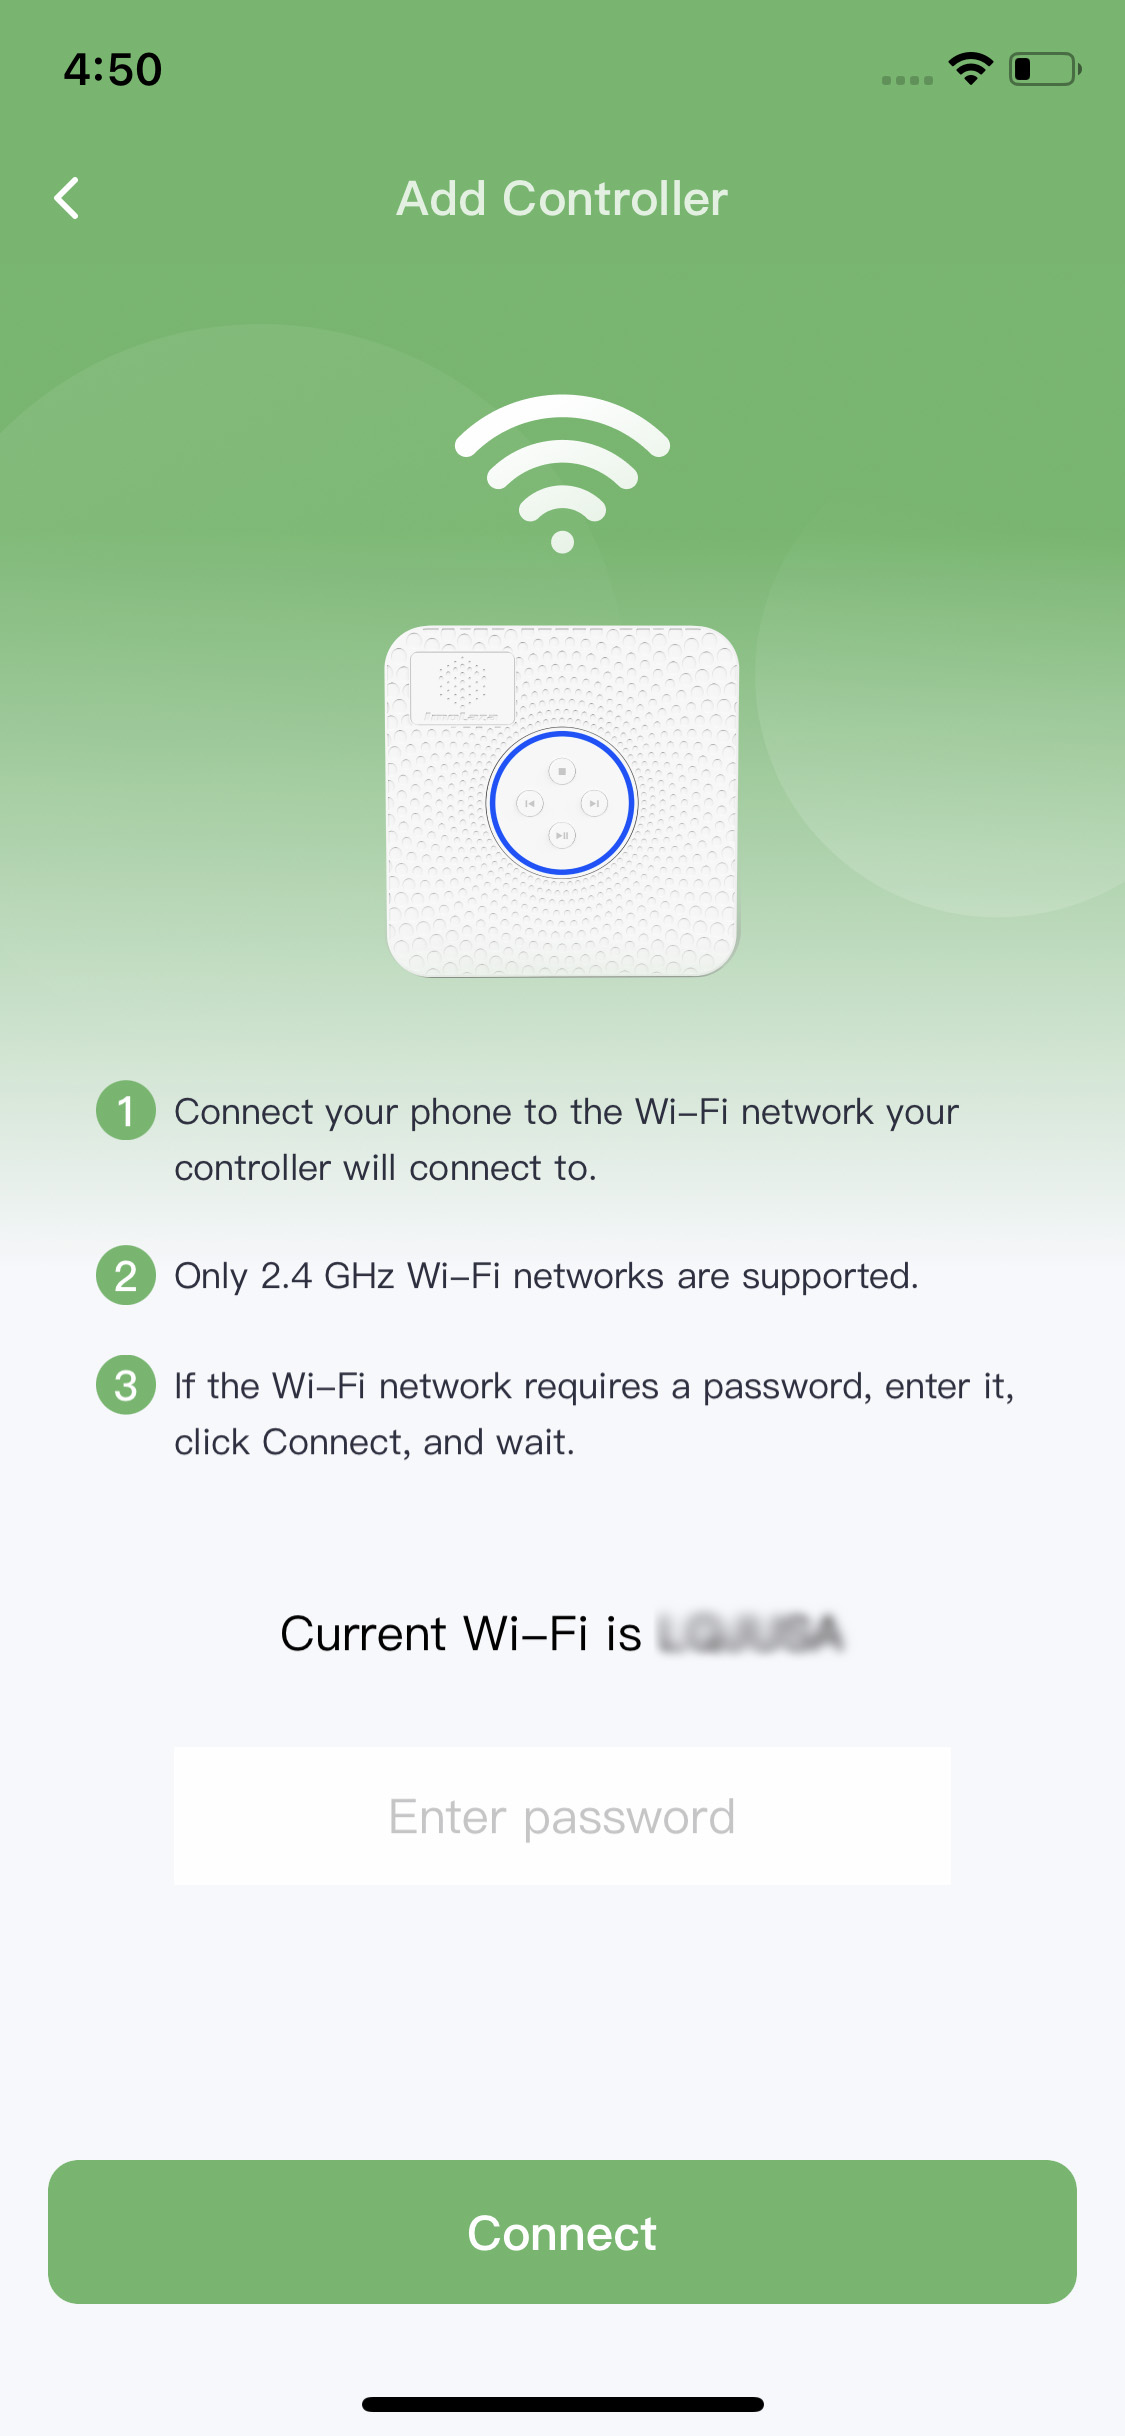
For Android, Tap “Switch Wifi” and choose the new WiFi to connect. Make sure it is a 2.4GHz WiFi.
Step4: Job finished.
Still need help?
In case the above method doesn’t work for you, please contact our technical support team directly using the contact information below. We will respond to you by email within 12h after your message reaches us.
Email: Support@imolaza.com
Author: admin
Last update: 2025-03-28 04:58
If you’re experiencing connectivity problems, try these steps to resolve them:
Ensure you’re using the latest version of the app (check the App Store or controller management interface).
Install any available firmware updates, as they often include bug fixes and performance improvements.

Open the app and go to Controller Settings > Update Device WiFi.
Follow the on-screen instructions to reconnect to your WiFi network.
Important: Enter the password carefully—WiFi passwords are case-sensitive (check uppercase/lowercase letters and special characters).
How do I update Wi-Fi on my controller?

Unplug the controller’s power cord for 10 seconds, then plug it back in.
Wait for the device to fully restart before testing the connection.
Power off your router by unplugging it for 30 seconds, then reconnect it.
This can resolve temporary network glitches and improve connectivity.
Use your smartphone to check the WiFi signal near the controller.
If the signal shows less than 2 bars:
Move the router closer to the controller.
Consider upgrading to a high-power router or WiFi extender for better coverage.
In case the above method doesn’t work for you, please contact our technical support team directly using the contact information below. We will respond to you by email within 12h after your message reaches us.
Email: Support@imolaza.com
Author: admin
Last update: 2025-03-28 04:31
Why This Happens:
Your controller appears offline in the app because it’s currently disconnected from WiFi. However, any previously set schedules will continue running since they’re stored locally in the controller’s memory.
How to Fix It:
Open the app and go to:
Settings → Controller Settings → Update Device WiFi
Follow the on-screen instructions to reconnect your controller to your WiFi network.
Once reconnected, the status should update to "Online," and you’ll regain full app control.
Tip:
If the issue persists, try rebooting your router or moving the controller closer to your WiFi source to ensure a stable connection.

In case the above method doesn’t work for you, please contact our technical support team directly using the contact information below. We will respond to you by email within 12h after your message reaches us.
Email: Support@imolaza.com
Author: admin
Last update: 2025-03-28 04:53
If you’re unable to connect a new device to your home WiFi—whether via QR code or manual MAC address entry—follow these steps to diagnose and resolve the issue.
1. WiFi Signal Strength
Ensure your phone shows at least 2 bars of WiFi signal near the device.
If the signal is weak:
Move closer to the router.
Use a WiFi extender to improve coverage.
2. Verify WiFi Password
Double-check that the password entered is correct (including uppercase/lowercase letters and special characters).
If your WiFi password was recently changed, update it on the new device.
3. Confirm WiFi Frequency
Some devices only support 2.4GHz (not 5GHz).
If your router broadcasts both bands, ensure the device connects to 2.4GHz.
If the issue persists, try these steps:
1. Power Cycle the Device
Unplug the device for 10+ seconds, then reconnect.
This clears temporary errors and refreshes the connection.
2. Restart the App
Force quit the app, then reopen it.
This resolves app glitches that may interfere with setup.
3. Factory Reset & Reconnect
Locate the RESET button on the device.
Hold it for 5 seconds to restore default settings.
Set up the device again as if it were new.
Still need help?
In case the above method doesn’t work for you, please contact our technical support team directly using the contact information below. We will respond to you by email within 12h after your message reaches us.
Email: Support@imolaza.com
Author: admin
Last update: 2025-03-28 04:56
If your ImoLaza controller loses its internet connection, here’s what to expect:
1. 24-Hour Offline Notification
If the device remains disconnected for more than 24 hours, you’ll receive an email reminder to reconnect it to Wi-Fi for full smart control.
2. Schedules Continue Running
All pre-set watering schedules will keep operating normally.
Any schedule changes made in the app will automatically sync to the controller once it reconnects to the internet.
3. Local Event Logging
The controller logs all watering activity (time and duration) while offline.
This data syncs to your irrigation history once back online.
4. Automatic Time Sync on Reconnection
When Wi-Fi is restored, the controller updates its time automatically for accurate scheduling.
5. Power Outage Behavior
During a power failure, the controller stops all functions.
Once power returns:
. It reconnects to Wi-Fi automatically.
. Resumes normal operation, including missed schedules (if within the same day).
In case the above method doesn’t work for you, please contact our technical support team directly using the contact information below. We will respond to you by email within 12h after your message reaches us.
Email: Support@imolaza.com
Author: admin
Last update: 2025-03-28 06:37
If your controller has been offline in the app for hours, follow these steps to diagnose and resolve the issue:
. Possible Cause: Short circuit or power issue.
. Solution:
1. Power cycle the controller:
Unplug the power adapter, wait 20 seconds, then reconnect.
2. Test for a short-circuited solenoid valve:
Manually run each zone one by one (if your controller has buttons).
If the controller suddenly shuts off when activating a specific zone, that zone’s solenoid valve may have a short circuit.
. Example:
Zone 1 & 2 run normally → No issue.
Zone 3 causes the controller to shut off → Short circuit in Zone 3’s solenoid valve.
3. Safety Note:
If a short circuit is detected, avoid handling wiring yourself—contact a professional for repair to prevent electric shock.
. Possible Cause: Wi-Fi connectivity issue.
. Solution:
1. Check your home Wi-Fi:
Ensure your router is working (test with another device).
2. Verify Wi-Fi credentials:
Confirm the network name (SSID) and password haven’t changed.
If they have, update them in the controller’s settings.
3. Reconnect to Wi-Fi:
Go to: App Settings → Controller Settings → Update Wi-Fi Network.
How do I update Wi-Fi on my controller?
4. Restart the controller:
Unplug for 10 seconds, then reconnect.
5. Reboot your router:
Unplug for 1 minute, then restart.
In case the above method doesn’t work for you, please contact our technical support team directly using the contact information below. We will respond to you by email within 12h after your message reaches us.
Email: Support@imolaza.com
Author: admin
Last update: 2025-03-28 06:55
Is the ImoLaza App compatible with my phone? How do I connect the controller to my home WiFi? Don't worry, The Imolaza App supports both Android and iOS phones, but it's not exactly the same when setting up WiFi for both phones. Please watch the corresponding video tutorial to set up WiFi.
For Android
For iOS
Still need help?
In case the above method doesn’t work for you, please contact our technical support team directly using the contact information below. We will respond to you by email within 12h after your message reaches us.
Email: Support.imolaza.com
Author: Imolaza
Last update: 2023-10-20 04:56
To ensure access to the latest features, please update your device to the most recent firmware version. If you encounter update failures, follow these steps:
1. Power cycle the device:
. Unplug the controller from power
. Wait 10 seconds
. Reconnect the power cable
2. Optimize positioning:
Move the controller closer to your WiFi router (if possible) to ensure strong signal strength
1. Reboot your router:
. Disconnect the router's power
. Wait 1 full minute (this ensures complete reset)
. Restore power and wait for full reboot
1. Check for updates:
. When the update notification appears, tap the prompt immediately
. If no prompt appears, check the app's firmware update section manually
2. Begin installation:
. Ensure your device remains powered on and connected during the entire process
. Do not interrupt the update once started
. Verify your WiFi network is stable (minimum 2-bar signal strength)
. Confirm the controller has adequate power supply
. Check for app updates in your device's app store
. If issues persist, contact our support team with:
. Your controller model number
. Current firmware version
. Specific error messages received
Note: Failed updates may occasionally require factory reset. Please backup your settings before attempting this solution.
Would you like me to add visual guides or more detailed network diagnostic steps?
Still need Help?
In case the above method doesn’t work for you, please contact our technical support team directly using the contact information below. We will respond to you by email within 12h after your message reaches us.
Email: Support@imolaza.com
Author: Imolaza
Last update: 2025-03-28 08:21
To ensure optimal performance, your ImoLaza controller requires a stable WiFi connection. Follow this guide to verify if your chosen installation spot provides adequate signal strength.
If you haven't installed the controller yet:
. Stand at the planned installation location with your smartphone.
. Check your phone's WiFi signal strength:
. ✅ Good: 2+ bars (stable connection)
. ❌ Poor: 1 bar or unstable signal
If signal is weak:
. Move the controller closer to your router or
. Reposition your router to improve coverage

If you can't change the installation spot:
. Upgrade to a high-power router with better range
. Install a WiFi extender/repeater between your router and controller
. Consider a mesh WiFi system for large properties
If your controller is already installed:
. Open the ImoLaza app
. Navigate to: Settings → Controller Settings → Device Info
Check the displayed SSID signal strength:
. ⚠️ 1 bar: Unstable connection (needs improvement)
. ✅ 2+ bars: Acceptable signal
For weak signals:
. Follow the solutions in Section 2 above
. Temporarily move the controller closer to test if signal improves

. ImoLaza's smart features require consistent WiFi connectivity
. Poor signal causes:
. Delayed schedule execution
. Failed remote commands
. Intermittent offline status
. Test at different times of day (signal strength can vary)
. Avoid installing near:
. Large metal objects
. Other electronics that cause interference
. Thick concrete walls
Still need help?
In case the above method doesn’t work for you, please contact our technical support team directly using the contact information below. We will respond to you by email within 12h after your message reaches us.
Email: Support@imolaza.com
Author: Imolaza
Last update: 2025-03-28 09:03
Author: Imolaza
Last update: 2024-11-18 08:58
Forgot your password? Or would like to change your password to a memorable one. Please follow the steps below.
Forget your password
Step1: On the login screen of the ImoLaza app, tap the link that reads "FORGOT PASSWORD?".
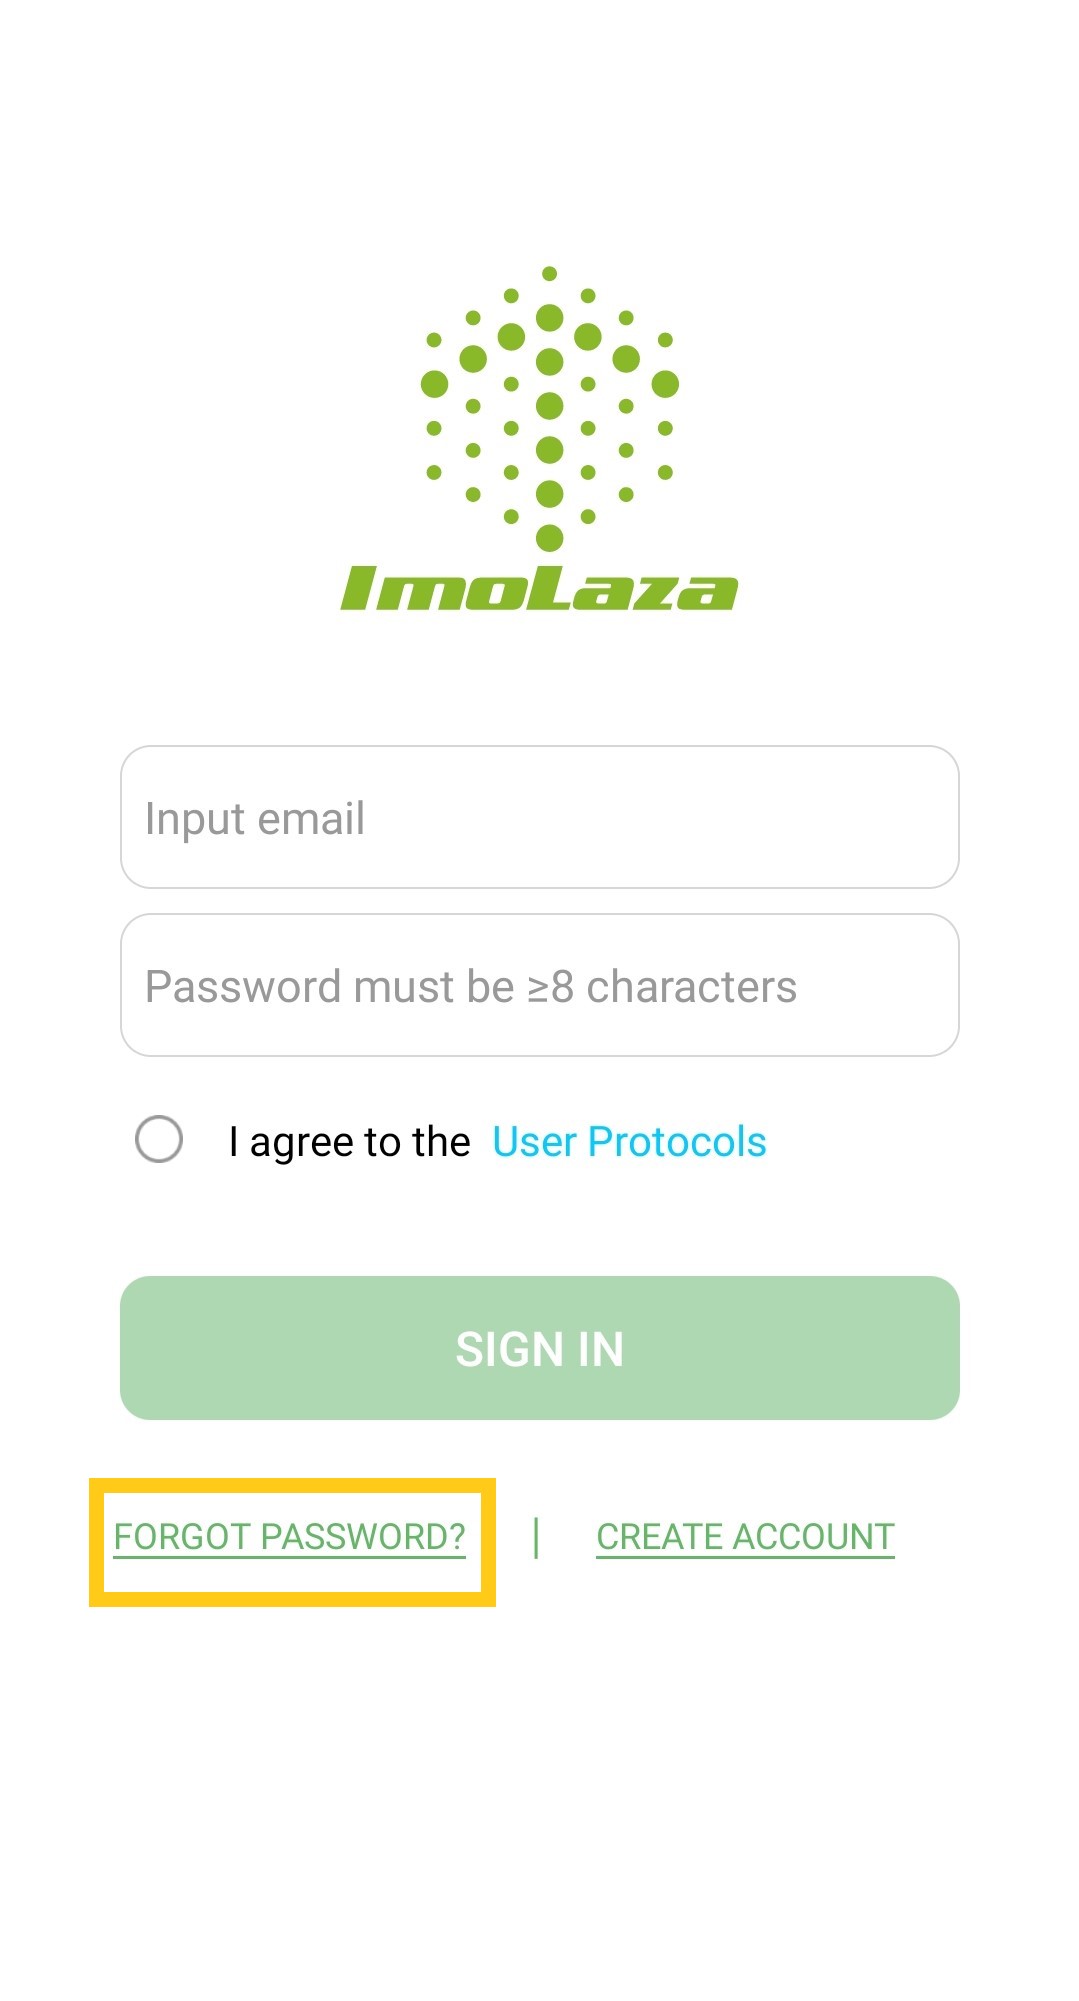
Step2: Enter your email address (which serves as your username) on the reset screen, then hit "Send".
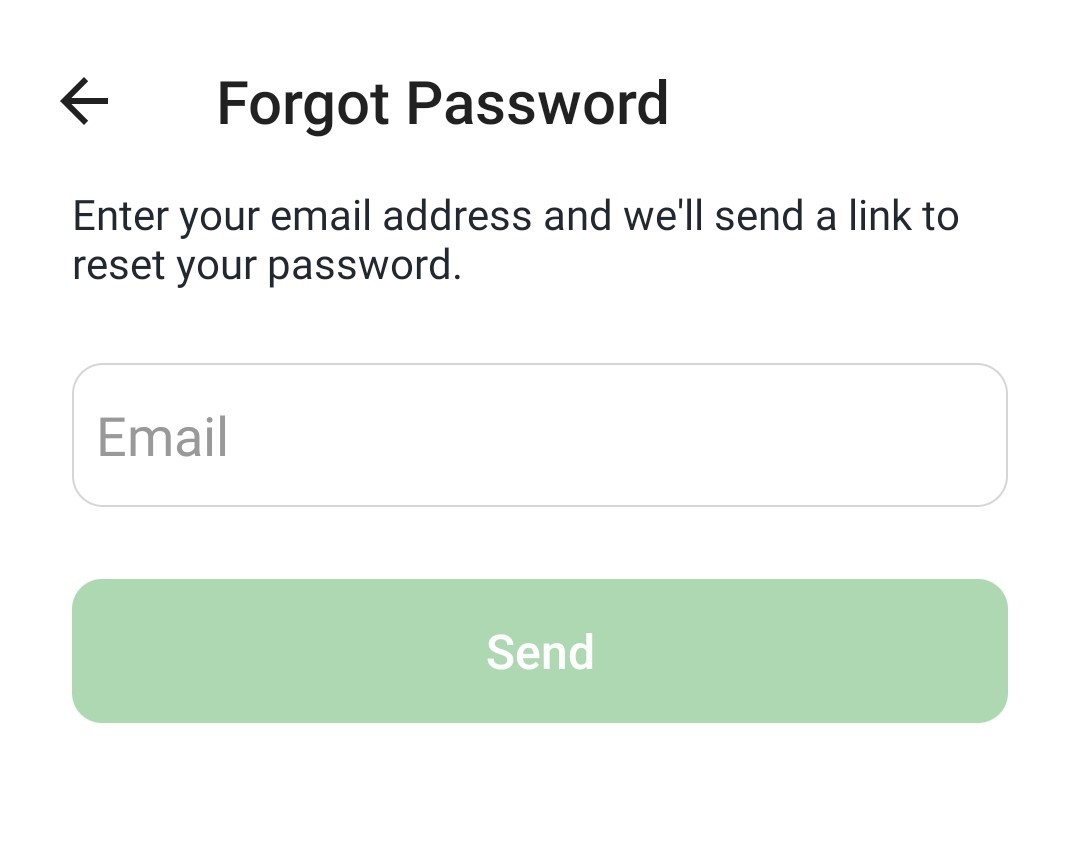
Step3: Next, check your email for a message from ImoLaza. Within the email, select "Reset Your Password".
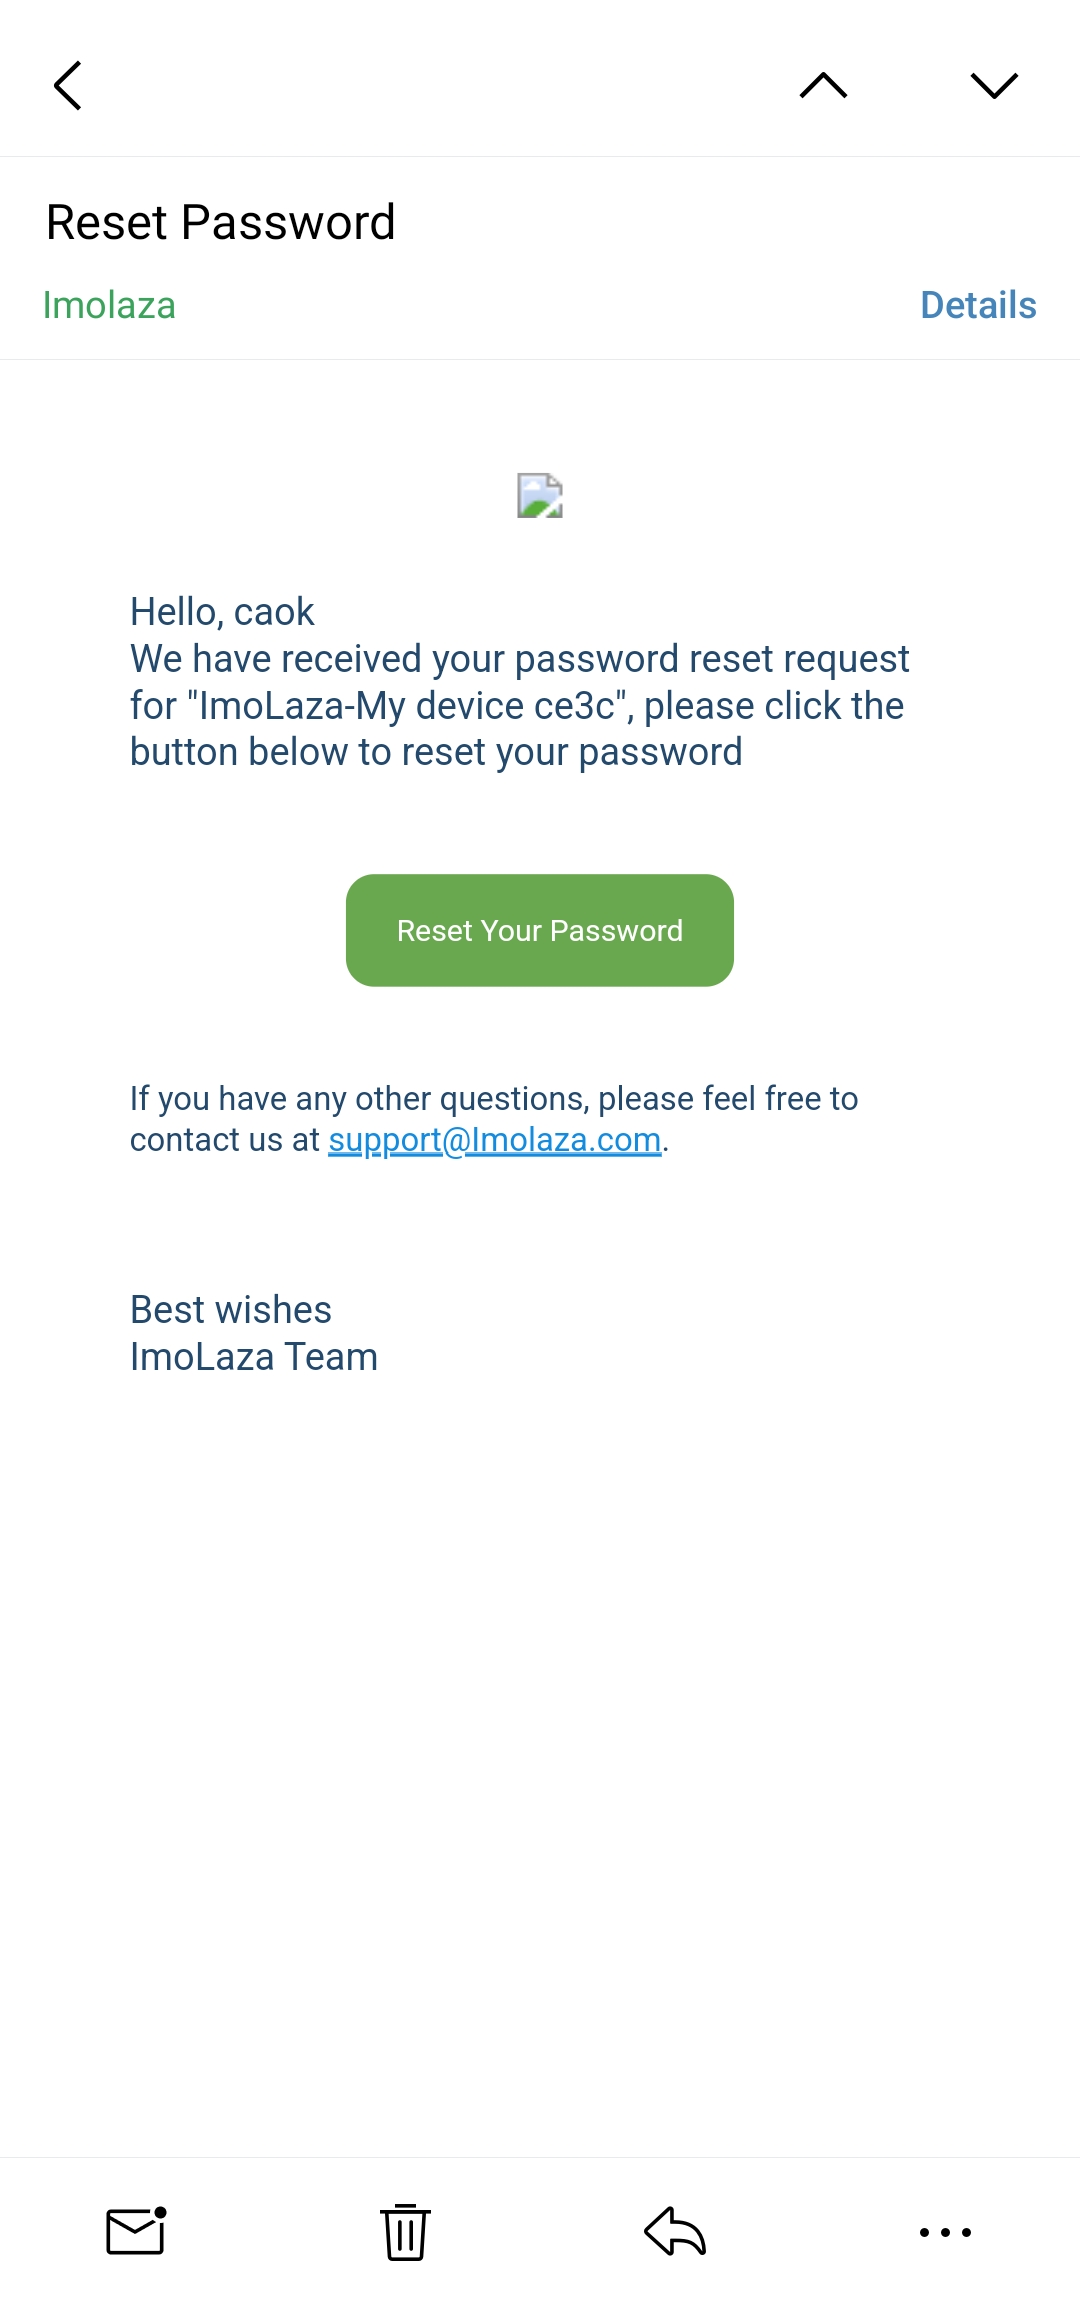
Step4: Enter and confirm your new password, then hit "RESET".
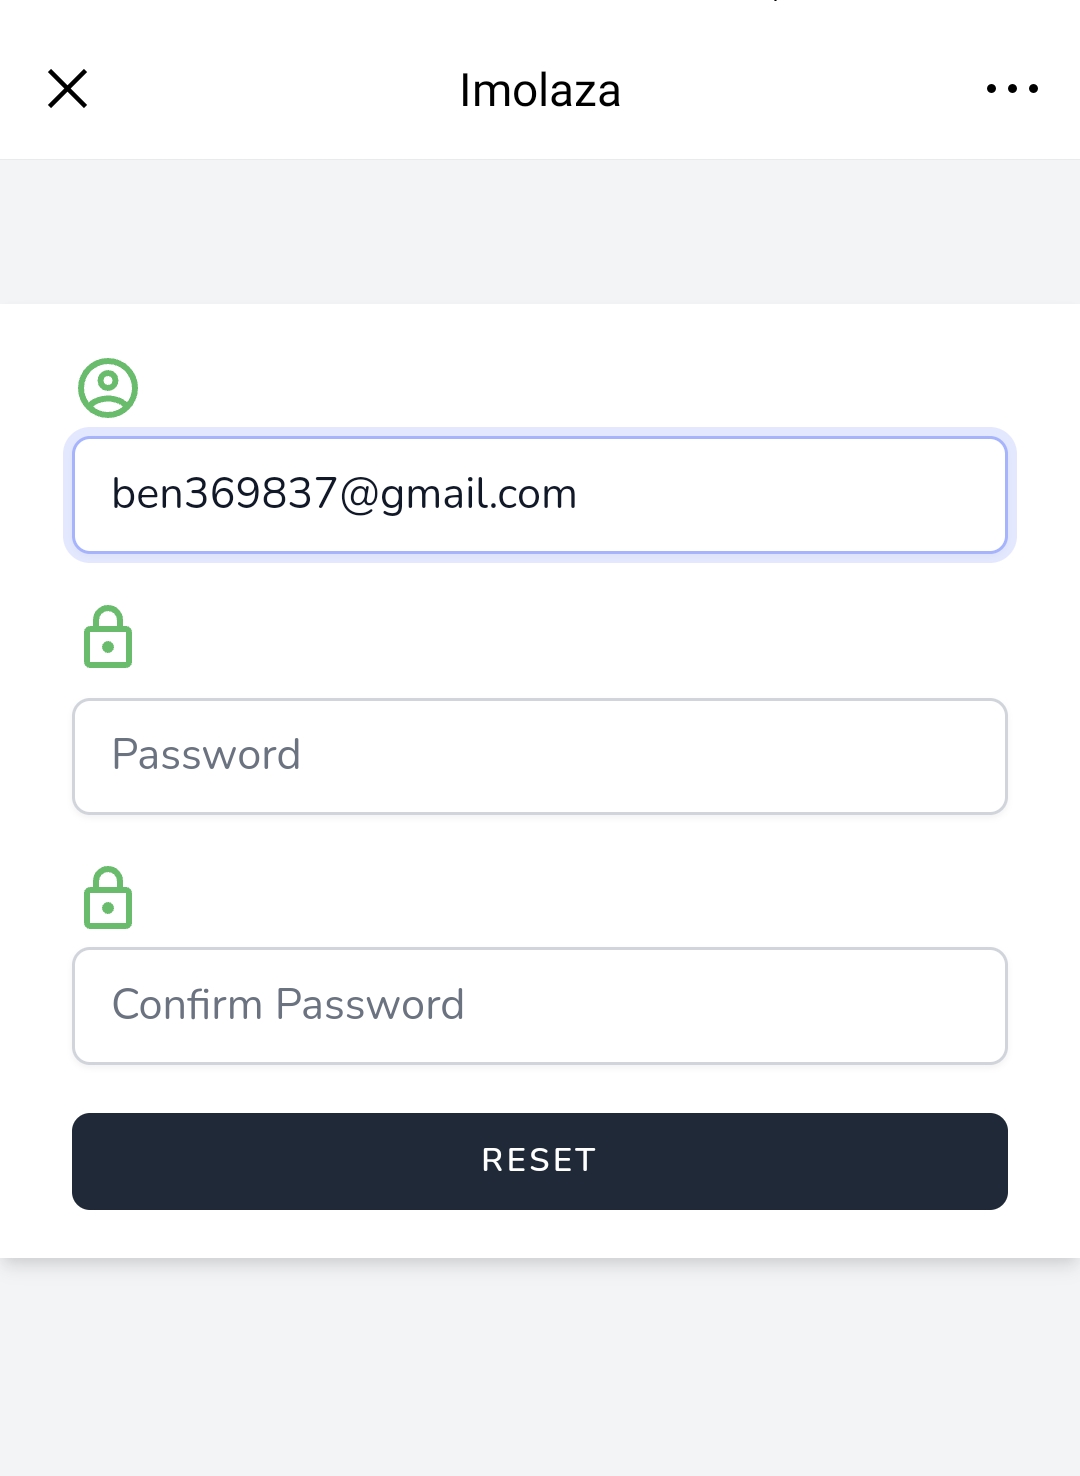
Step5: Once your password is reset, you'll receive an on-screen confirmation message ("Password Reset Successfully"). You can then log in with your new password.
Know your password, but want to change it?
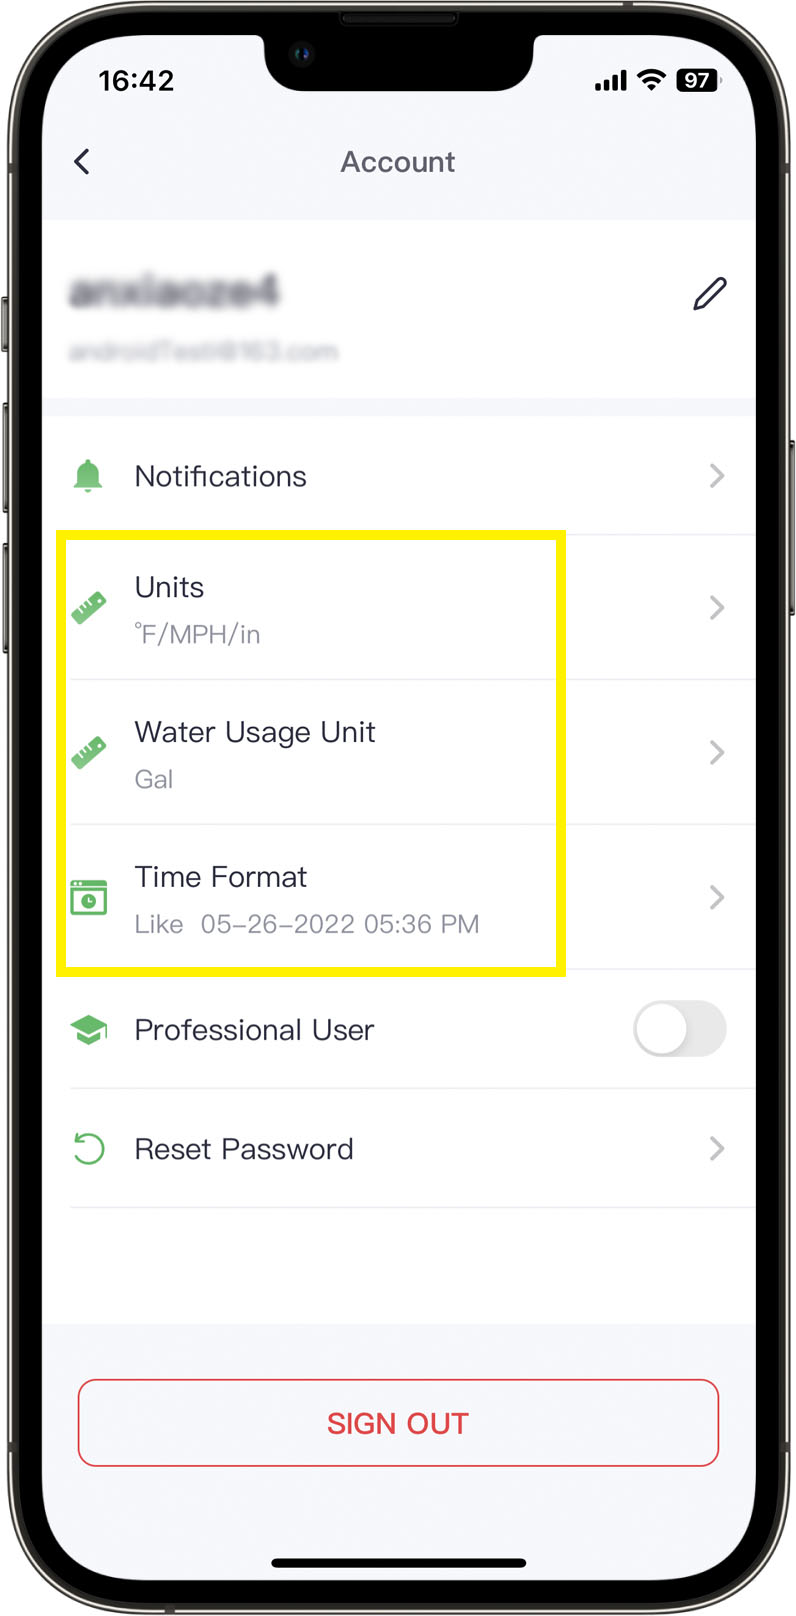
Step1: Log in and go to the "Setting" tab, and then select "Account", and "Reset Password".
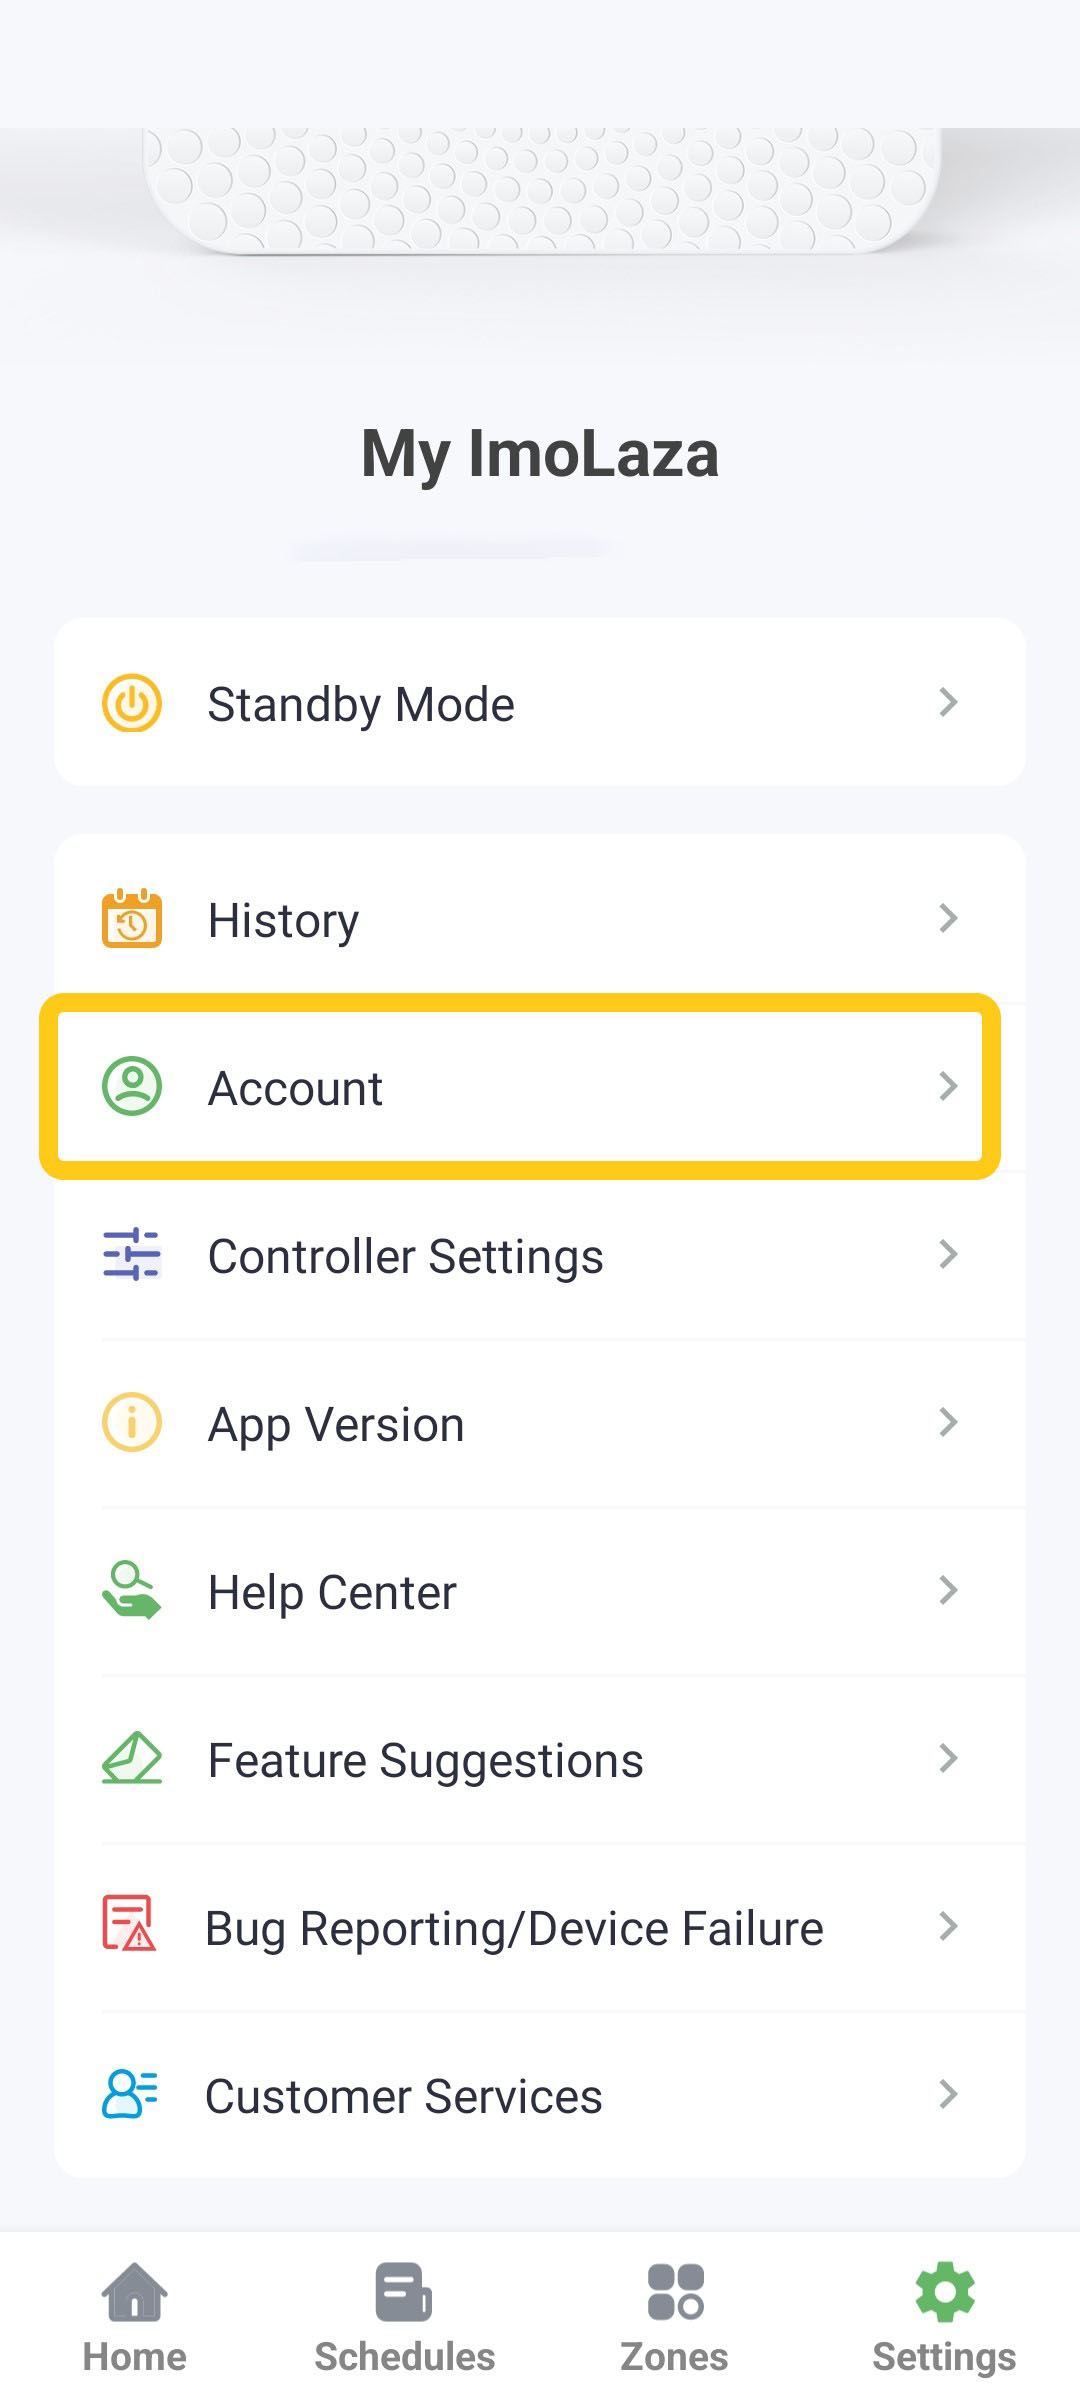
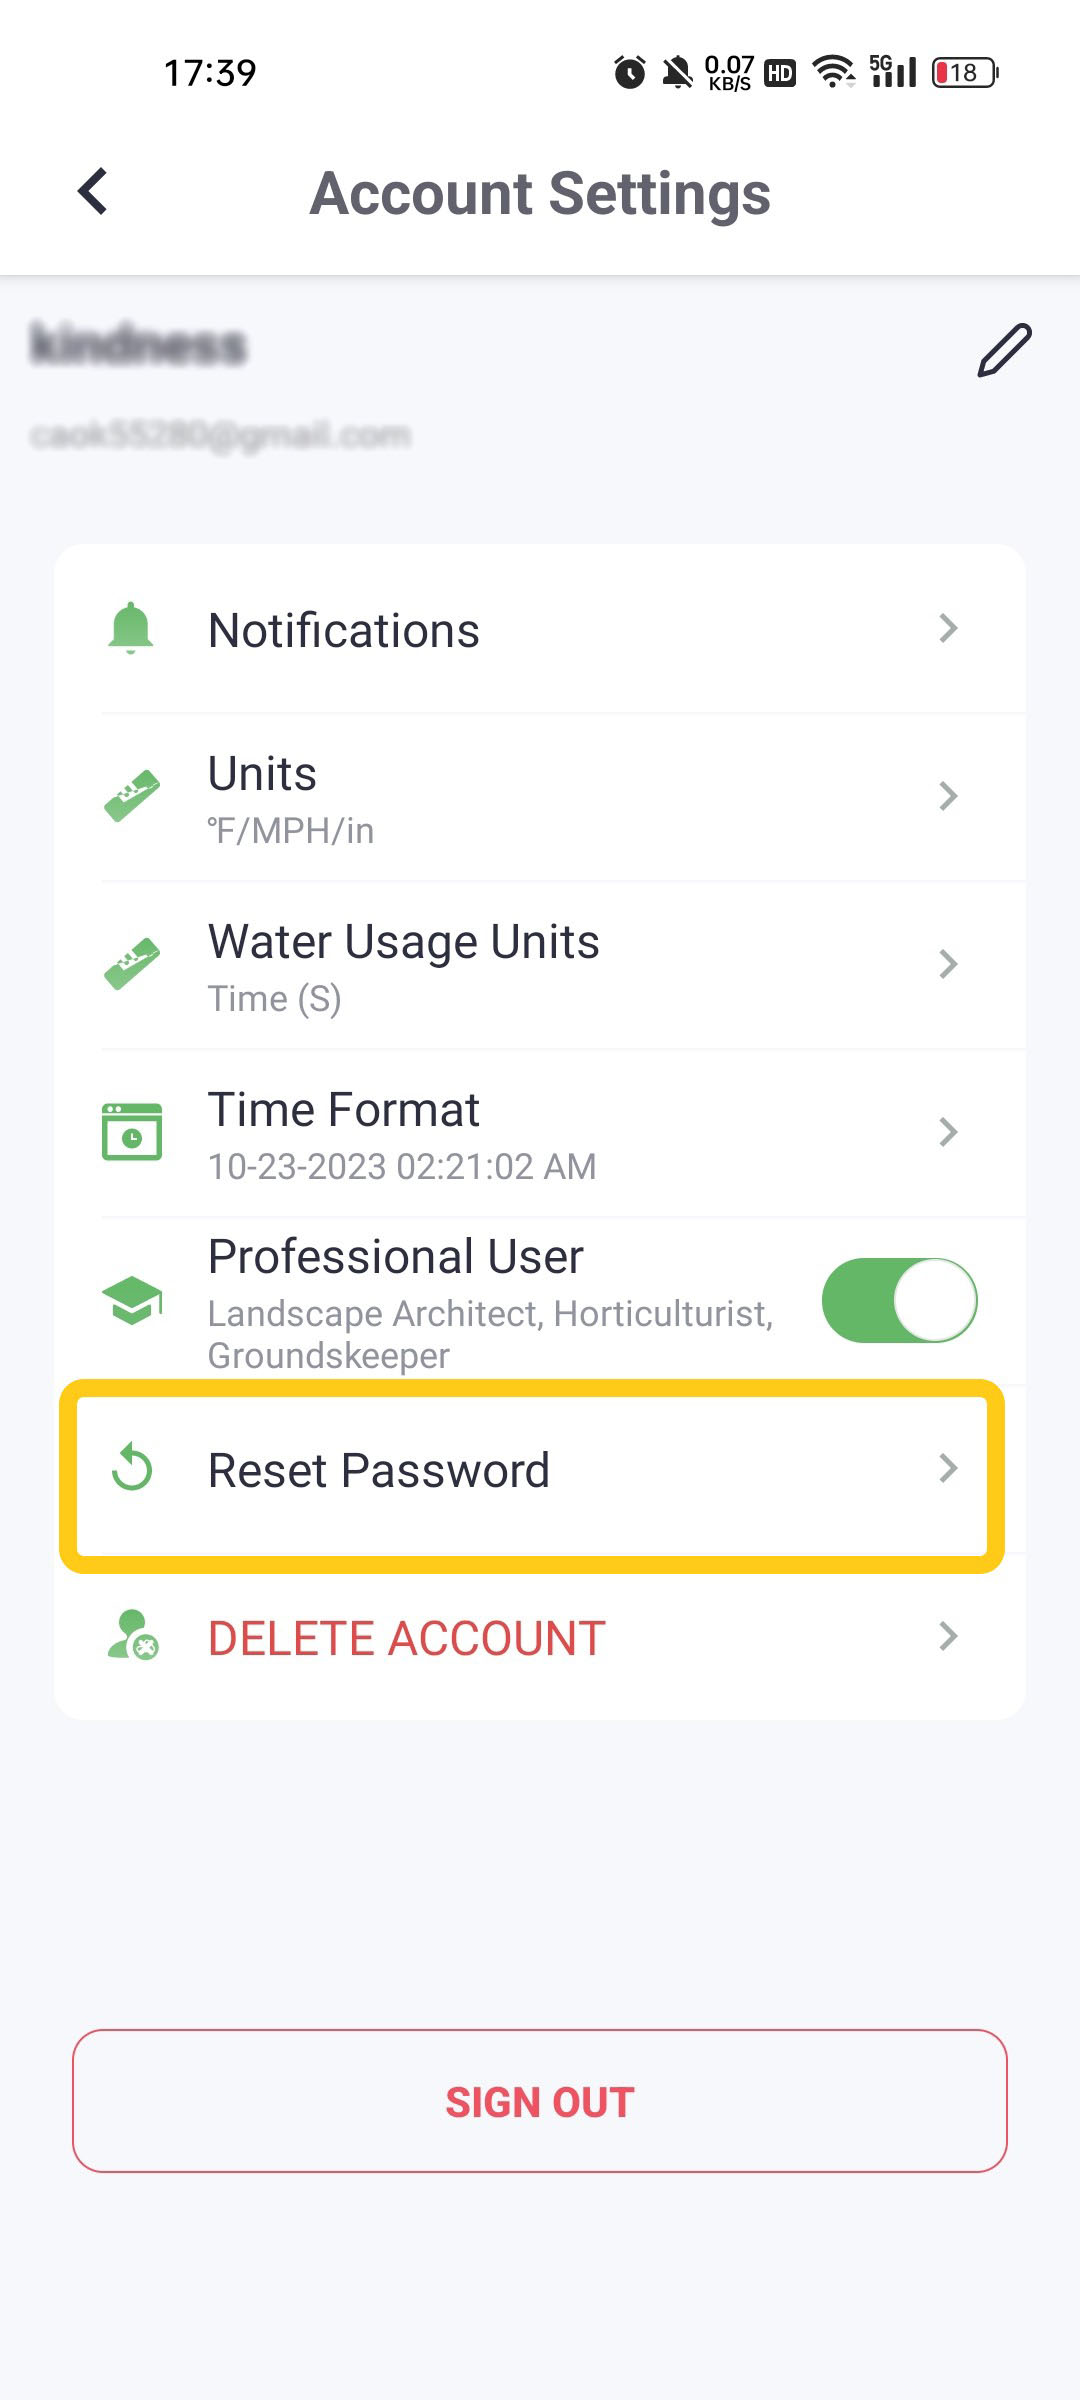
Step2: Repeat the steps above.
Still need help?
In case the above method doesn’t work for you, please contact our technical support team directly using the contact information below. We will respond to you by email within 12h after your message reaches us.
Email: Support@imolaza.com
Author: admin
Last update: 2023-10-23 11:43
Author: admin
Last update: 2022-08-02 10:43
We currently do not support email address replacement. It is important to select a registered email address carefully, ensuring its long-term usability and ability to receive verification messages. Please choose an email address wisely to ensure a smooth experience and seamless communication.
Still need help?
In case the above method doesn’t work for you, please contact our technical support team directly using the contact information below. We will respond to you by email within 12h after your message reaches us.
Email: Support@imolaza.com
Author: admin
Last update: 2023-05-23 05:36
Author: admin
Last update: 2023-05-23 05:38
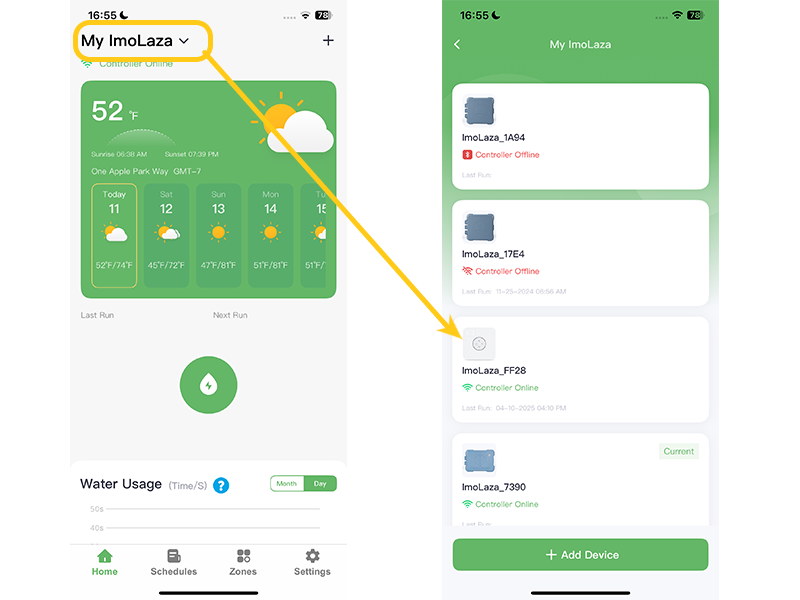
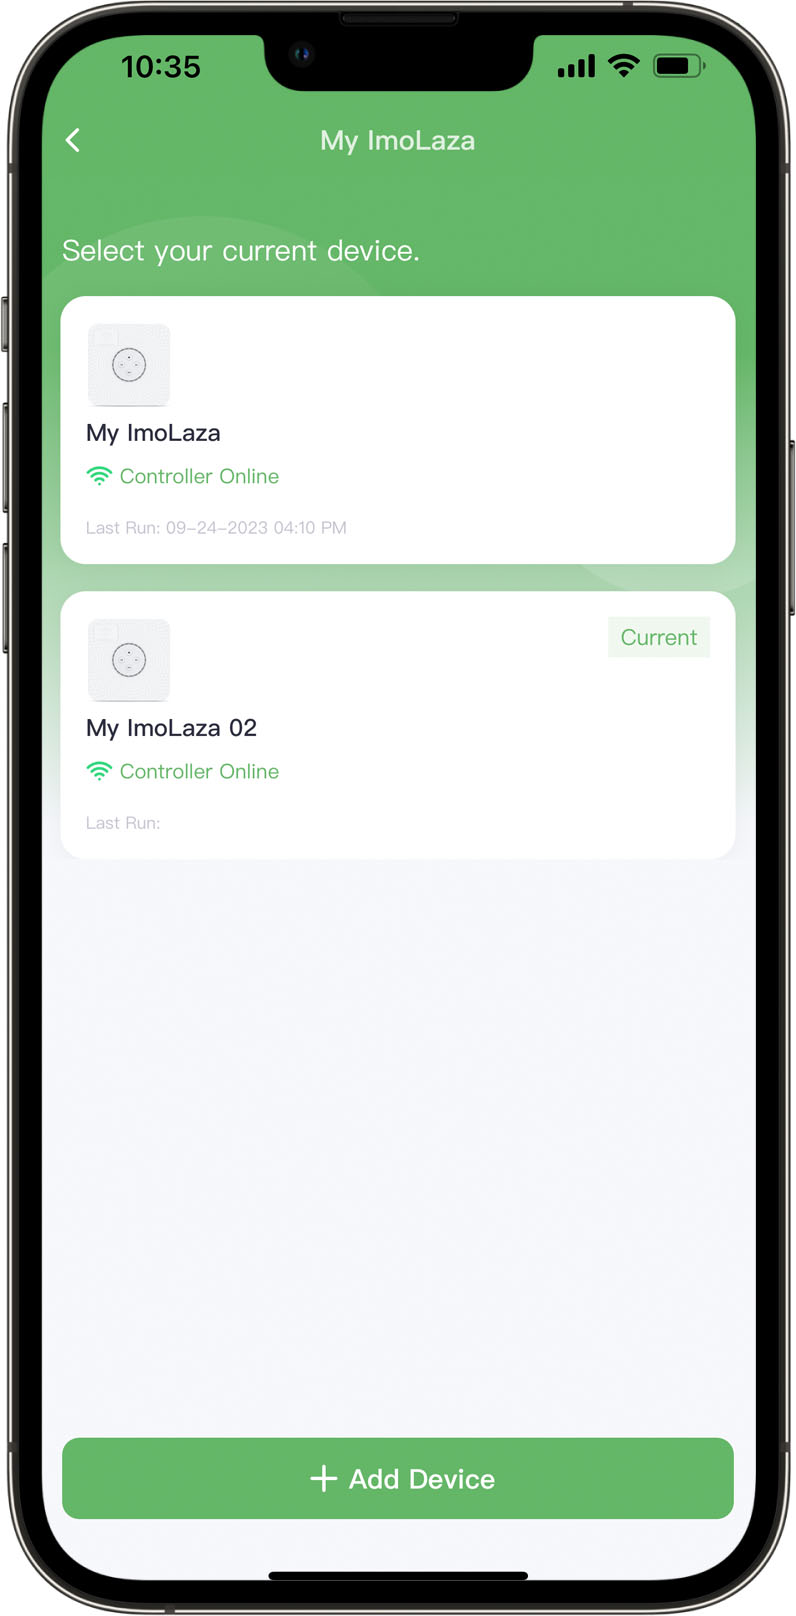
For larger yards where a single controller cannot meet all irrigation needs, we recommend using multiple controllers for zoned management. Our app supports simultaneous control of multiple devices, providing flexible irrigation management.
To get started:
Add all controllers to your account via the "My ImoLaza" section on the home screen
Easily switch between controllers for seamless management
Still need help?
In case the above method doesn’t work for you, please contact our technical support team directly using the contact information below. We will respond to you by email within 12h after your message reaches us.
Email: Support@imolaza.com
Author: admin
Last update: 2025-04-11 11:04
Author: admin
Last update: 2025-02-06 03:15
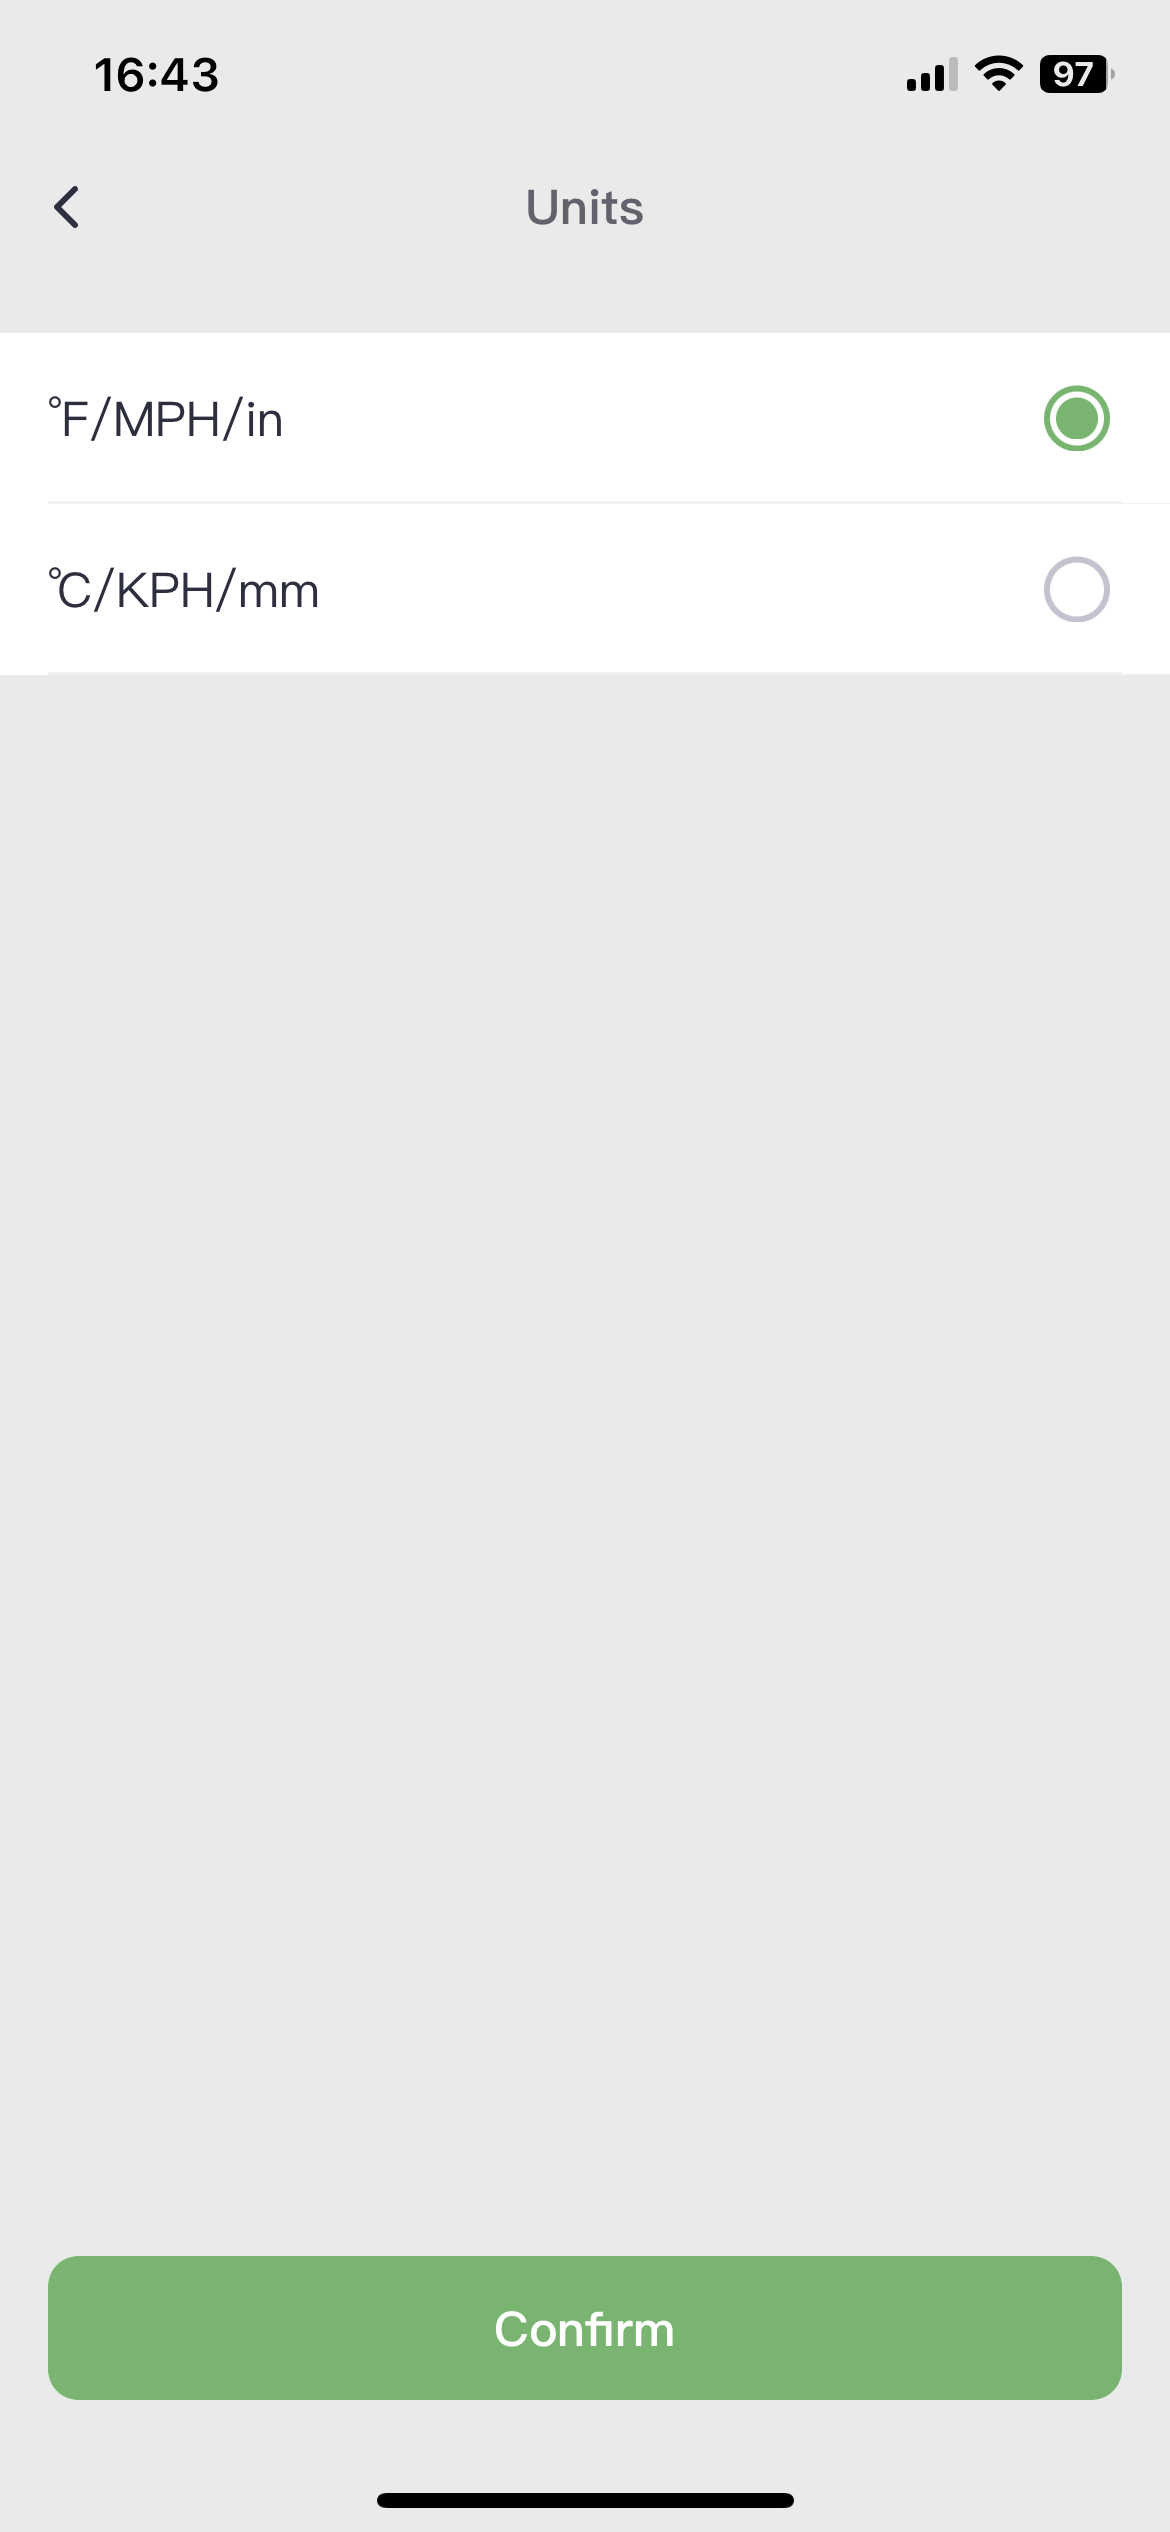
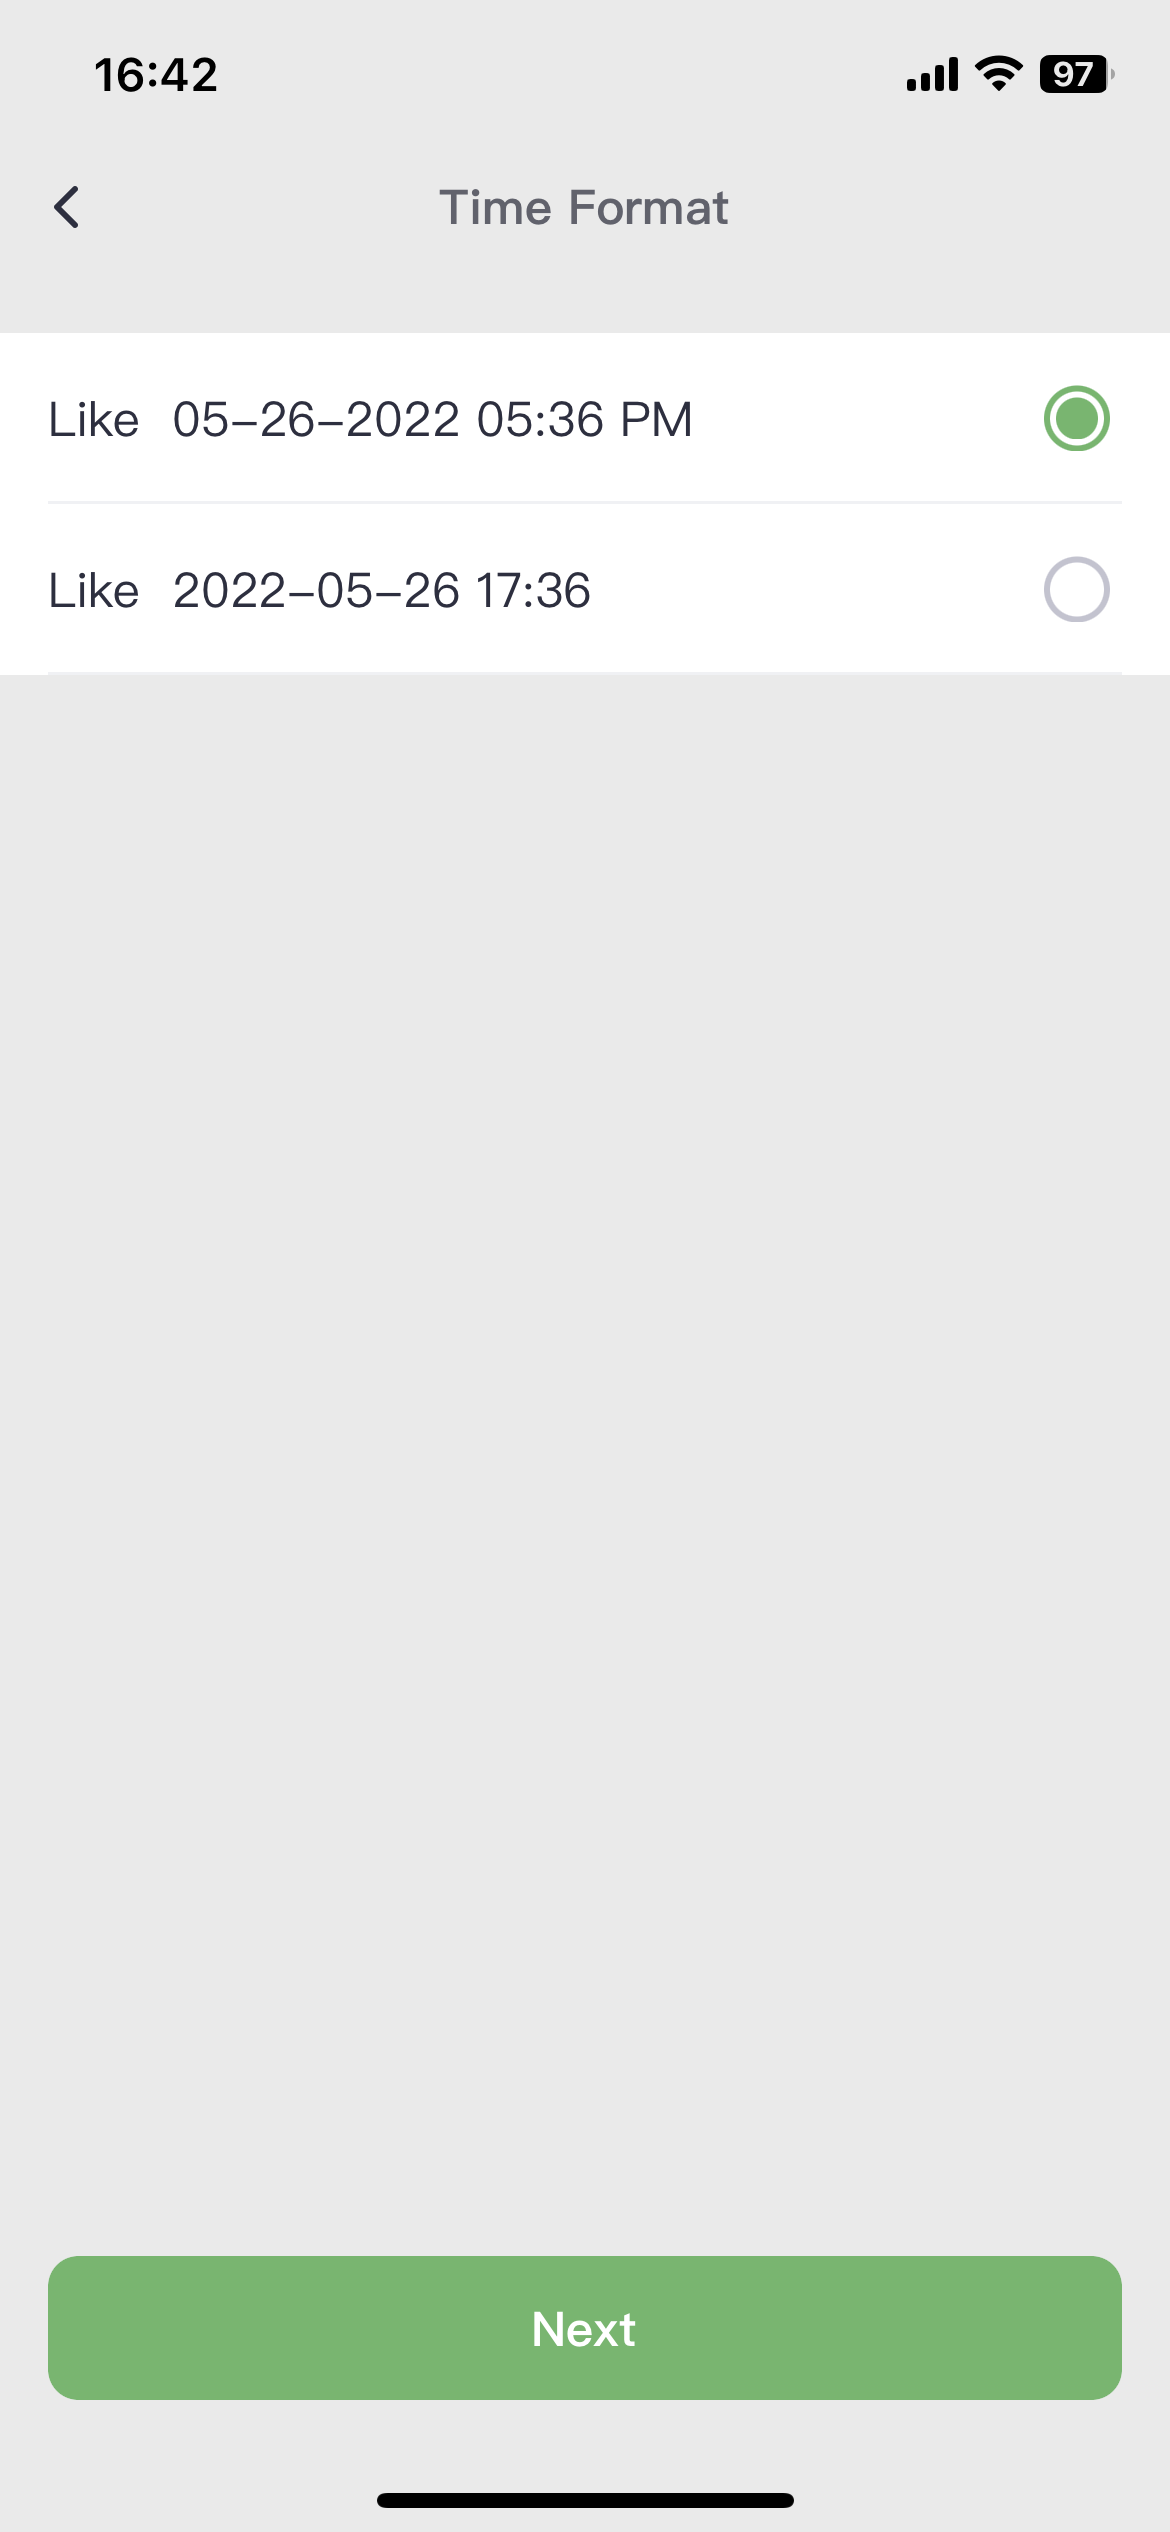
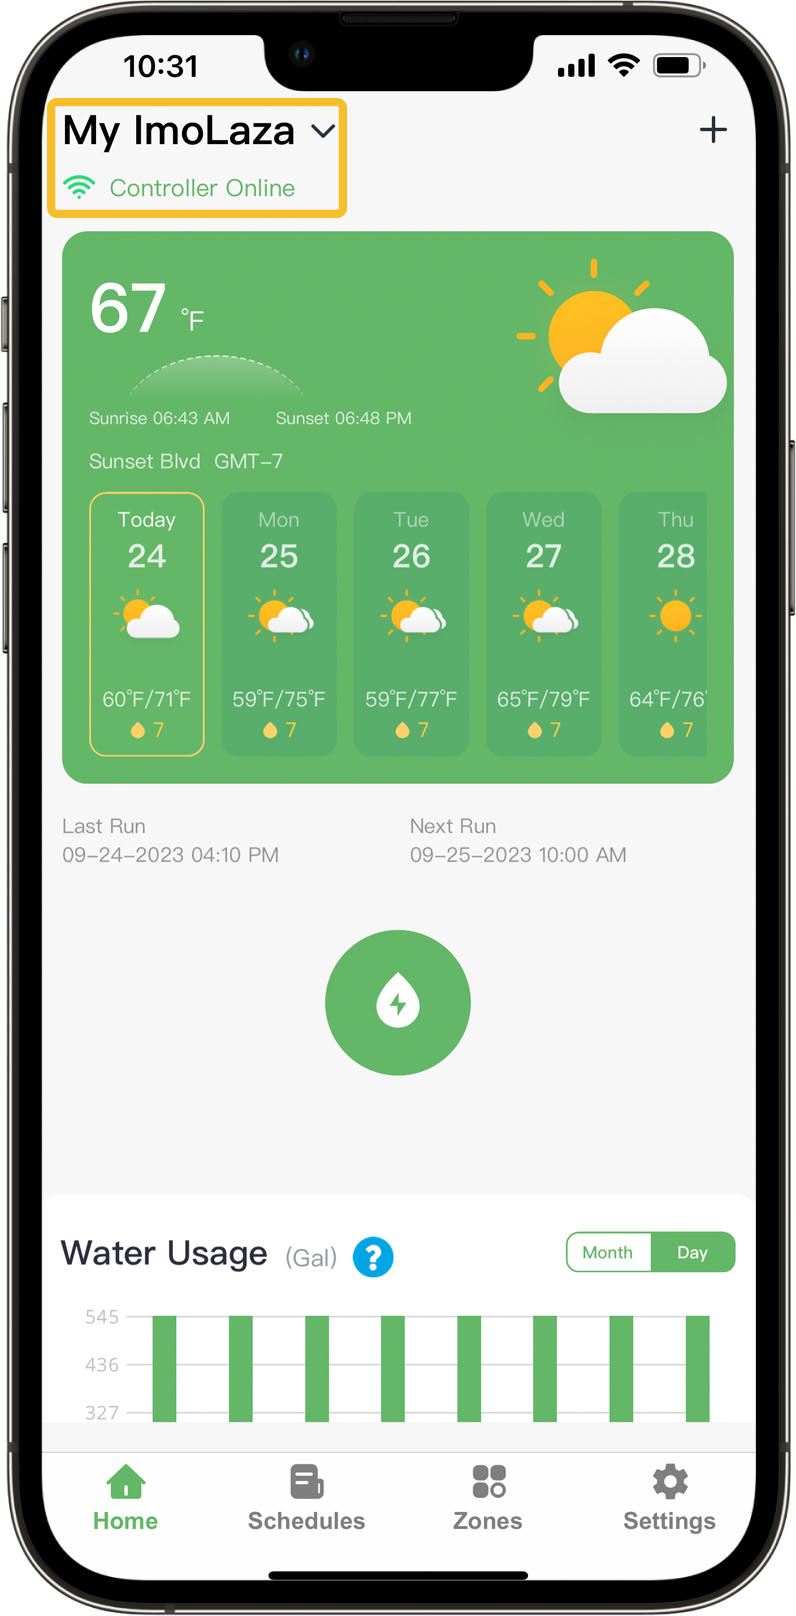
ImoLaza gives you full control over how you view measurements. You can easily switch between metric and imperial systems, and even adjust how watering durations are displayed.
To change your units:
1. Open the ImoLaza app
2. Go to Settings → Account
3. Select your preferred units:
. Volume: Liters or Gallons
. Distance: Centimeters or Inches
. Time: 12-hour clock or 24-hour clock
Still need help?
In case the above method doesn’t work for you, please contact our technical support team directly using the contact information below. We will respond to you by email within 12h after your message reaches us.
Email: Support@imolaza.com
Author: admin
Last update: 2025-03-28 09:34
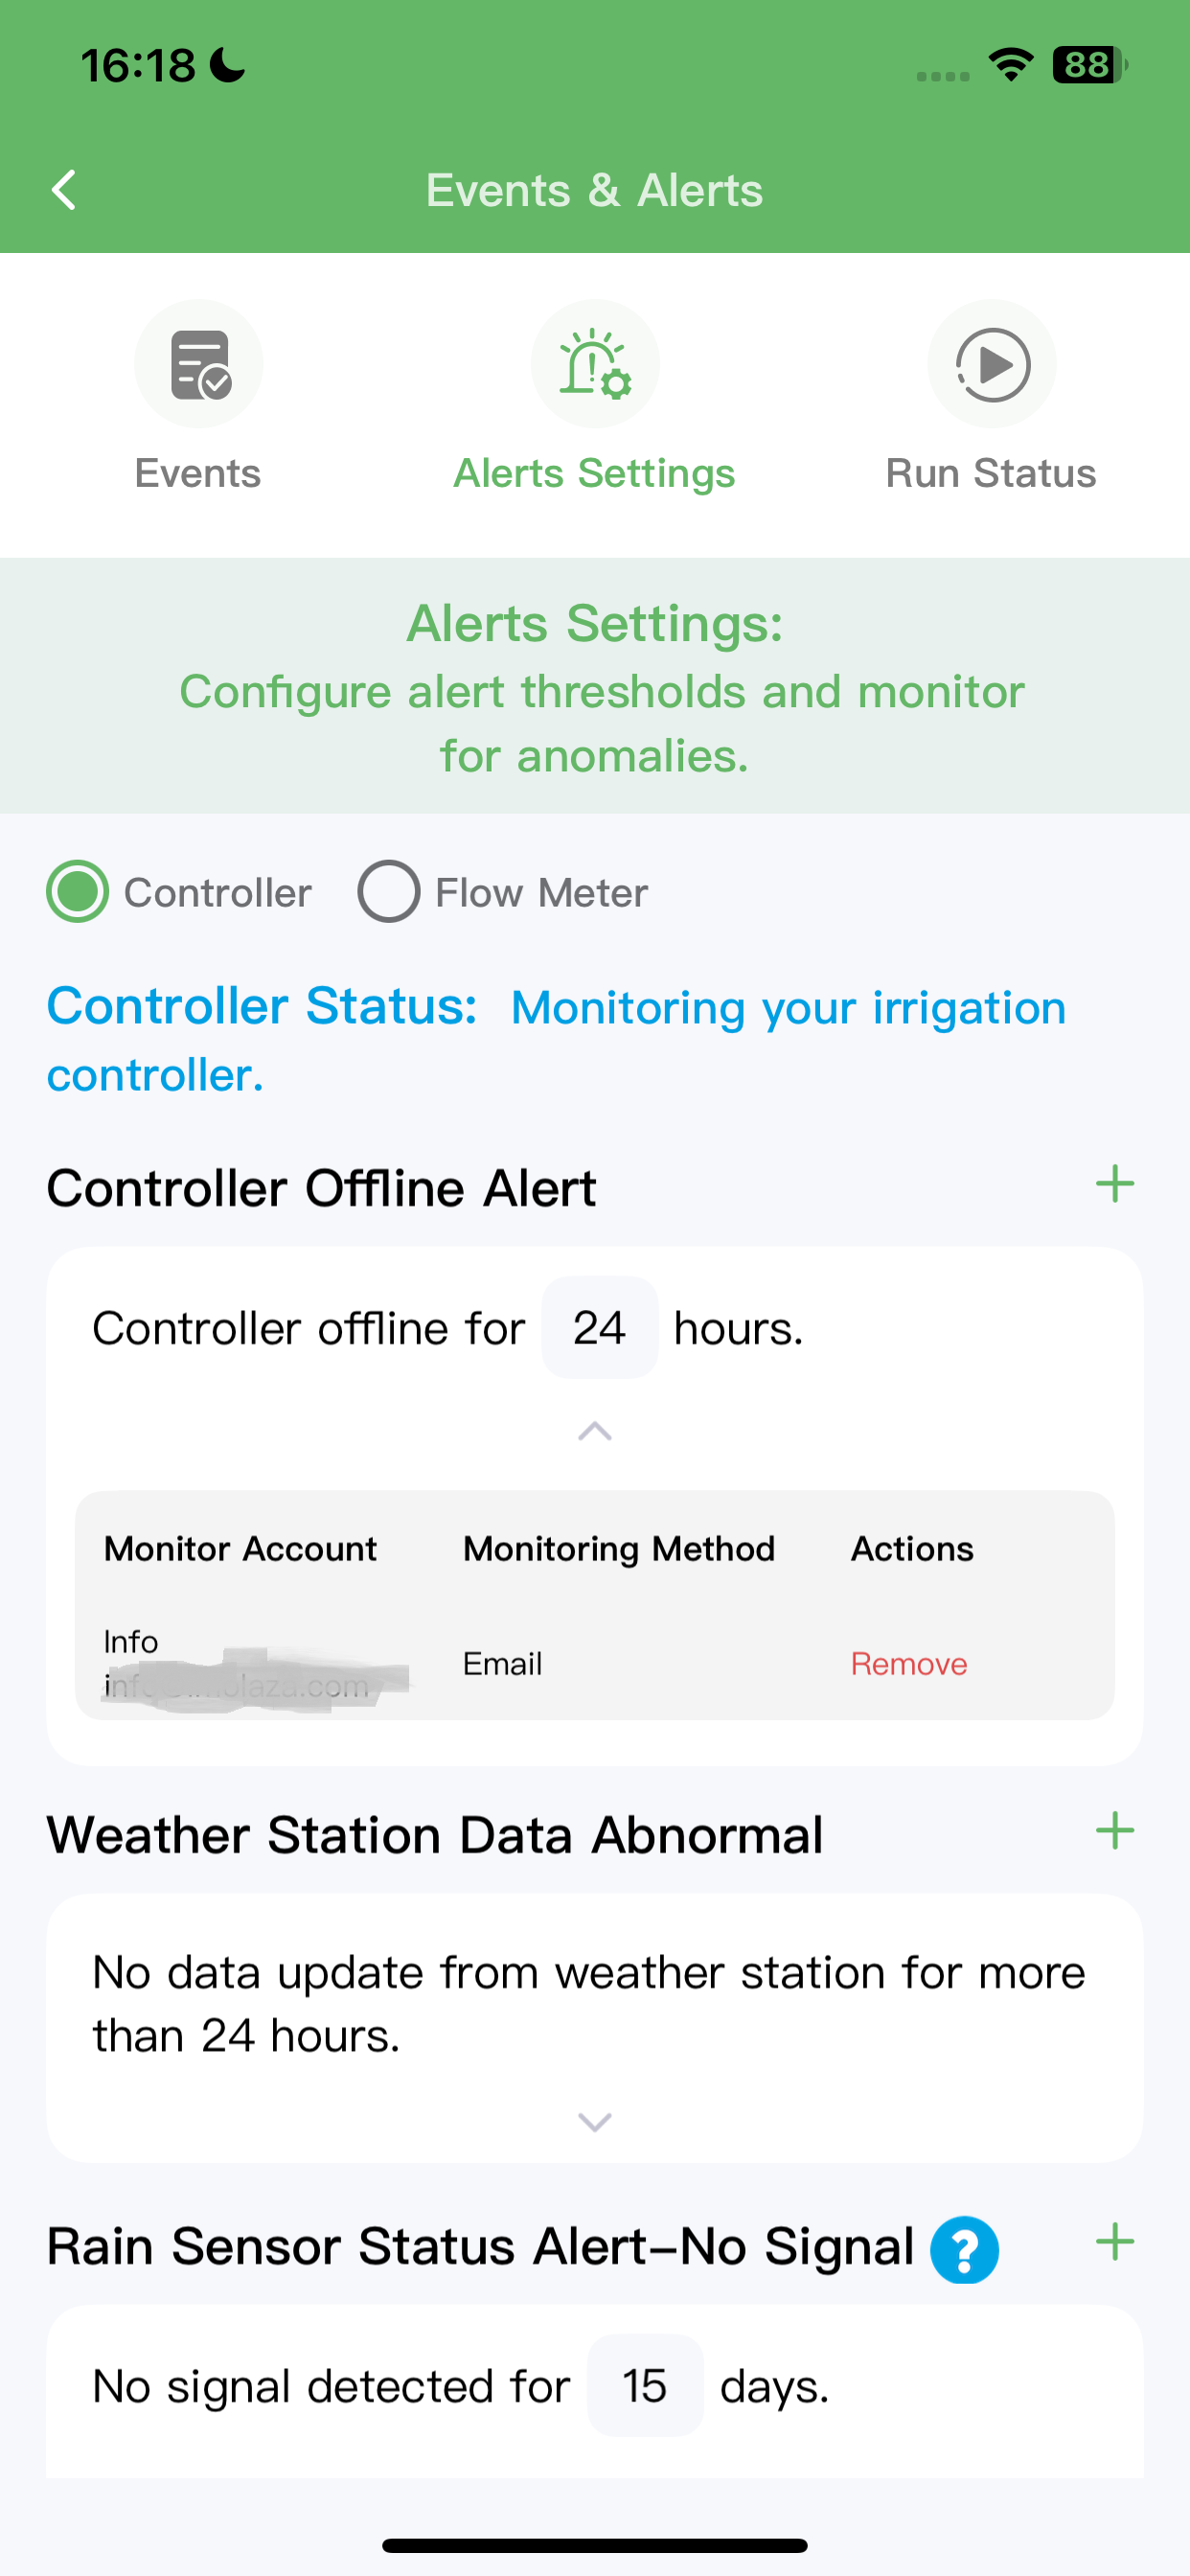
If you are not receiving pop-up notifications from ImoLaza or email notifications, it may be due to notification settings being disabled or emails being mistakenly classified as spam. Below are detailed troubleshooting steps and solutions:
Step 1: Check App Notification Settings
Open the ImoLaza App:
Log in to your ImoLaza account. Go to Settings > Events & Alerts, then check the content you wish to be notified about.
Step 2: Check Email Notifications
Verify Email Address:
In Settings > Events & Alerts, confirm that the email address for receiving notifications is correct.
Check Spam Folder:
Log in to your email account and check the spam folder to see if any ImoLaza notifications were misclassified. If found, mark them as "Not Spam."
Add to Whitelist:
Add ImoLaza's sender email address to your email whitelist to prevent future filtering.
Step 3: Check Mobile Notification Settings
Go to your phone’s Settings app, find the app notification settings, locate ImoLaza, and ensure that its notification permissions are enabled.
In case the above method doesn’t work for you, please contact our technical support team directly using the contact information below. We will respond to you by email within 12h after your message reaches us.
Email: Support@imolaza.com
Author: admin
Last update: 2025-03-28 09:27
Author: Imolaza
Last update: 2023-03-30 11:04
Author: Imolaza
Last update: 2023-10-23 10:38
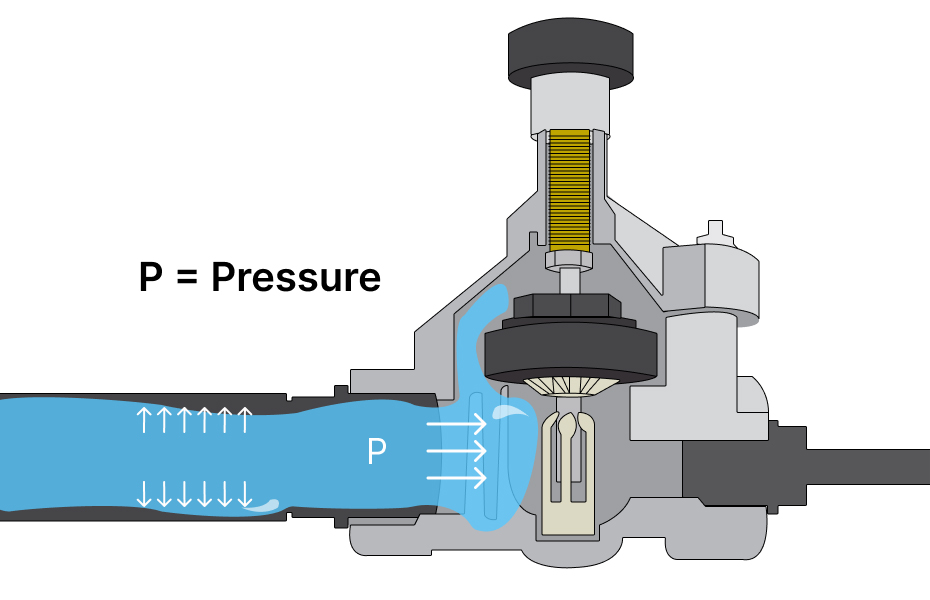
In your equipment's operation, have you ever heard a loud banging sound coming from the pipes? It's as if the water is violently striking the pipe walls. This sound is what we refer to as water hammer. This article will provide you with a detailed explanation of the causes behind water hammer and its detrimental effects on the piping system. Additionally, we will introduce how our controller addresses and resolves this issue.
How water hammer forms and its hazards?
Water hammer is the occurrence of pressure surges in a piping system caused by sudden changes in fluid flow. When valves, pumps, or other devices are rapidly closed or opened in a pipeline, the fluid flow experiences a sudden change, resulting in the water hammer effect.
When a valve or device is closed, the inertia of the fluid causes it to continue flowing for a brief period even though the valve is already closed. As a result, the fluid is abruptly forced to stop, creating a pressure shock wave. This pressure shock wave propagates back through the pipeline at high speed, causing vibration and impact forces.
The hazards of water hammer include:
1. Pipeline damage: Water hammer can lead to pipe ruptures, fractures, or leaks, resulting in damage to the pipeline system and associated repair costs.
2. Equipment damage: Water hammer exerts impact forces on valves, pumps, and other equipment in the pipeline system, potentially causing equipment damage or failure, requiring maintenance or replacement.
3. Noise and vibration: Water hammer-induced shock waves generate noise and vibration in the pipeline system, causing unnecessary disturbances and damage to the working environment and equipment.
4. Safety risks: In severe cases, water hammer can trigger explosions, fires, or other safety hazards, posing significant risks to personnel and facilities.
How can ImoLaza reduce it?
ImoLaza's "Minimize Water Hammer" feature greatly reduces the occurrence of water hammer. Unlike the conventional method of sequentially opening irrigation valves, with "Minimize Water Hammer" enabled, the controller proactively opens the valve of the next irrigation zone while the current zone is still being irrigated. This helps alleviate the pressure surge caused by valve switching.
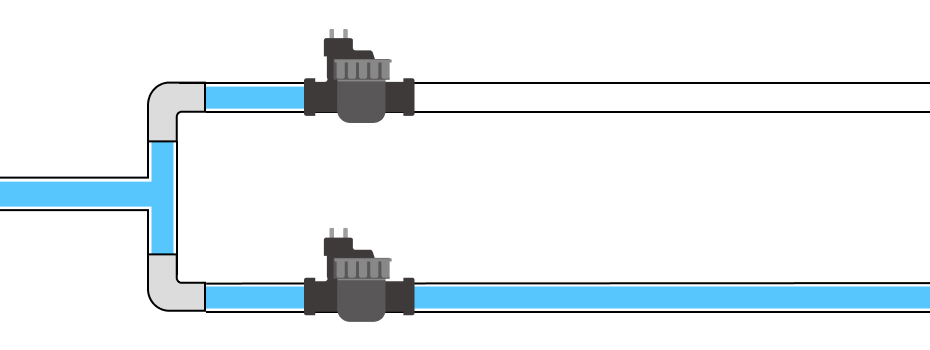
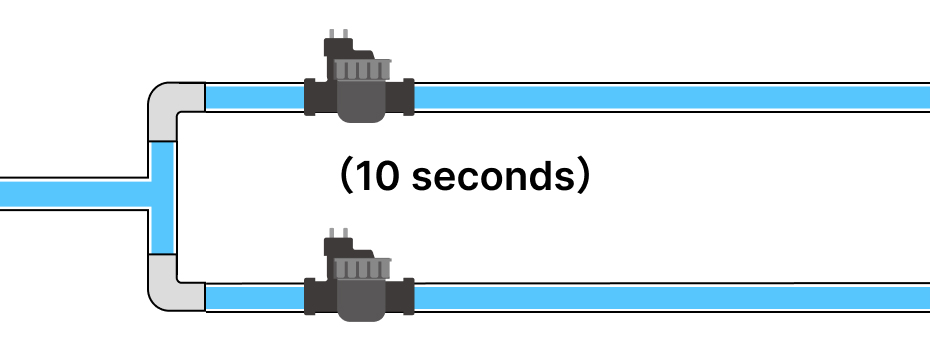
The working principle is as follows: approximately 10 seconds before the completion of irrigation in the current zone, the valve of the next irrigation area will be opened. After 10 seconds, the current zone will close, and the irrigation will continue in the next zone.
This intelligent sequencing of valve operations minimizes the abrupt changes in water flow and effectively mitigates the potential risks associated with water hammer. By reducing pressure fluctuations and ensuring smoother transitions between irrigation zones, ImoLaza's "Minimize Water Hammer" feature enhances the overall efficiency and longevity of the irrigation system.
Please be aware that, to prevent any misunderstanding, when the next zone is pre-opened, the app and device lights will not show that two zones are running concurrently. Furthermore, the 10-second pre-run time will not be counted towards the total irrigation duration of that zone.
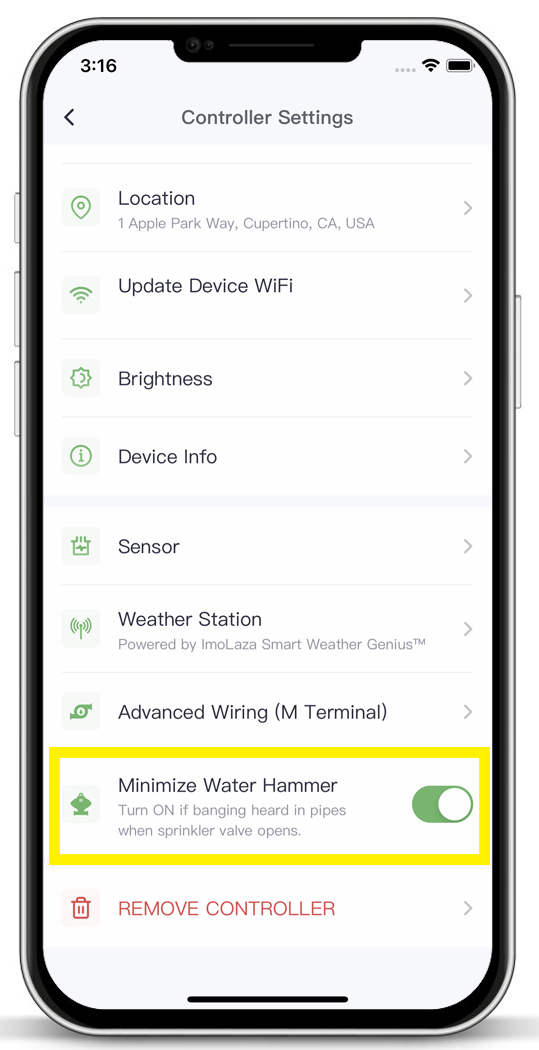
How to enable this feature?
Activating this feature is a straightforward process. Simply navigate to the "Settings" menu and select "Controller Settings." From there, enable the "Minimize Water Hammer" option.
In case the above method doesn’t work for you, please contact our technical support team directly using the contact information below. We will respond to you by email within 12h after your message reaches us.
Email: Support@imolaza.com
Author: Imolaza
Last update: 2023-10-23 10:39
Now you get an ImoLaza controller, you still need to install our app to start your worry-free watering life. Our app is available at no cost for both Android and iOS.
Download our app from the Apple App Store (For iOS) or Google Play Store (For Android).


Note: The ImoLaza App requires a phone running 12.0 or higher on iOS and 7.0 or higher on Android.
In case the above method doesn’t work for you, please contact our technical support team directly using the contact information below. We will respond to you by email within 12h after your message reaches us.
Email: Support@imolaza.com
Author: admin
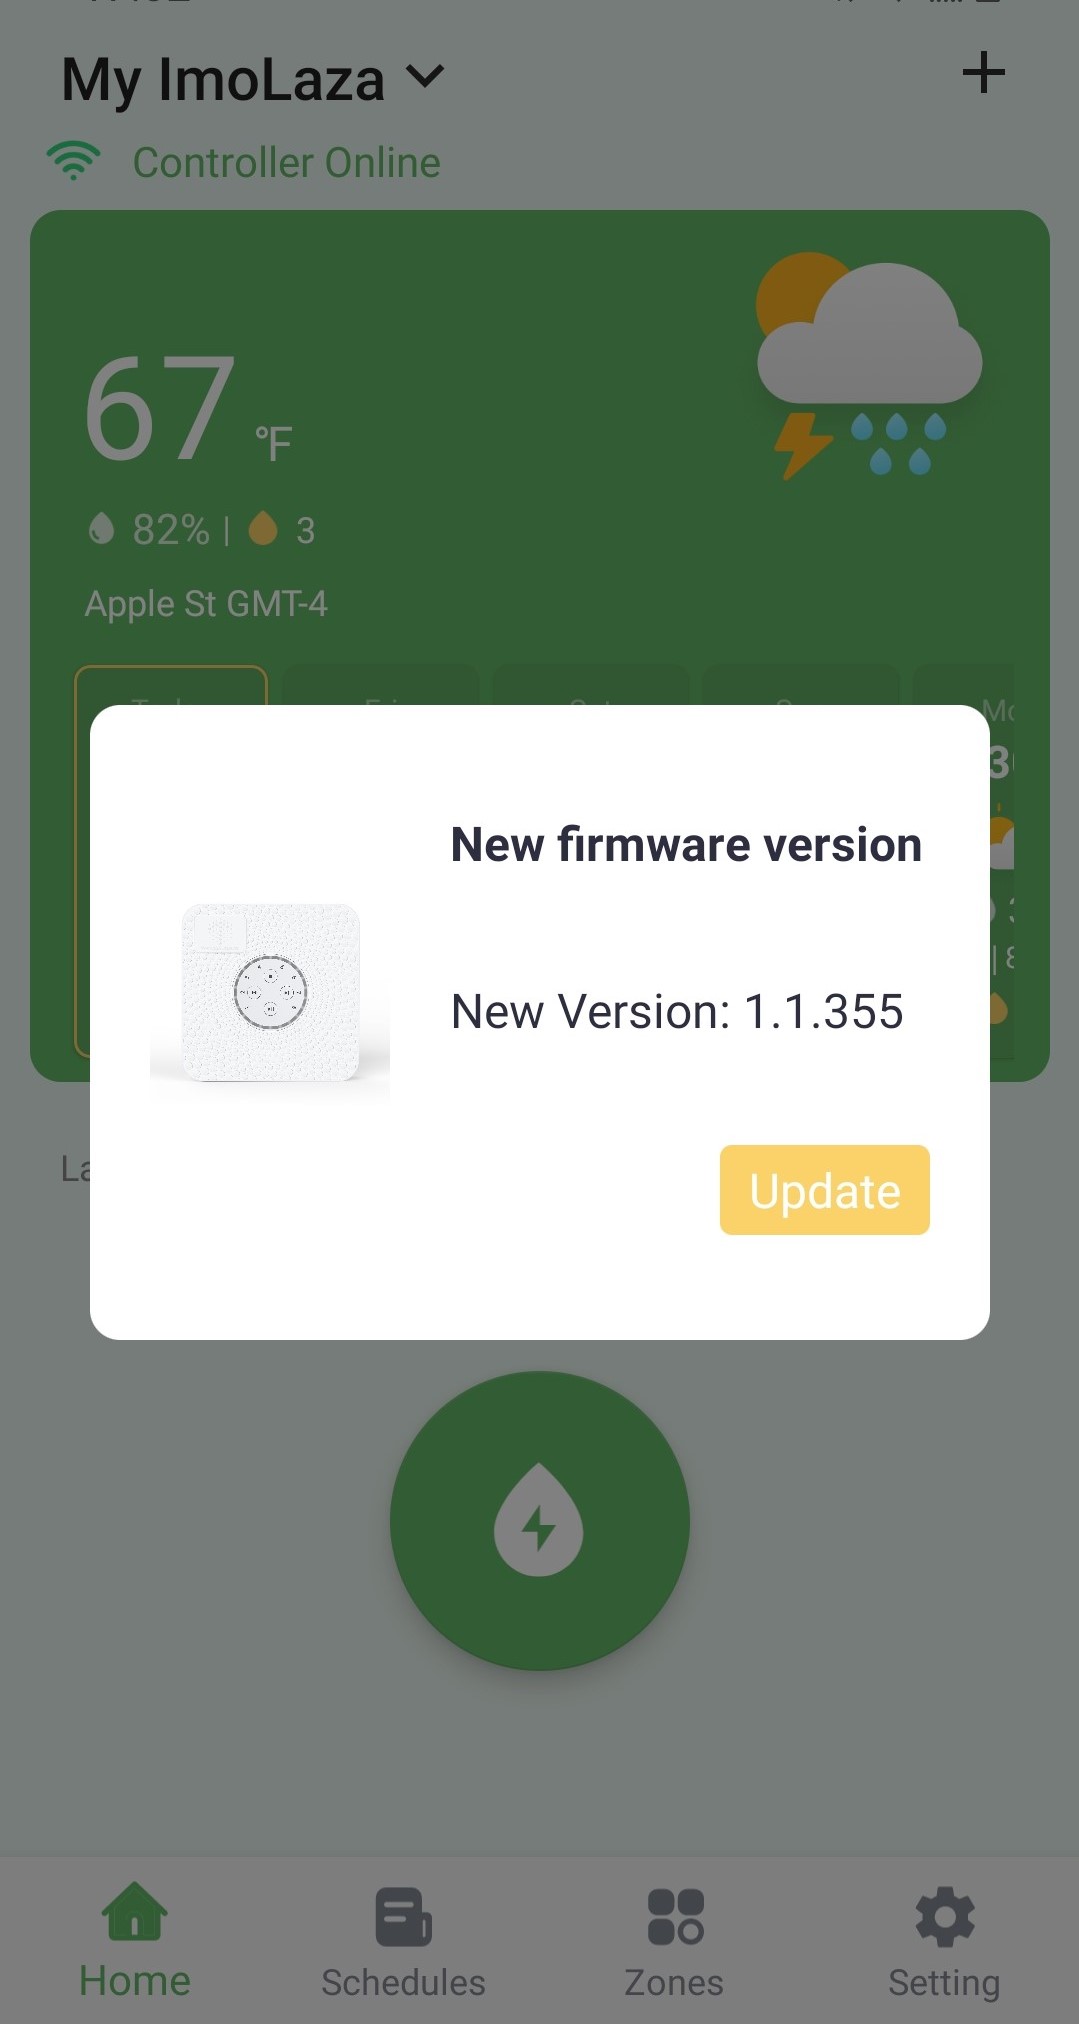
Last update: 2024-12-03 03:07
We are constantly adding new features for the ImoLaza, so you might see an automatic firmware update once your ImoLaza is connected to the Internet. Just click "Update" and wait 1-2 minutes for the update completed.
Note: The purpose of updating the firmware is to fix the device’s problems and add new features. For the best user experience, we recommend that you update to the latest firmware version in time.
Still need help?
In case the above method doesn’t work for you, please contact our technical support team directly using the contact information below. We will respond to you by email within 12h after your message reaches us.
Email: Support@imolaza.com
Author: admin
Last update: 2023-10-20 04:59
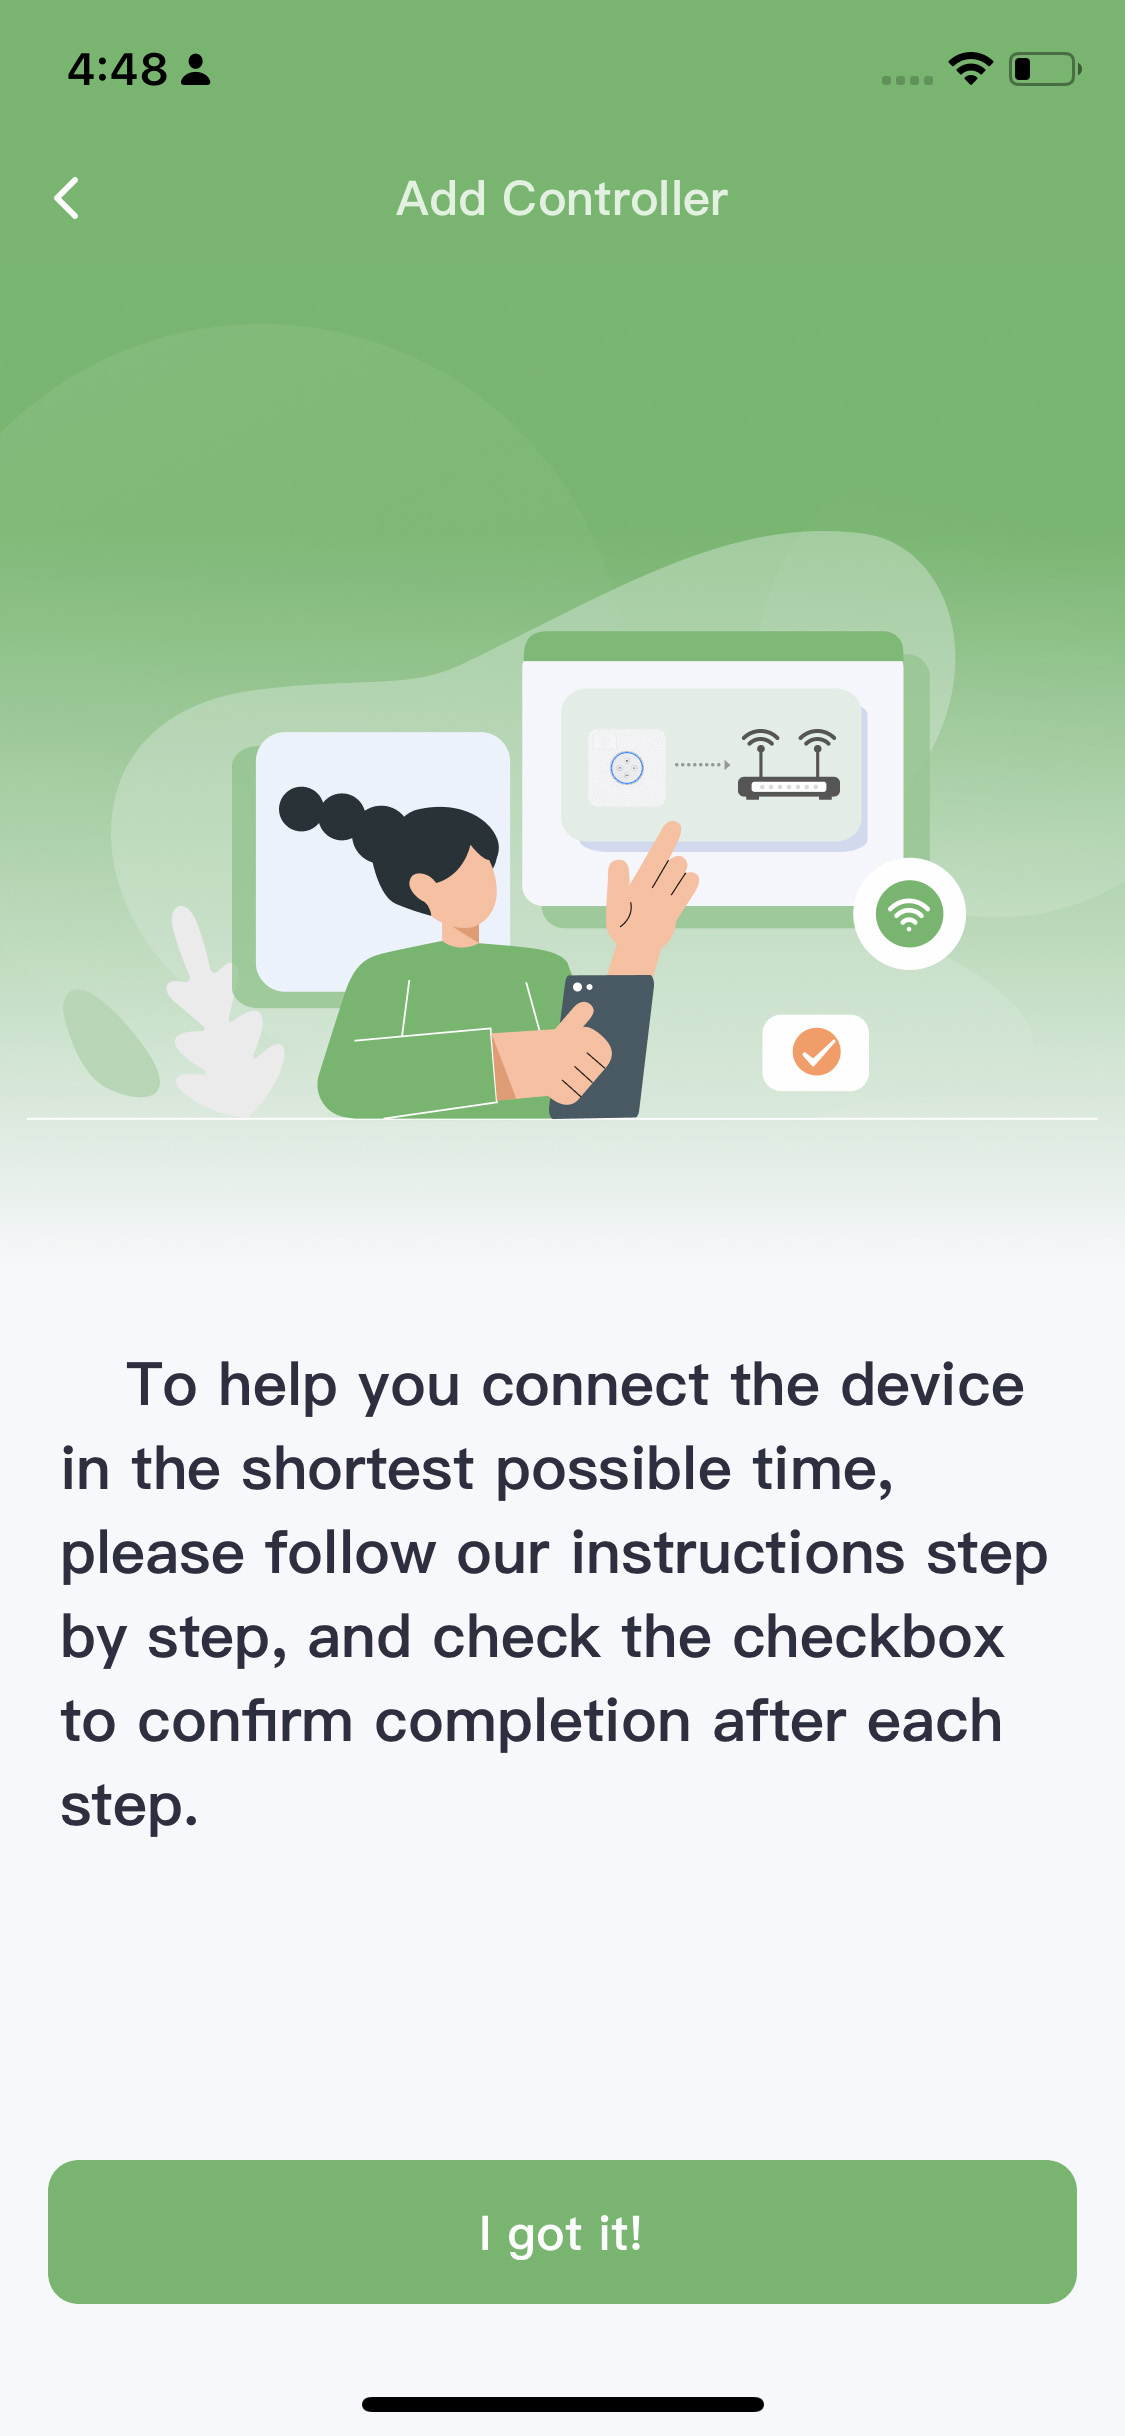
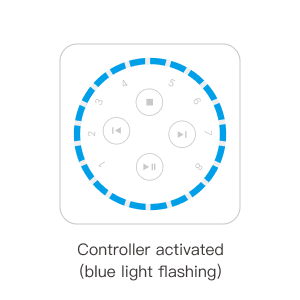
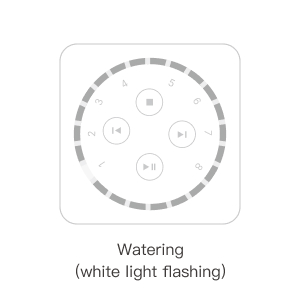
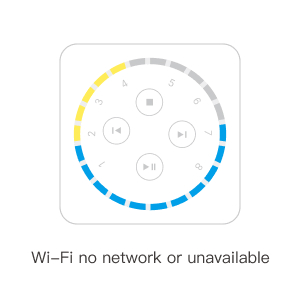
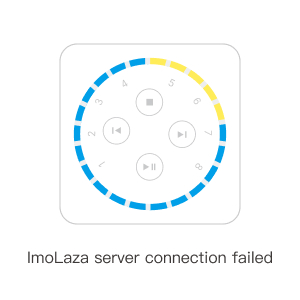
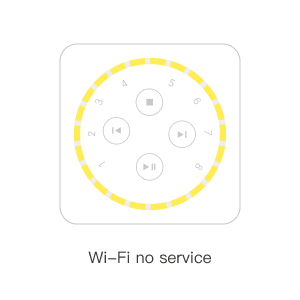
The controller's light bar will exhibit various colors and shapes to indicate different statuses, allowing you to easily identify the device's current state. The provided images will assist you in determining the specific status of your controller.

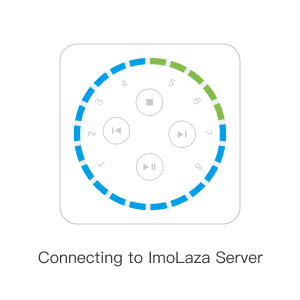
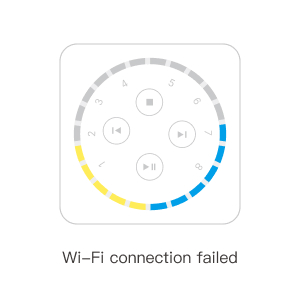
The controller flashes lights like this during the device addition process and indicates that the network has no service, please follow these steps:
(1) Restart the router: Try power cycling the router by turning off the power, waiting for a moment, and then turning it back on. This can help resolve temporary issues and restore WiFi connectivity services.
(2) Check other devices connected to the same WiFi network: Firstly, confirm if other devices connected to the same WiFi network are able to function properly. If other devices also cannot function properly, it may indicate an issue with the WiFi network itself. We recommend contacting your internet service provider (ISP), reporting the problem, and seeking their support and solutions.
A yellow light indicates that the controller is not receiving internet service through the connected WiFi. The device is unable to access the internet or communicate with other devices via this WiFi network. This is typically caused by either a weak WiFi signal or a network issue. Please follow the troubleshooting methods below to diagnose the problem:
(1) Check your network connection: Ensure that your device is connected to the correct WiFi network and that the signal strength is strong. You can try reconnecting to the WiFi or moving your device closer to the router to improve signal quality.
(2) Restart your device and router: Power off your device and router, wait for a few seconds, and then power them back on. This can help clear any temporary network issues and establish a fresh connection.
(3) Verify router settings: Make sure that your router settings are correct and that there are no restrictions preventing your device from connecting. You can access your router's management interface or contact your internet service provider for further assistance.
(4) Check with your internet service provider: If none of the above steps resolve the issue, it could be due to a problem with your internet service provider, resulting in a loss of connectivity. Contact your internet service provider to report the problem and seek their support and solutions.
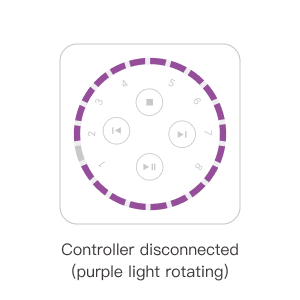
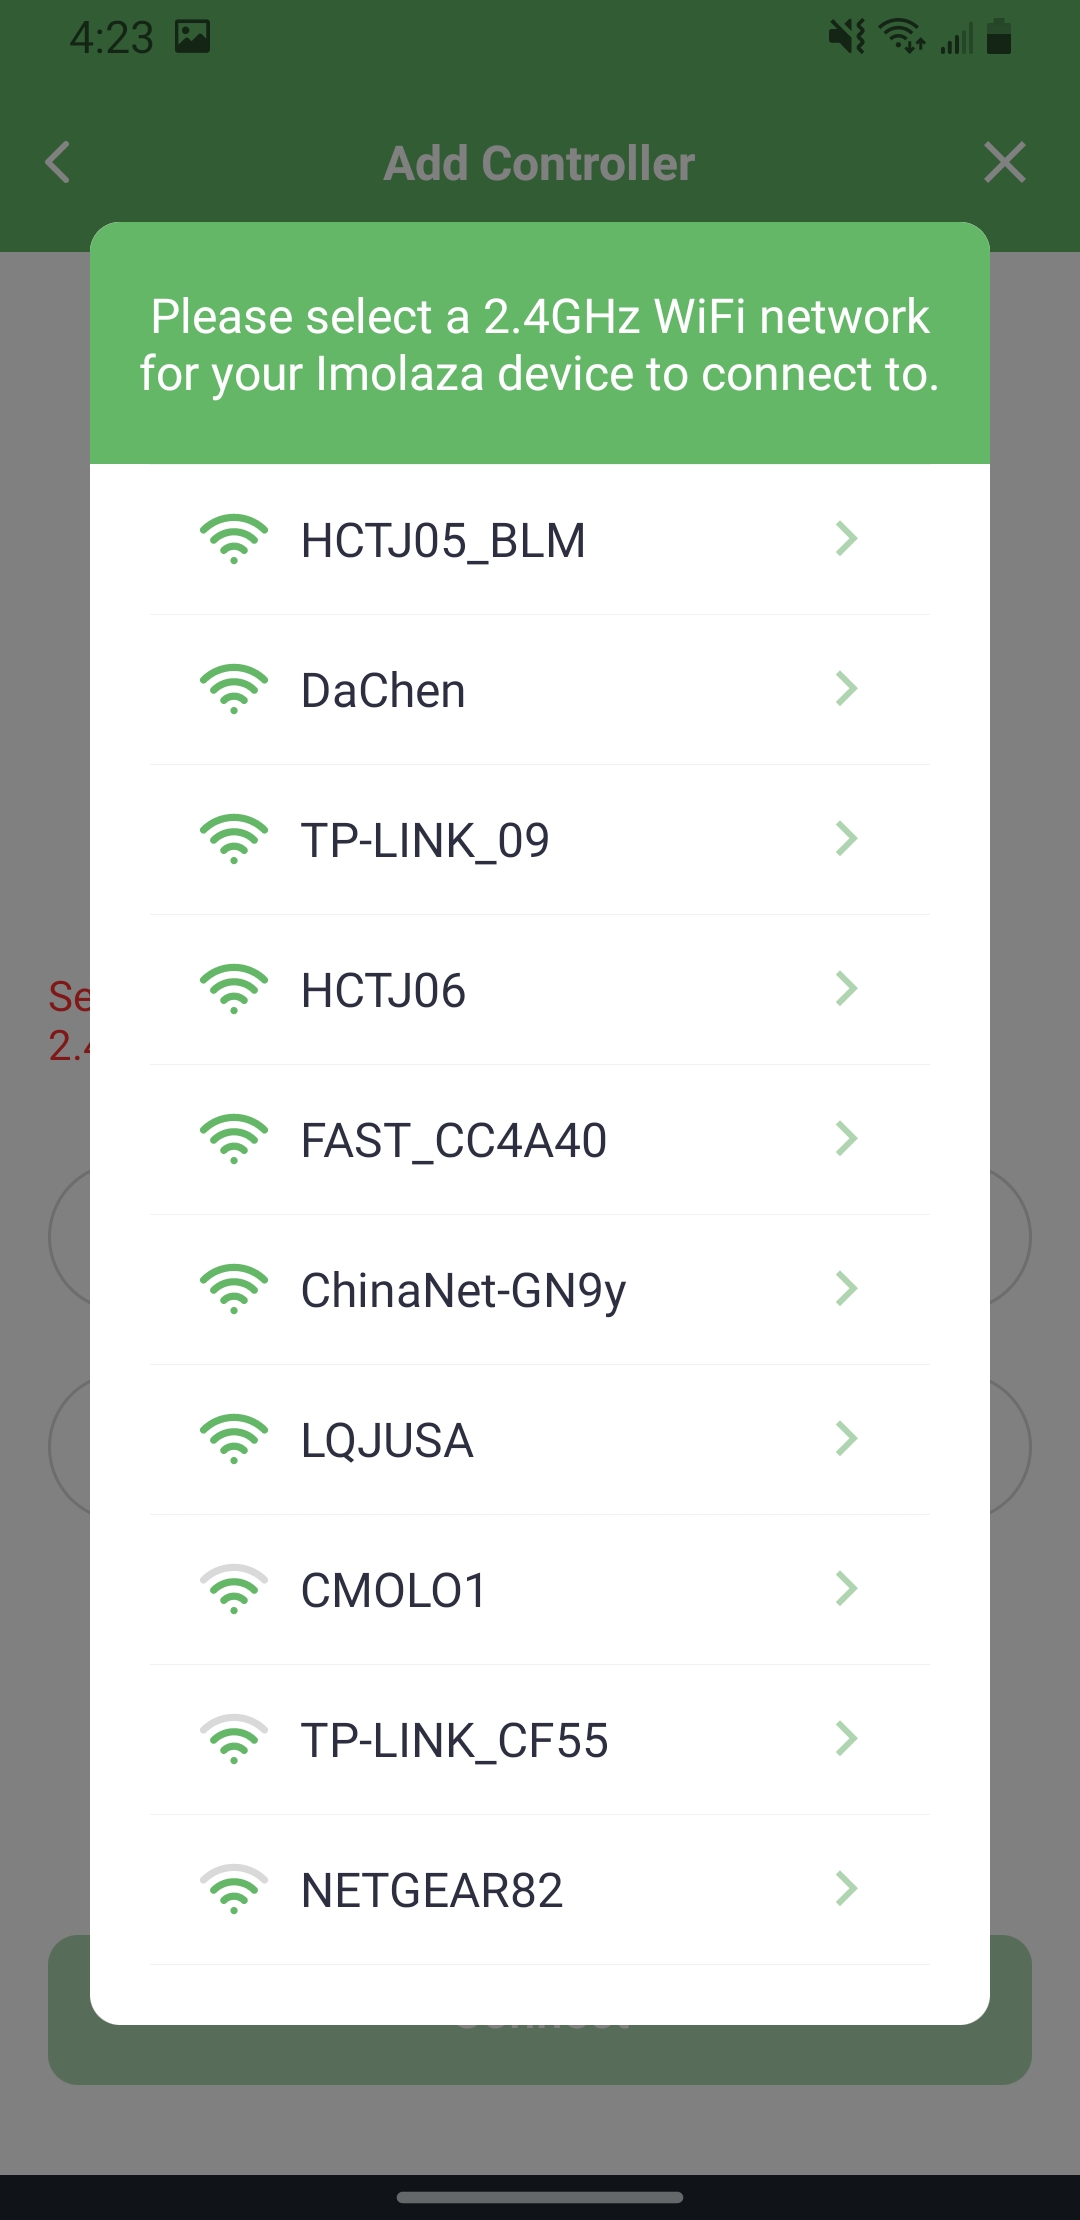
If the device indicator light is flashing purple and rotating around the halo, it means that the device has lost connection with the WiFi. This could be due to changes made to your WiFi settings, such as modifying the WiFi name or password, or if the controller is too far away from the router. Please try the following steps to resolve the issue:
(1) Ensure that you are connected to a 2.4GHz WiFi network.
(2) Restart your router and device.
(3) In the app's "Settings" interface, navigate to "Controller Settings", then select "Update Device WiFi". Follow the in-app instructions to update the WiFi settings.
(4) If the issue persists, try moving the router closer to the controller and repeat the above steps.

Still need help?
In case the above method doesn’t work for you, please contact our technical support team directly using the contact information below. We will respond to you by email within 12h after your message reaches us.
Email: Support@imolaza.com
Author: admin
Last update: 2023-10-20 05:00
When you need some extra water for your lawn but happen to have your phone out of the way or your phone is dead. Here we are, those buttons would help you out.
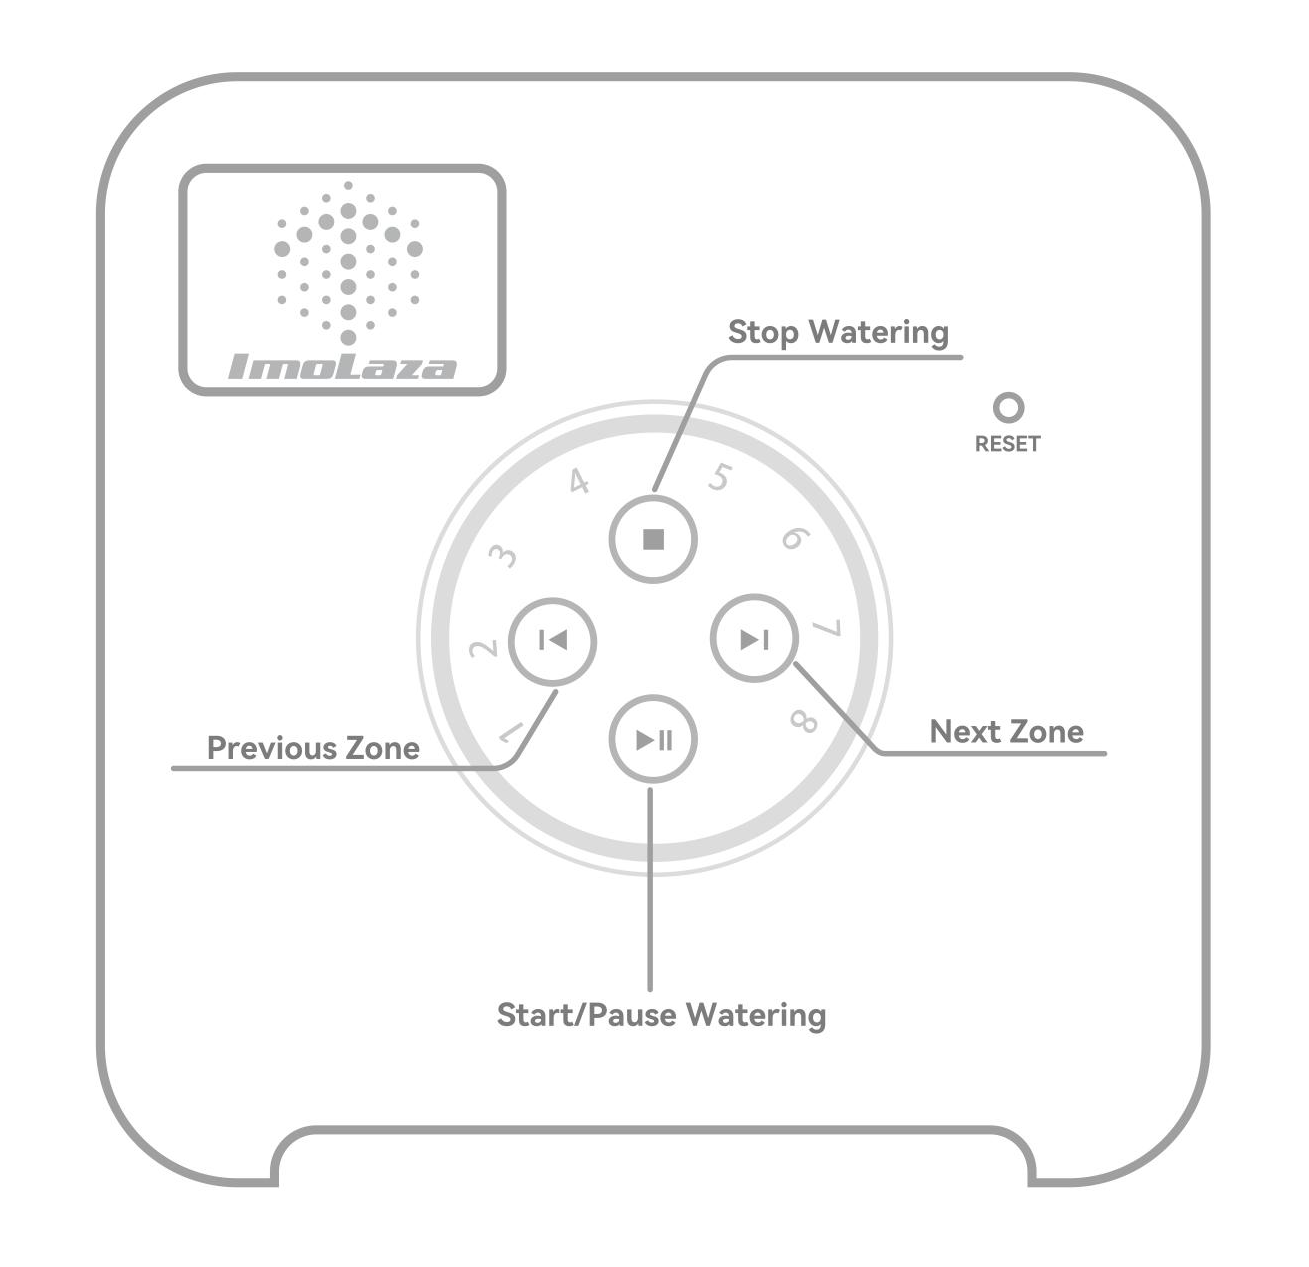
Water a Specific Zone
Press the ![]() and
and ![]() arrows to select the desired zone, then press the
arrows to select the desired zone, then press the ![]() to begin watering.
to begin watering.
Start/Pause Watering
Press the ![]() button to start/pause watering anytime.
button to start/pause watering anytime.
Stop Watering
Press the ![]() button to exit the current watering state.
button to exit the current watering state.
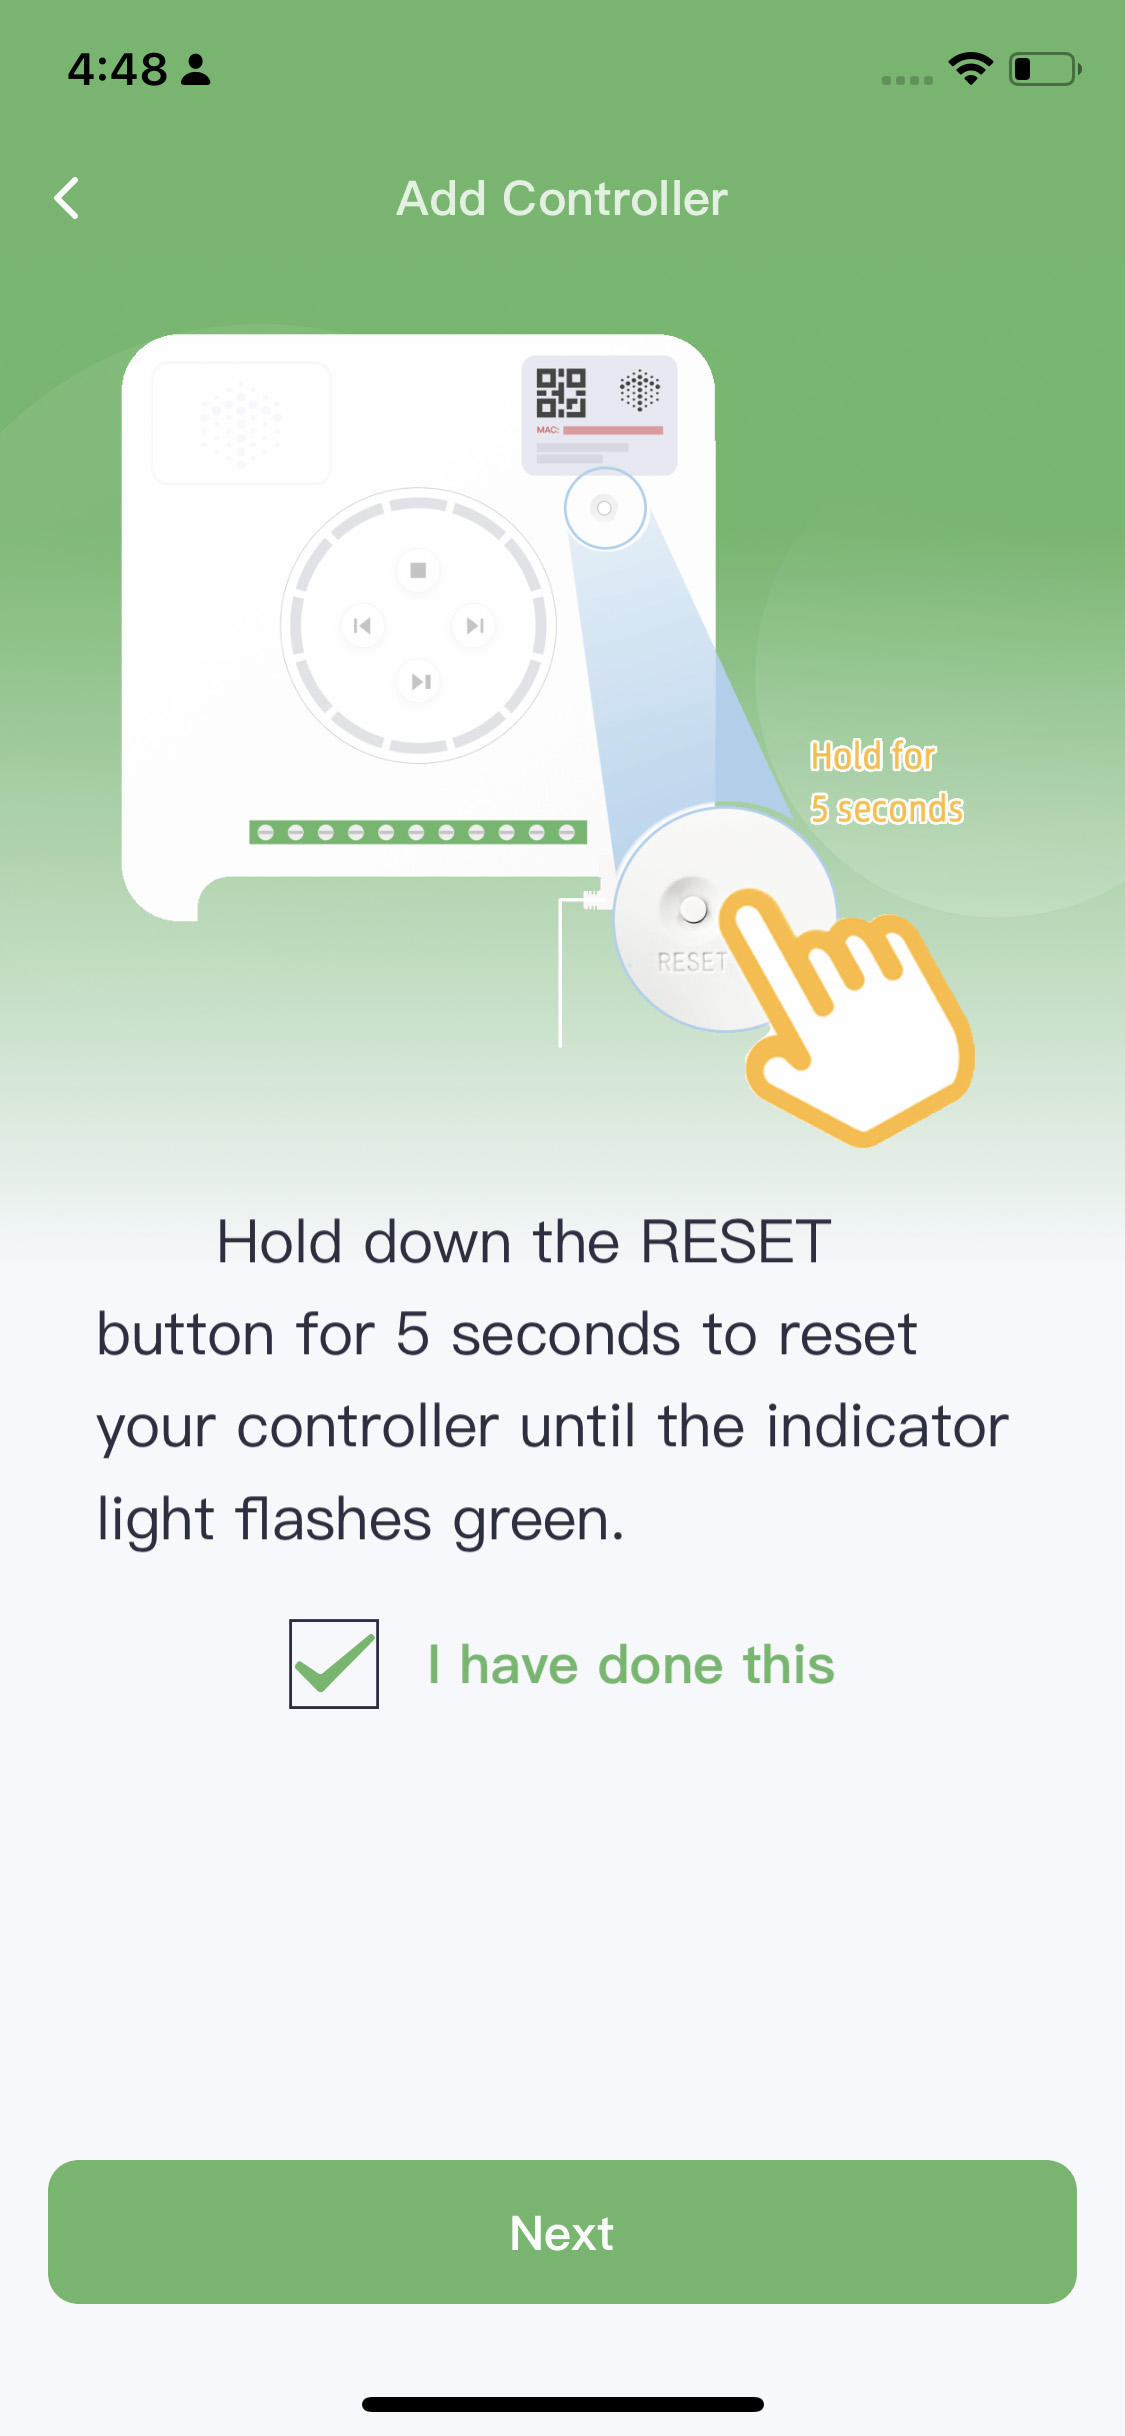
Reset Button
Please note that the RESET button should only be used in two specific scenarios. Firstly, when adding a device, you should long-press the RESET button for 5 seconds, and then proceed with adding the device through the app. Secondly, if the device is offline and you need to change the WiFi network, you can utilize the RESET button.
Please refrain from using this button for any other purposes.
Still need help?
In case the above method doesn’t work for you, please contact our technical support team directly using the contact information below. We will respond to you by email within 12h after your message reaches us.
Email: Support@imolaza.com
Author: admin
Last update: 2025-04-11 11:18
The RESET button is located beneath the controller cover (under the label sticker). To access it, simply remove the cover.
1. Adding a Device
When setting up for the first time or re-adding after removal, long-press the RESET button for 5 seconds, then add the device in the app.
2. Changing Wi-Fi (Device Offline)
If the device is offline and you need to update the Wi-Fi, follow the app instructions: long-press RESET for 5 seconds and proceed with the setup.
⚠️ Important Notes:
. The RESET button does not restore factory settings.
. To fully remove device data, go to:
App → Settings → Controller Settings → REMOVE CONTROLLER.

Still need help?
In case the above method doesn’t work for you, please contact our technical support team directly using the contact information below. We will respond to you by email within 12h after your message reaches us.
Email: Support@imolaza.com
Author: admin
Last update: 2025-04-11 11:20
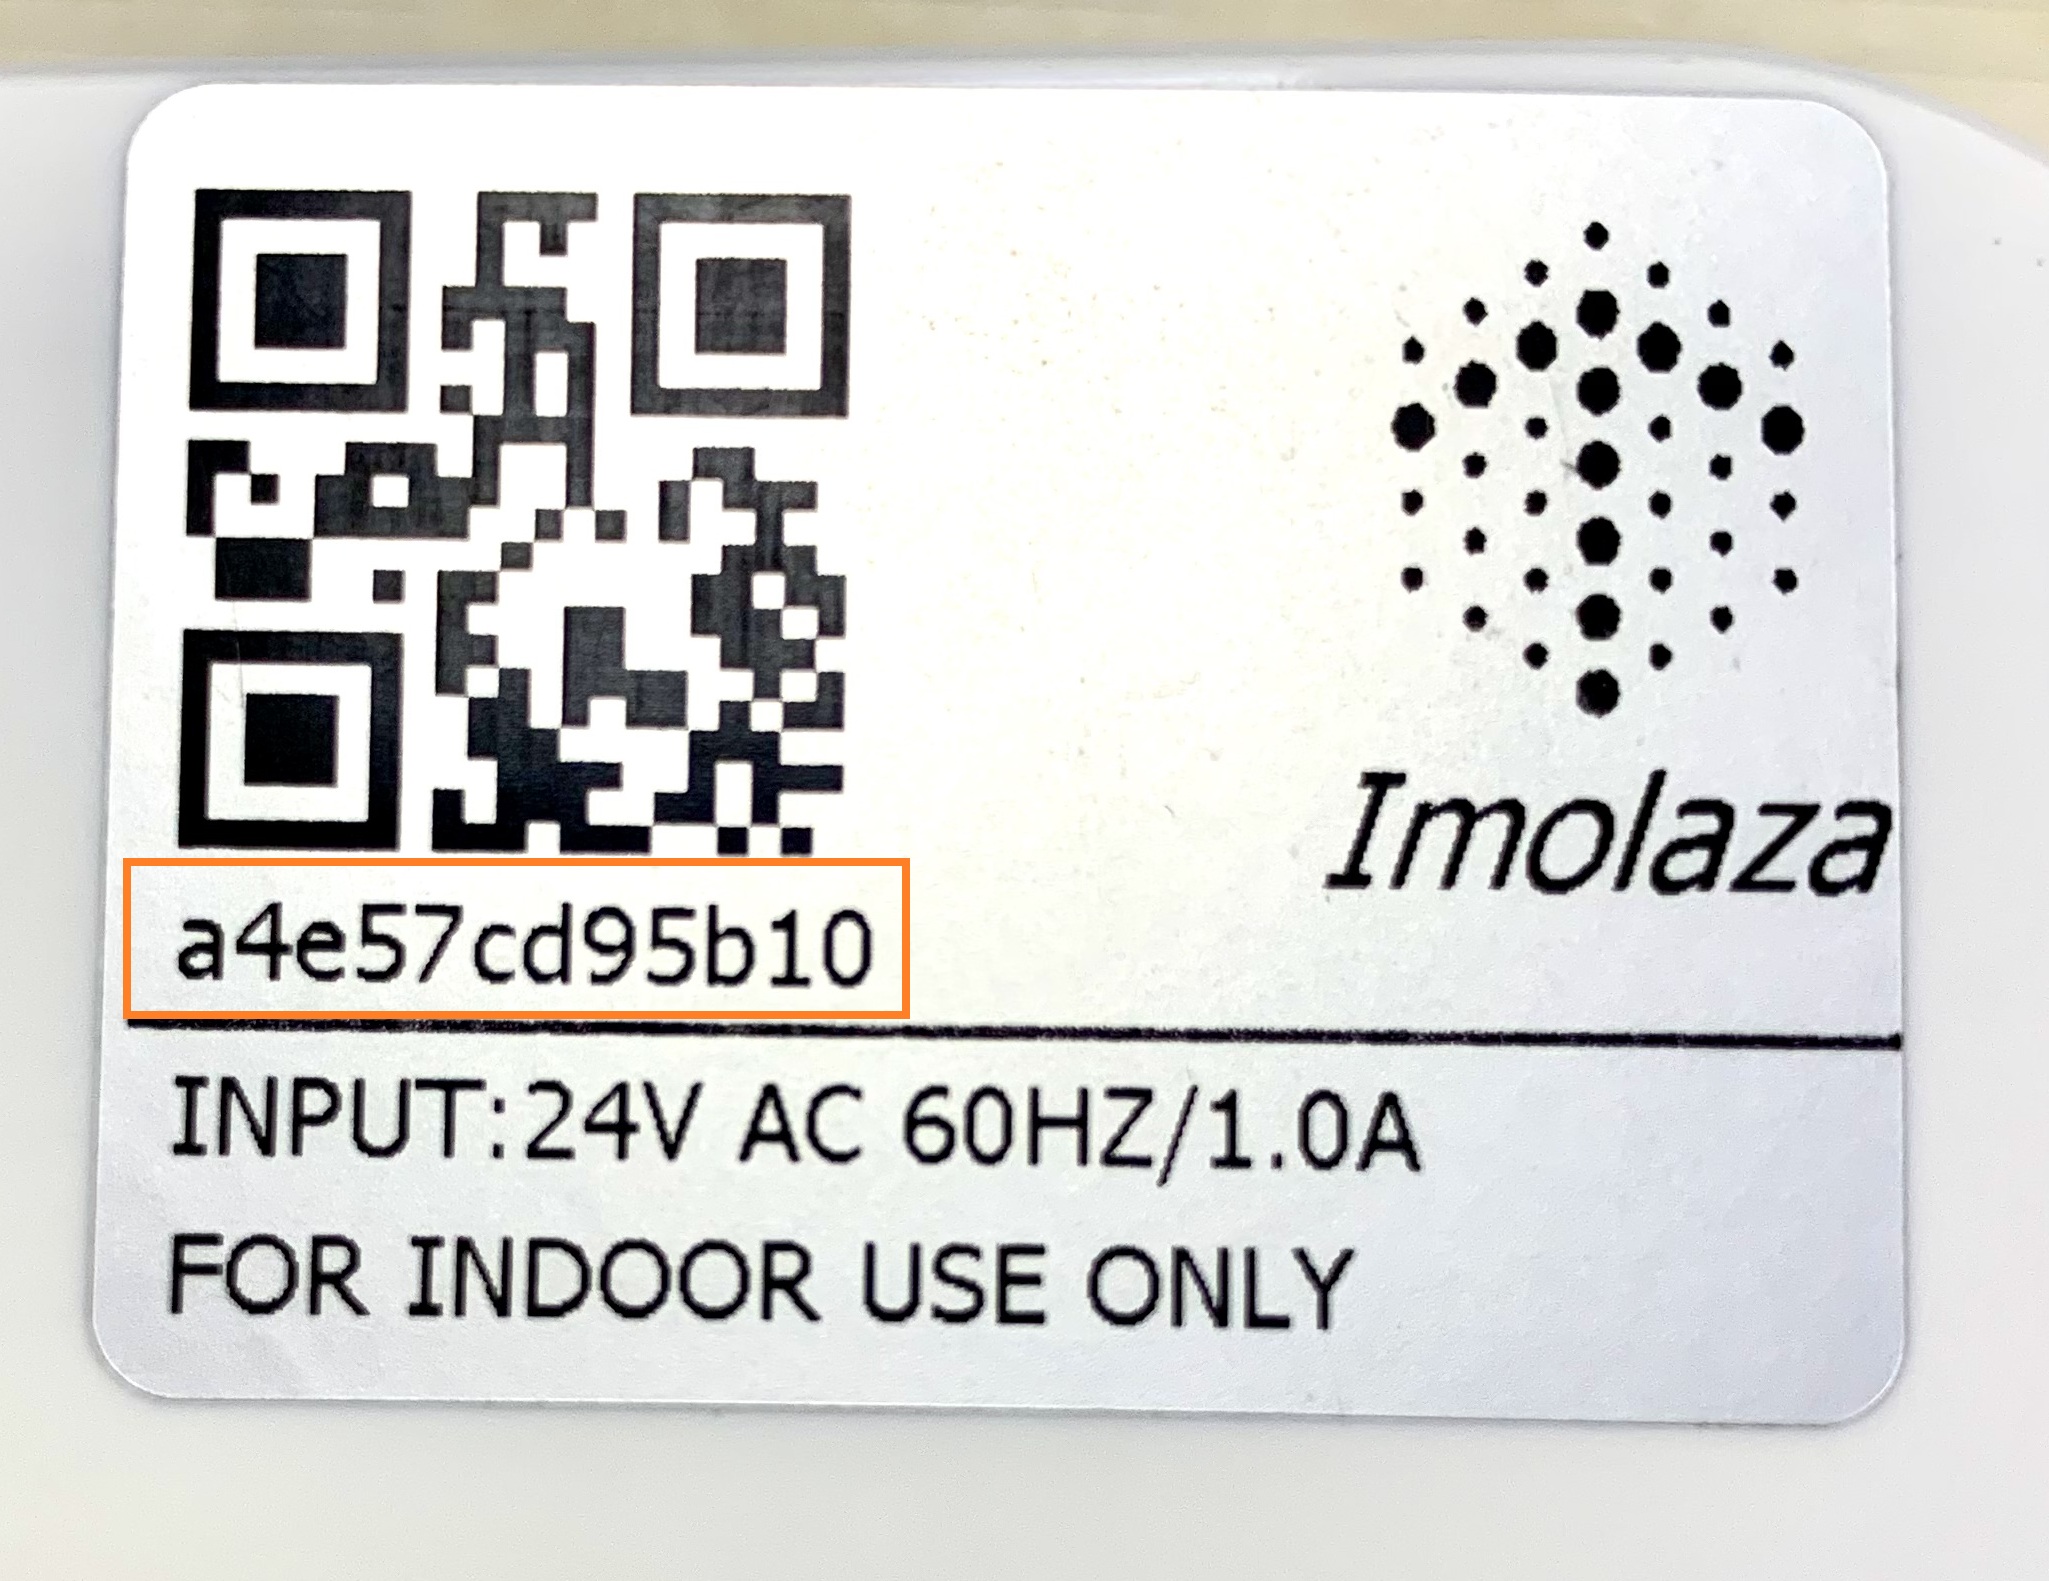
Location:
You can find your controller’s MAC address at the bottom of the front cover, just below the QR code.
Why It’s Useful:
. If you contact ImoLaza Support for troubleshooting or Wi-Fi issues, providing the MAC address helps us assist you faster.
. You can also manually add controllers in the app by entering the MAC address directly.
Still need help?
In case the above method doesn’t work for you, please contact our technical support team directly using the contact information below. We will respond to you by email within 12h after your message reaches us.
Email: Support@imolaza.com
Author: admin
Last update: 2025-04-11 11:37
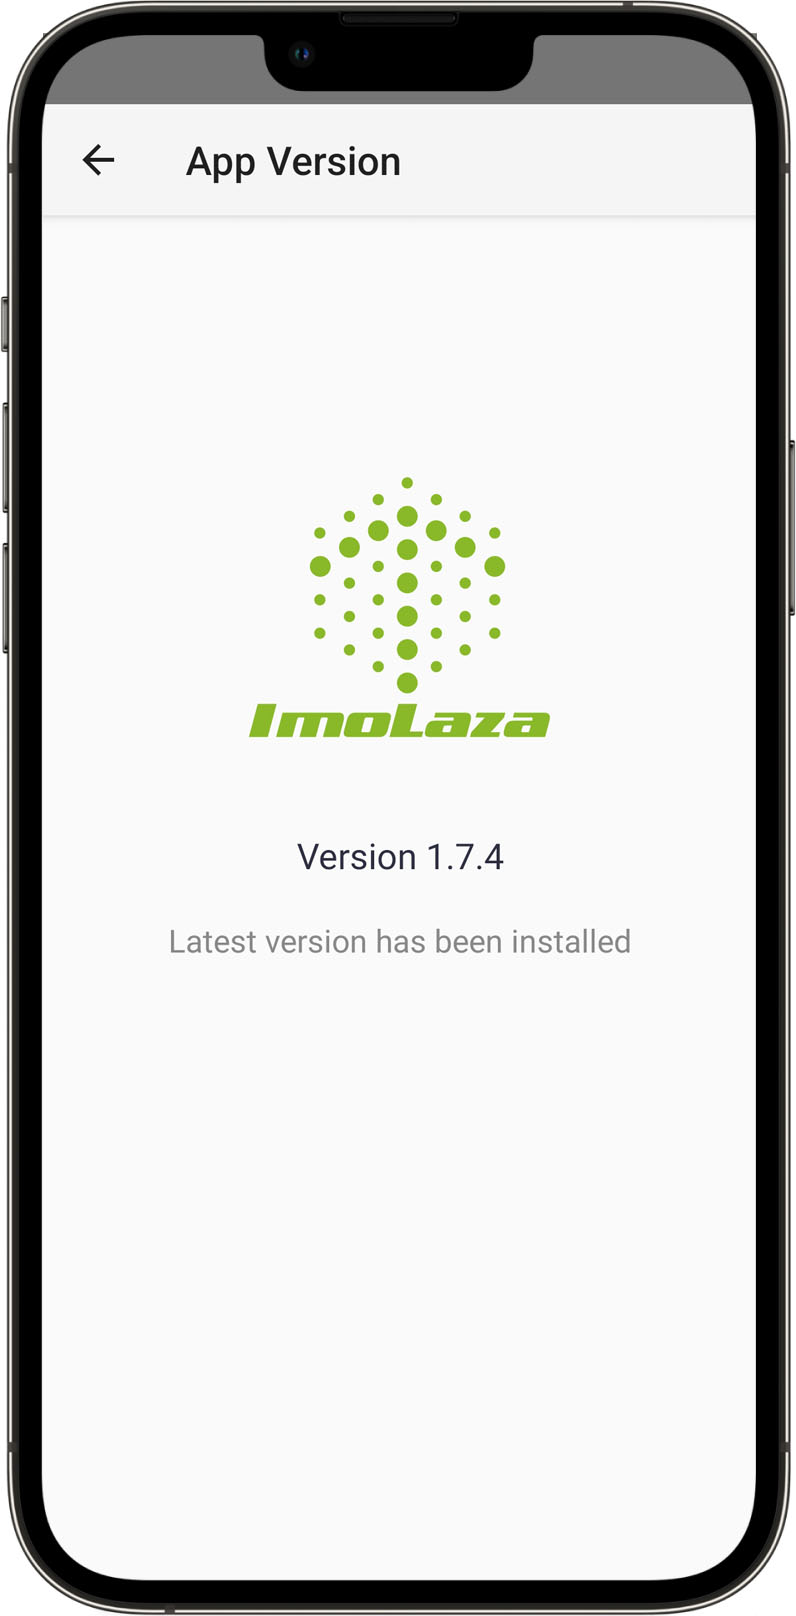
The ImoLaza app will automatically notify you when a new version is available. Simply confirm the update, and it will install.
If you don’t see a notification, follow these steps:
For iOS (iPhone/iPad):
Open the App Store.
Search for "ImoLaza".
Tap "Update" (if available).

For Android:
Open the Google Play Store.
Tap the ≡ menu → "My apps & games".
Find ImoLaza and tap "Update".

Still need help?
In case the above method doesn’t work for you, please contact our technical support team directly using the contact information below. We will respond to you by email within 12h after your message reaches us.
Email: Support@imolaza.com
Author: Imolaza
Last update: 2025-04-11 11:40
This article will tell you all the technical specifications related to the ImoLaza controller.
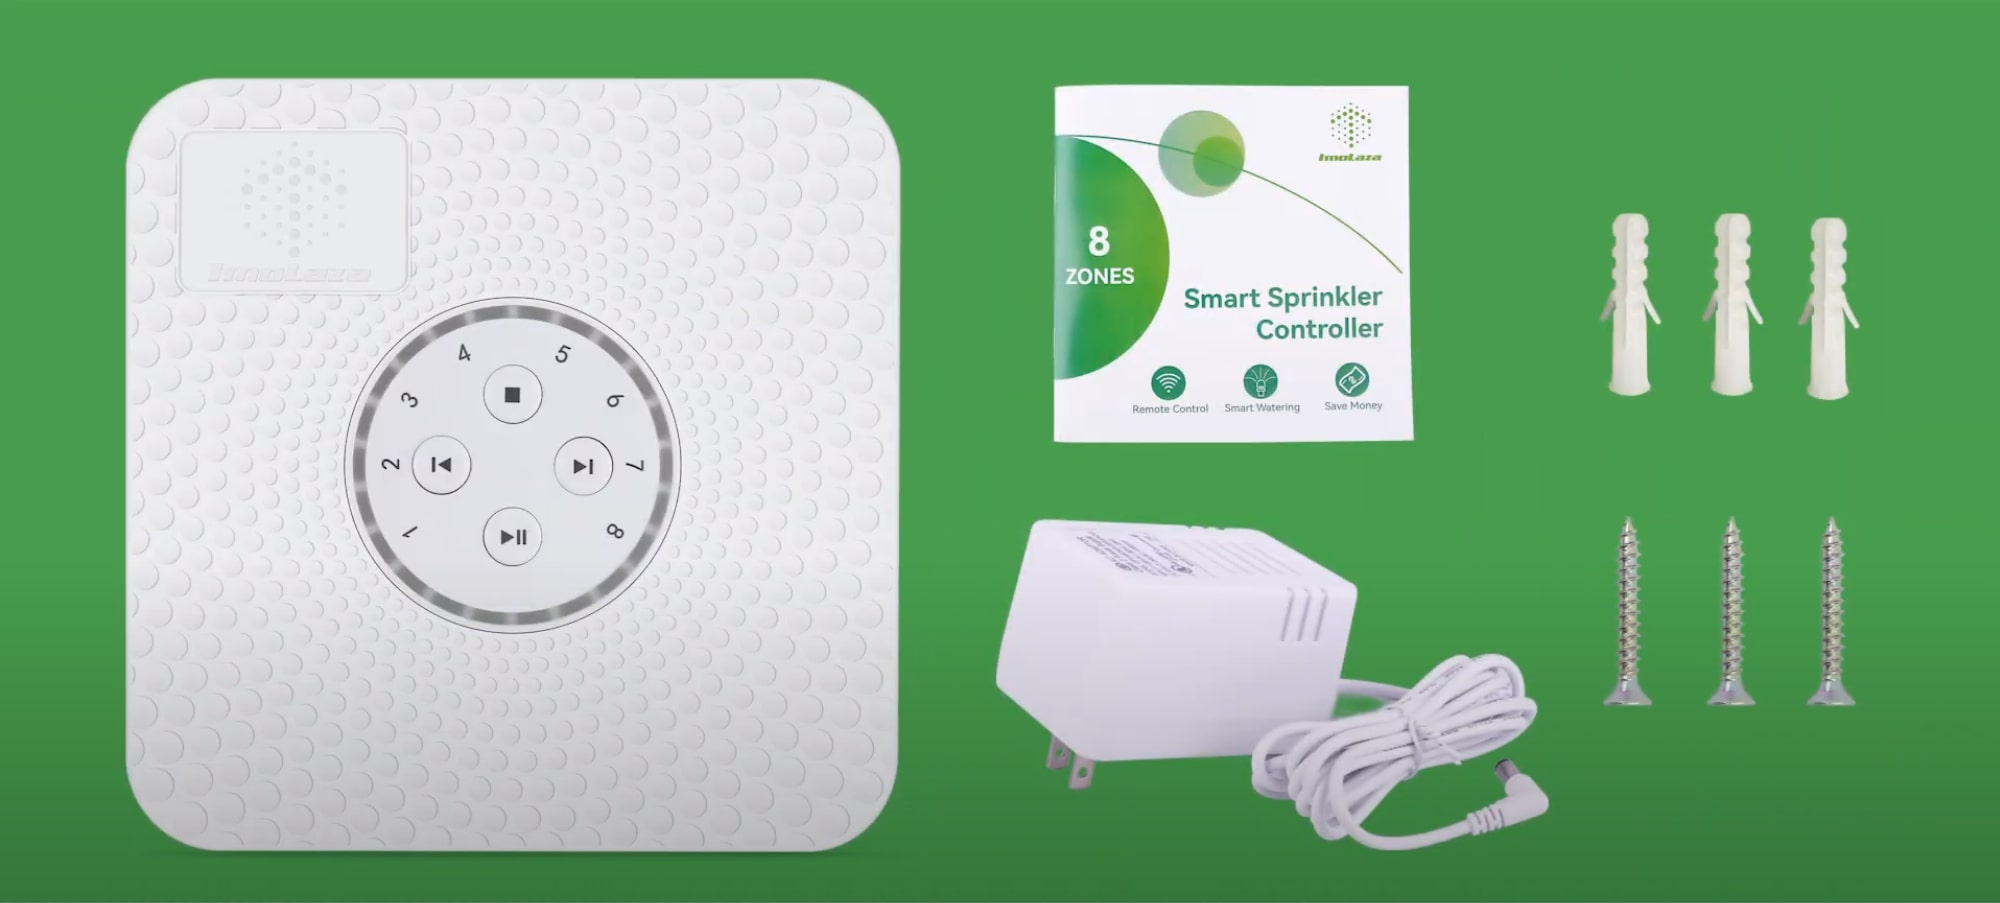
What's included?
ImoaLza Smart Sprinkler Controller
. Weight: 345g (0lb 12.16952oz)
. Dimensions: 6.3" x6.3" x 1.2"
Power Supply with Cord
Mounting Hardware:
. Positioning paper
. User Manual
. Wire Label Sheet
. Power Adapter
. 3 Screws and 3 Anchors
. Screwdriver
App Compatibility
The ImoLaza App lets you connect the controller to your home Wi-Fi. It runs on iOS 11.0+ and Android 7.0+.
Wi-Fi Connection
Requires 2.4 GHz wireless network signal available at the installation location.
Does ImoLaza works with 5G Wi-Fi?
How do I update Wi-Fi on my controller?
Solve Wi-Fi Networks can refer to the following solutions.
Power Requirements
The ImoLaza controller must be connected to the AC power adapter included. DC Transformers are not supported.
Power Supply: External Transformer
Transformer input: 120 VAC ~60Hz 28W
Transformer output: 24 VAC 1000mA
Zone output (24 VAC): Compatible with 24VAC Solenoids
Wire Compatibility
ImoLaza supports 14-20 AWG gauge wires.
Hardware Compatibility
ImoLaza is compatible with
Master valve/pump relay
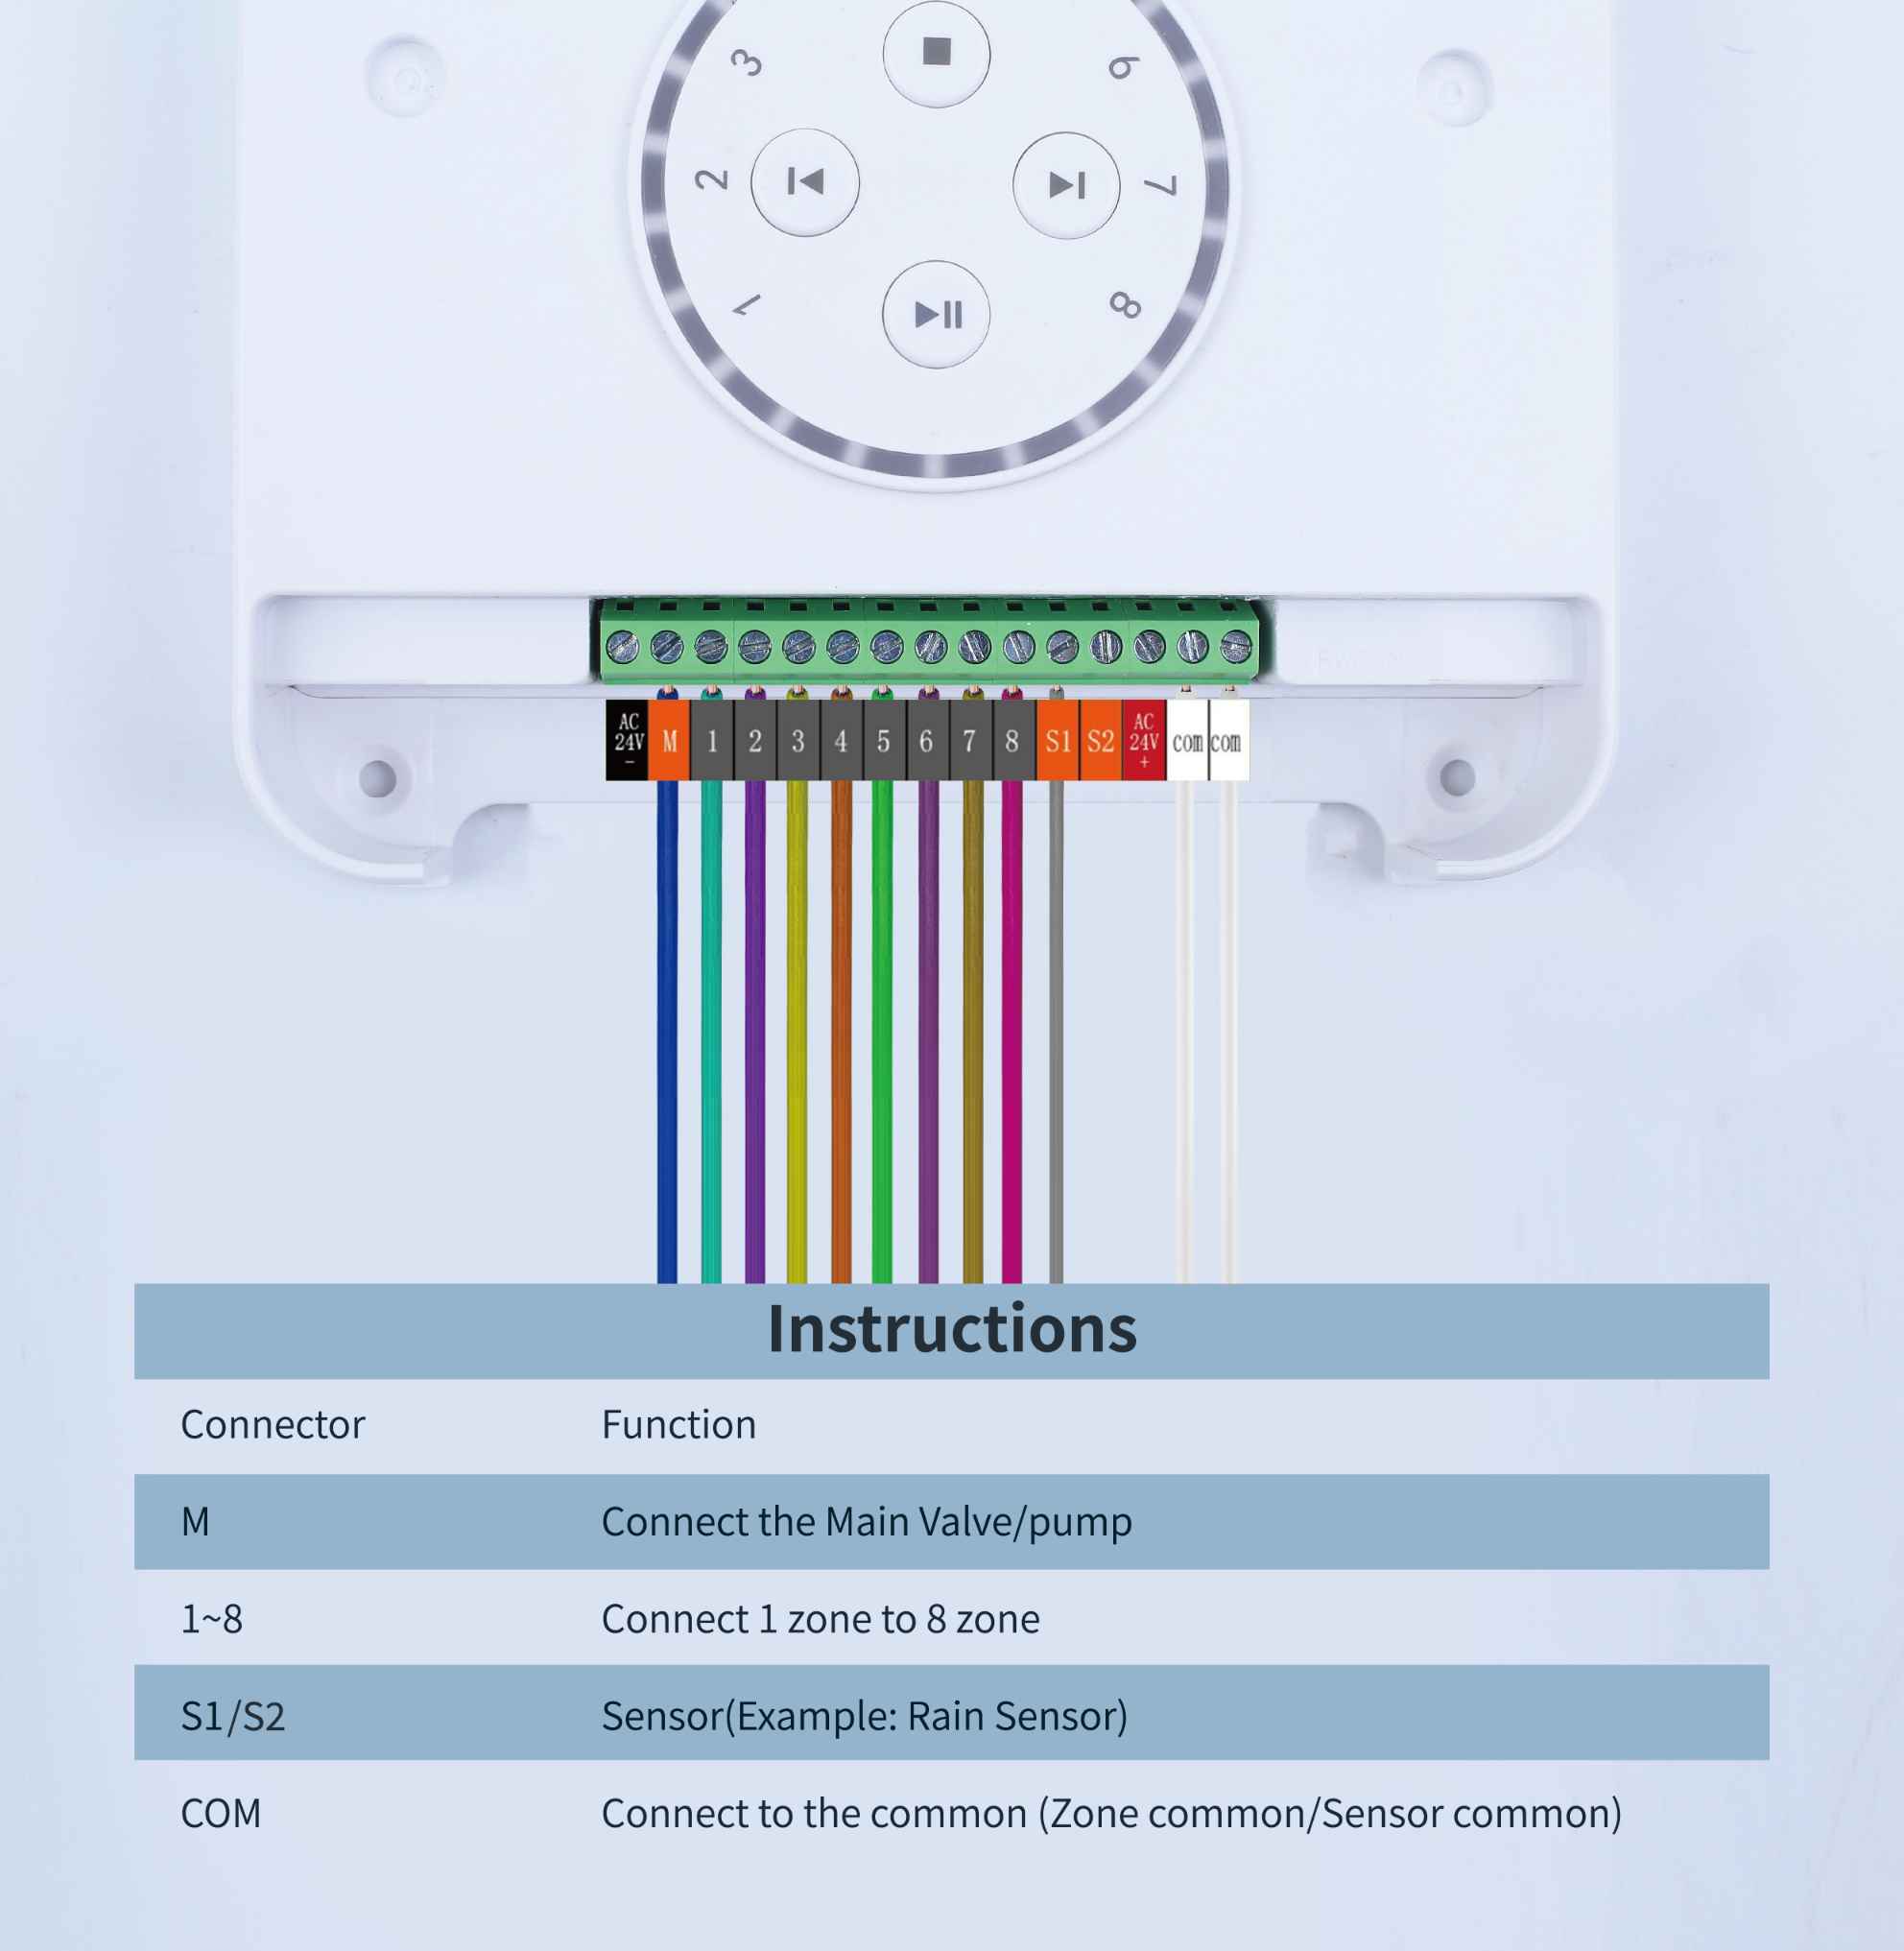
Rain Sensor: Wired & Wireless Normally Closed (NC) Rain Sensors
Rain Sensor FAQs
Water Delay, Skip, Rain Sensor, Weather Intelligence. Who dominates?
Zones/Model Numbers
4 & 8 & 12 & 16 zones
How to set up a zone?
How to disable/enable a zone?
Warranty
2-year limited warranty.
Optional Outdoor Enclosure
If your controller is installed outdoors, it is recommended that you purchase an outdoor enclosure to protect your controller.
Safty temperature: -13°F to 140°F
Still need help?
In case the above method doesn’t work for you, please contact our technical support team directly using the contact information below. We will respond to you by email within 12h after your message reaches us.
Email: Support@imolaza.com
Author: Imolaza
Last update: 2023-10-20 05:03
Welcome to ImoLaza! You will start a fascinating journey for just a 15 ~ 30 minutes installation. Please follow the video tutorials to complete the work. Rest assured that you don't need a professional electrician, you can do it yourself.
Controller Installation
Controller & Outdoor Enclosure Installation
Still need help?
In case the above method doesn’t work for you, please contact our technical support team directly using the contact information below. We will respond to you by email within 12h after your message reaches us.
Email: Support@imolaza.com
Author: Imolaza
Last update: 2023-05-10 08:59
Here is a list of specialized terms that you may have encountered before but are not sure what they mean. Please check the explanations below.
APP
ImoLaza has a mobile app for cell phones to remotely control the controller.
How can I update my ImoLaza App to the latest version?
Common Wire
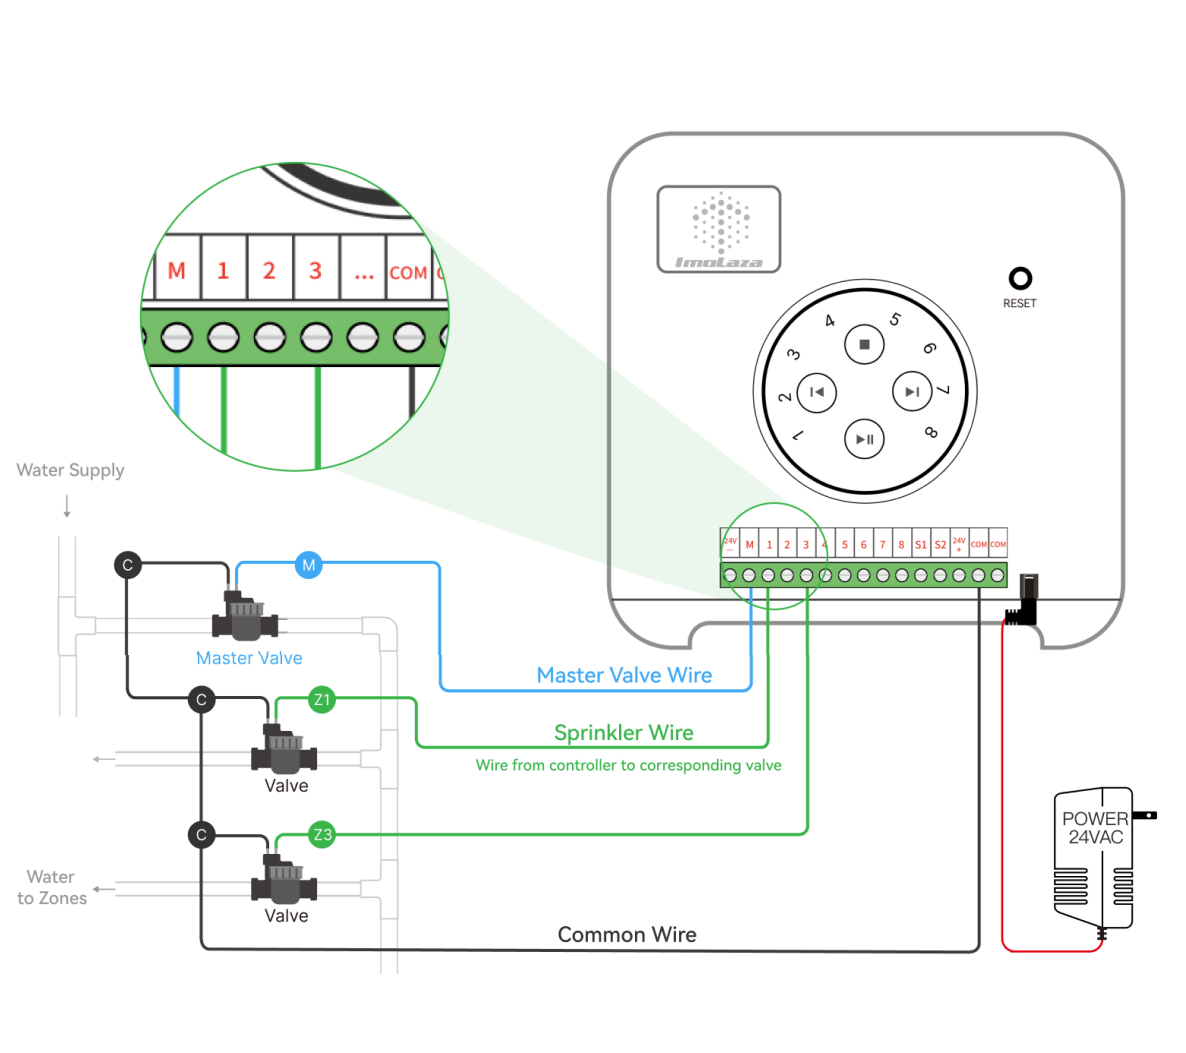
Usually white, the common wire connects all solenoid valves, please connect the common wire to the "C" port.
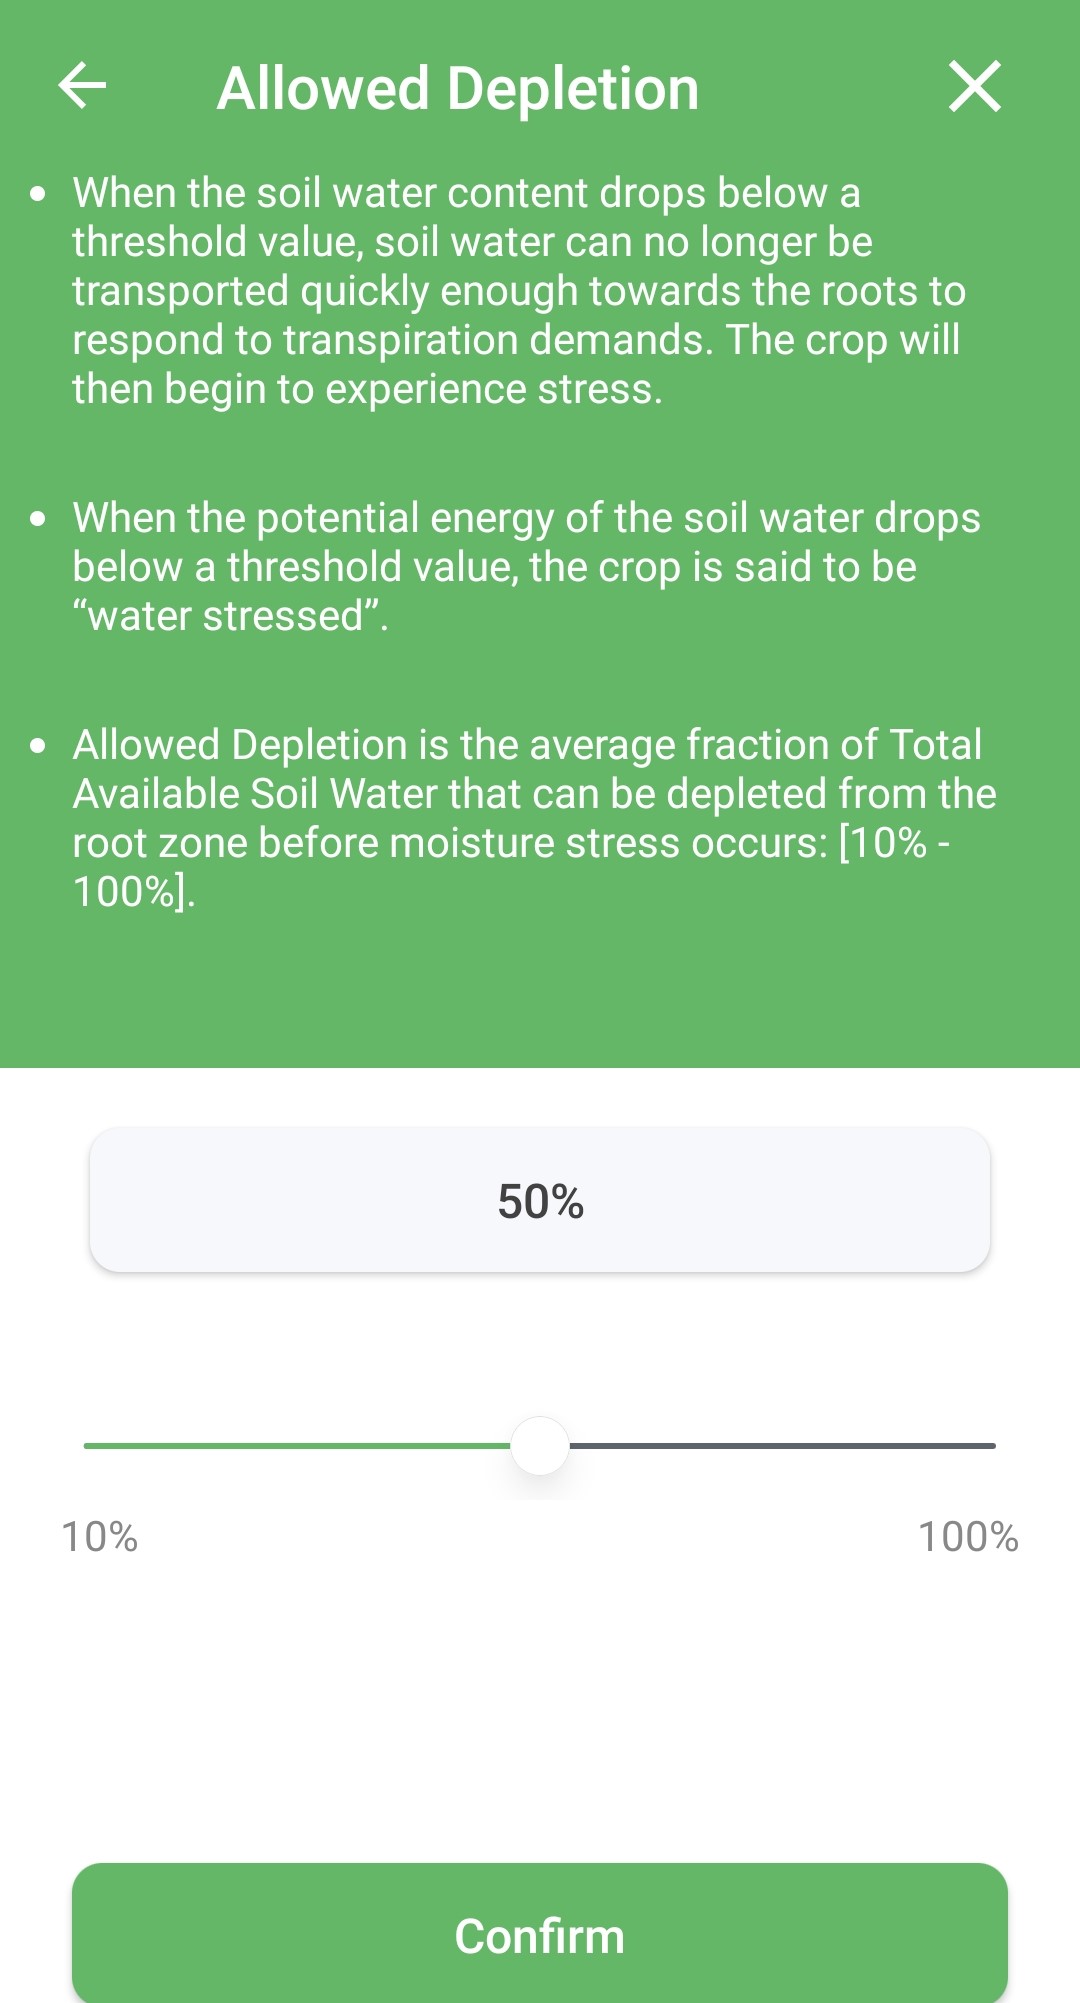
Allowed Depletion
Allow soil moisture to deplete to a managed level before watering again.
Available Water
The amount of water that can be stored in a soil profile and be available for growing crops.
Crop Coefficients
Crop coefficients are properties of plants used in predicting evapotranspiration (ET).
Evapotranspiration
Evapotranspiration (ET) is a term used to describe the water consumed by plants over a period of time. Evapotranspiration is the water loss occurring from the processes of evaporation and transpiration. Evaporation occurs when water changes to vapor on either soil or plant surfaces. Transpiration refers to the water lost through the leaves of plants.
2.4GHz
This refers to the frequency band used by the Wi-Fi signals our routers emit. 2.4G WiFi offers better through-wall performance and compatibility.
Does ImoLaza works with 5G Wi-Fi?
Calendar
The calendar on the schedule screen lets you know the number of scheduled executions for the day and which ones will be executed.
Community
The ImoLaza community board is a place where users can talk about what they want to say, and where you can post your experience or ask for help.
Firmware
Firmware is the device "driver" stored inside the device, through which the operating system can realize the operation of a specific machine according to the standard device driver.
MAC address
A bit address is used to identify the location of a network device.
What's the Mac address for and where it is?
Master Valve
A valve installed upstream of the conventional valve controls the flow of water into the main piping system, please connect the wire to the main valve to the "M" port.
Quick Run
Run the schedules or zones at any time.
Rain Sensor
A switching device activated by rainfall, the controller connected to the rain sensor will skip watering on rainy days.
Root Depth
The deepest soil depth reached by the roots of an individual plant (i.e. maximum rooting depth).
History
Check all the historical information on your imolaza system, including schedule starts, ends, and system updates.
Solenoid
An electronically controlled valve is used to control the water coming out of the nozzle.
SSID
Name of your Wi-Fi network.
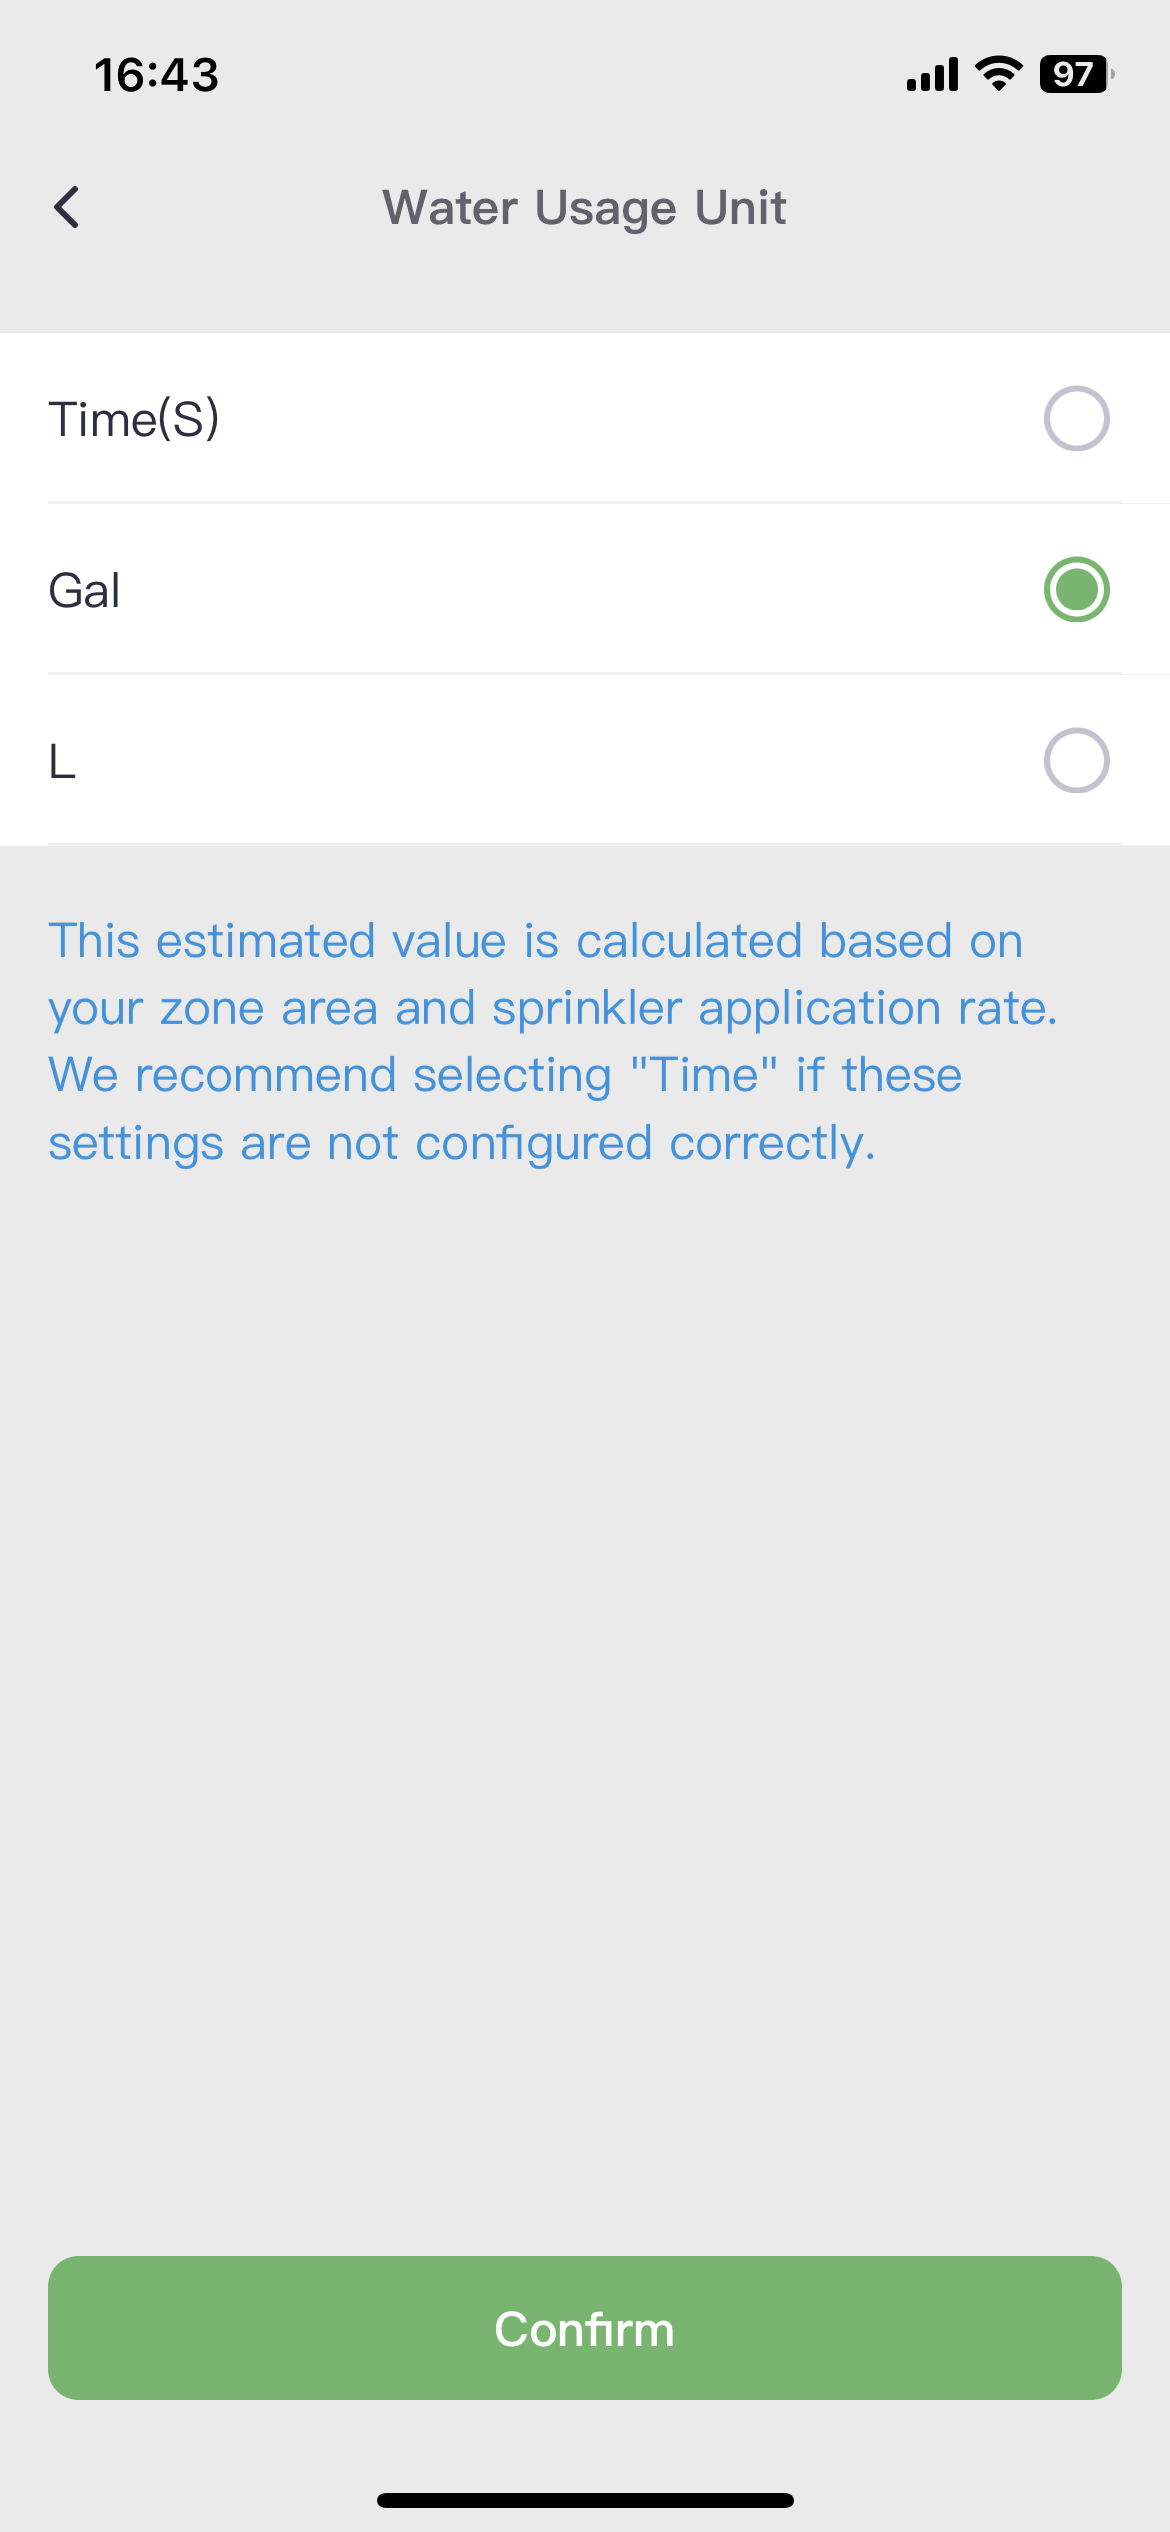
Water Usage
Track the amount of water used on a daily or monthly basis.
Smart Skip
Intelligent algorithms automatically adjust the execution of the plan based on weather data.
Winterize
Prepare the irrigation system for winter.
How to winterize my sprinkler system?
Zone
A specific area of your yard, activated by a single valve. ImoLaza has four types of controllers with 4 zones, 8 zones, 12 zones and 16 zones.
Still need help?
In case the above method doesn’t work for you, please contact our technical support team directly using the contact information below. We will respond to you by email within 12h after your message reaches us.
Email: Support@imolaza.com
Author: Imolaza
Last update: 2023-10-23 08:18
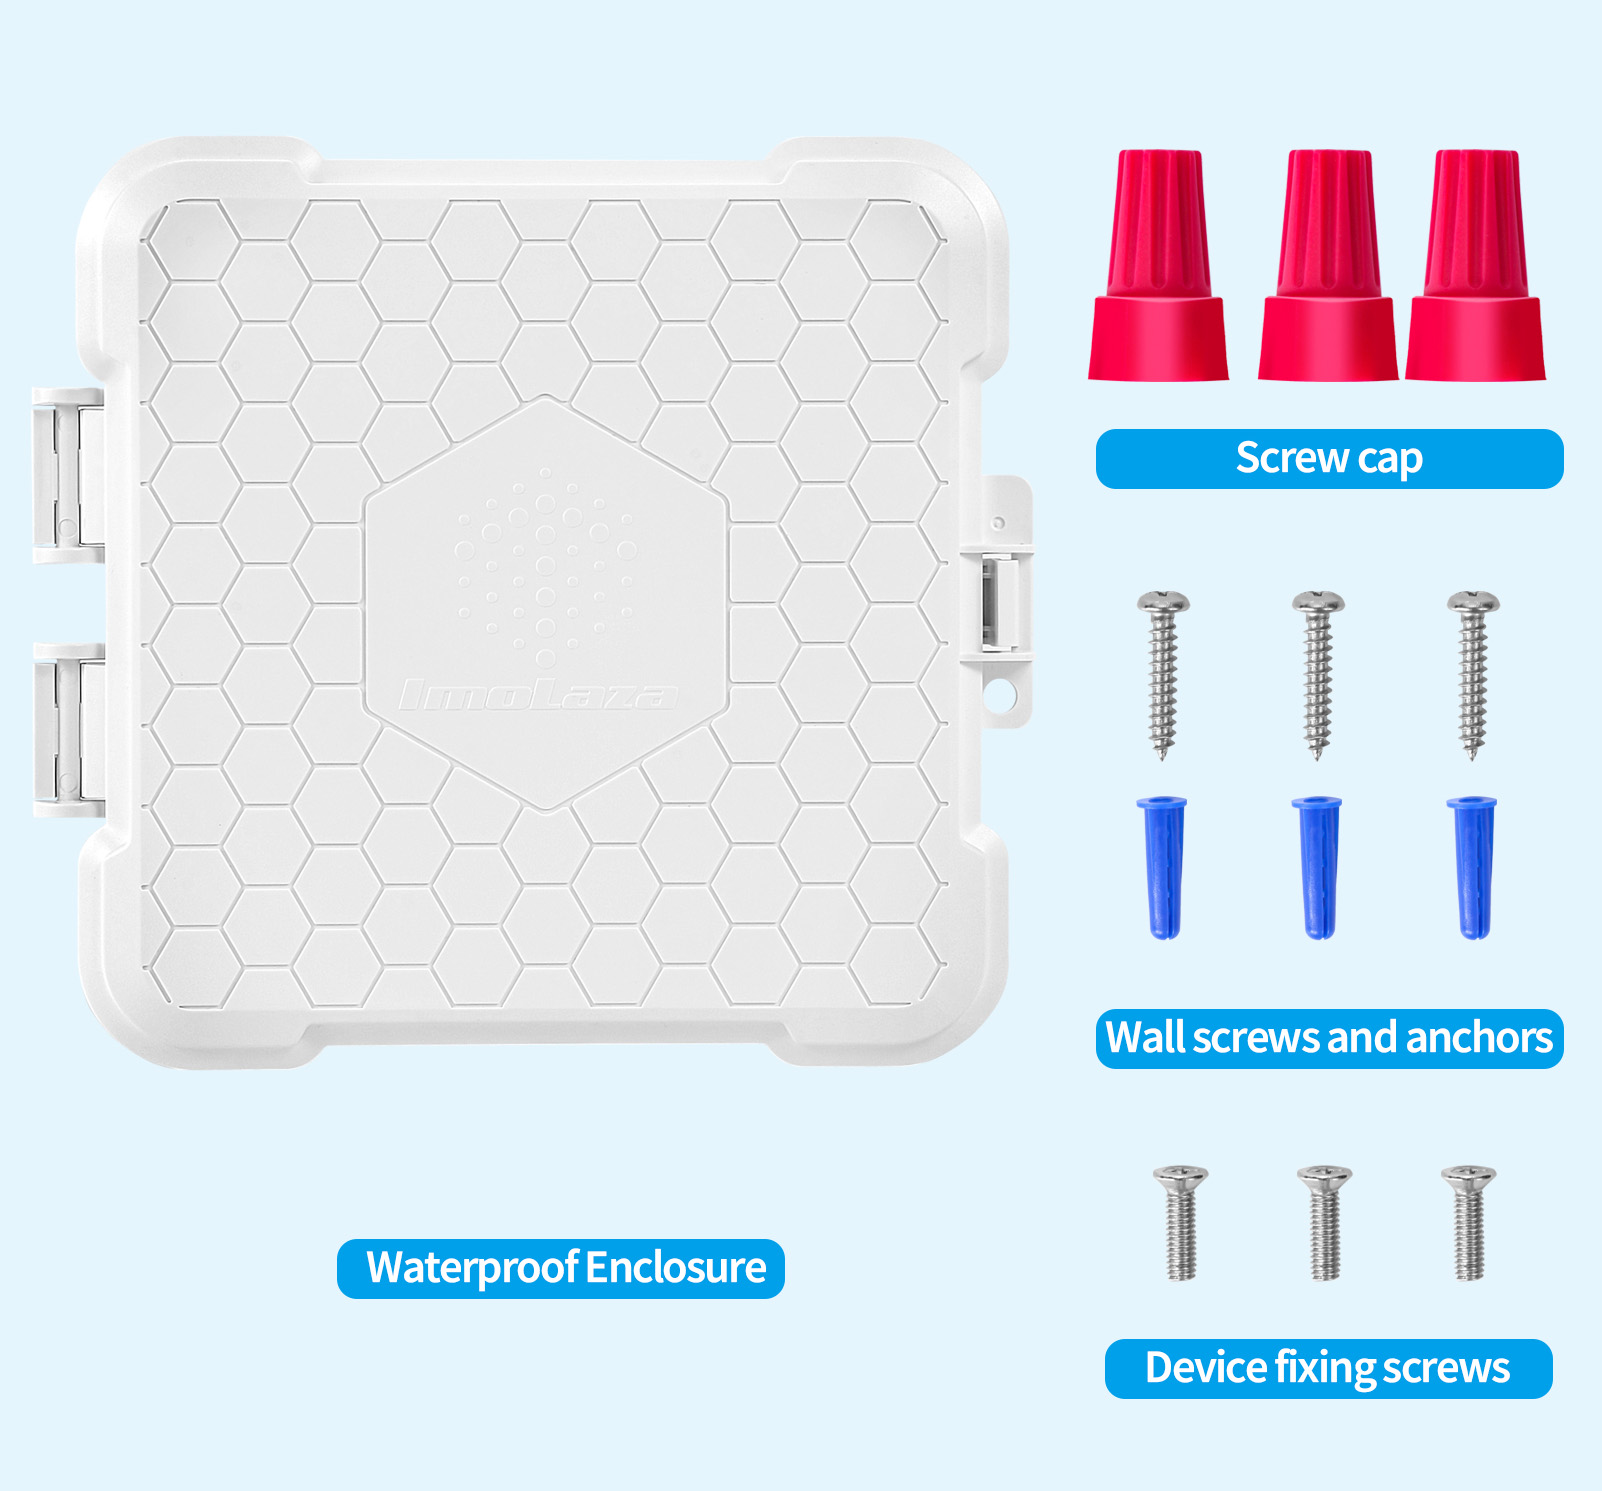
If your controller is installed outside, you'll need an outdoor waterproof enclosure to keep out the ravages of the storm. Here are the technical parameters of the enclosure.
Dimensions: 8.66” L x 3.94” W x 7.87” H

Weight: 1.0 Lbs
Color: White
Material: ABS
What's Included?
In case the above method doesn’t work for you, please contact our technical support team directly using the contact information below. We will respond to you by email within 12h after your message reaches us.
Email: Support@imolaza.com
Author: Imolaza
Last update: 2023-05-10 09:22
If you have a large yard or farm, a single controller may not suffice to meet your irrigation needs. In such cases, it's advisable to use multiple controllers to manage different zones. Our app is designed to cater to this requirement, enabling you to control multiple controllers simultaneously.
To begin, you can add multiple controllers to your account and access the "My ImoLaza" feature on the home page. This feature allows you to seamlessly switch between controllers.
Still need help?
In case the above method doesn’t work for you, please contact our technical support team directly using the contact information below. We will respond to you by email within 12h after your message reaches us.
Email: Support@imolaza.com
Author: Imolaza
Last update: 2025-04-17 03:20
Author: admin
Last update: 2023-04-14 09:49
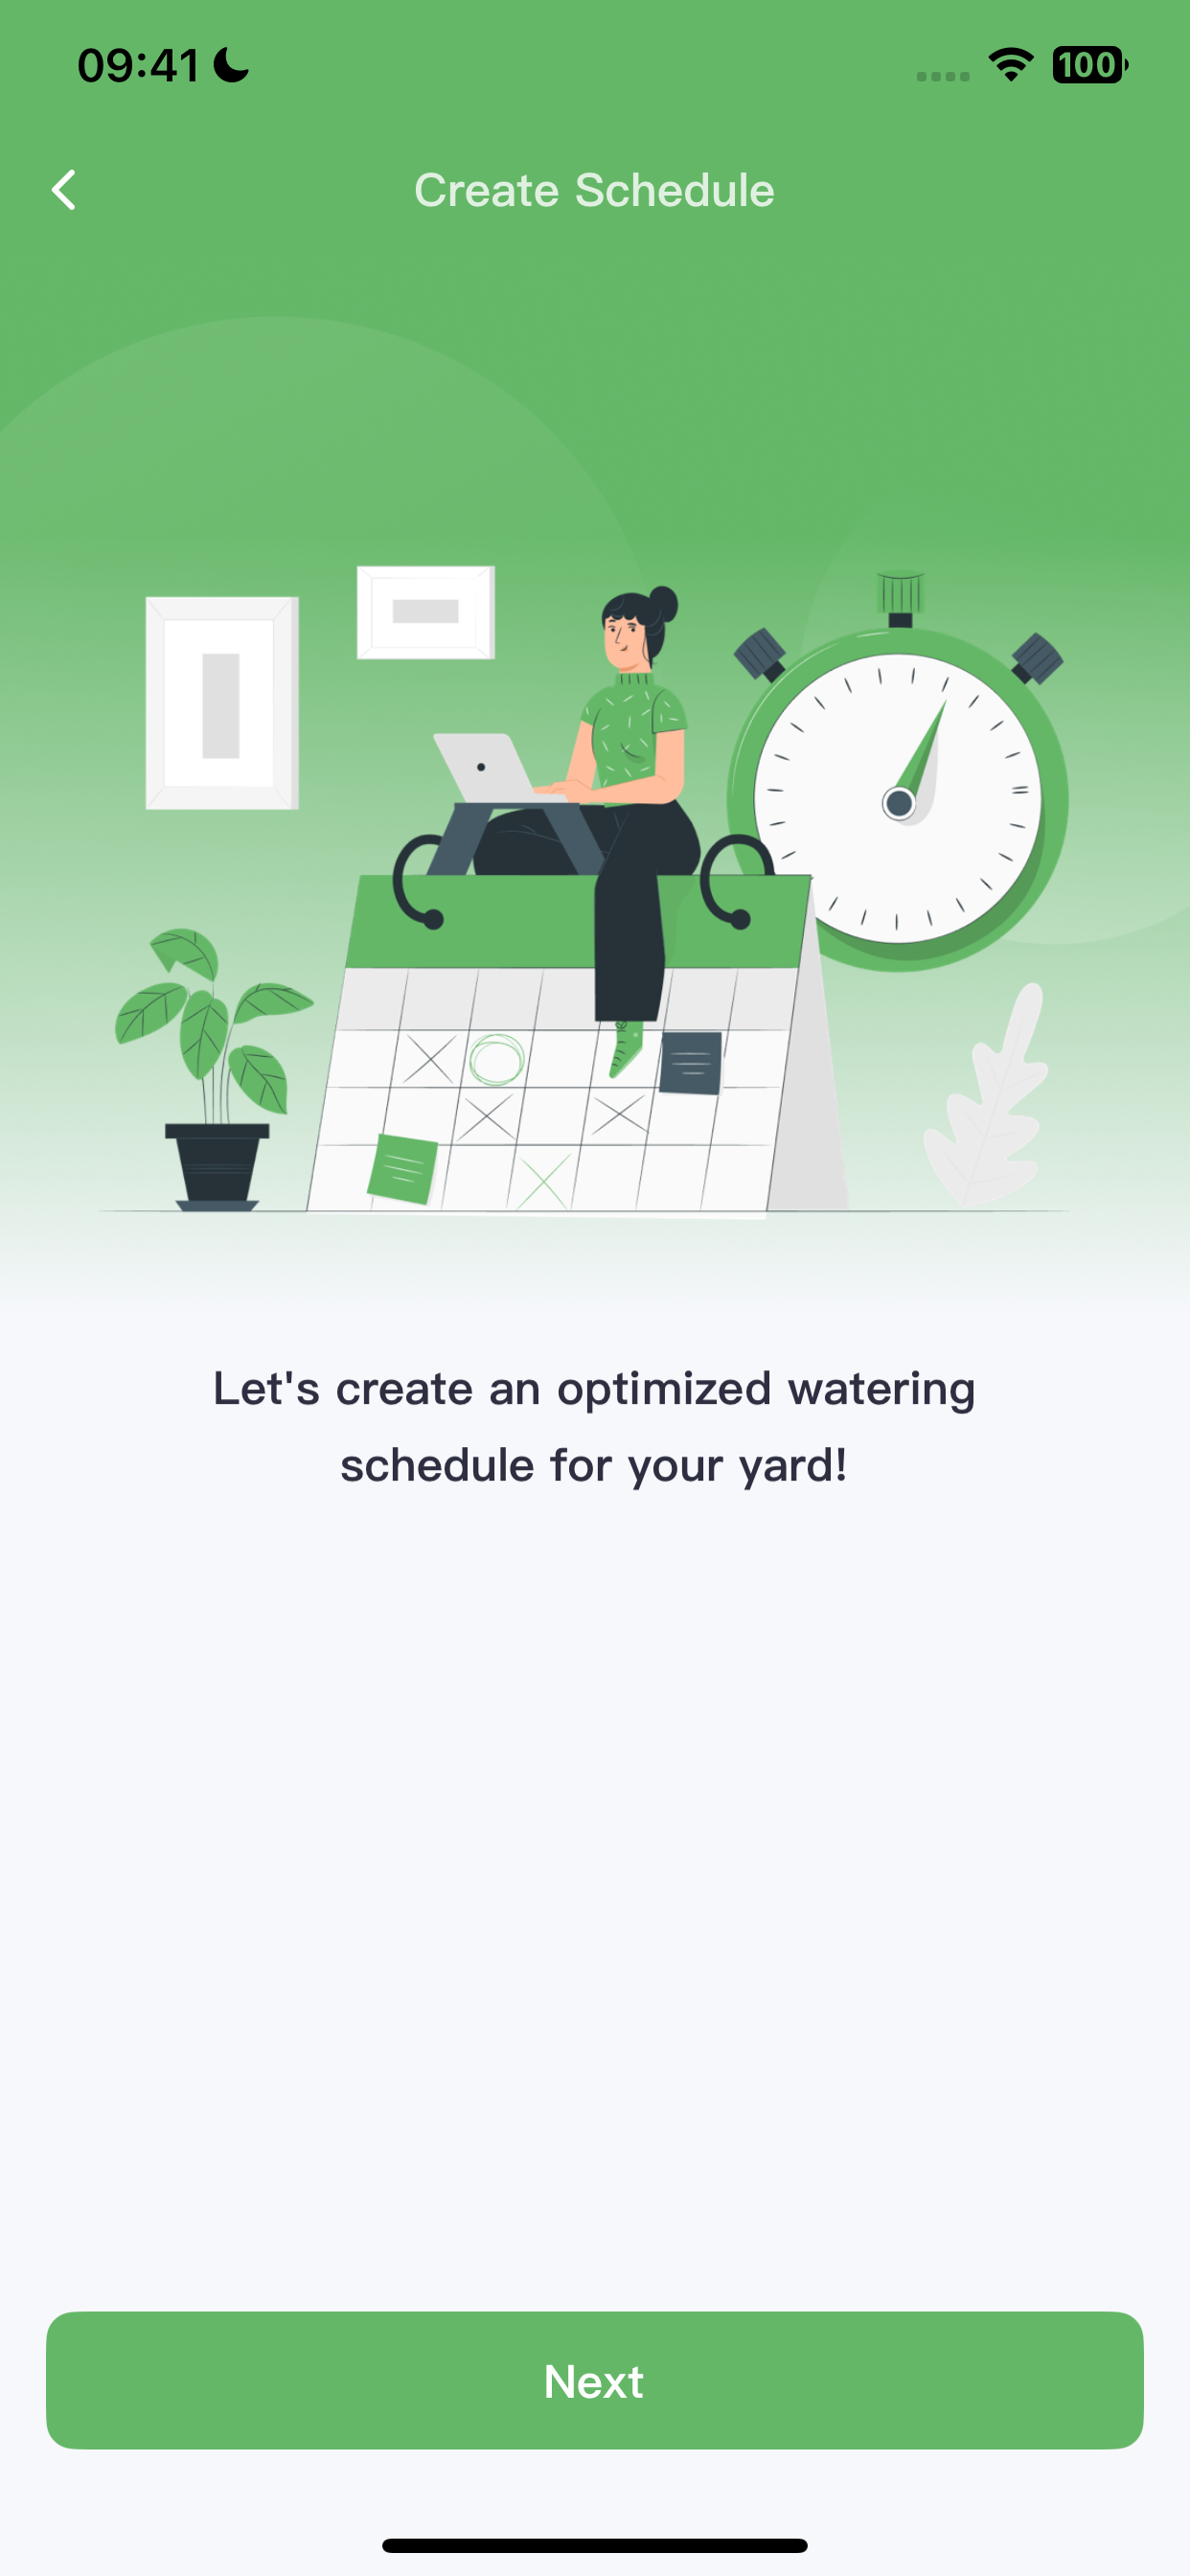
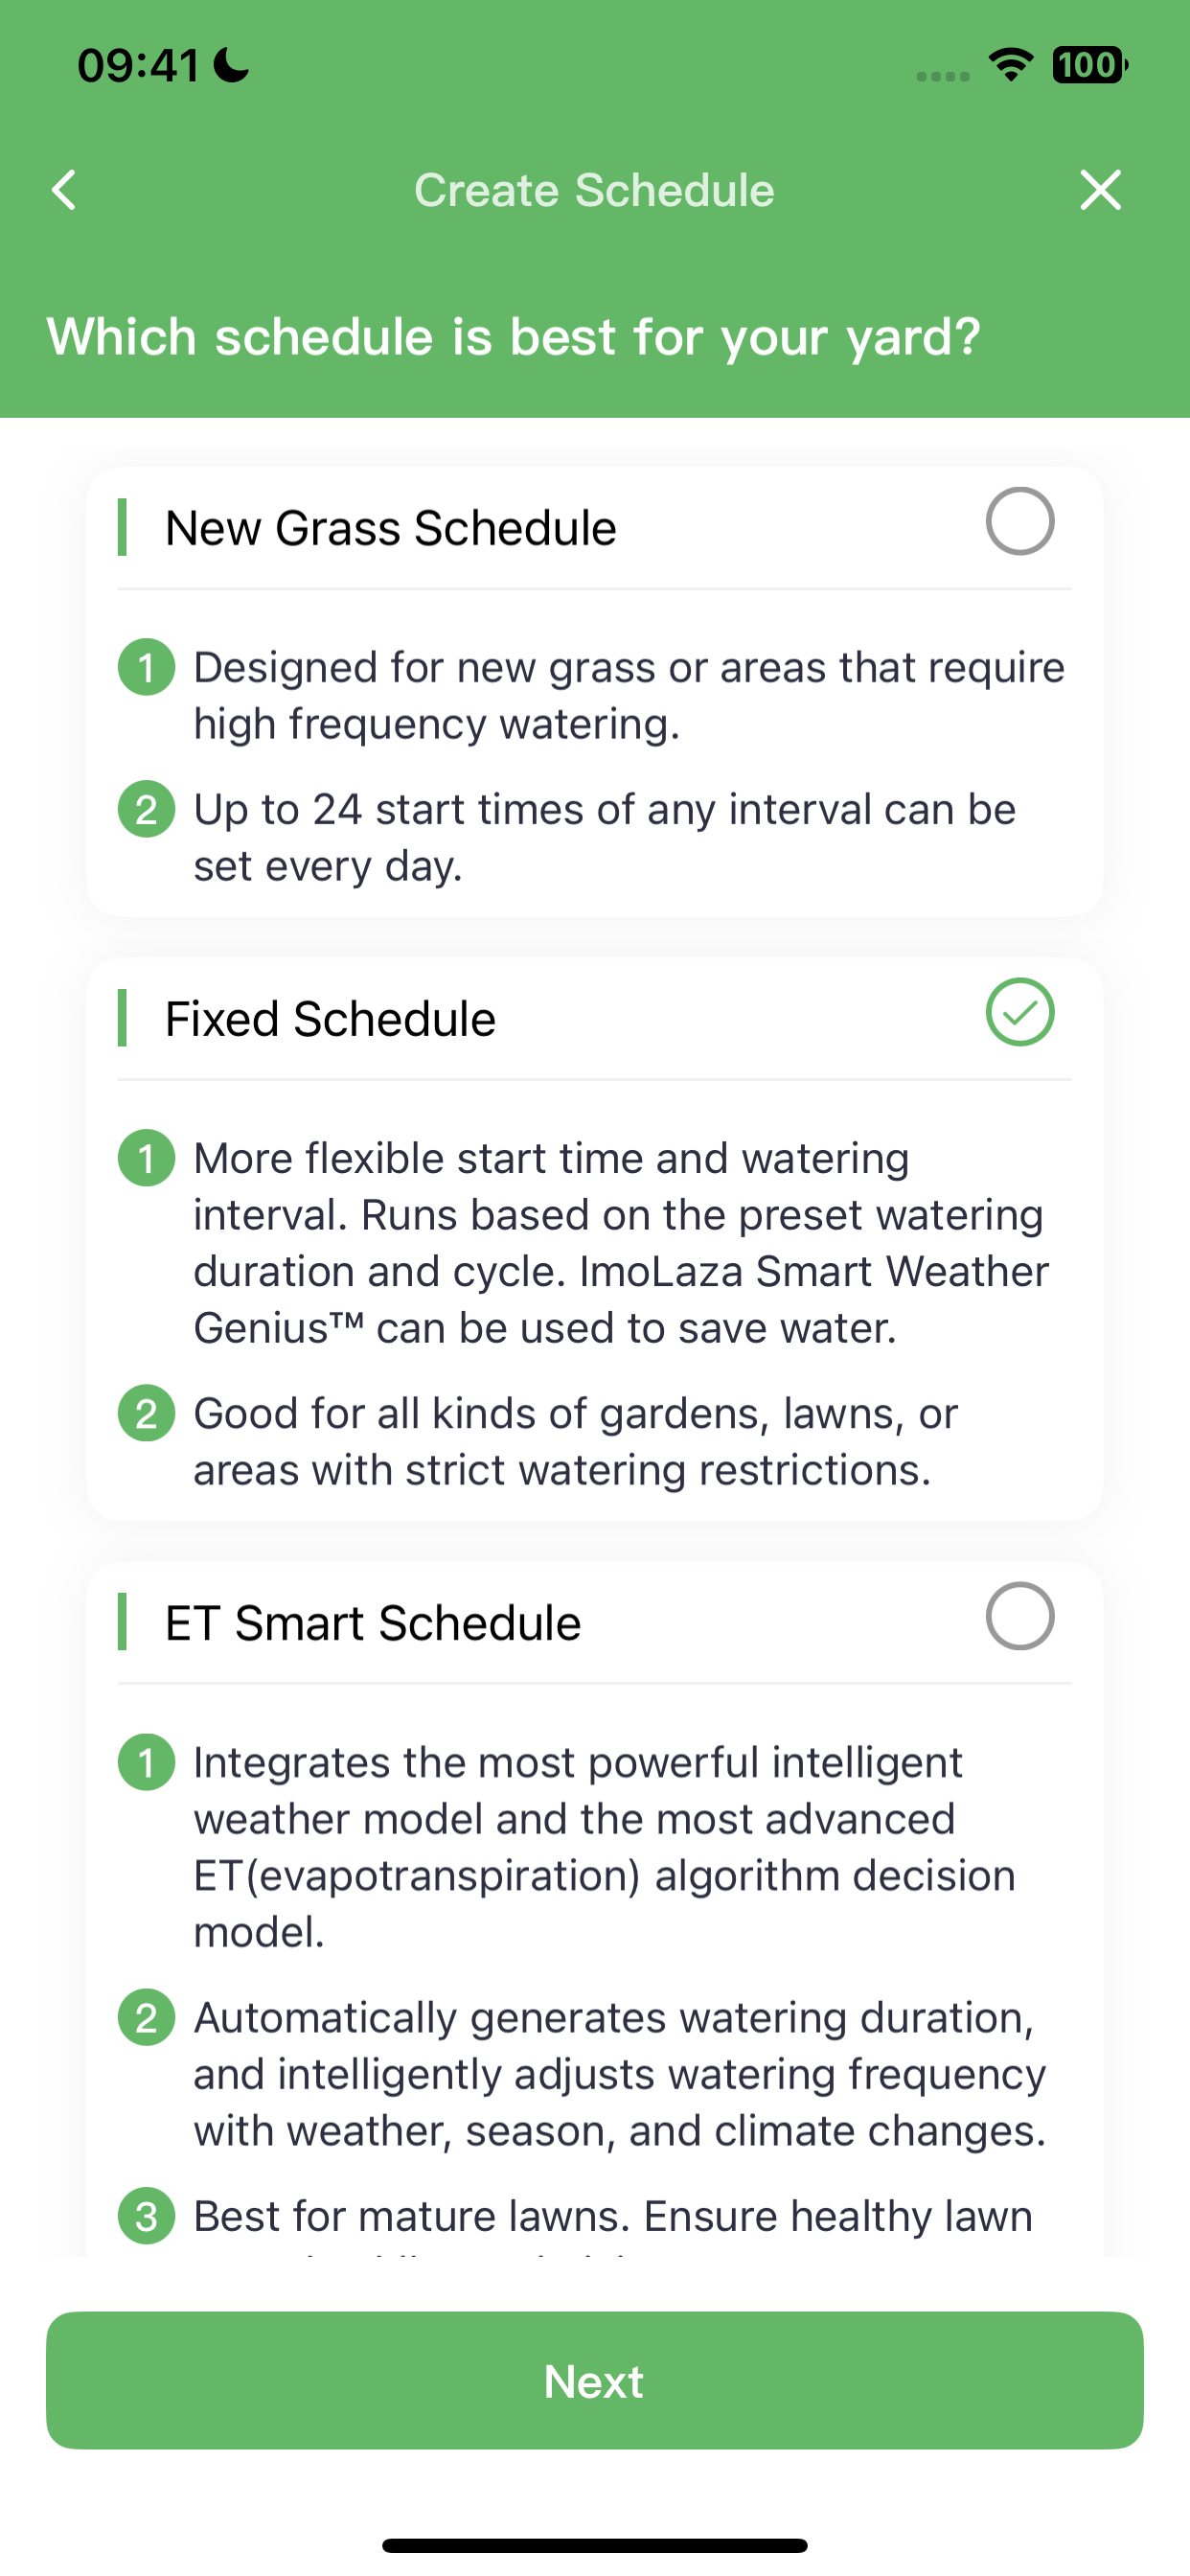
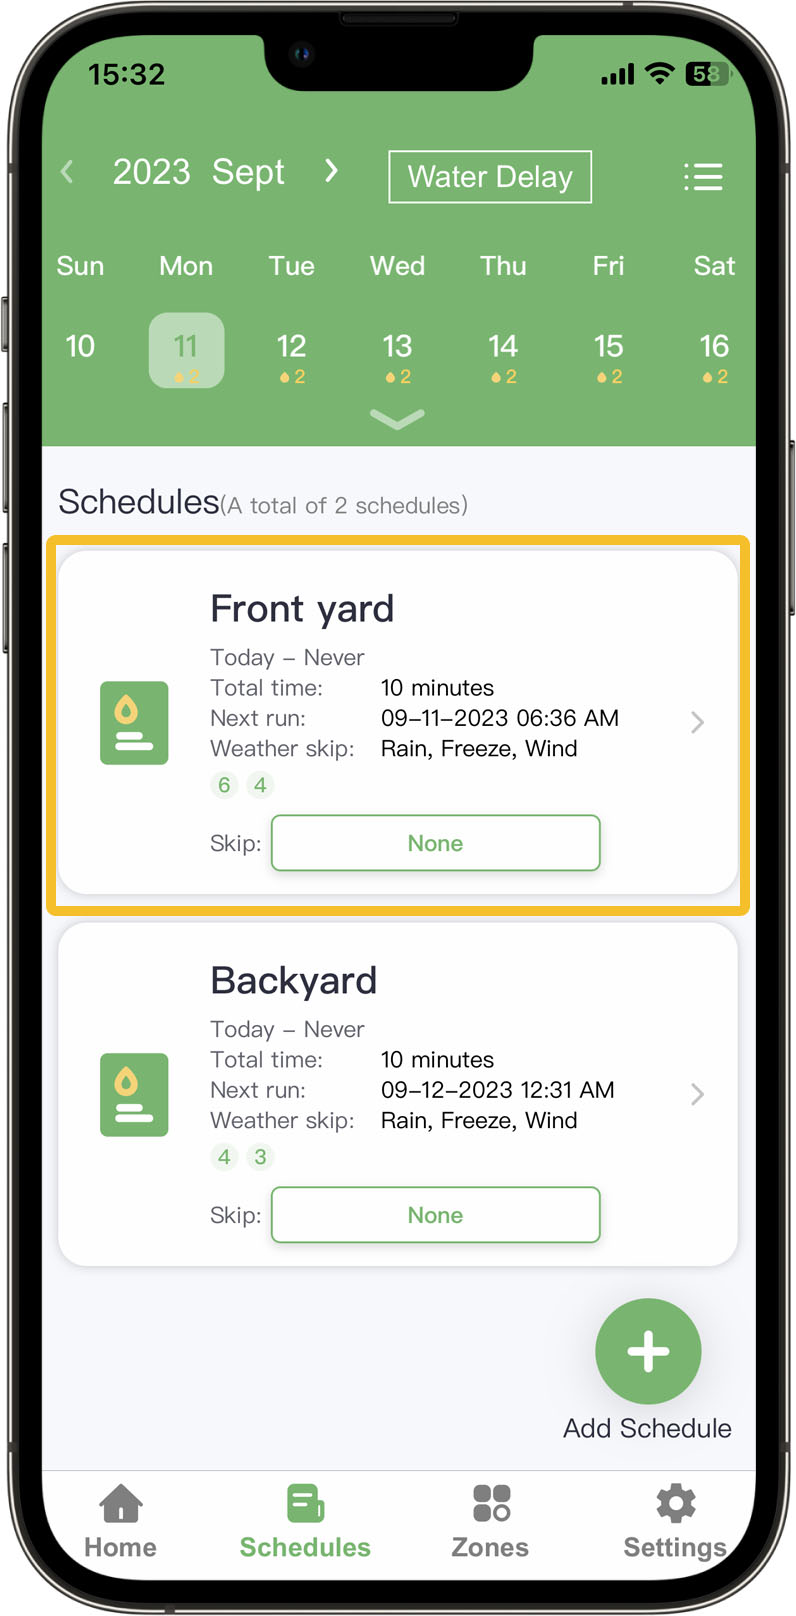
ImoLaza offers three types of watering schedules: New Grass Schedule, Fixed Schedule, and ET Smart Schedule. While the setup process is similar, this guide will walk you through how to create a Fixed Schedule step by step.
✅ Step 1: Start Creating a Schedule
Open the ImoLaza app, go to the Schedules screen, and tap Add Schedule to begin.
✅ Step 2: Choose Schedule Type
Select the schedule that suits your needs:
New Grass Schedule – Ideal for seeding or newly laid sod.
Fixed Schedule – Best for areas with strict watering restrictions.
ET Smart Schedule – Automatically adjusts watering based on weather and soil data (requires accurate zone settings).
In this guide, we’ll choose Fixed Schedule.
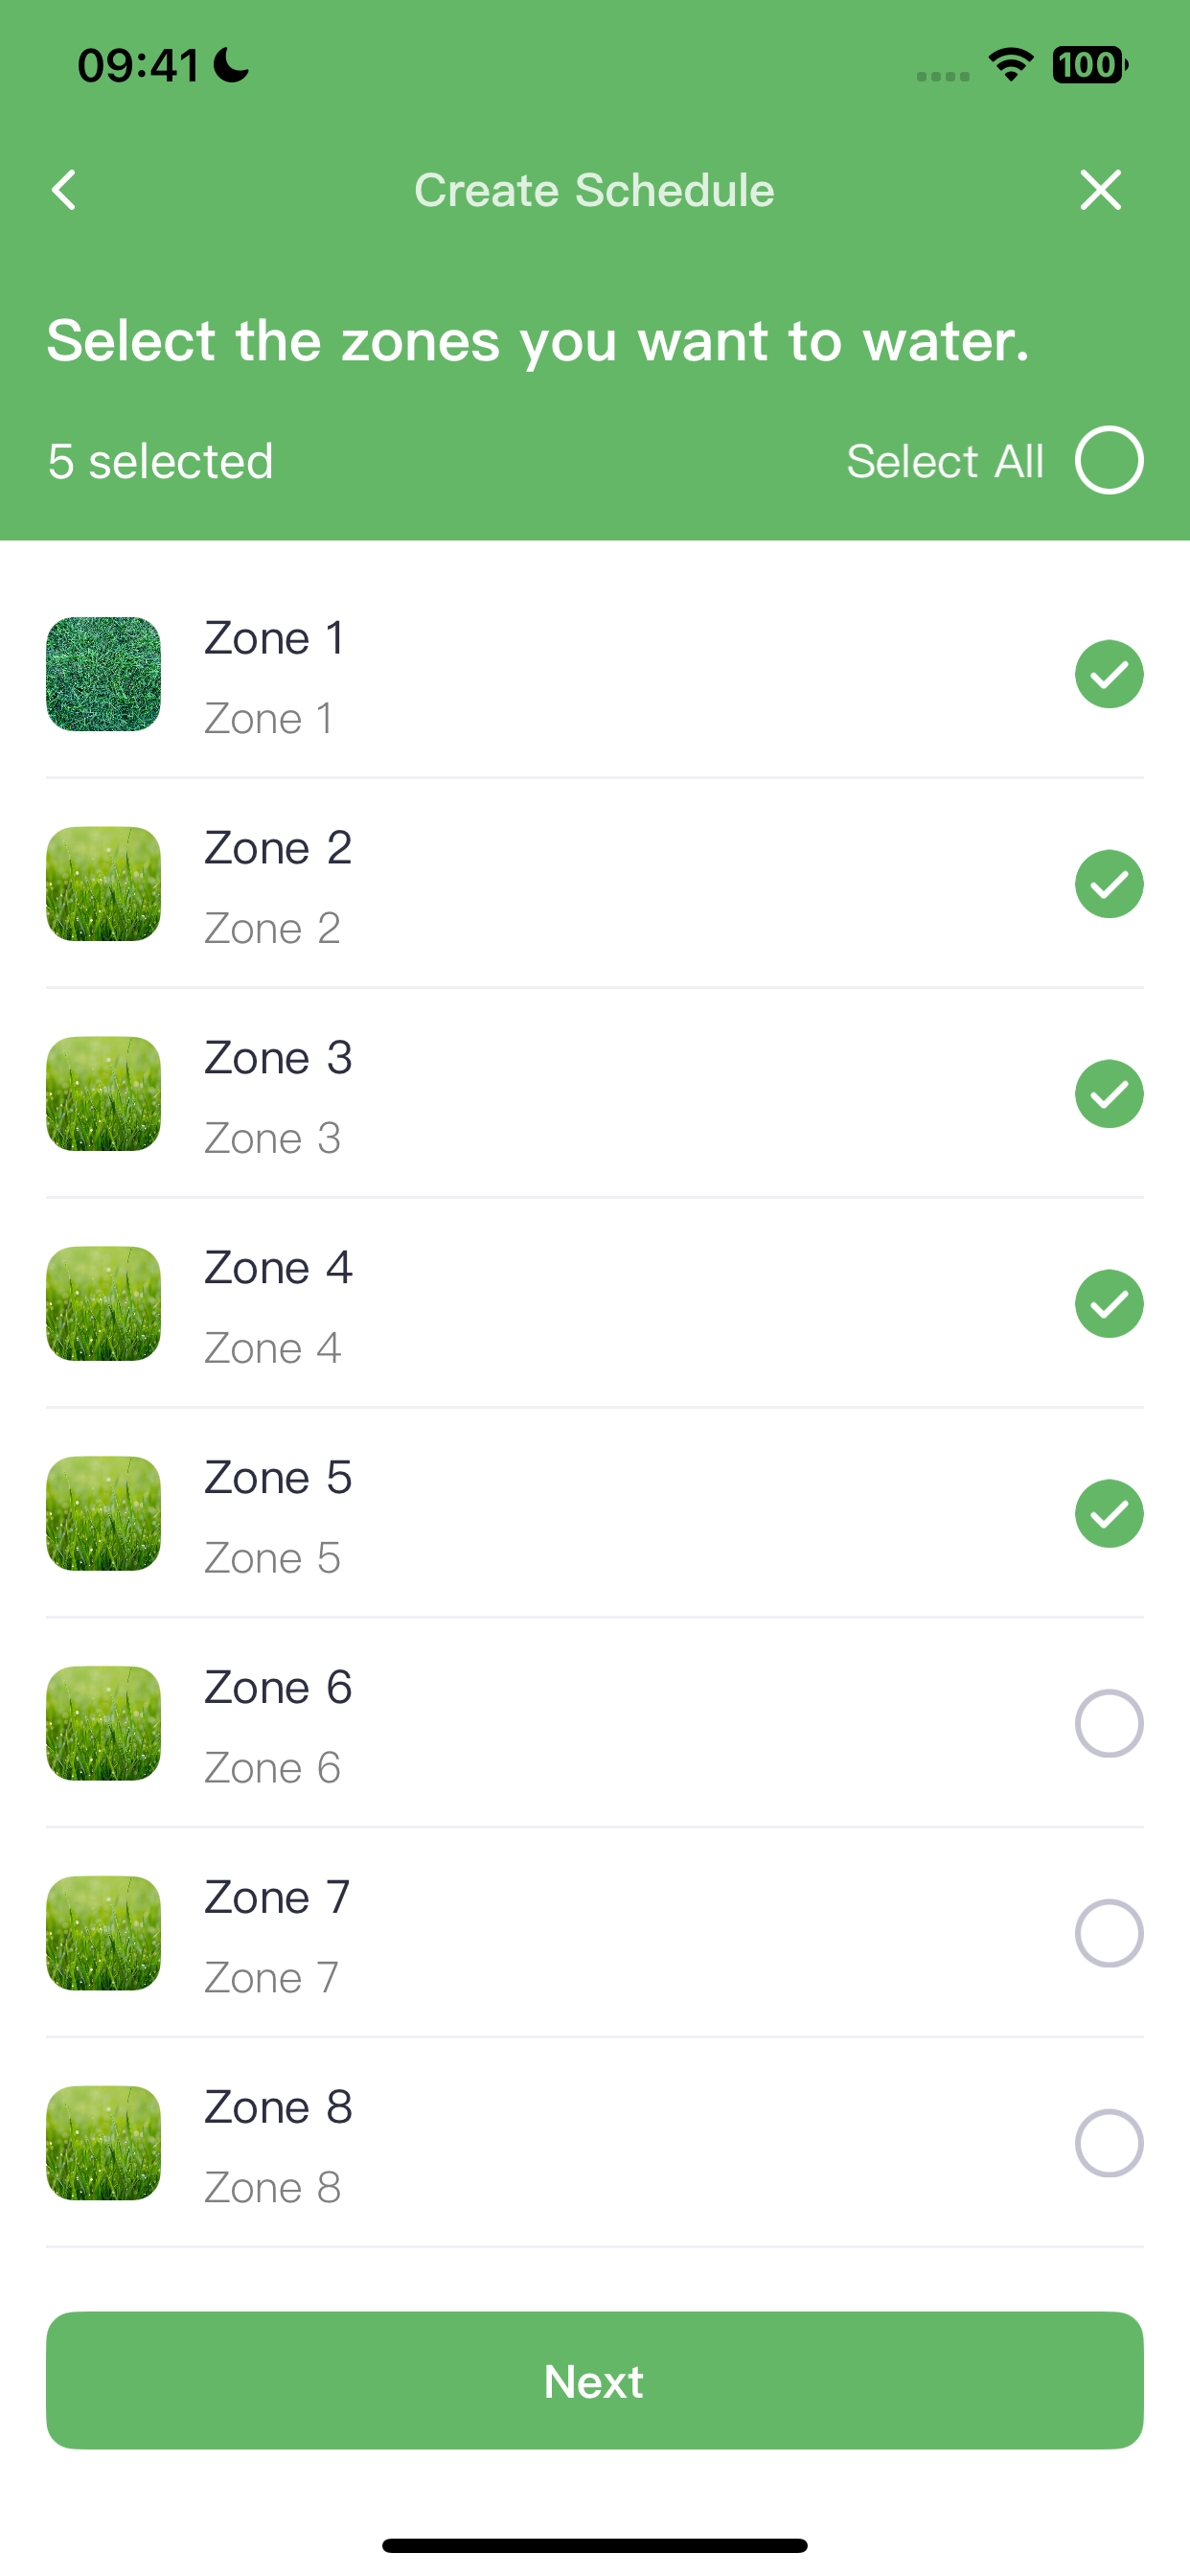
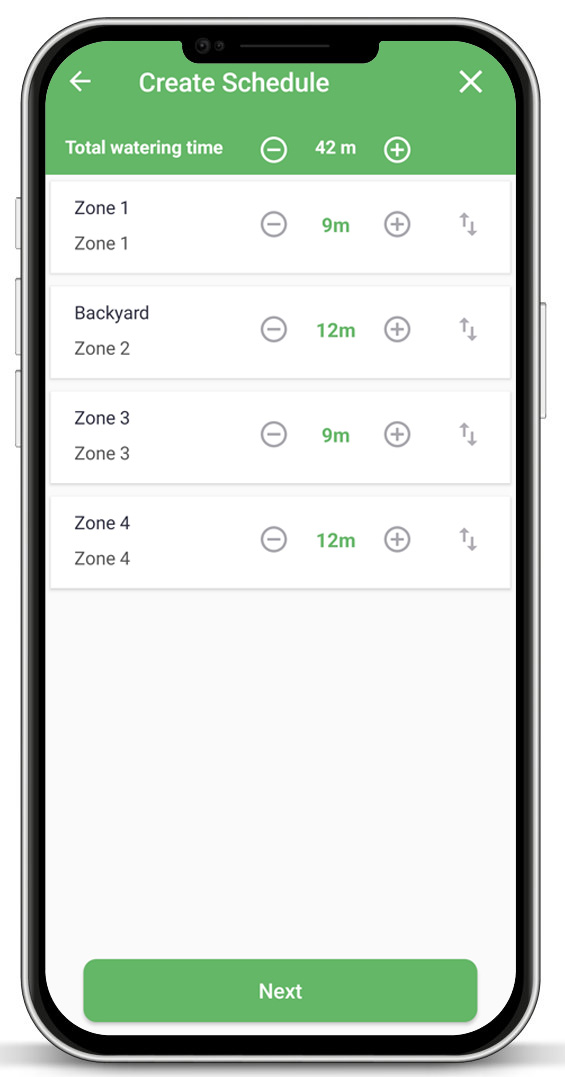
✅ Step 3: Select Zones
A schedule can include one or more zones.
Tip: Group zones with similar plant types or nearby locations together for better efficiency.
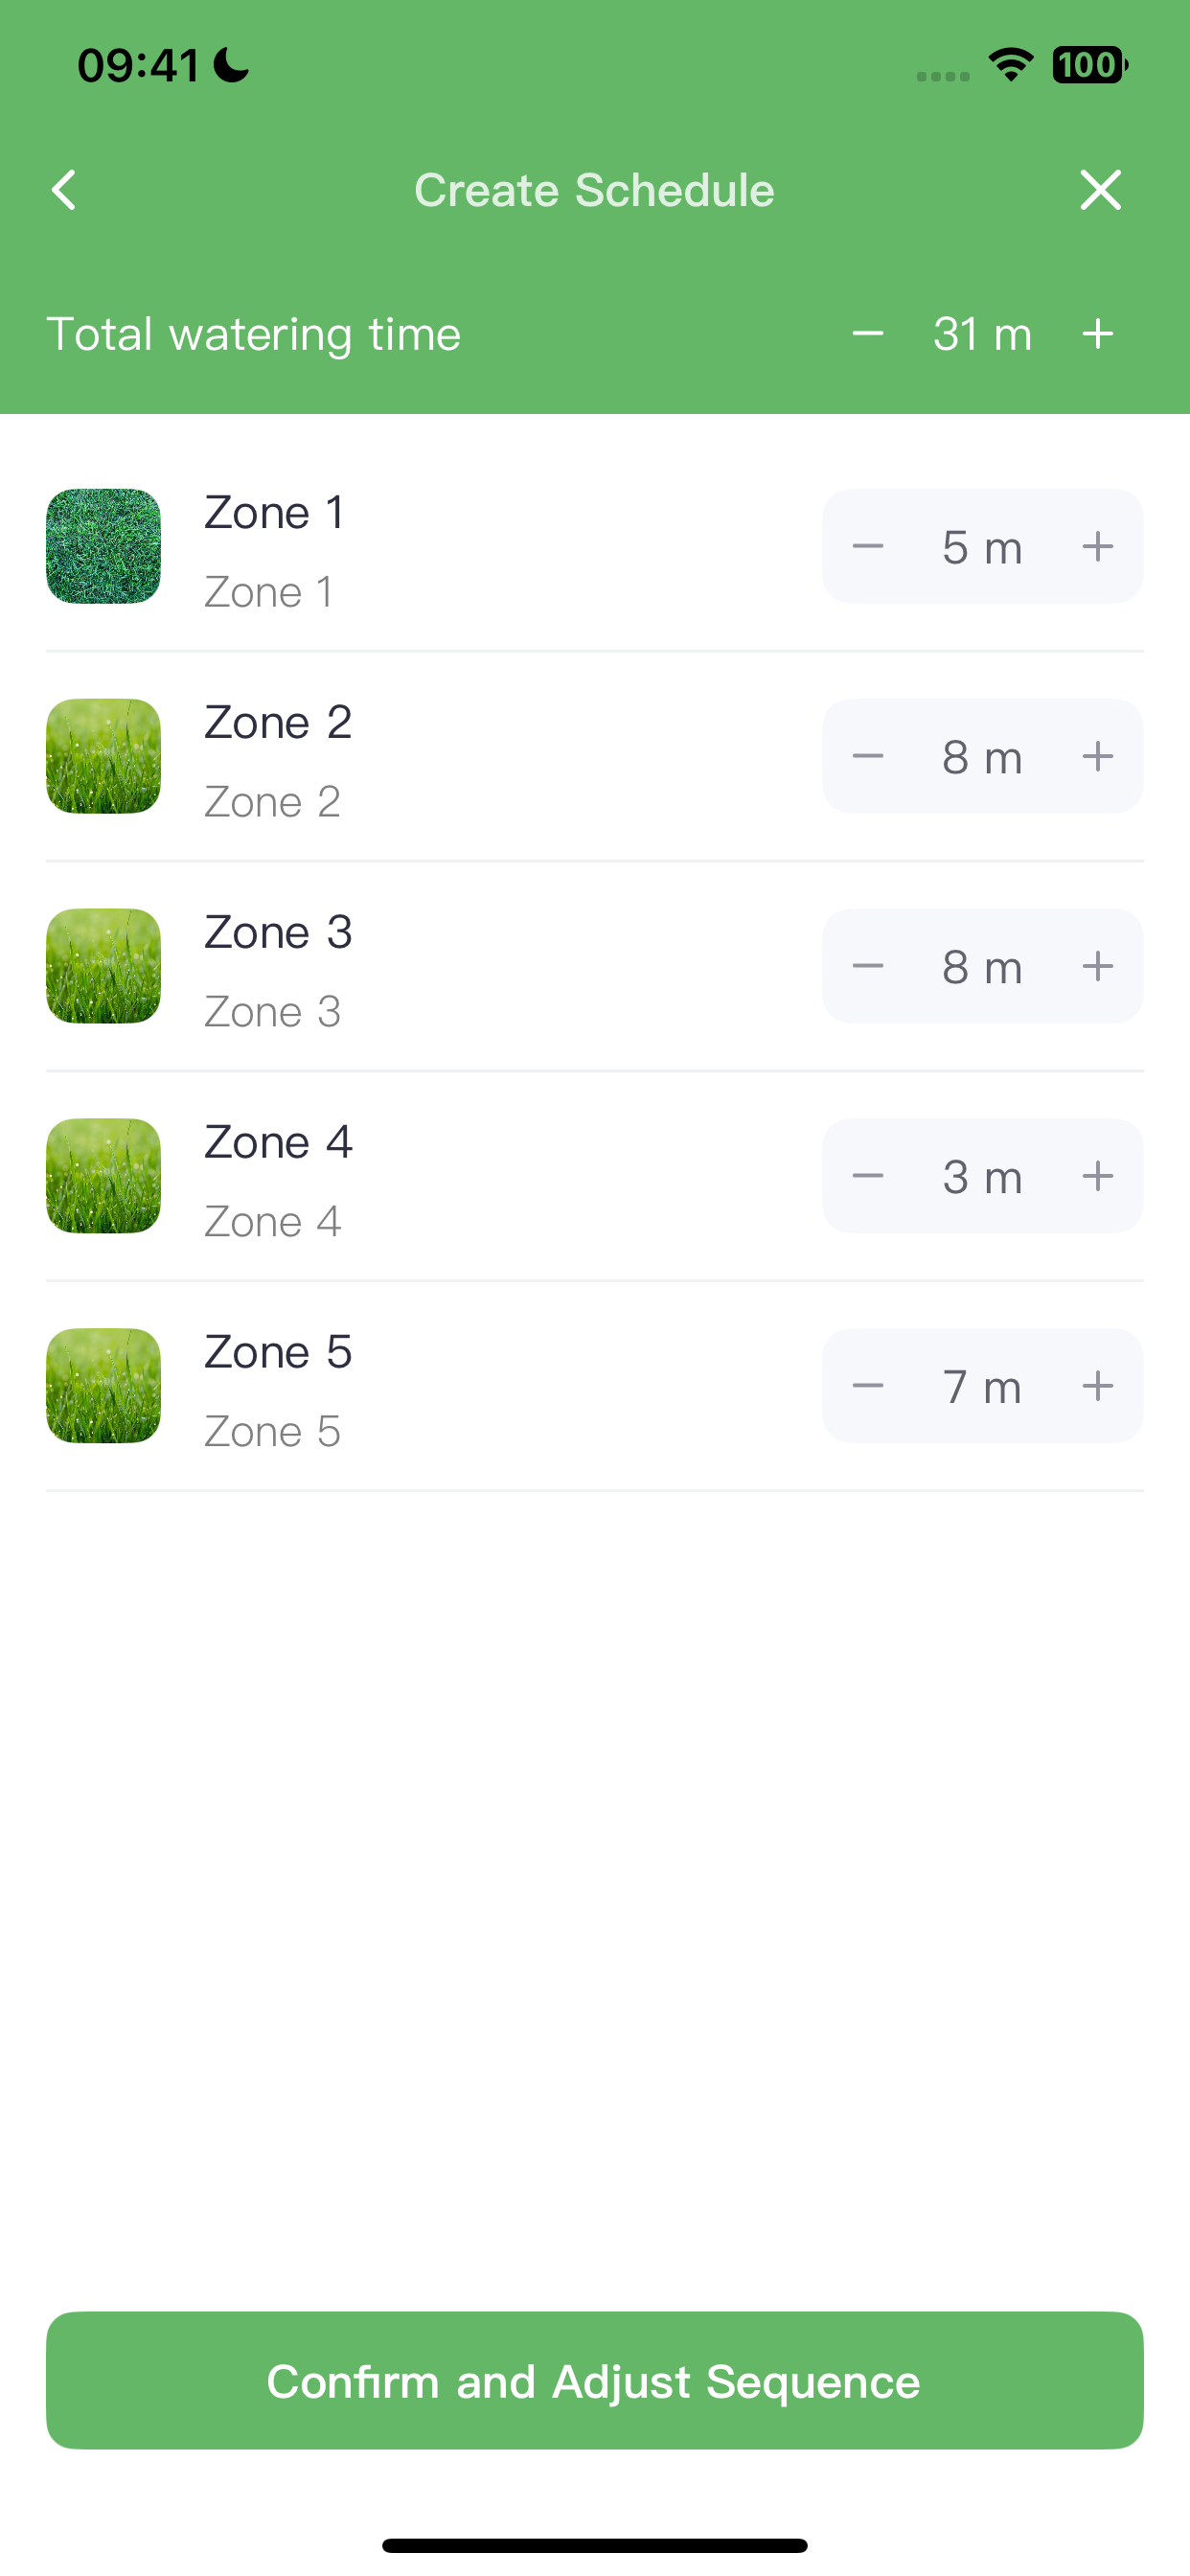
✅ Step 4: Set Watering Duration
For Fixed and New Grass schedules, you’ll manually set how long each zone runs (in minutes).
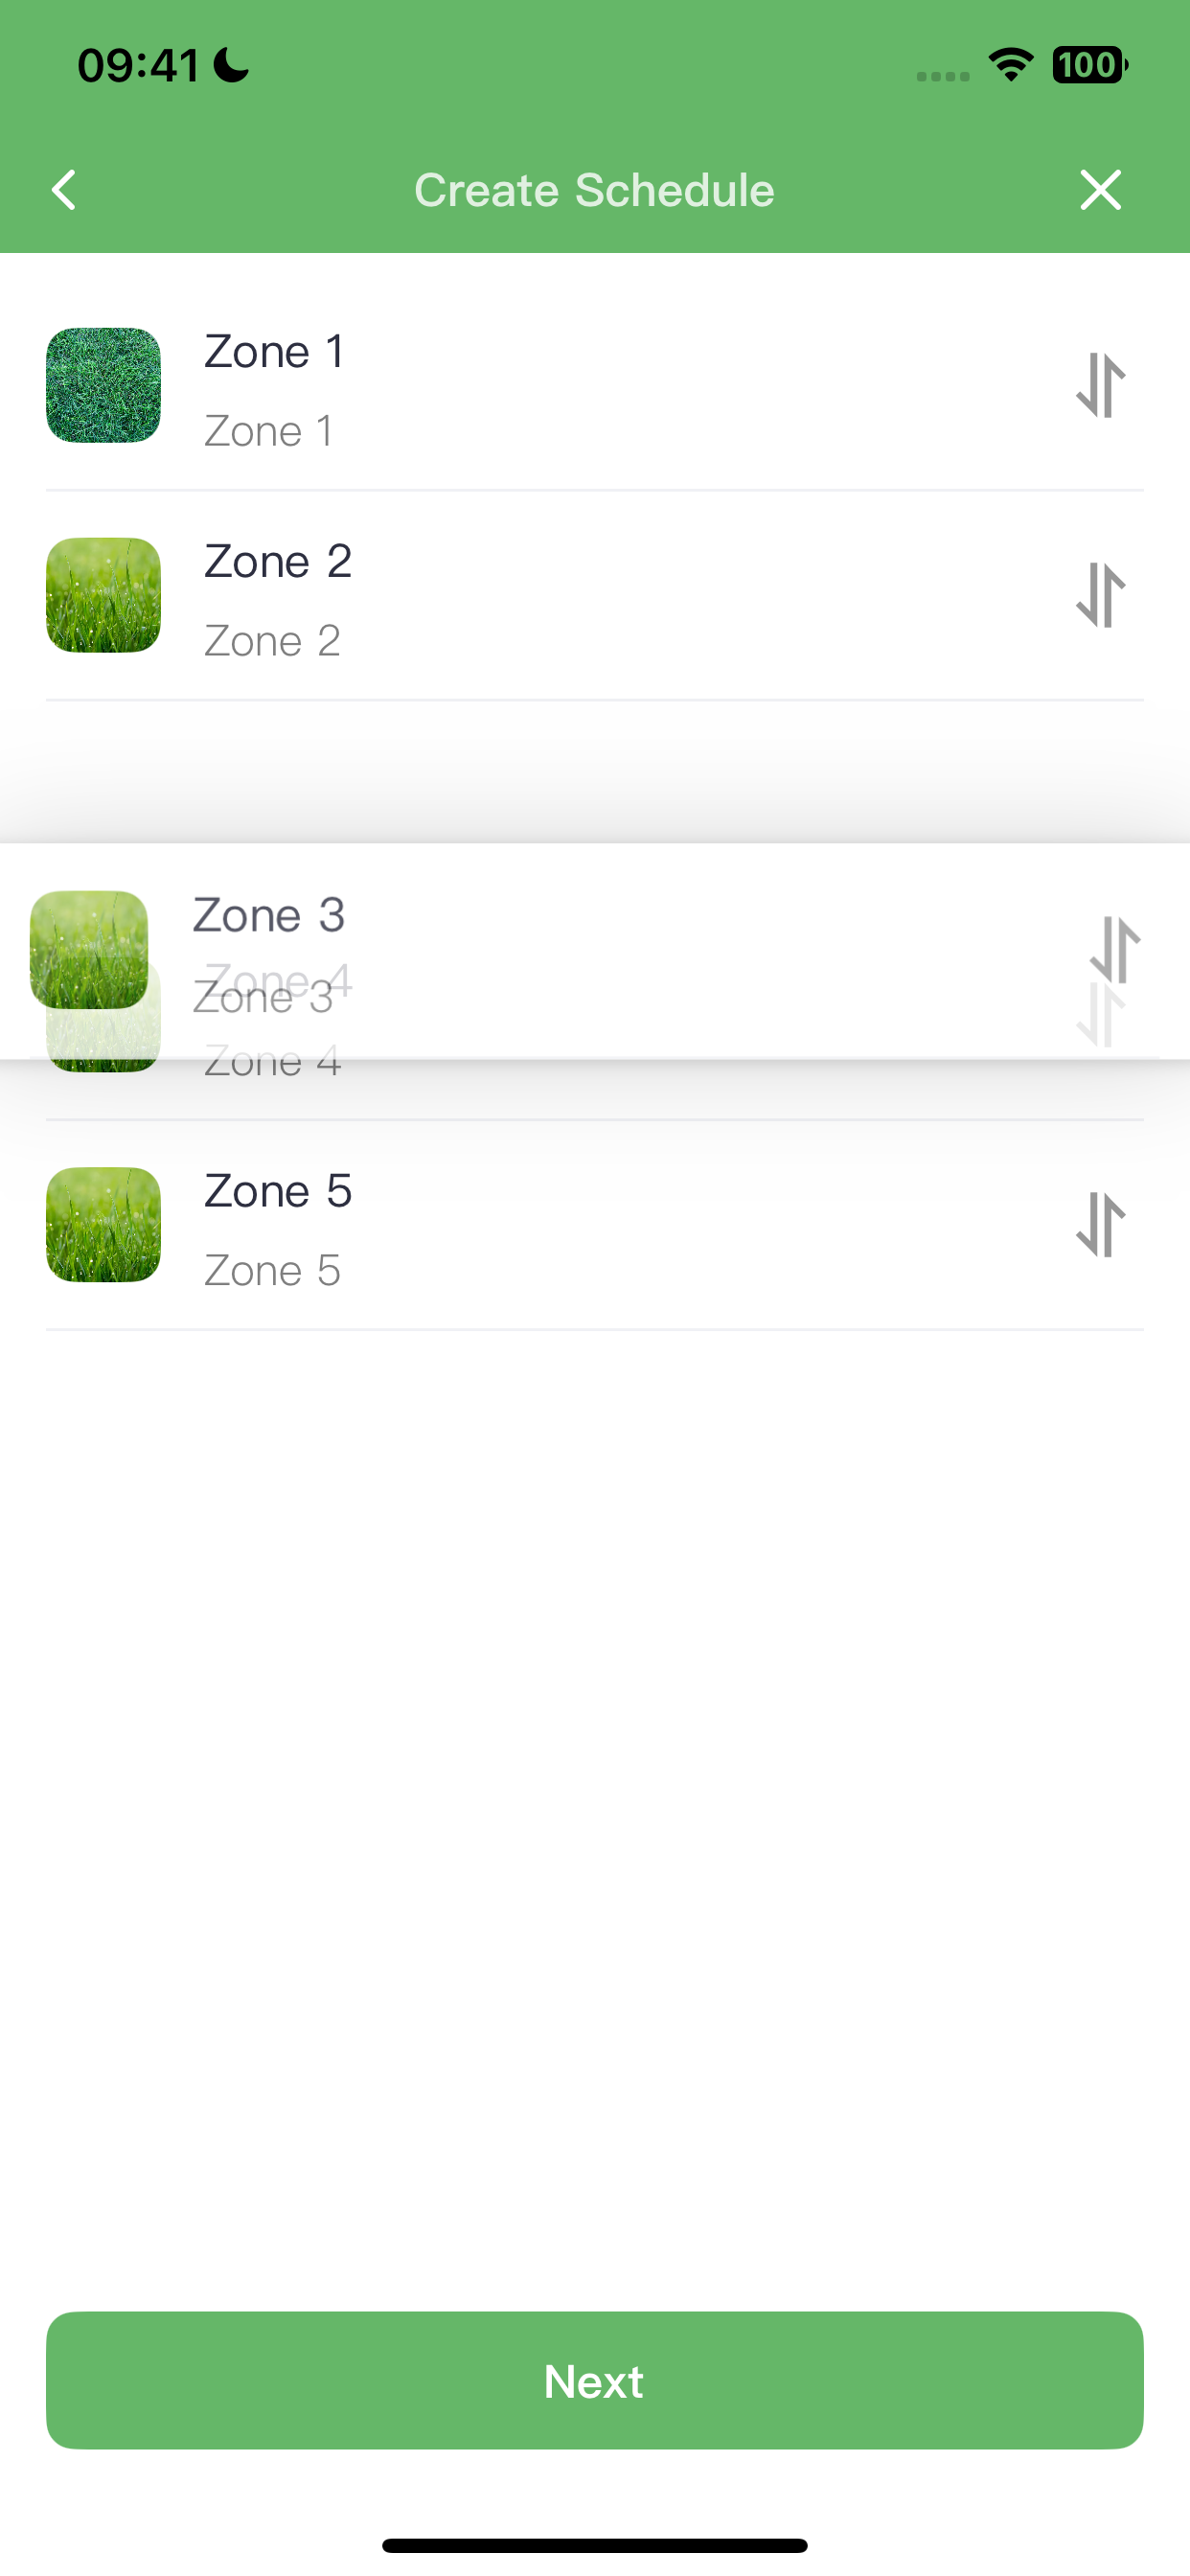
✅ Step 5: Running Sequence
Drag the arrows to adjust the order in which the regions run.
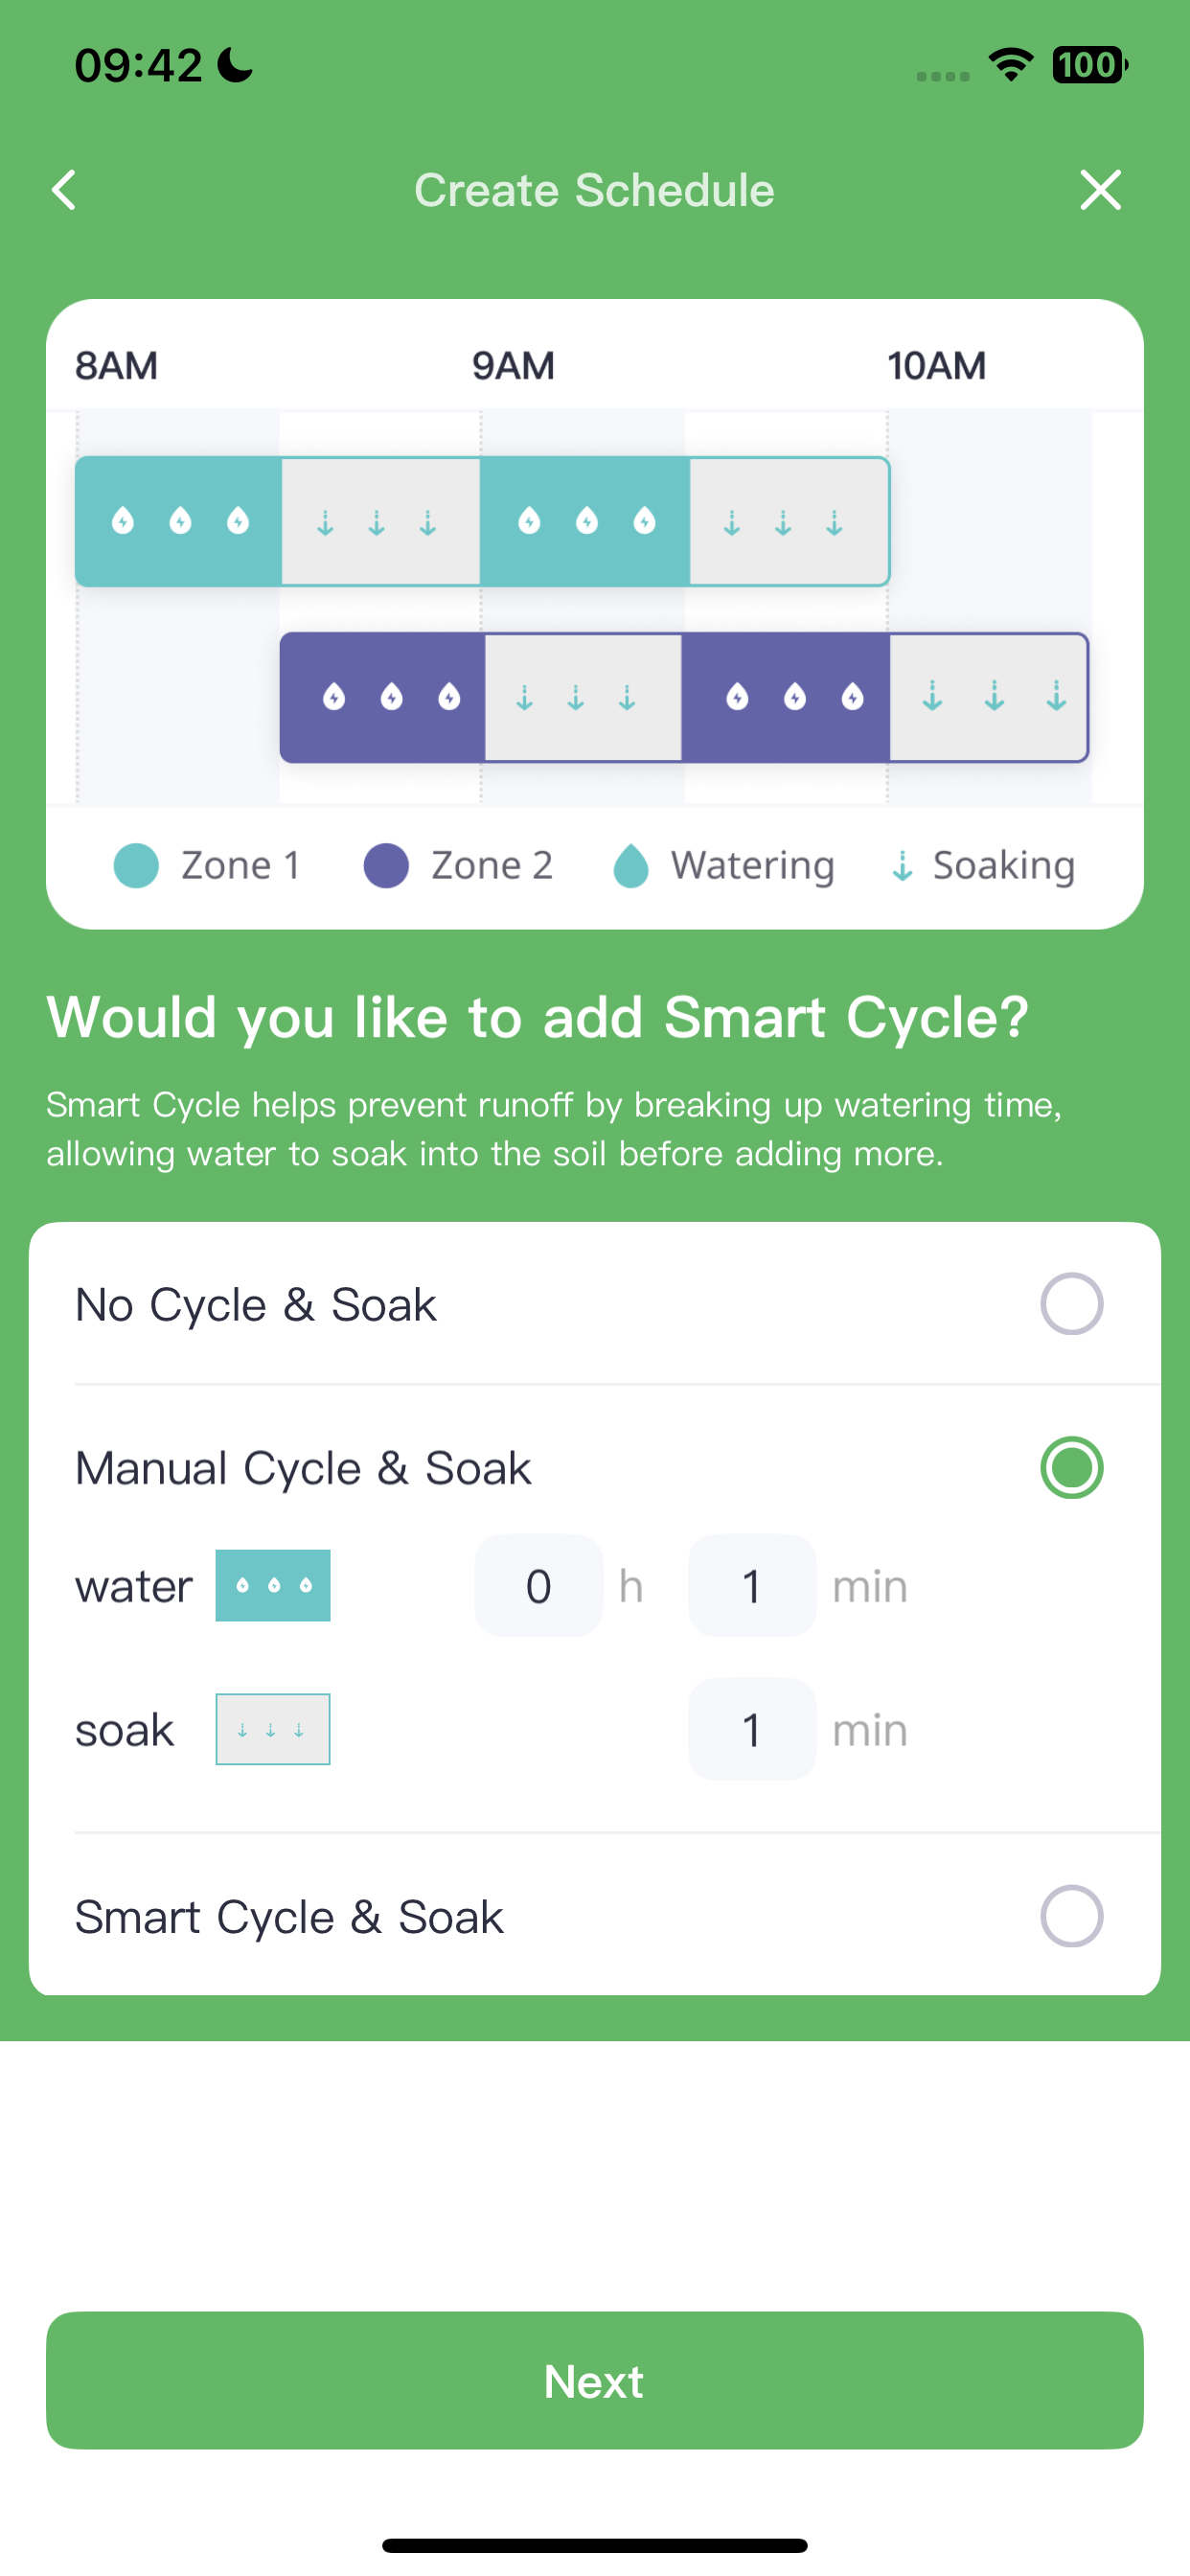
✅ Step 6: Enable Smart Cycle (Optional)
Smart Cycle breaks long run times into shorter cycles, allowing the soil to absorb water and preventing runoff.
You can:
Set cycle and soak times manually
Let the controller choose automatically
If a pump is connected, you’ll also see a Delay Between Zones option, allowing time for the water tank to refill.
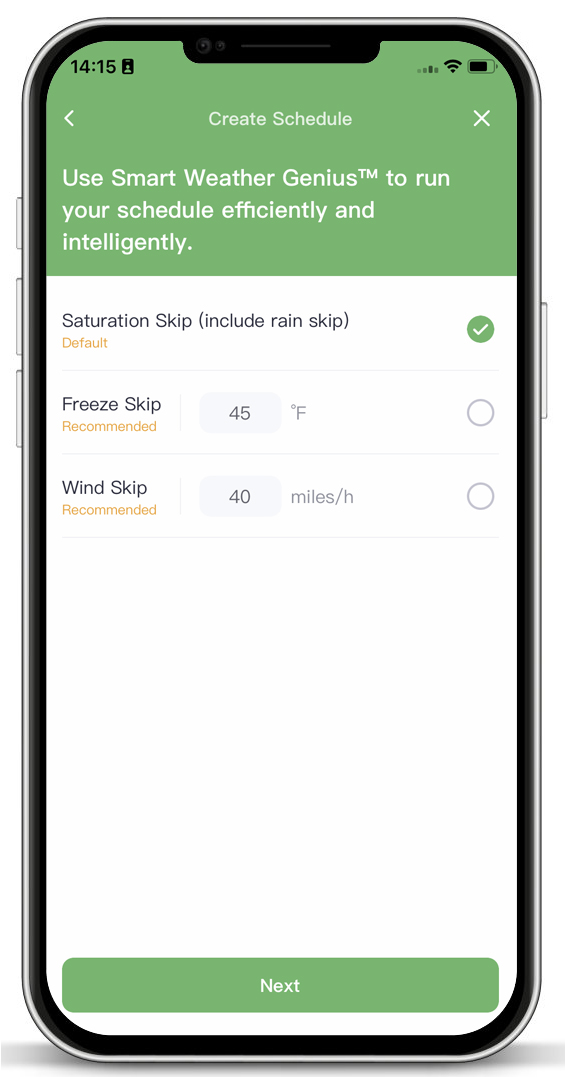
✅ Step 7: Enable Smart Weather Genius
Use these three features to skip watering based on real-time weather data:
Rain Skip
Freeze Skip
Wind Skip
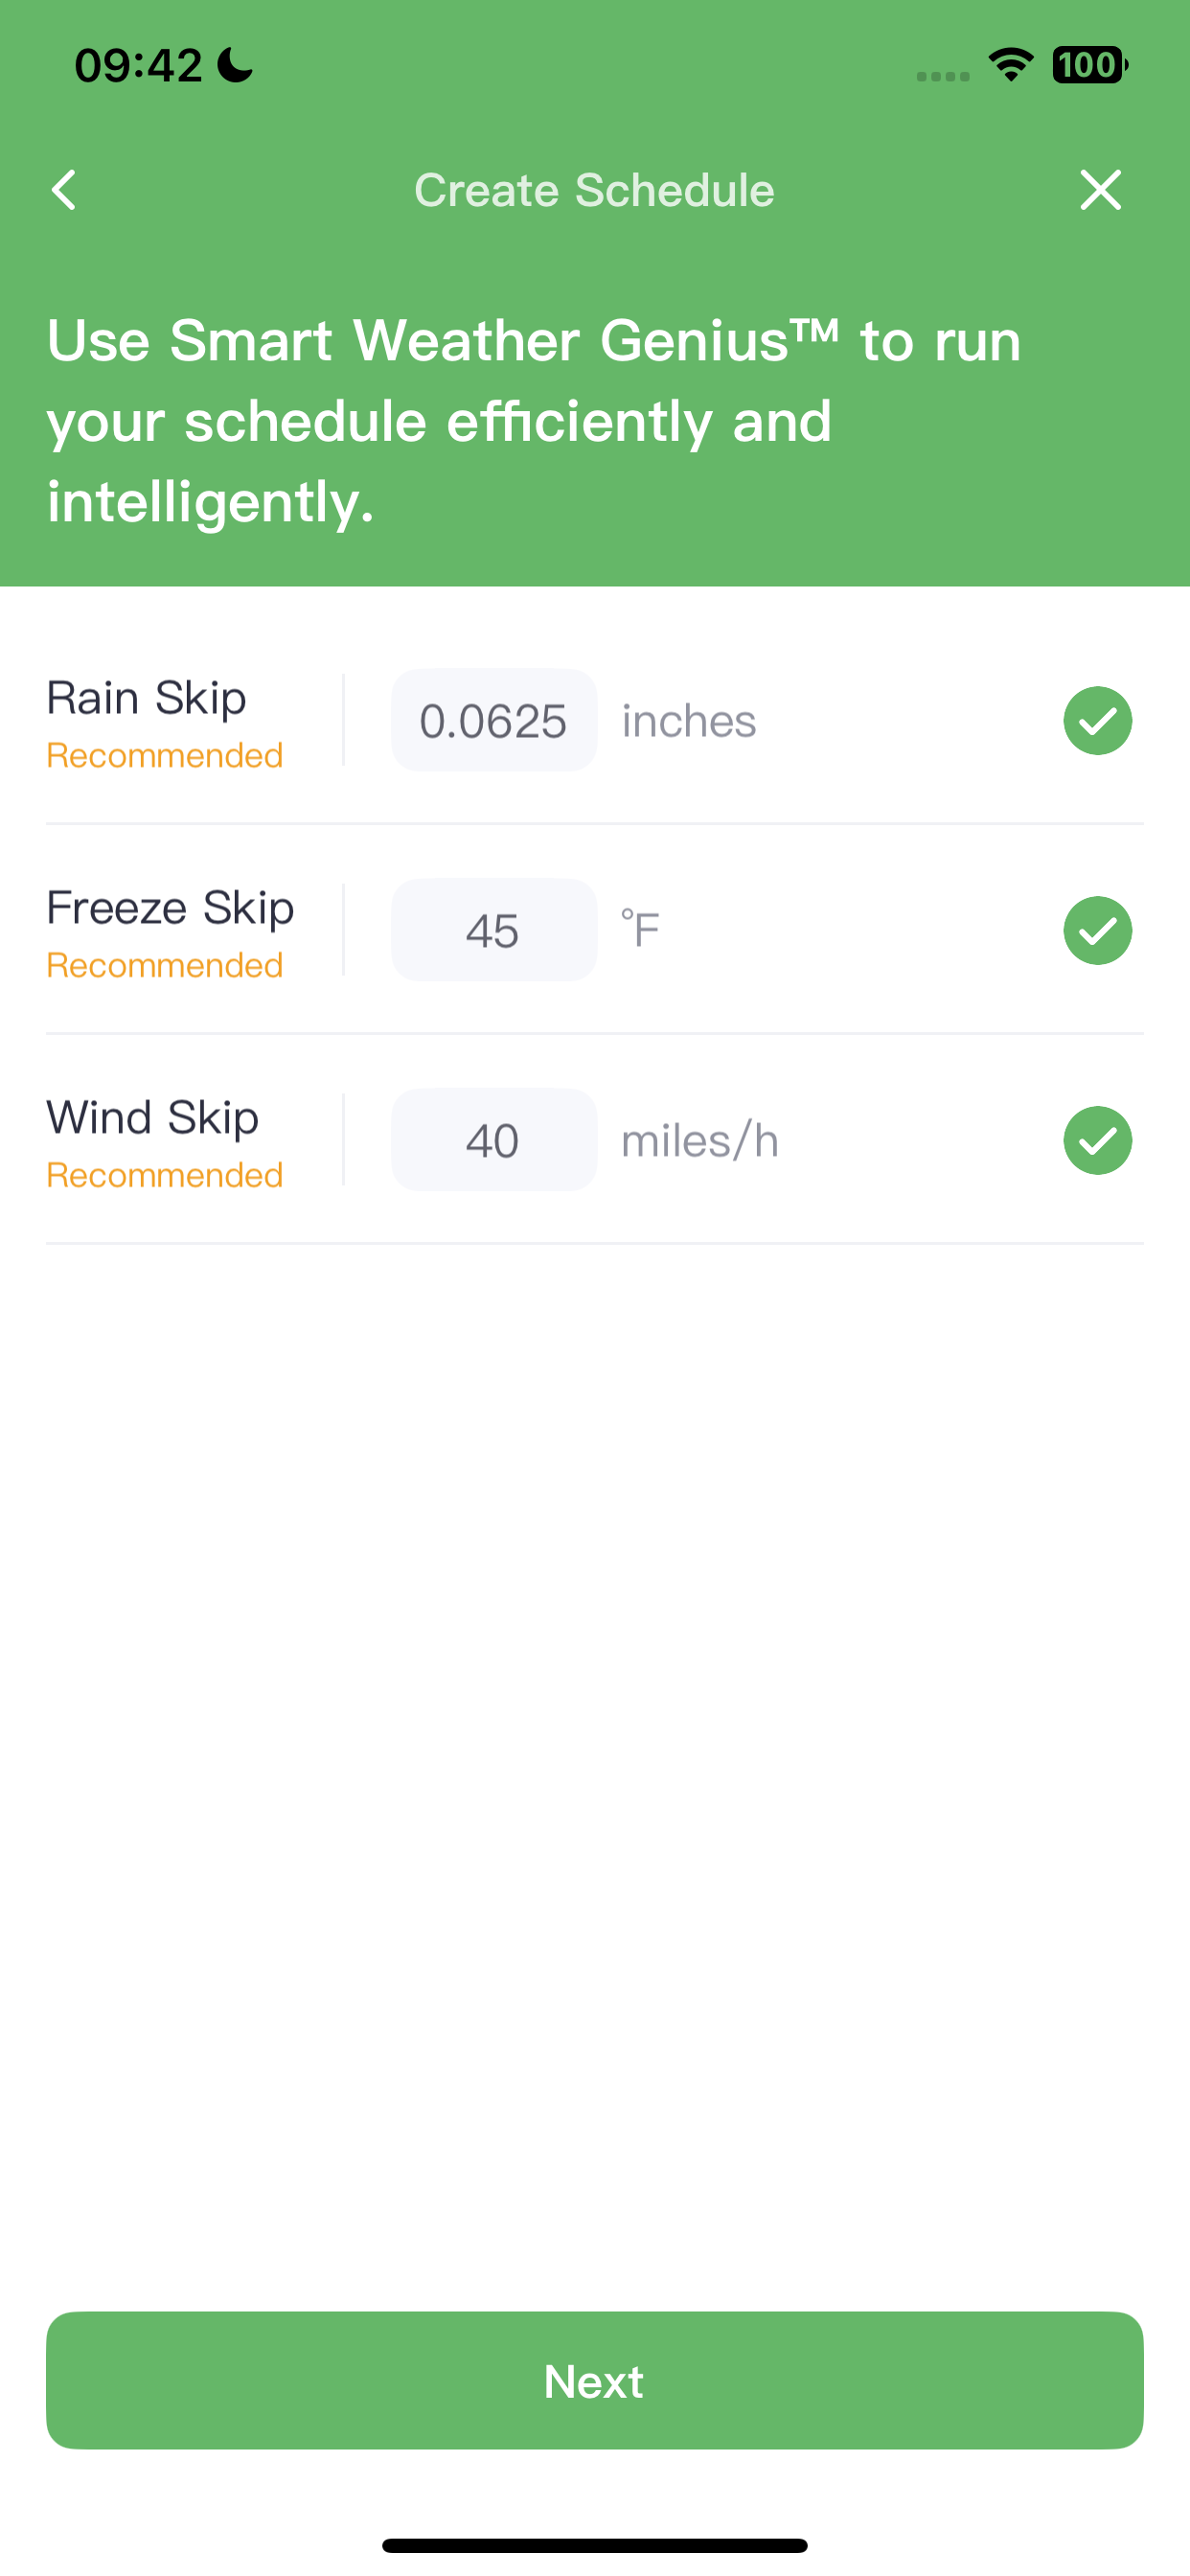
These save water and protect your landscape.
For ET Smart Schedules, Saturation Skip replaces Rain Skip, using soil moisture data to delay watering. Click the respective FAQs in the app for details.
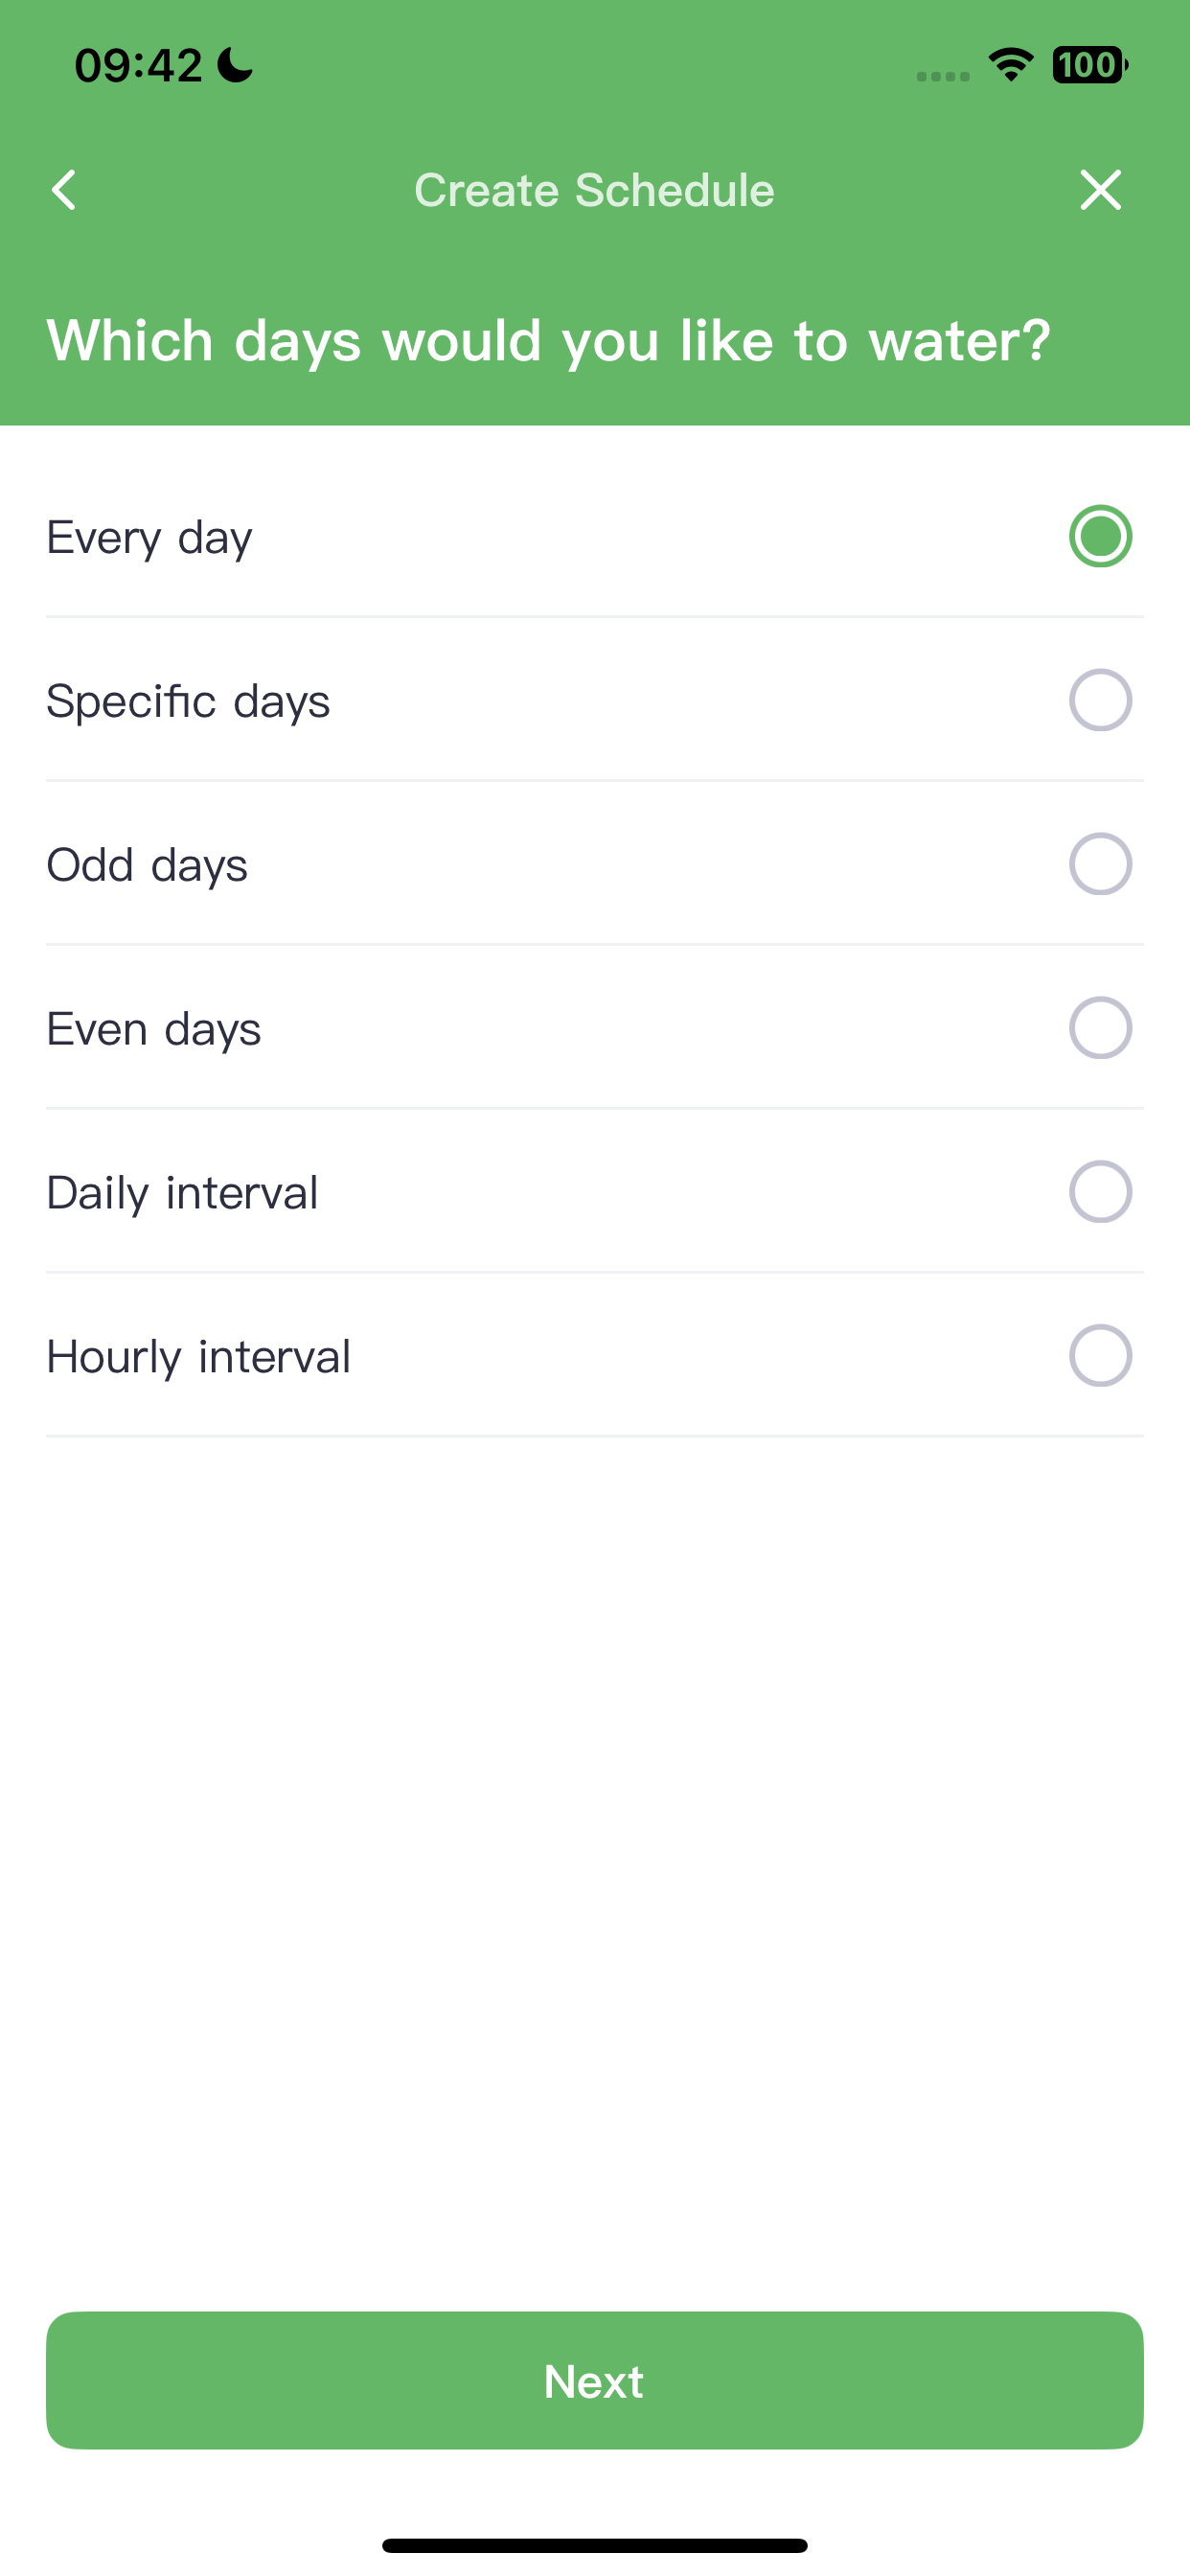
✅ Step 8: Choose Watering Days
Fixed Schedules offer 6 flexible options for selecting watering days, ideal for meeting local restrictions.
New Grass Schedule: 5 intervals
ET Smart Schedule: Ensures a minimum of 4 watering days per week
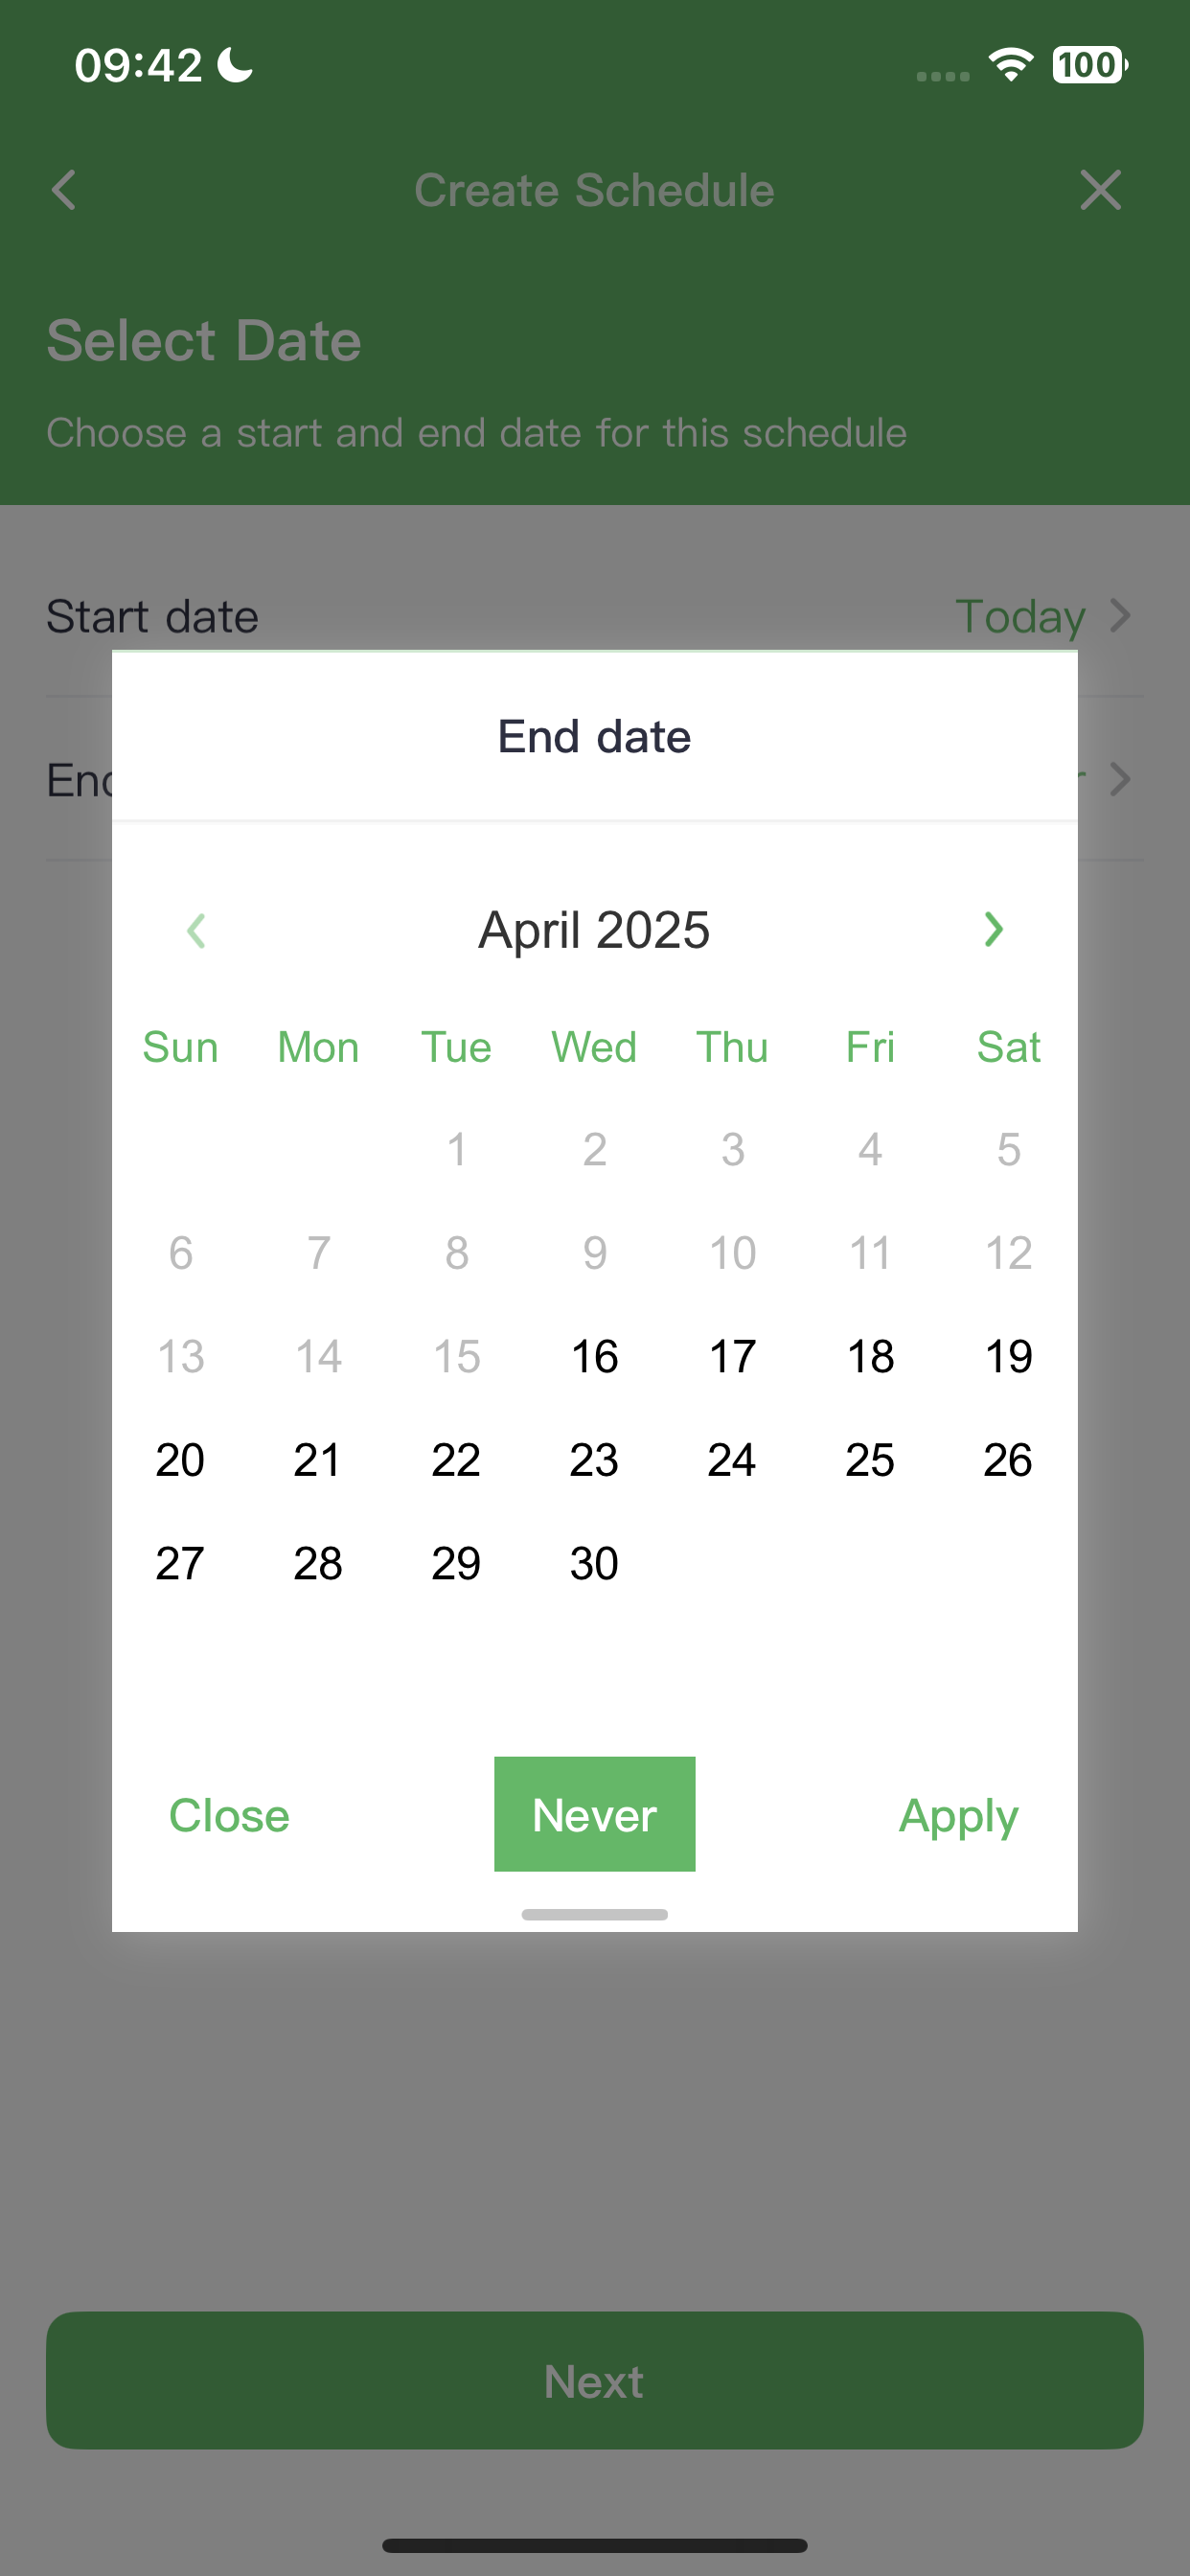
✅ Step 9: Set Start and End Dates
Define the schedule’s active period.
By default, the end date is set to “Never”, meaning the schedule runs indefinitely unless you stop it manually.
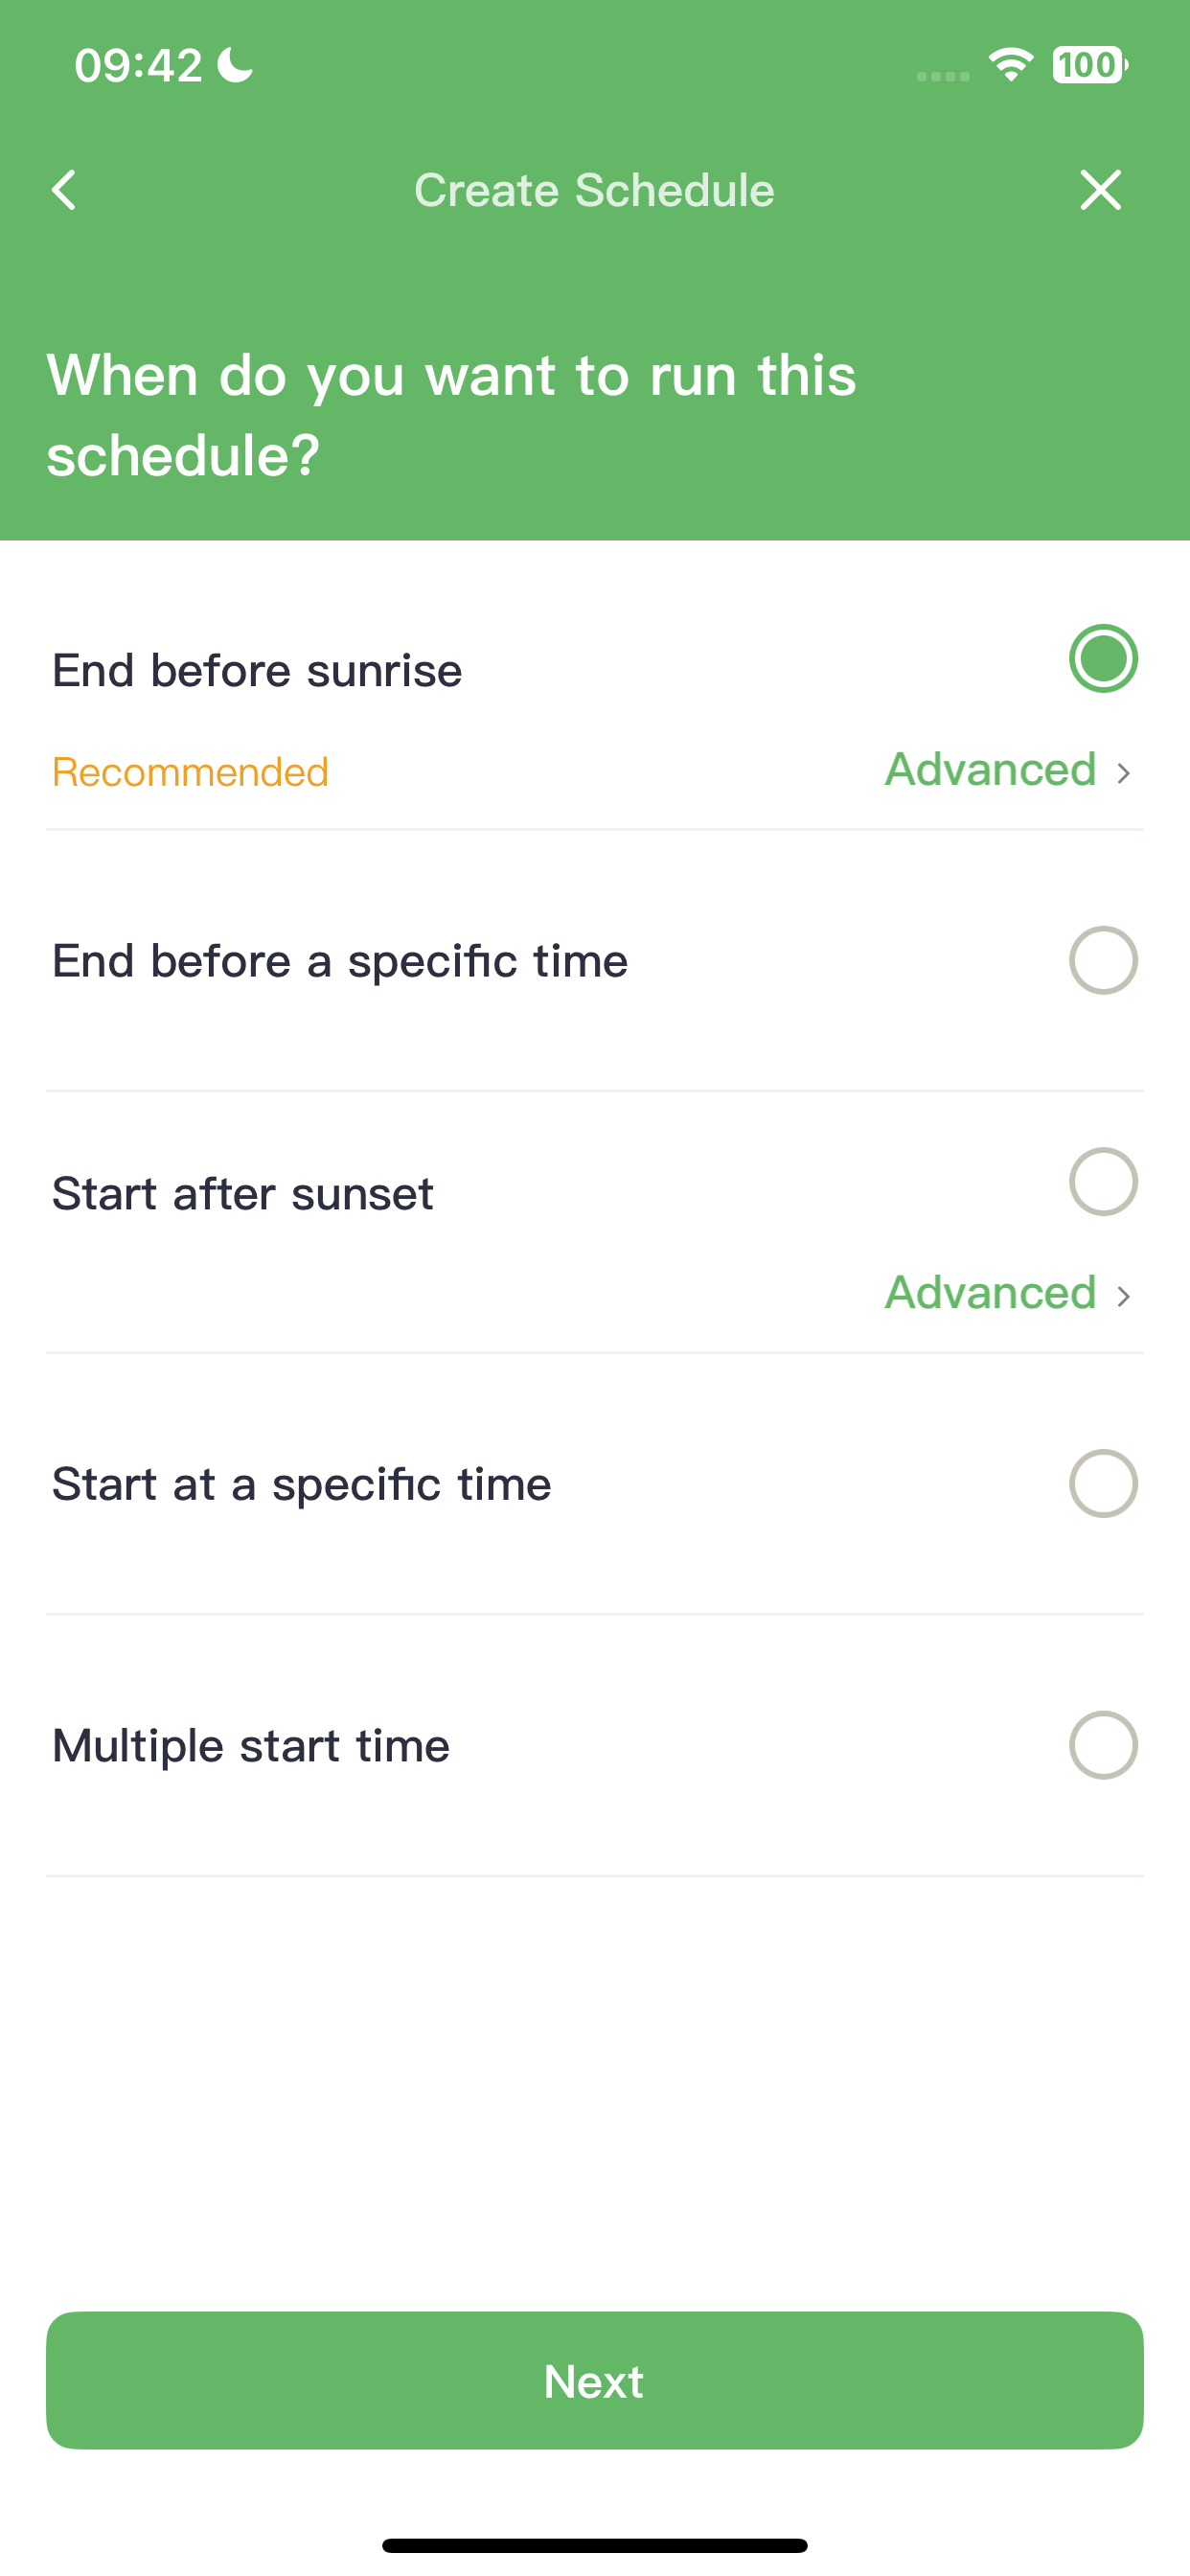
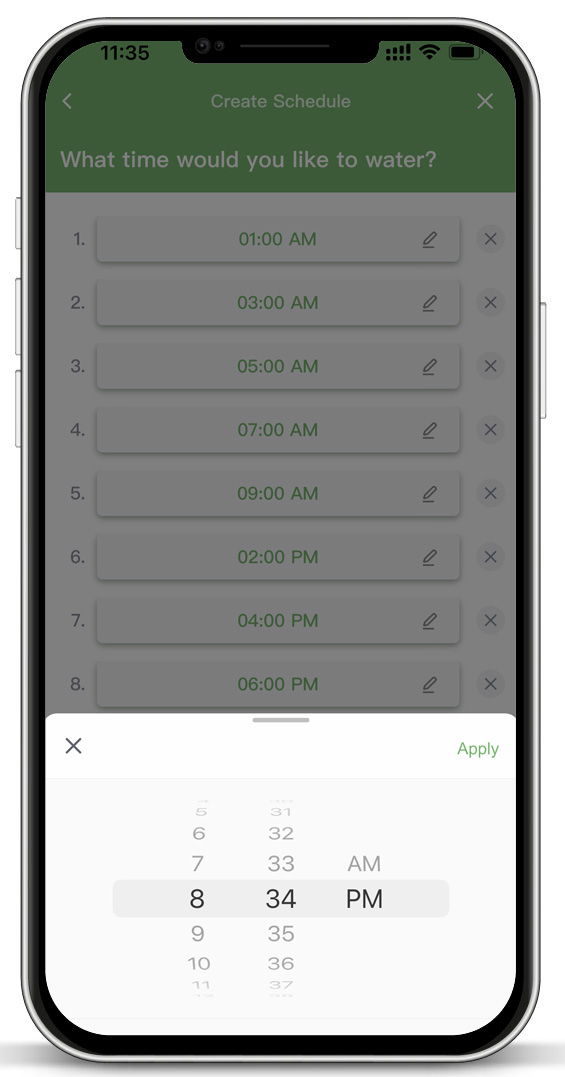
✅ Step 10: Choose Run Time
Decide when the schedule starts and ends each day.
ImoLaza provides five flexible timing options, so you can tailor the watering time to your daily routine or restrictions.
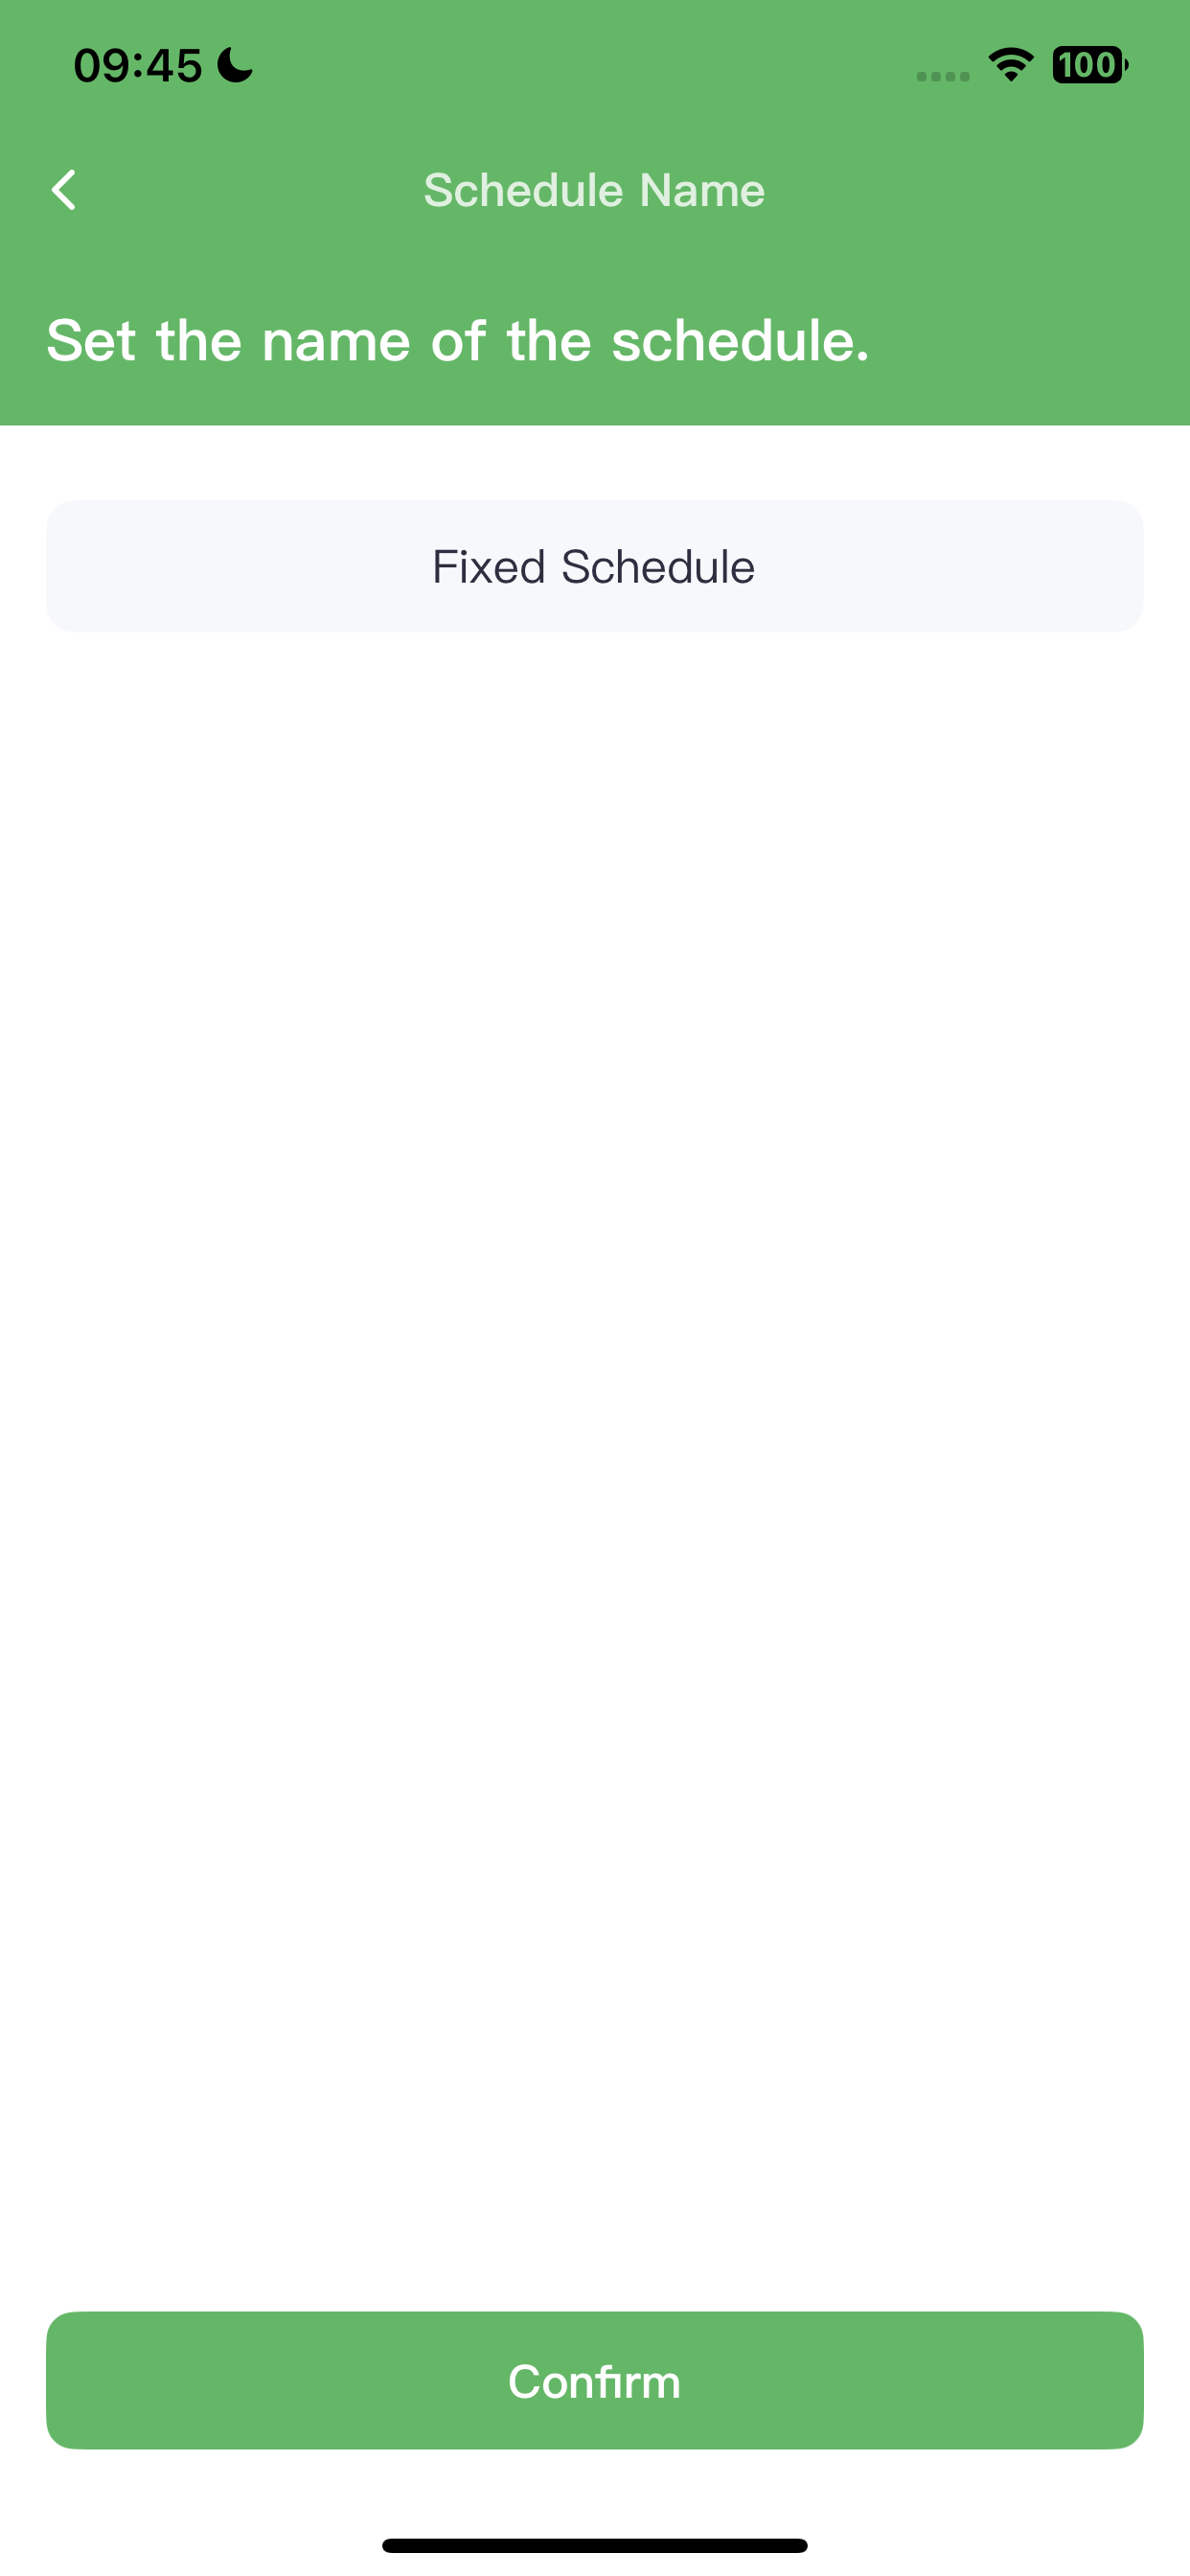
✅ Step 11: Name Your Schedule
Give your schedule a clear and memorable name.
Example: “Backyard - Odd Days - Sunrise - 20min”
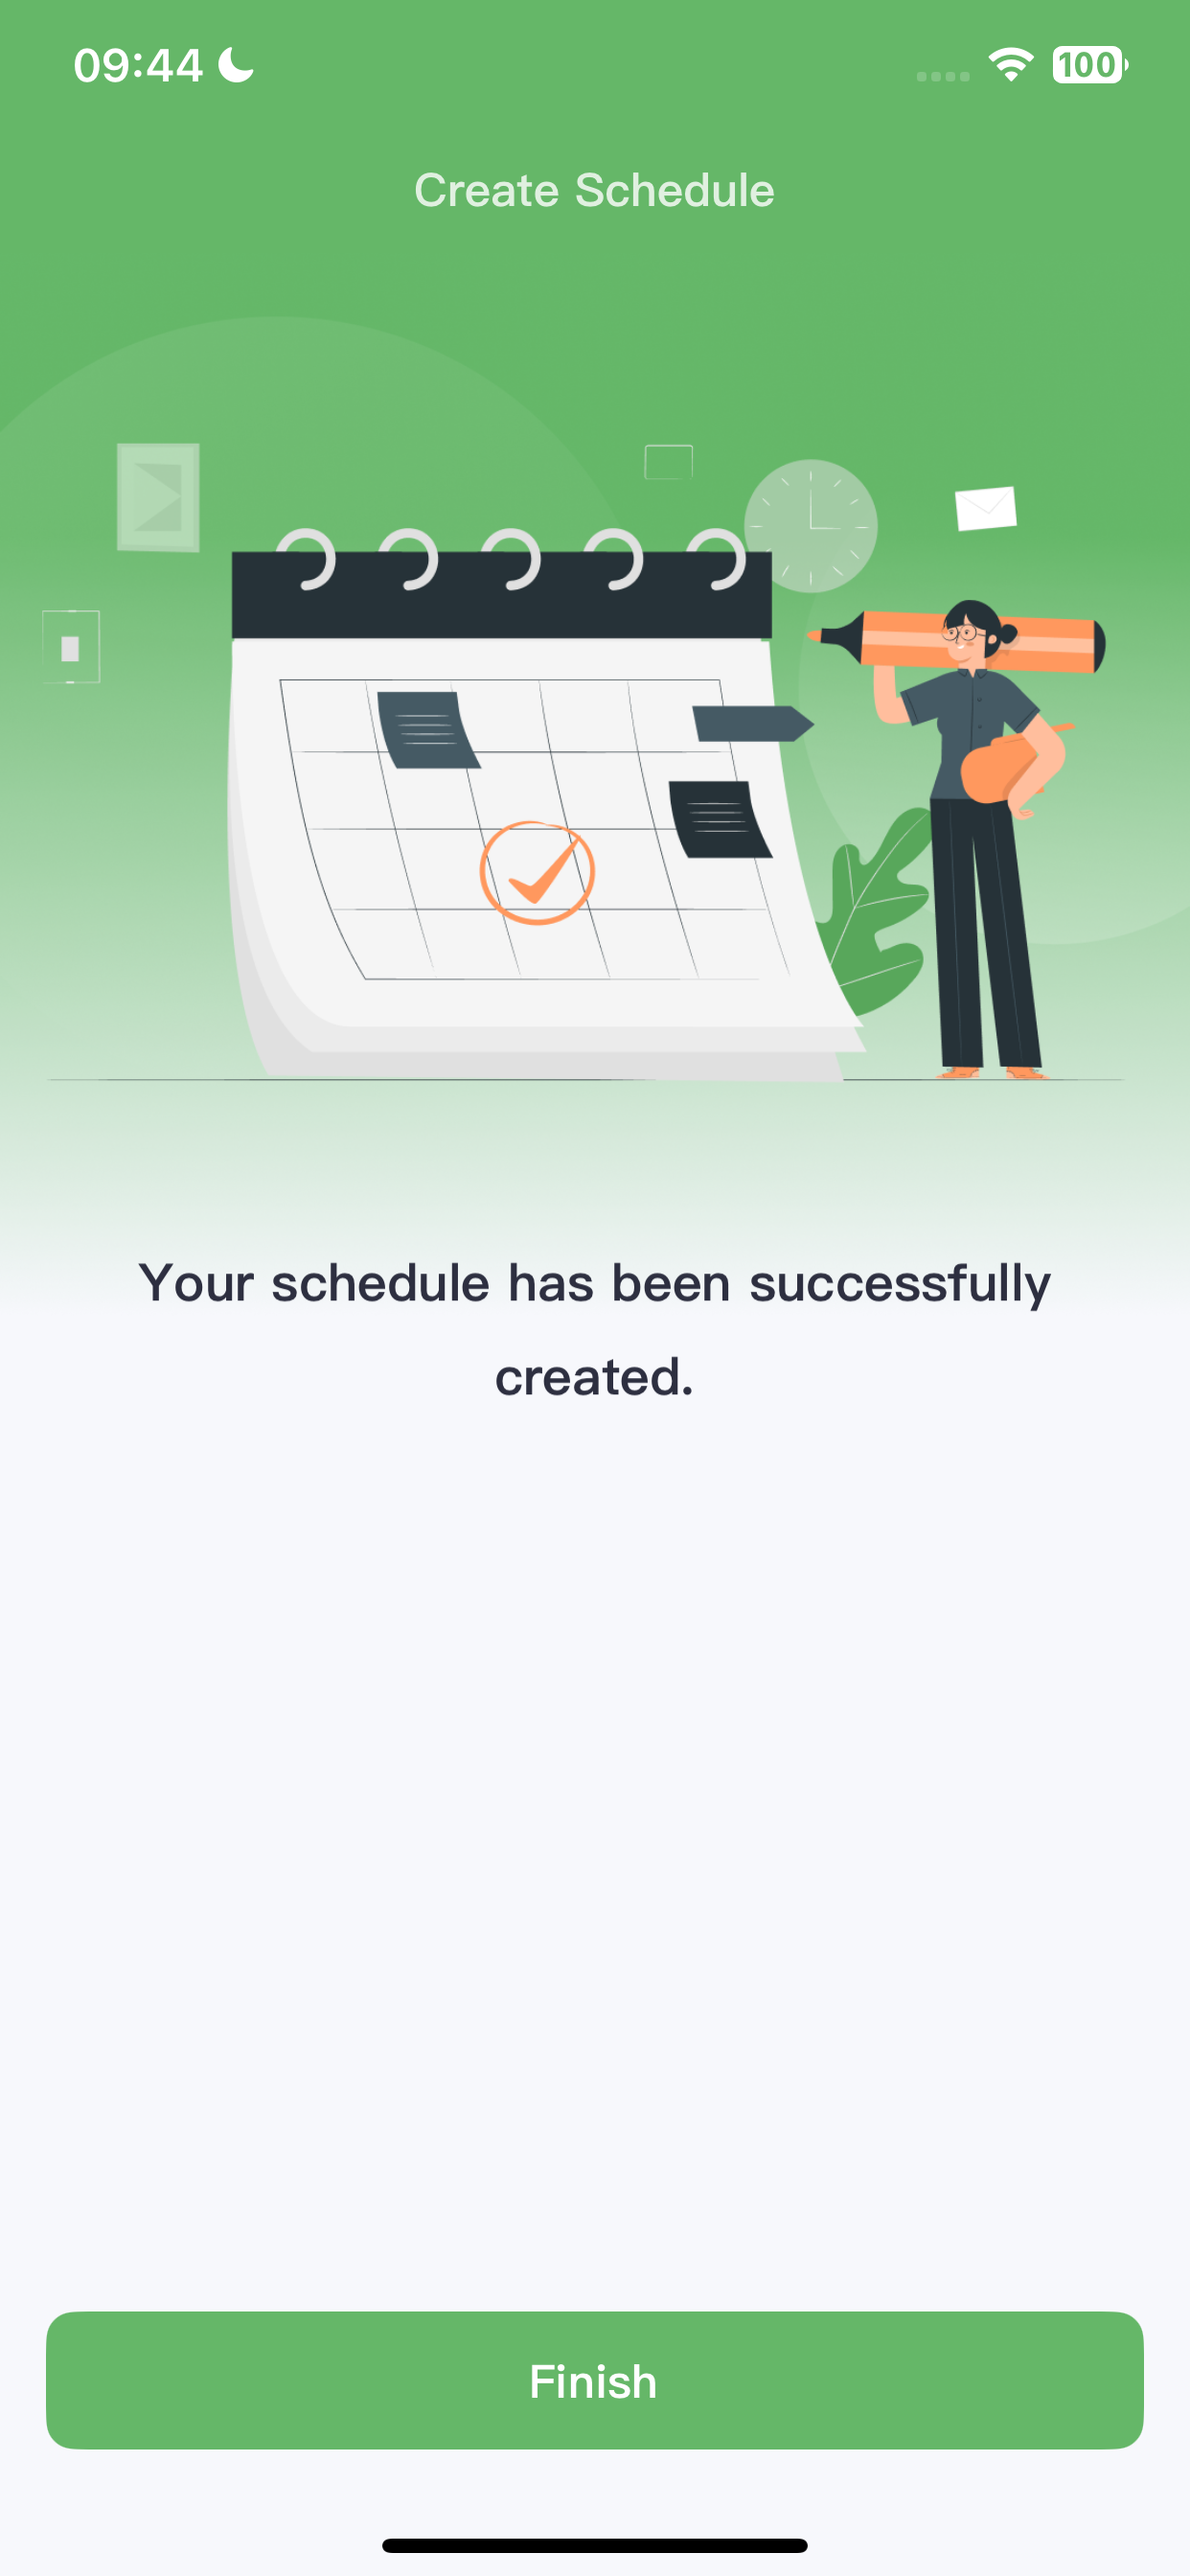
✅ Step 12: Job Finished
Still need help?
In case the above method doesn’t work for you, please contact our technical support team directly using the contact information below. We will respond to you by email within 12h after your message reaches us.
Email: Support@imolaza.com
Author: admin
Last update: 2025-04-17 05:56
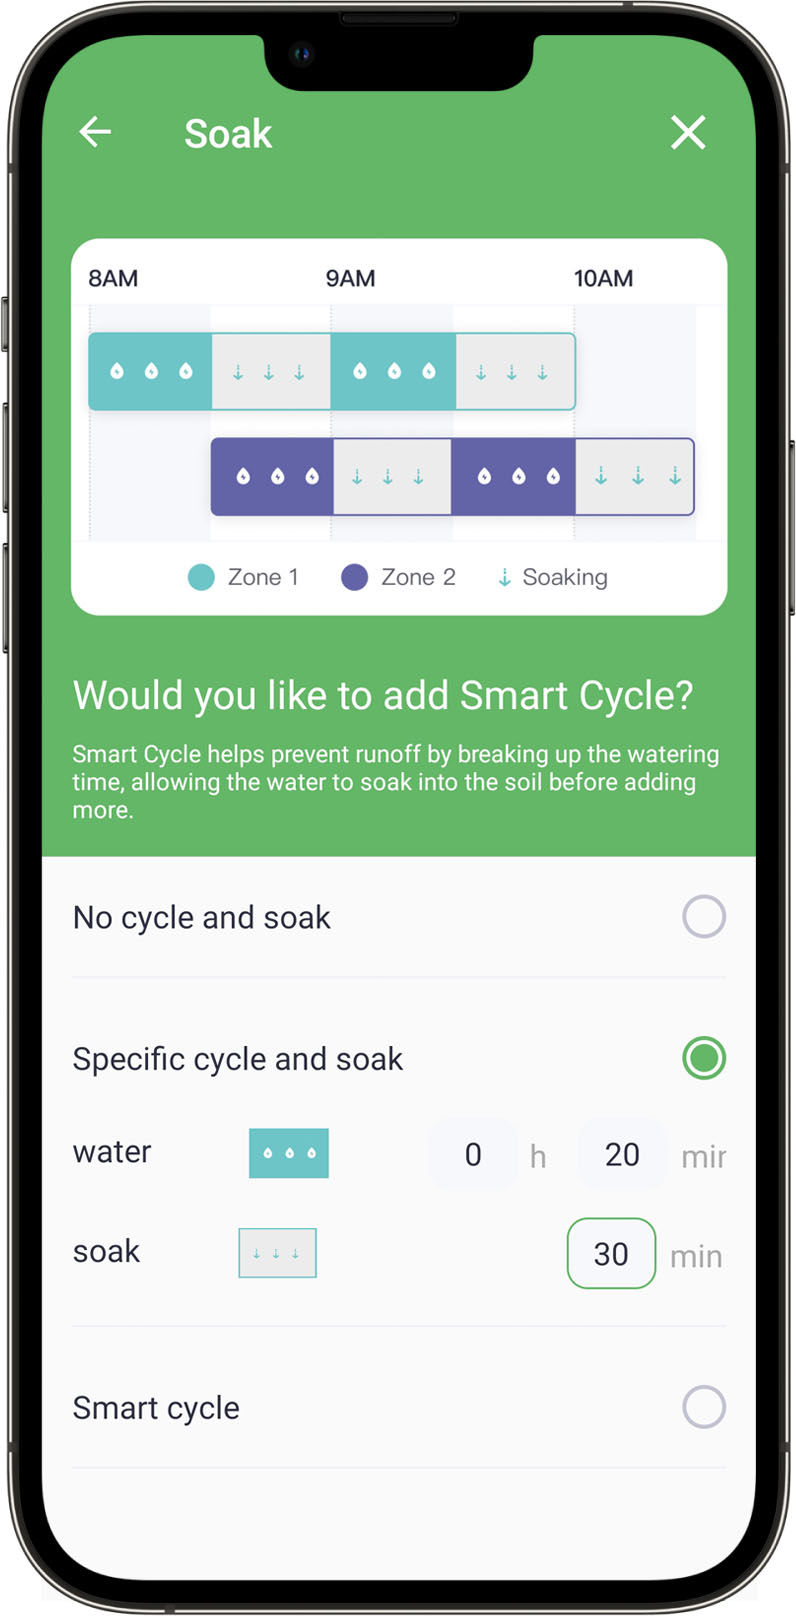
Cycle and Soak is an efficient irrigation method that breaks a long watering session into shorter, multiple cycles. This technique:
Slows down water application
Helps water penetrate the soil more effectively
Prevents runoff
Promotes deeper root growth
Leads to healthier plants overall
How It Works in ImoLaza
ImoLaza’s Cycle and Soak feature gives you two options:
Smart Cycle: Let the system automatically calculate optimal watering and soaking times based on your setup. (Recommended)
Manual Mode: Customize the watering and soaking durations to suit your specific needs.
If you find the Smart Cycle’s recommended times don’t work for your landscape, you can easily adjust them.
Example Scenario
Let’s say you have a schedule that starts at 5:00 AM and is set to run for 60 minutes total.
With Cycle and Soak enabled, here’s how it might work:
5:00 AM – 5:20 AM: Watering for 20 minutes
5:20 AM – 5:50 AM: Soaking (no watering, allowing water to seep into the soil)
5:50 AM – 6:10 AM: Watering resumes for another 20 minutes
6:10 AM – 6:40 AM: Second soak period
6:40 AM – 7:00 AM: Final 20-minute watering cycle
✅ Total run time: 60 minutes of watering over a 2-hour window.
This approach maximizes water efficiency and ensures your soil and plants get the hydration they need—without wasting a drop.
In case the above method doesn’t work for you, please contact our technical support team directly using the contact information below. We will respond to you by email within 12h after your message reaches us.
Email: Support@imolaza.com
Author: admin
Last update: 2025-04-17 04:21
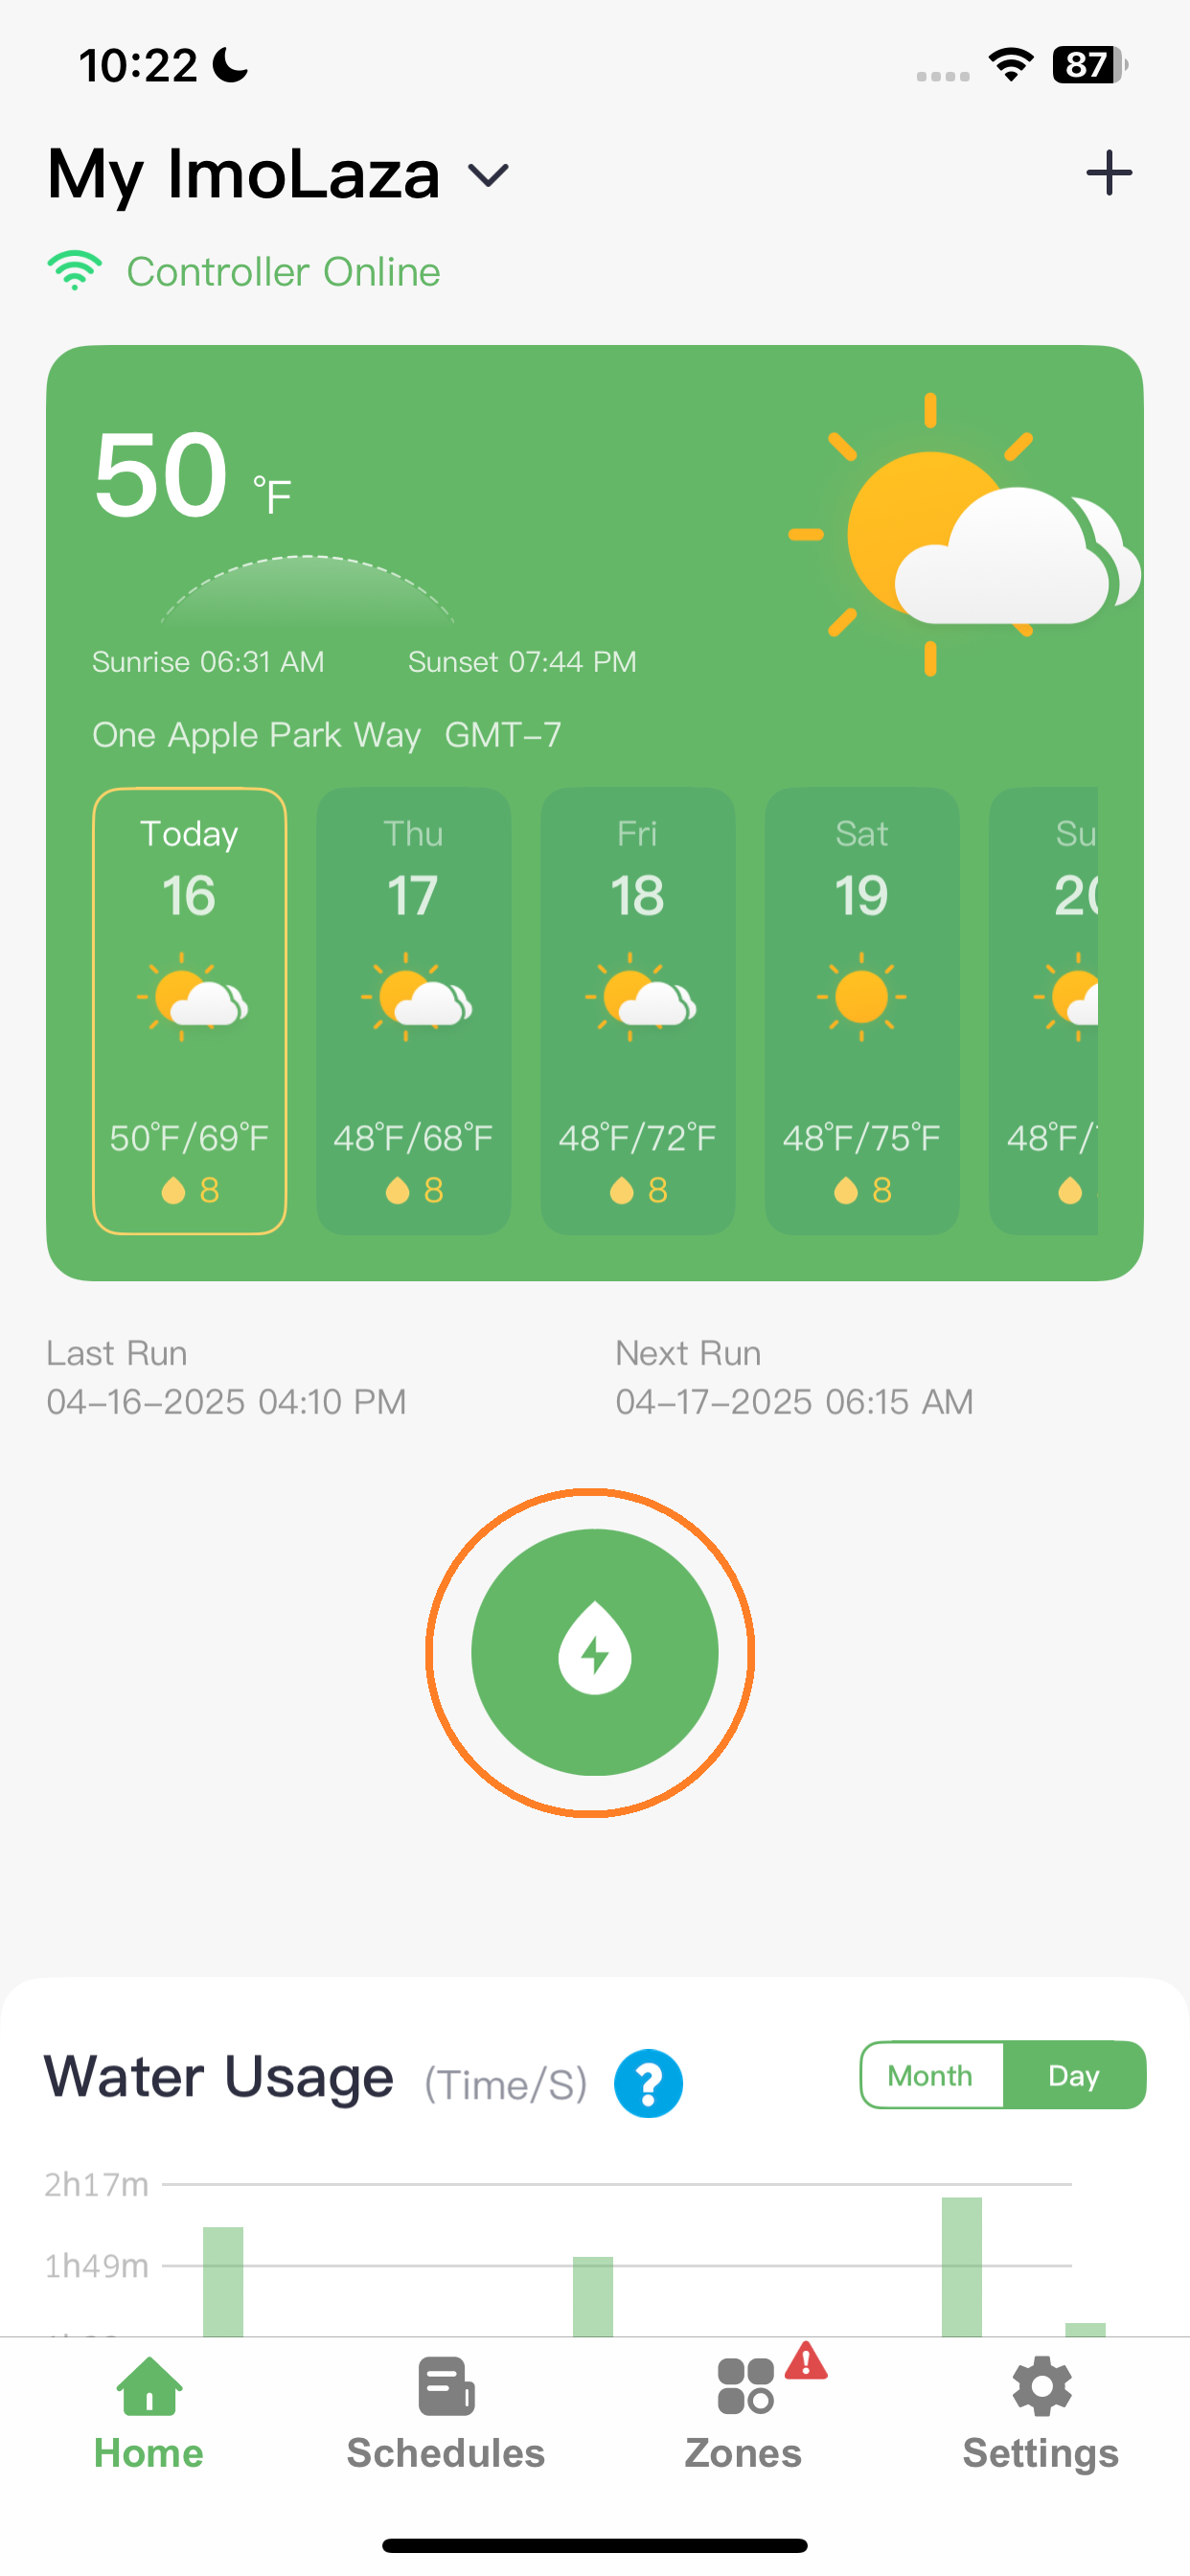
Quick Run is a convenient feature in the ImoLaza app designed for on-demand watering—perfect for those moments when your lawn looks a bit dry, but you don’t want to modify your existing irrigation schedule.
ImoLaza offers four different ways to access Quick Run, each with slightly different functions. Here's a breakdown to help you choose the right one for your needs:
1. Home Screen – Main Quick Run Button
On the app's home screen, you’ll see a green circular button—this is the main Quick Run shortcut.
Here, you have two options:
Create a New Quick Run:
Select the zones you want to water, set the watering order and duration, then start watering right away.
Use a Saved Quick Run:
ImoLaza saves up to 5 recent Quick Run records. Tap any of them to instantly run the same watering session again.
Ideal if you often use a similar manual watering routine.
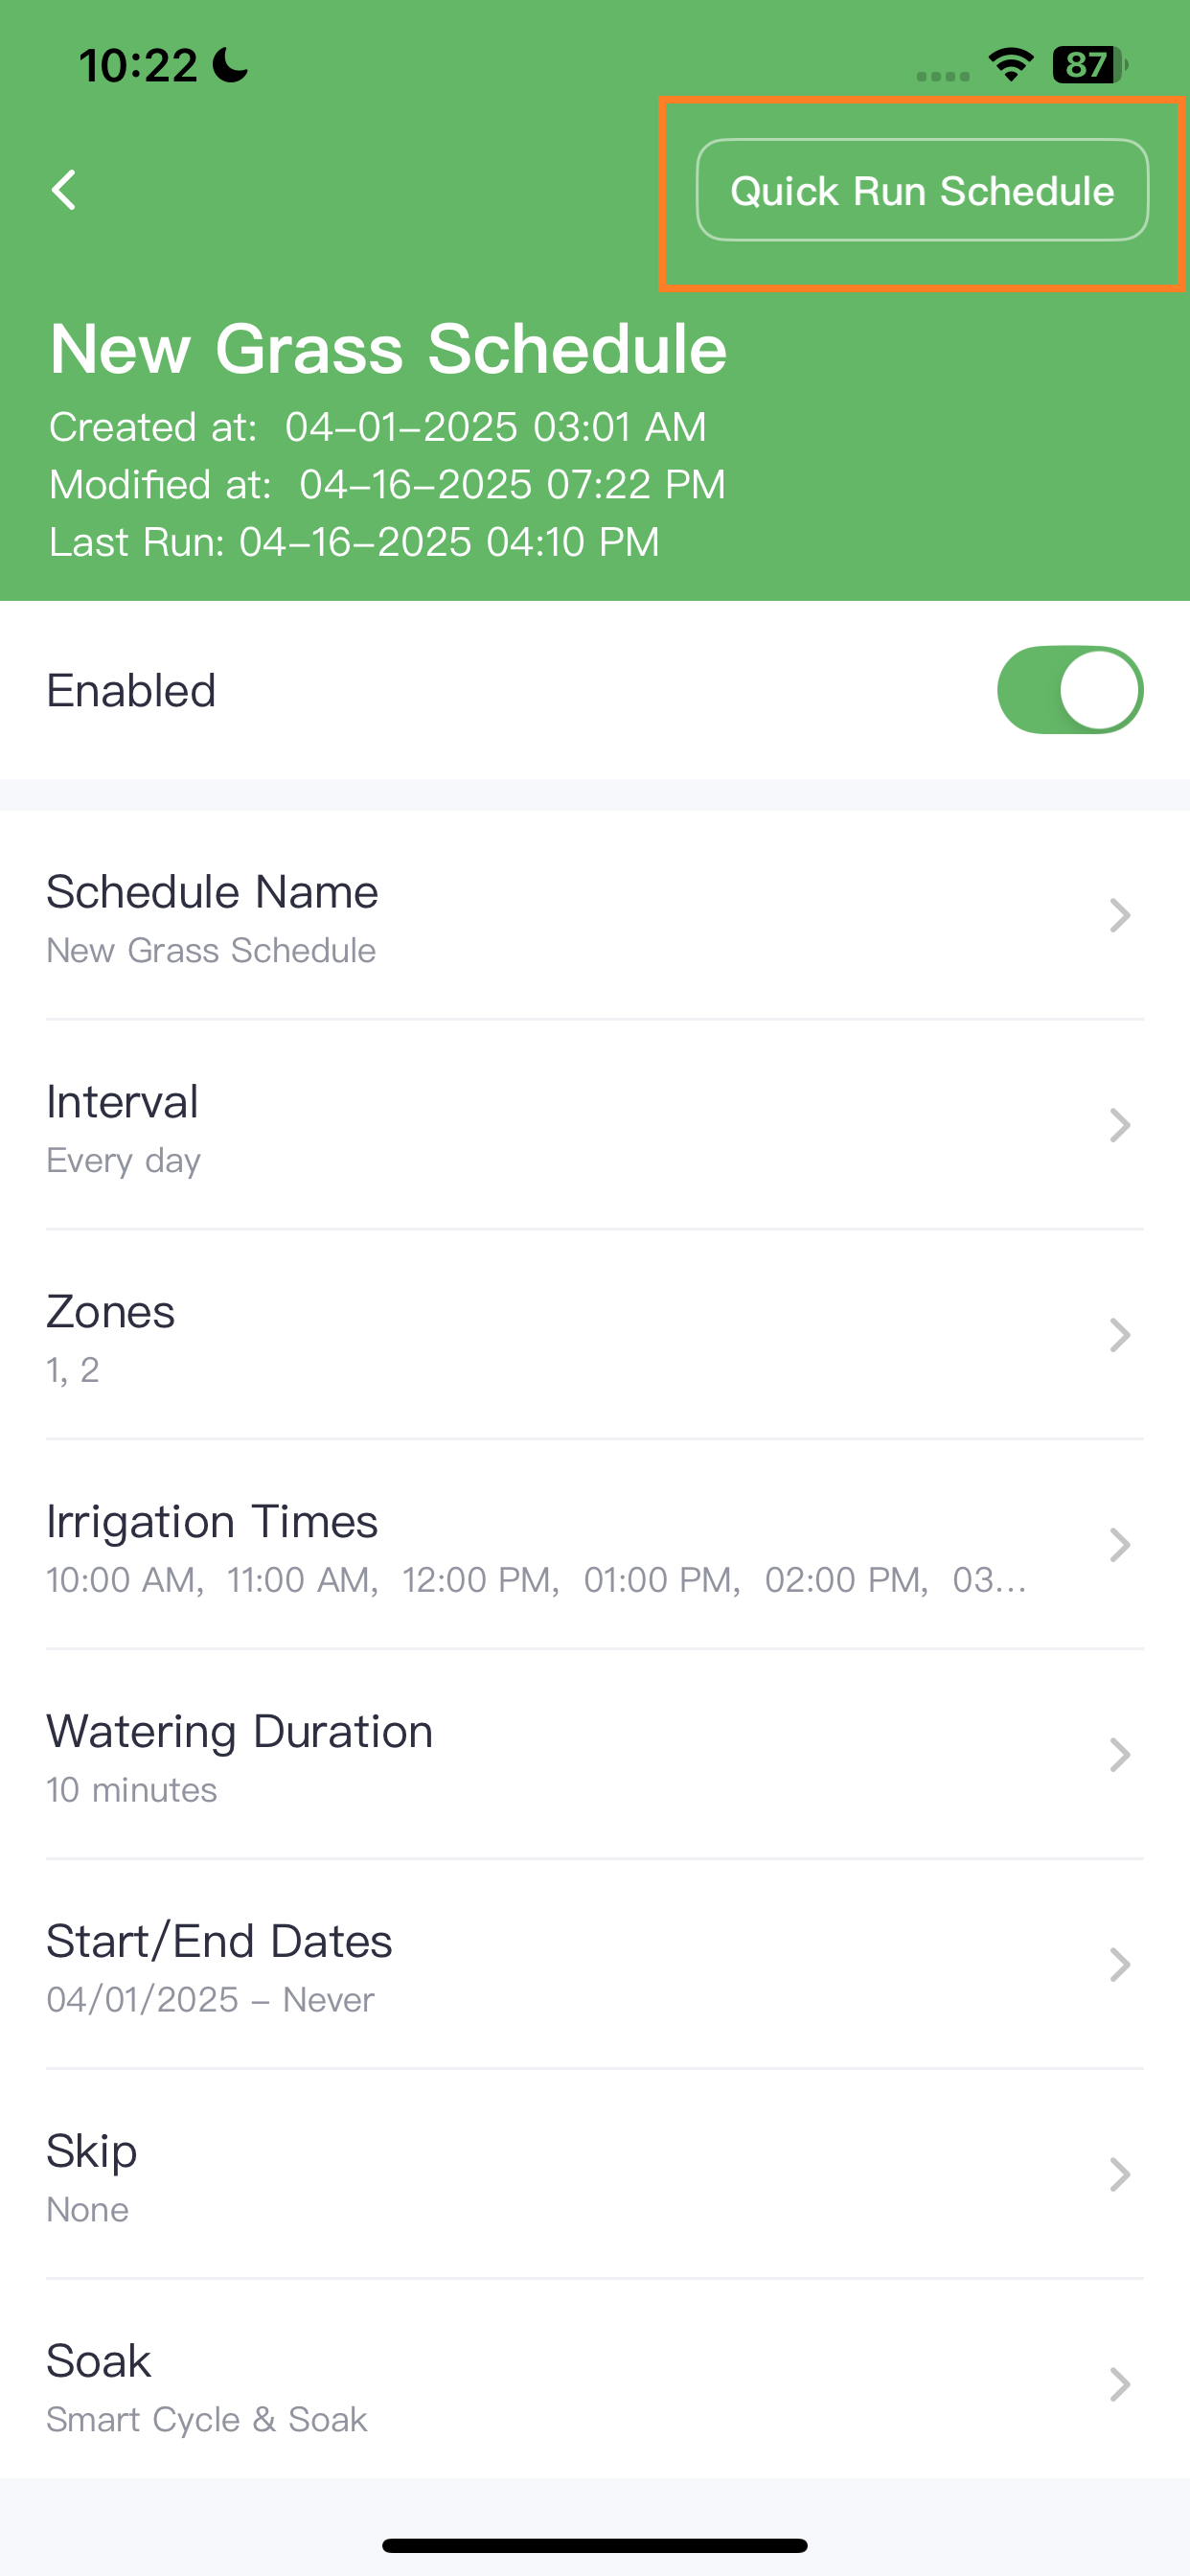
2. Schedule Detail Page – Quick Run Schedule
At the top right of a schedule’s detail page, tap Quick Run Schedule to instantly run the entire schedule.
Note: This version does not include soak time. It's a faster way to run the schedule, but without the cycle-and-soak functionality.
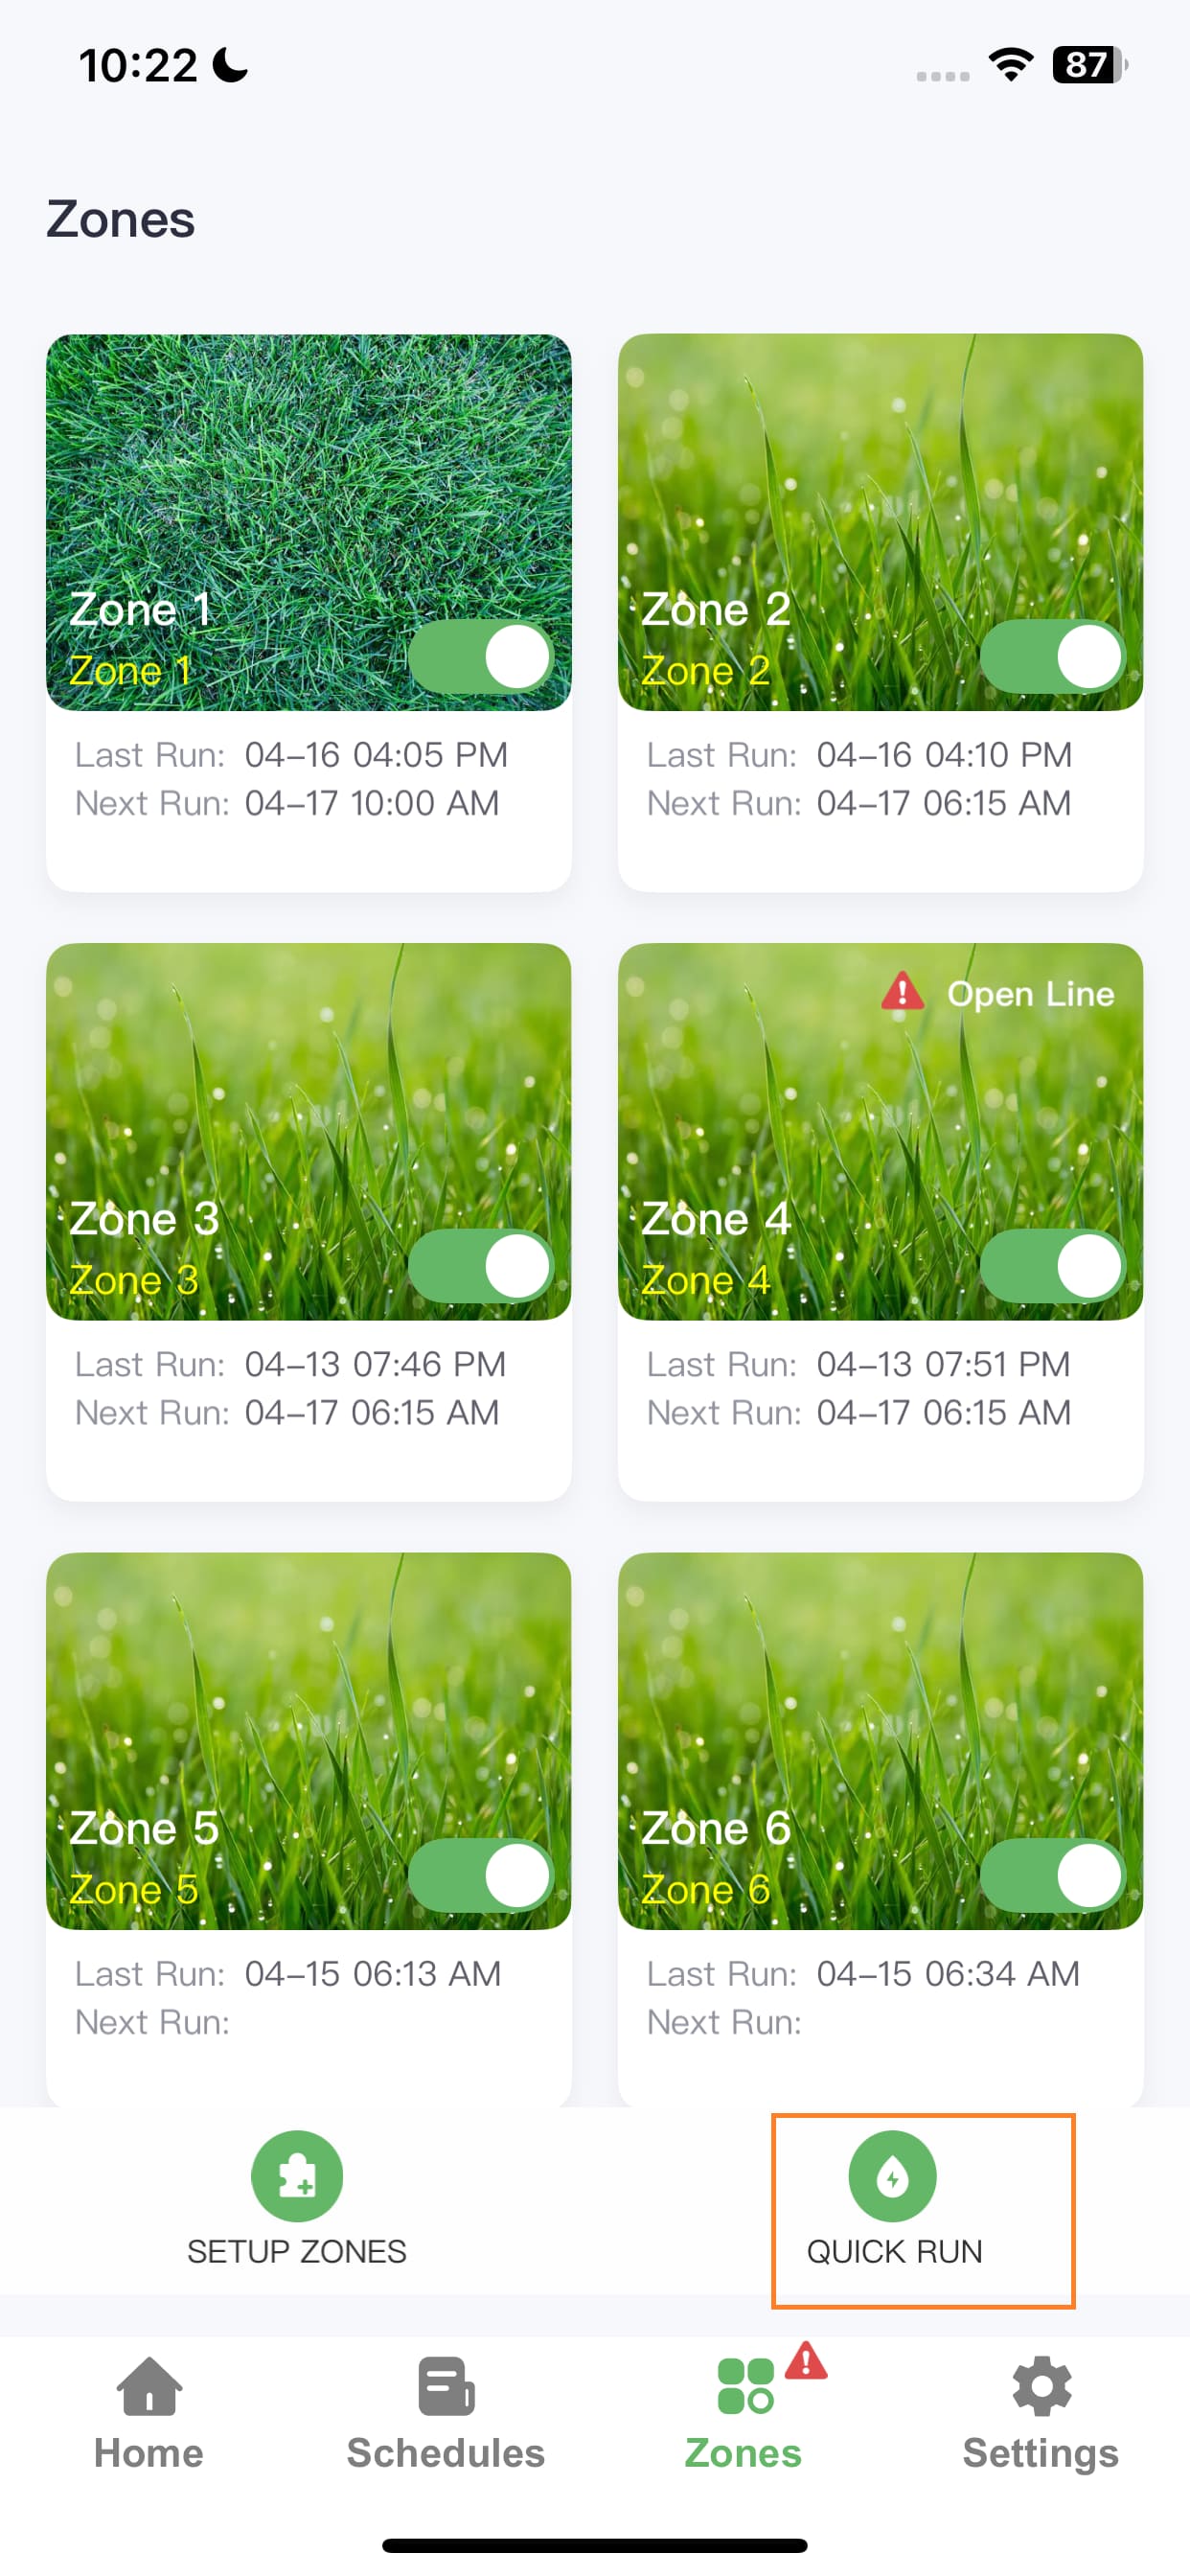
3. Zones Page – Bottom Right Button
On the main Zones page, there’s also a Quick Run button in the bottom right corner.
This option works the same way as the home screen version—allowing you to create a custom Quick Run across multiple zones.
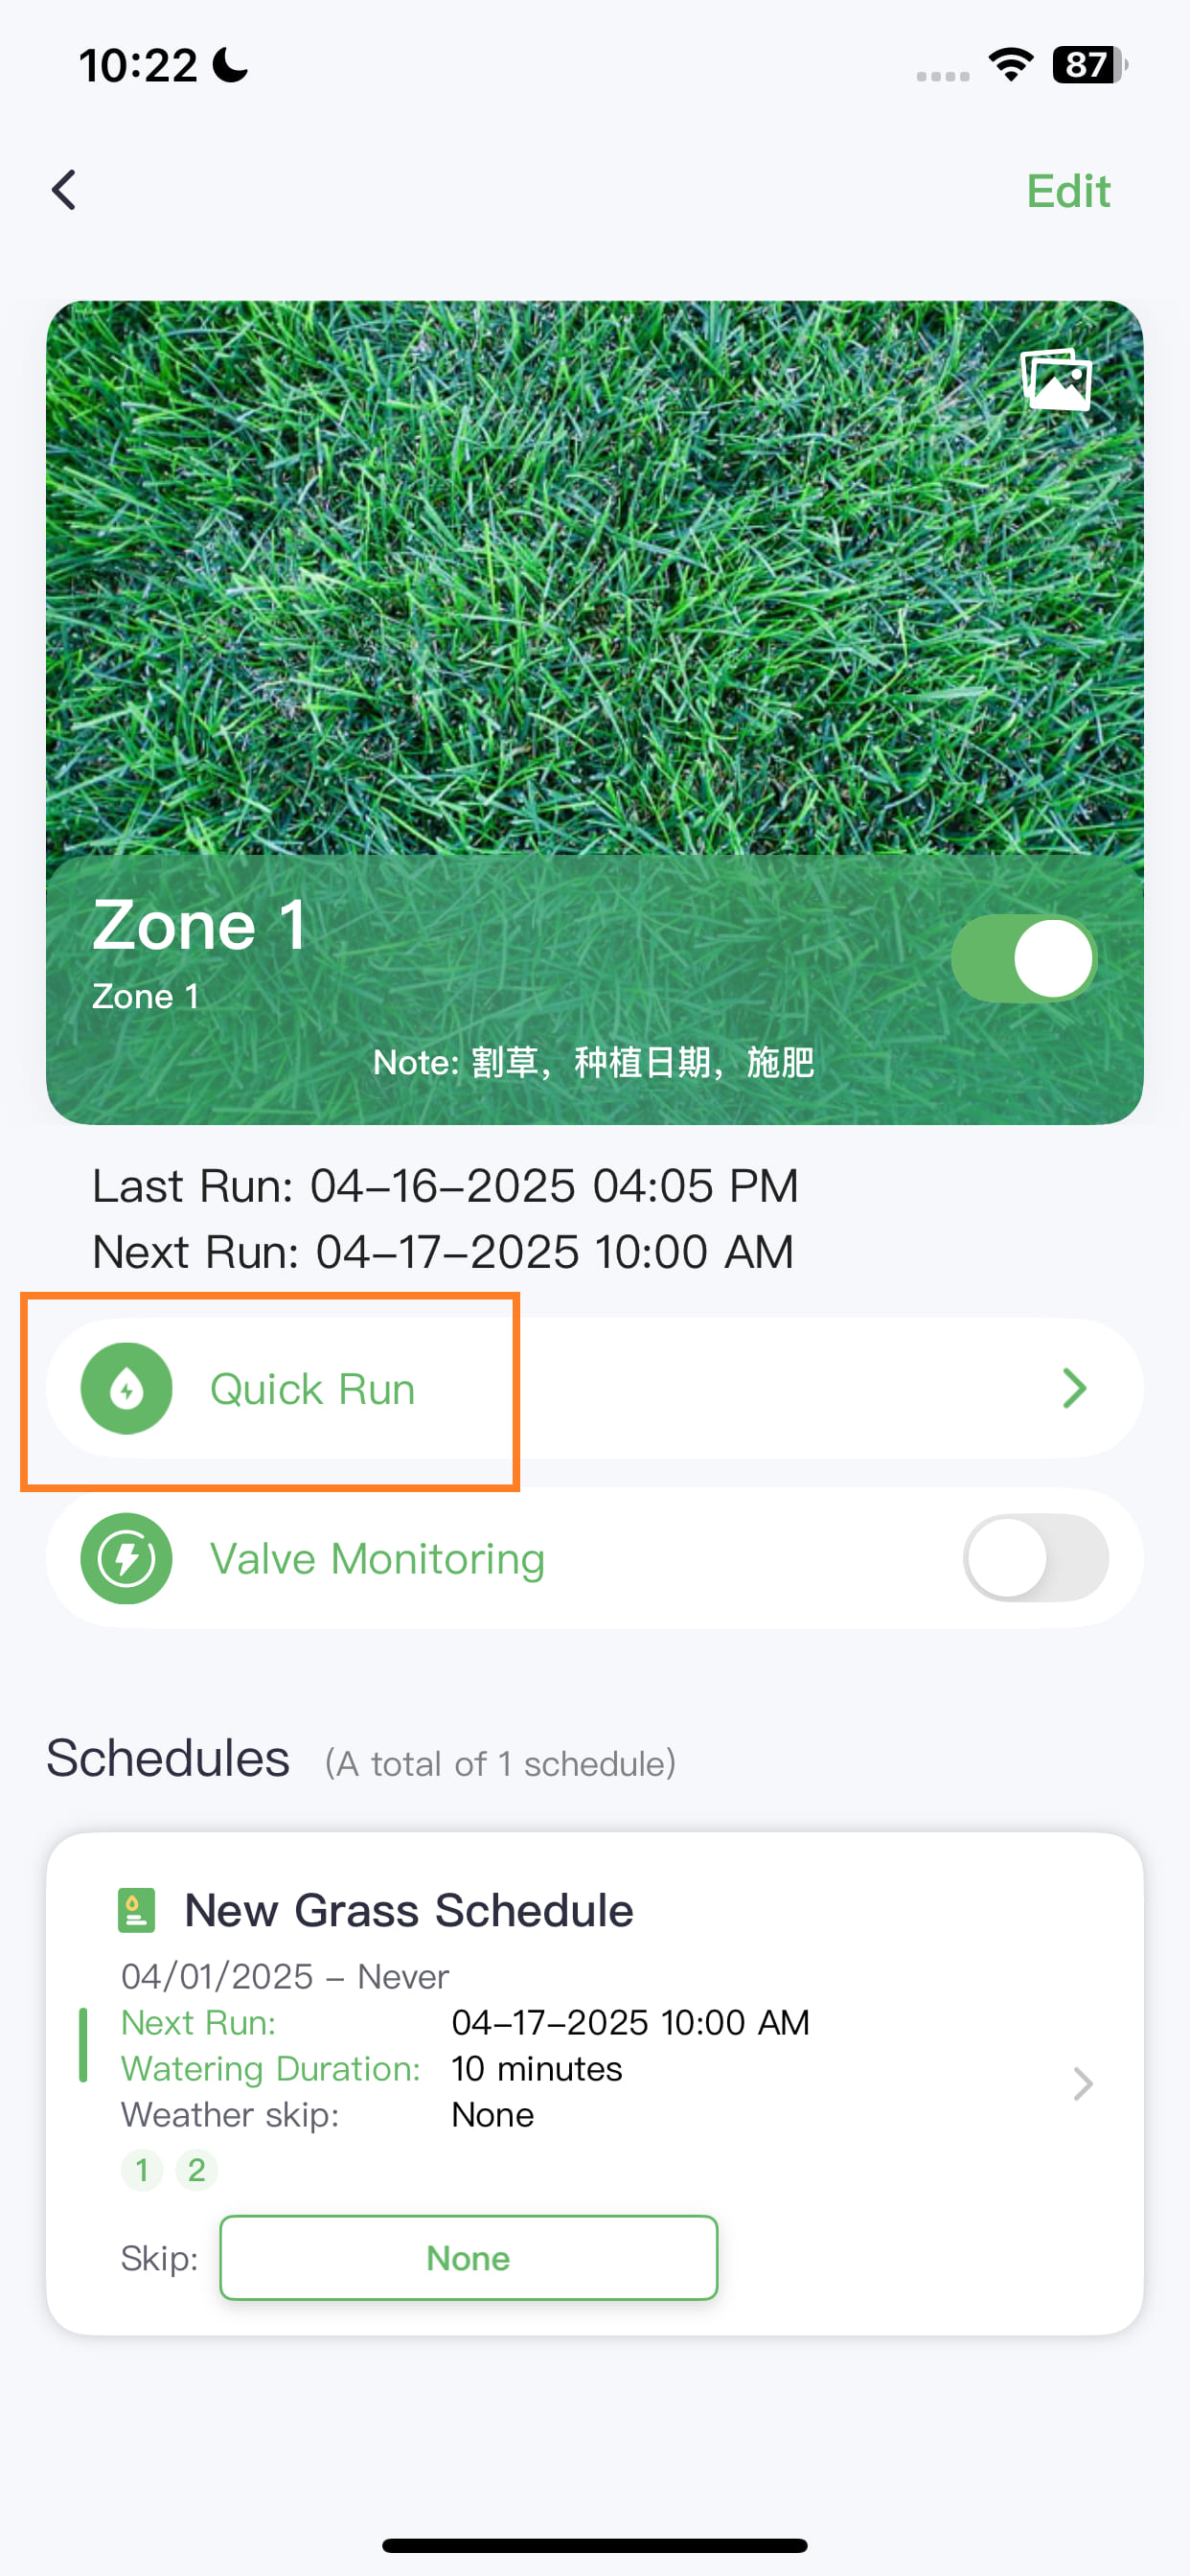
4. Zone Detail Page – Mid-Screen Button
On a specific zone’s detail page, you'll find a Quick Run button in the middle of the screen.
Tapping it will run only that single zone immediately.
This is perfect when you just want to water one area quickly without affecting the others.
Summary
ImoLaza’s Quick Run is flexible and easy to use—whether you want to water one zone, all zones, or rerun a previous session. Use the version that fits your needs best:
In case the above method doesn’t work for you, please contact our technical support team directly using the contact information below. We will respond to you by email within 12h after your message reaches us.
Email: Support@imolaza.com
Author: admin
Last update: 2025-04-17 05:29
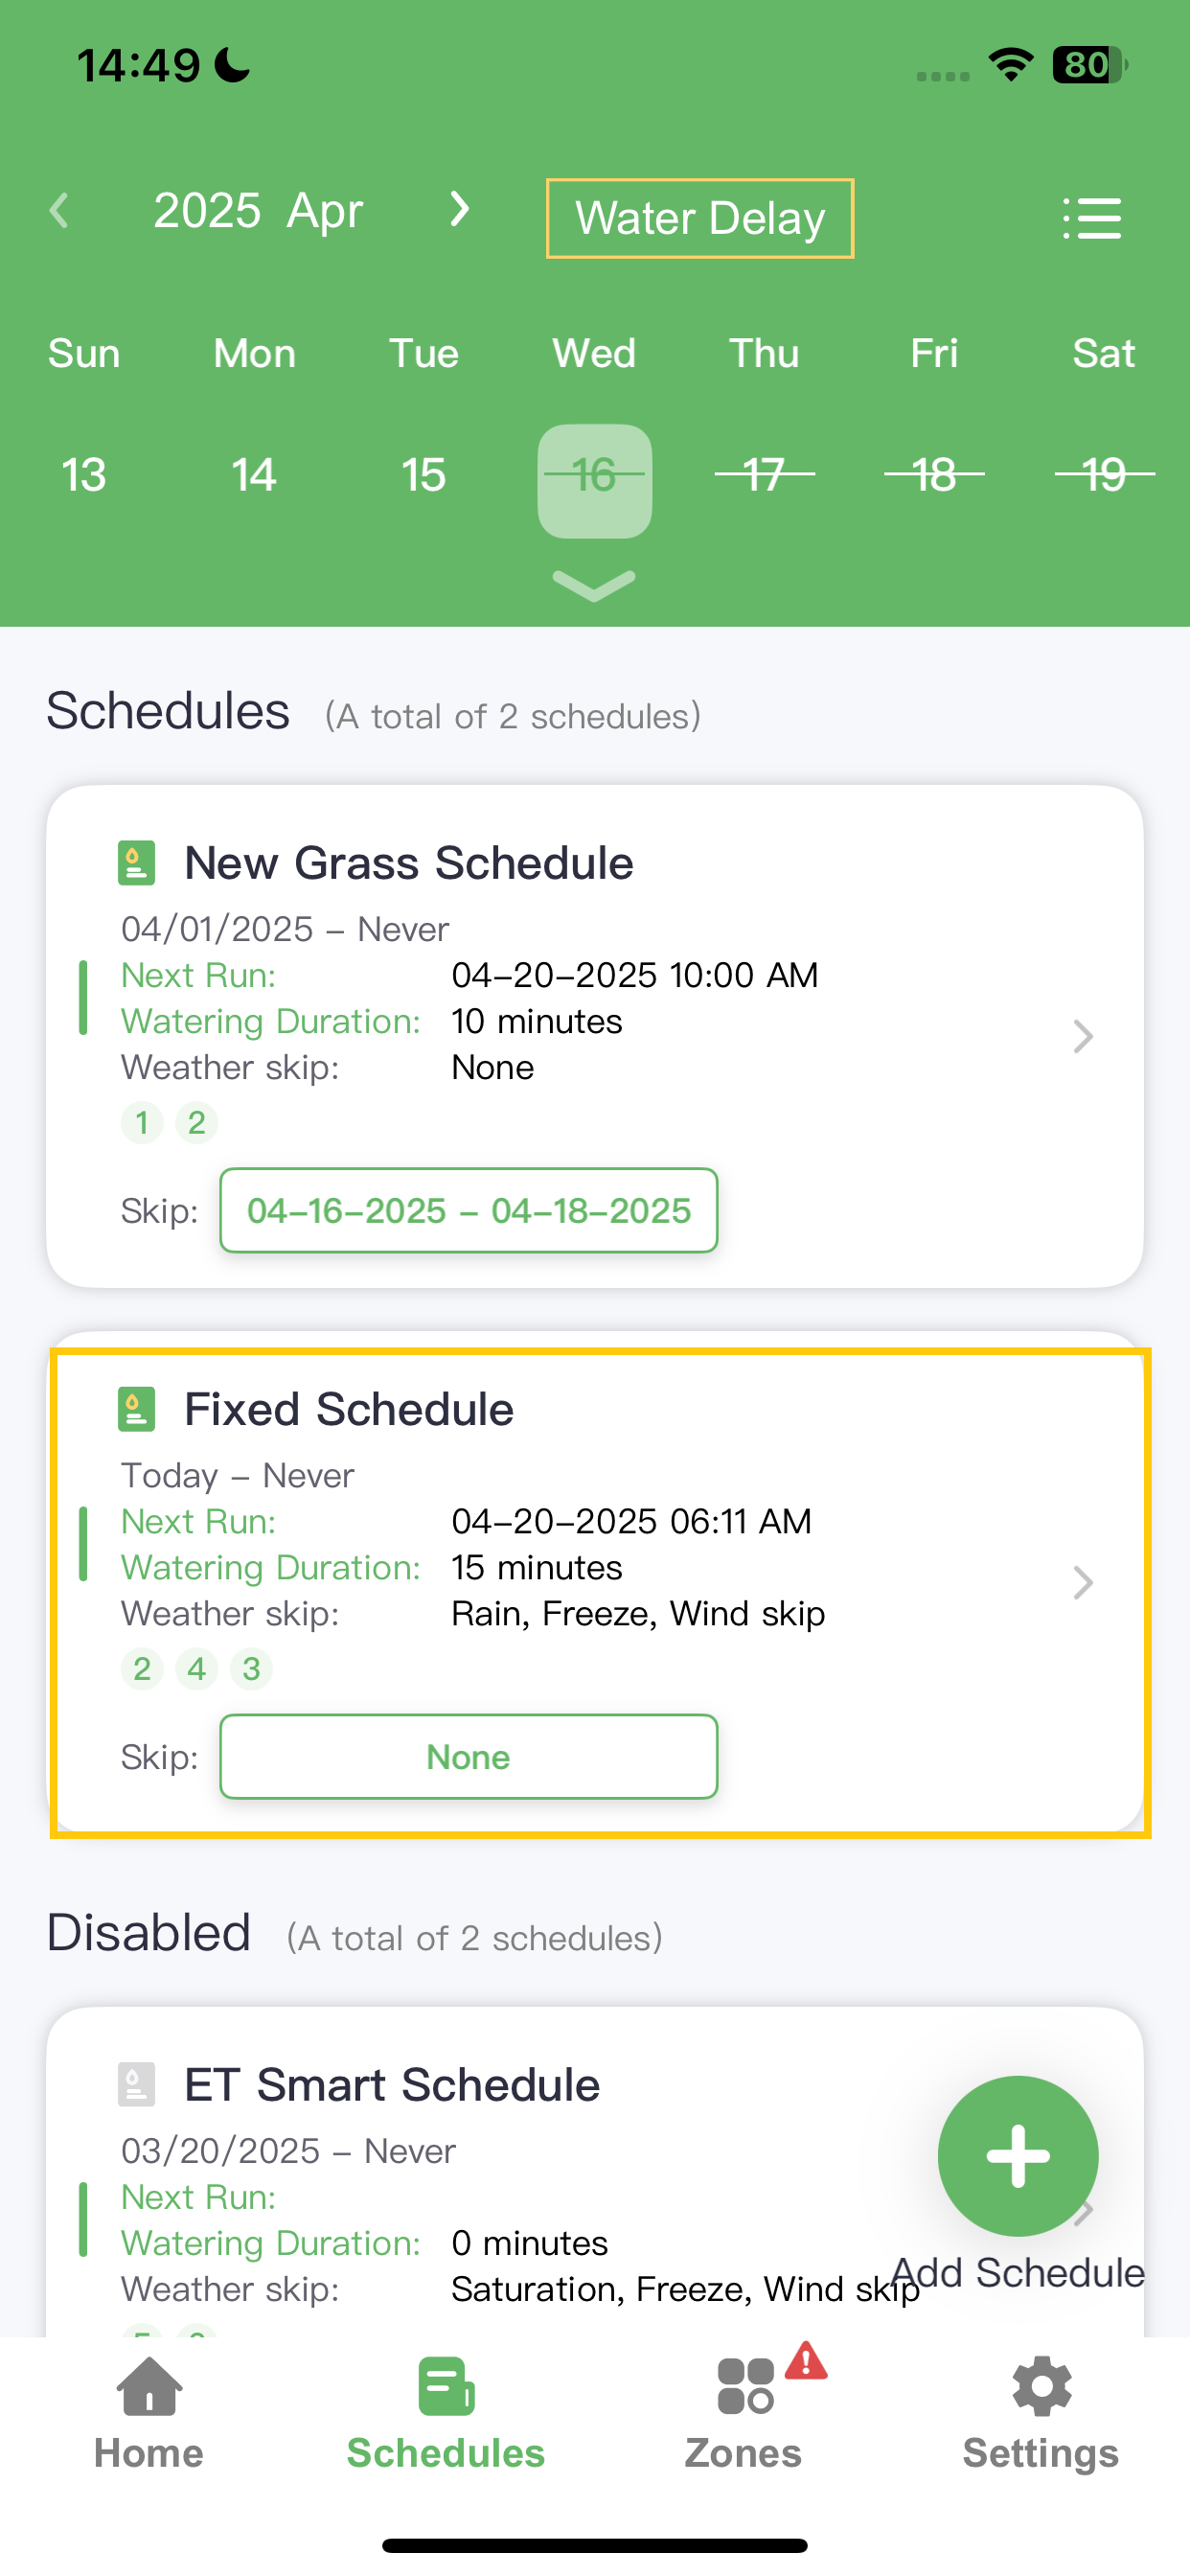
Up to 16 schedules can be added with no limit on the number of interval schedules.
Still need help?
In case the above method doesn’t work for you, please contact our technical support team directly using the contact information below. We will respond to you by email within 12h after your message reaches us.
Email: Support@imolaza.com
Author: admin
Last update: 2025-04-17 05:33
Even if your ImoLaza controller loses connection to your home WiFi, it will still continue to execute all previously created schedules as usual.
This includes:
. Fixed Schedules
. New Lawn Schedules
. ET Smart Schedules
Your watering will stay on track, even without an internet connection.
While the controller runs the schedules reliably, please note that weather-based skip features will be disabled when offline. This includes:
. Rain Skip
. Freeze Skip
. Wind Skip
. Saturation Skip (for ET Smart Schedules)
Since these features rely on real-time weather data from the cloud, they require an active internet connection.
. Online: Full functionality, including smart weather adjustments
. Offline: All schedules run as programmed, but no weather-based skipping
So rest assured — your lawn won’t be left dry, even if your WiFi takes a break! But, please be aware that long-term disconnection would probably cause disorder in running, so get it online if possible.
Still need help?
In case the above method doesn’t work for you, please contact our technical support team directly using the contact information below. We will respond to you by email within 12h after your message reaches us.
Email: Support@imolaza.com
Author: admin
Last update: 2025-04-17 05:43
If your ImoLaza controller experiences a power outage, there’s no need to worry — all your schedules and settings are safely stored in controller and will not be lost.
Once power is restored, the controller will automatically reconnect to your Wi-Fi and resume normal operation without any input from you.
Still need help?
In case the above method doesn’t work for you, please contact our technical support team directly using the contact information below. We will respond to you by email within 12h after your message reaches us.
Email: Support@imolaza.com
Author: admin
Last update: 2025-04-17 05:49
Yes — but with limitations.
If your ImoLaza controller loses power during a running schedule, it will attempt to resume once power is restored. However, it will not extend beyond the originally scheduled end time.
A schedule starts at 7:00 AM and is set to run for 30 minutes (until 7:30 AM).
If the power goes out at 7:10 AM and returns at 7:20 AM, the controller will resume but still stop at 7:30 AM — not 7:40.
If the power outage lasts past the end time (7:30 AM), the schedule will not resume at all.
Schedules won’t be rerun or extended after a long outage. They will resume only if power returns before the original end time.
Still need help?
In case the above method doesn’t work for you, please contact our technical support team directly using the contact information below. We will respond to you by email within 12h after your message reaches us.
Email: Support@imolaza.com
Author: admin
Last update: 2025-04-17 05:54
When you create a schedule with hourly intervals and specify a start and end time (e.g., sunrise/sunset), the behavior works as follows:
The first irrigation begins at the set start time (e.g., before sunrise).
After that, the schedule will continue to repeat at the set interval (e.g., every 6 hours), regardless of day or time—even into the next day.
The schedule will not reset based on the next day's sunrise/sunset; it simply follows the interval cycle from the first execution.
Example:
You set a schedule to start before sunrise, run for 10 minutes, and repeat every 6 hours:
Day 1, 5:50 AM (before sunrise): First irrigation starts.
11:50 AM: Second cycle starts.
5:50 PM: Third cycle starts.
11:50 PM: Fourth cycle starts.
And it continues every 6 hours from the first run time, not sunrise on the next day.
Still need help?
In case the above method doesn’t work for you, please contact our technical support team directly using the contact information below. We will respond to you by email within 12h after your message reaches us.
Email: Support@imolaza.com
Author: admin
Last update: 2025-04-17 07:36
ImoLaza is packed with smart features designed to help you save water and avoid unnecessary irrigation. But with so many powerful tools—Weather Skips, Saturation Skip, Water Delay, Schedule Skip and Rain Sensor Trigger—you might be wondering:
When multiple features could skip a watering schedule, which one actually takes control?
This article clears up the confusion.
Water Delay vs. Schedule Skip
Both Water Delay and Schedule Skip allow you to temporarily stop irrigation—but they’re used in slightly different scenarios:
Schedule Skip
This function allows you to skip a specific irrigation schedule.
You can skip it for 1 to 7 days or customize your own skip cycle.
Set a Start Time and End Time—even on a future date.
Perfect when you're doing yard work, trimming the lawn, or making localized adjustments.
Water Delay
This is a system-wide pause on all irrigation schedules.
Best used when reseeding, repairing the system, or responding to unexpected weather.
Postpones all schedules, not just individual ones.
Quick and efficient for managing watering across your entire yard.
So… Who Actually Decides to Skip?
Great question! ImoLaza’s skipping logic is hierarchical but cooperative. If any one of the following conditions is met, the controller will not run the schedule:
. Weather Skips (Rain Skip / Freeze Skip / Wind Skip)
. Saturation Skip (ET Smart Schedule only)
. Water Delay
. Single-Schedule Skip
. Rain Sensor Trigger
That means just one active skip condition is enough to stop the schedule from running.
Summary
| Feature | Applies To | Best For |
|---|---|---|
| Weather Skips | All schedules | Real-time weather adjustments |
| Saturation Skip | ET Smart only | Soil moisture-based skip |
| Water Delay | All schedules | Whole-yard pause (maintenance, reseeding) |
| Schedule Skip | Single schedule | Temporary changes to one zone or area |
| Rain Sensor Trigger | All schedules | Area with unreliable weather forecast |
Still need help?
In case the above method doesn’t work for you, please contact our technical support team directly using the contact information below. We will respond to you by email within 12h after your message reaches us.
Email: Support@imolaza.com
Author: Imolaza
Last update: 2025-04-17 08:07
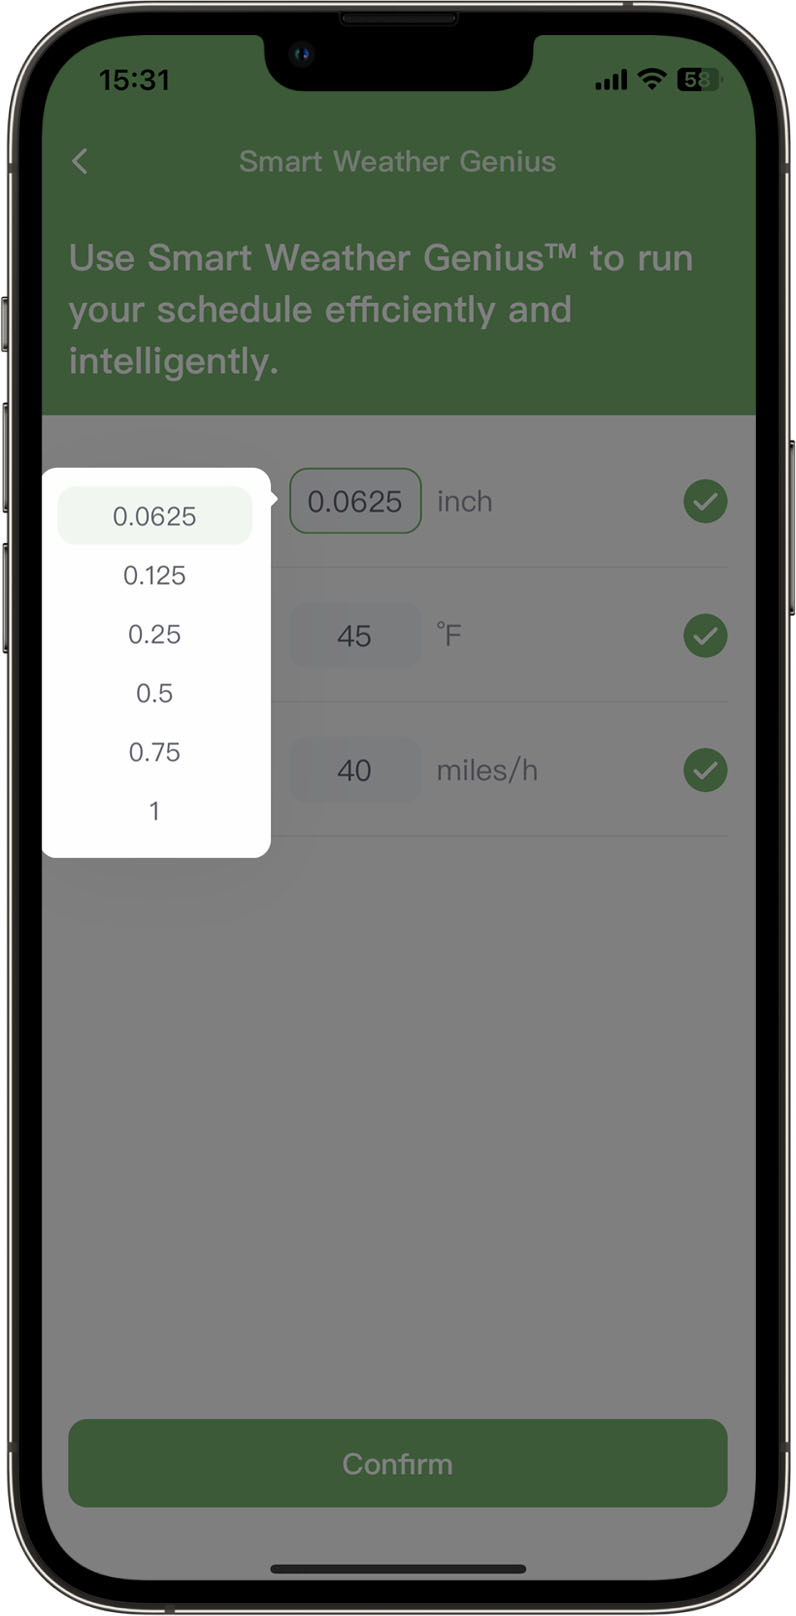
Rain Skip is one of ImoLaza’s key smart features, designed to prevent watering on rainy days and help you conserve water and avoid waste. When setting up a Fixed Schedule, we highly recommend enabling Rain Skip to get the most out of your smart irrigation system.
This article breaks down how Rain Skip works and how you can set or adjust its threshold.
When Rain Skip is enabled for a schedule, the controller performs two key checks before deciding whether to water:
1. Before the Schedule Starts
. Starting 10 minutes before the scheduled irrigation time, the controller checks:
Past 24-hour rainfall from your selected weather station
Forecasted rainfall for the next 24 hours from a third-party weather service
. If the total rainfall (past + forecasted) exceeds your Rain Skip threshold, the schedule is skipped.
. If it’s below the threshold, the schedule runs as planned.
2. Mid-Schedule Check (Optional)
. If your schedule runs for 45 minutes or longer, the controller will check again at the 45-minute mark:
It fetches real-time rainfall data from the weather station.
It adds this to the rainfall recorded in the 24 hours prior to the start time.
. If the combined rainfall now exceeds the threshold, the schedule is stopped mid-way.
. If the schedule is shorter than 45 minutes, this second check is not performed.
Example Scenarios:
Schedule is Skipped:
. Threshold set: 0.75 inches
. Past rainfall: 0.5 inches
. Forecasted rainfall: 0.3 inches
. Total: 0.8 inches → Exceeds threshold → Schedule is skipped
Schedule Runs:
. Past rainfall: 0.5 inches
. Forecasted rainfall: 0.2 inches
. Total: 0.7 inches → Below threshold → Schedule runs
Mid-Schedule Skip:
. The schedule starts normally.
. At the 45-minute mark, new rainfall observed is 0.6 inches.
. With 0.5 inches already recorded before the start, the total becomes 1.1 inches, exceeding the threshold → Schedule stops early
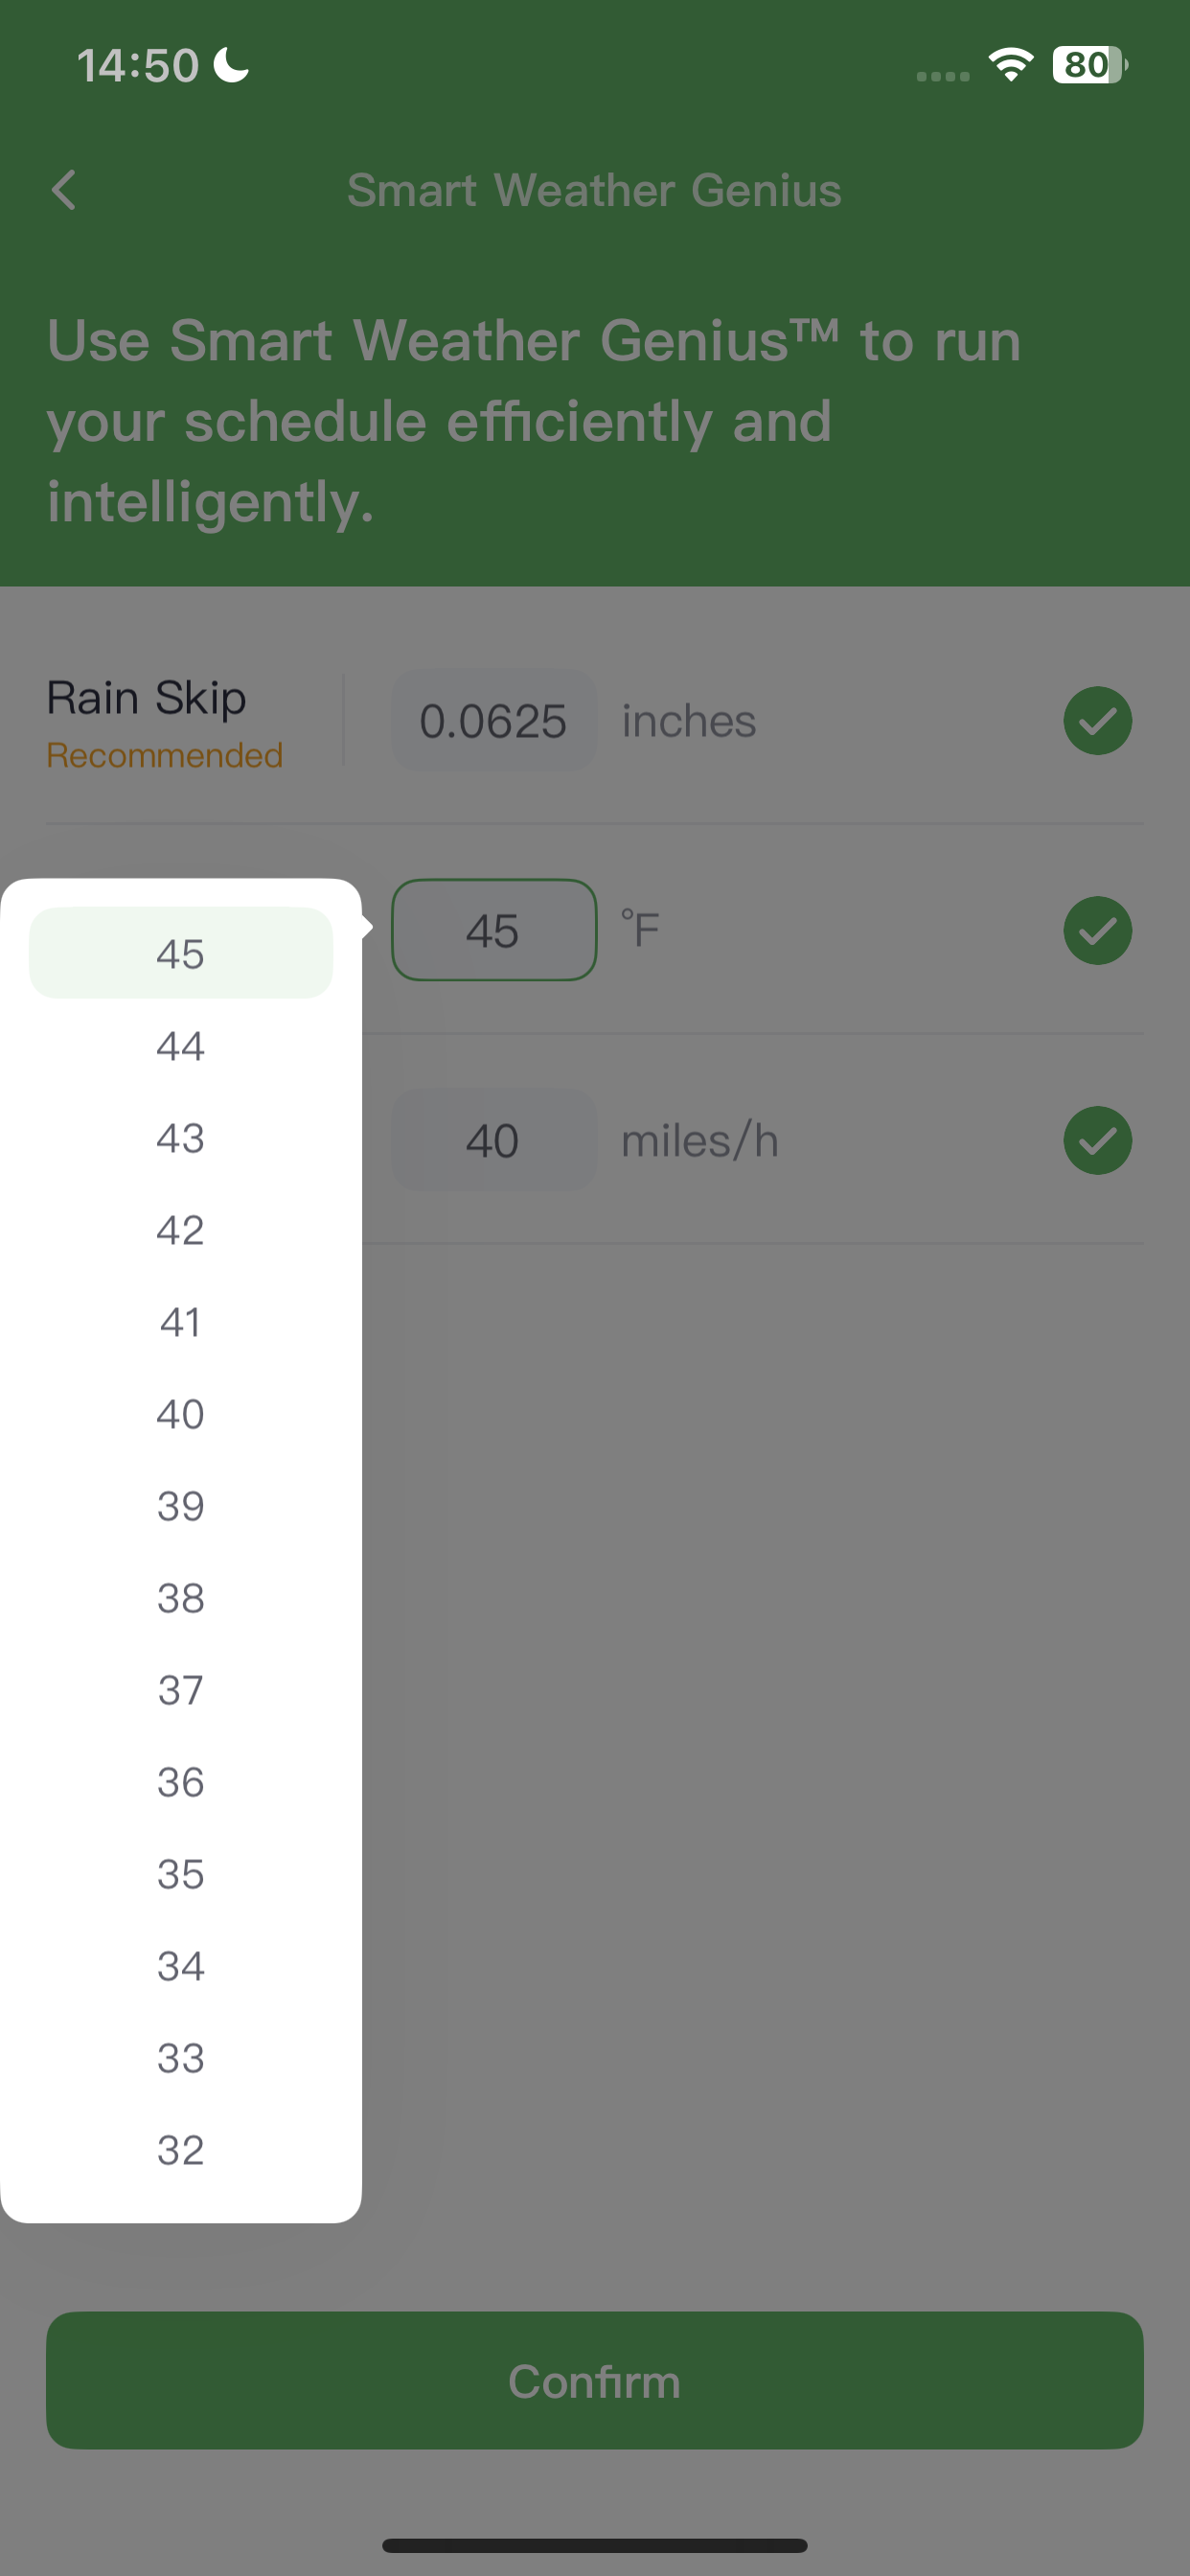
1. Choose the schedule
In the Schedules screen, select the schedule for which you need to modify the Rain Skip threshold.
2. "Smart Weather Genius" tab
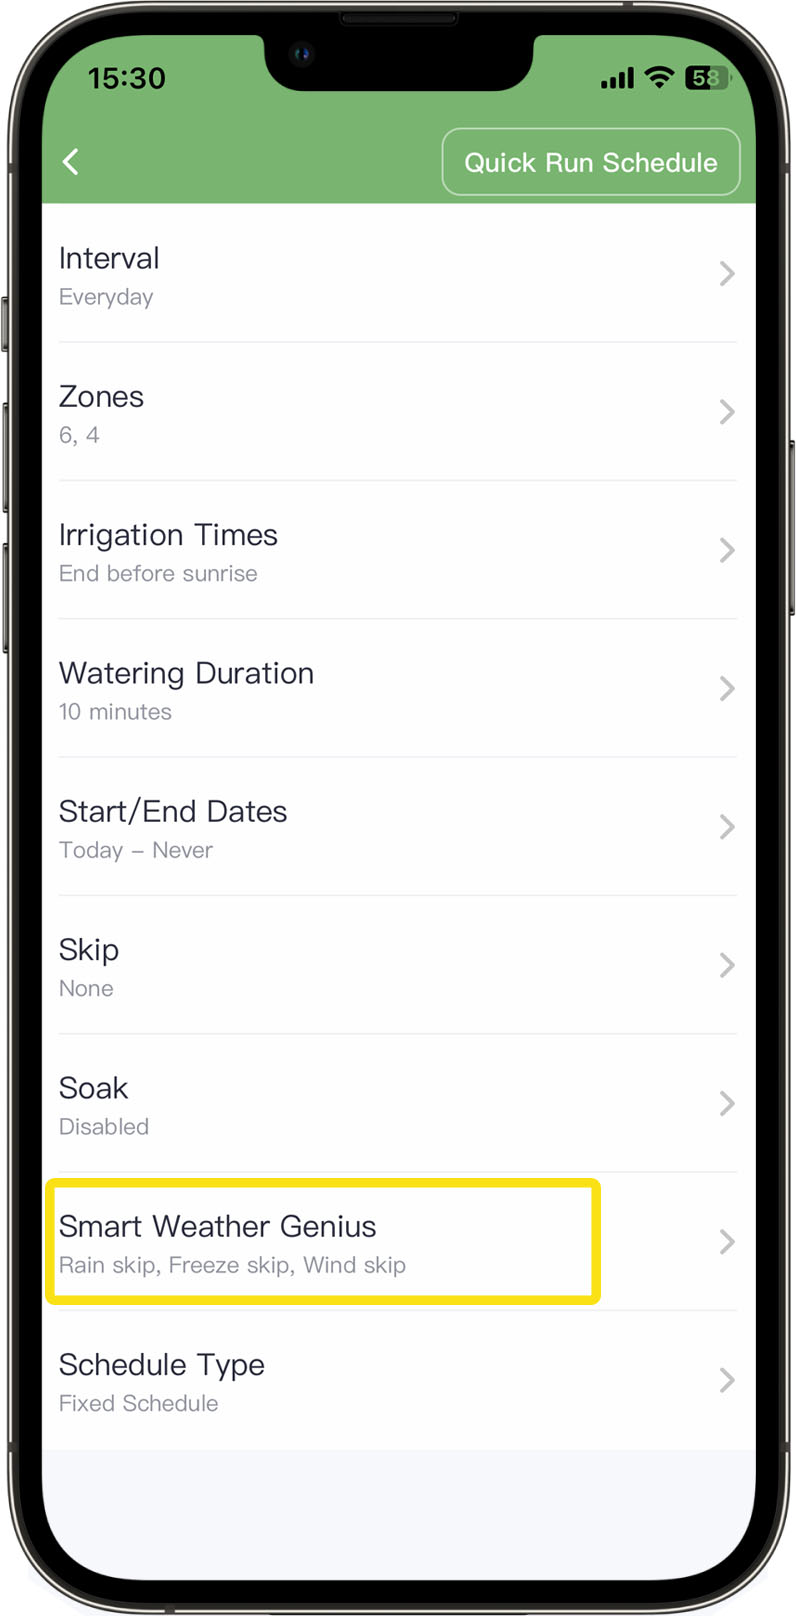
3. Modify the threshold
Choose the precipitation at which you would like your schedules to skip watering.
Still need help?
In case the above method doesn’t work for you, please contact our technical support team directly using the contact information below. We will respond to you by email within 12h after your message reaches us.
Email: Support@imolaza.com
Author: Imolaza
Last update: 2025-04-17 08:23
With firmware version 1.4.001 or later, your ImoLaza Smart Sprinkler Controller unlocks a new level of efficiency with the ET Smart Schedule. Wondering if this is the right option for your landscape? Let’s break it down and help you decide!
1. What Is ET Smart Schedule?
ET Smart Schedule (Evapotranspiration-based Scheduling) is ideal for established lawns and landscapes. It automatically determines the optimal watering duration and frequency for each zone, adapting to weather, seasons, and climate.
It’s designed to:
. Meet your plants’ real watering needs
. Save water intelligently
. Take the guesswork out of scheduling
2. How Does It Work?
ImoLaza combines two advanced systems to create a smart, self-adjusting watering plan:
Watering Duration Expert
Calculates how long each zone should be watered based on:
. Soil type
. Nozzle precipitation rate
. Root zone depth
. Allowable soil moisture depletion
Smart Weather Genius
Collects real-time and forecasted weather data from multiple sources to:
. Track evaporation and plant transpiration
. Predict when watering is truly needed
. Automatically skip irrigation when conditions don’t require it
Together, these systems form the Intelligent ET Master, which ensures your plants are watered just enough, at the right time, based on:
. Local weather
. Zone-specific needs
. Ongoing soil moisture monitoring
Note: Each zone is managed independently, so start times and watering durations may differ across zones within the same ET Smart Schedule.
3. Can I Convert Other Schedule Types into ET Smart?
No, once a schedule is created, its type cannot be changed. That’s because Fixed, New Grass, and ET Smart Schedules operate with different rules for:
. Watering frequency
. Start times
. Skip mechanisms
Be sure to choose the schedule type that best fits your needs when setting it up.
4. Is It Suitable for Mixed Crop Zones?
Not really. In fact, none of the three schedule types are ideal for zones with mixed plant types.
For the best results, group plants with similar watering needs into the same zone.
5. Will the Watering Duration Change Over the Season?
No. While the watering frequency adapts to changing conditions, the watering duration remains fixed, calculated based on zone properties when the schedule is created.
6. Do I Need to Buy a Weather Station?
Not at all. ImoLaza gives you access to:
. 375,000+ private weather stations
. 5,000+ national weather stations
Within 5 km (3 miles) of your location, you'll usually have 3–5 options to choose from.
To select one: Go to Settings > Controller Settings > Weather Stations in the ImoLaza app.
7. Why Do Trees Need Longer Watering?
Trees, shrubs, and perennials have deep root systems, requiring water to reach deeper soil layers. That’s why they might need longer watering durations, such as 3 hours or more.
However, they don’t need to be watered as often. So while the watering time is longer, the watering frequency is lower, helping save water while meeting your plants’ needs.
Still need help?
In case the above method doesn’t work for you, please contact our technical support team directly using the contact information below. We will respond to you by email within 12h after your message reaches us.
Email: Support@imolaza.com
Author: Imolaza
Last update: 2025-04-17 08:31
Whether you're a professional landscaper or a homeowner looking to maintain a beautiful lawn, the "New Grass Schedule" feature is an essential tool that guarantees a thriving, healthy lawn. This innovative feature is specifically designed to cater to the needs of newly planted grass and freshly seeded lawns. This article would help you go through it.
Newly planted grass has shallow, underdeveloped root systems. This makes it harder for the grass to absorb enough water and nutrients, especially under harsh environmental conditions like high heat, strong winds, or prolonged sun exposure.
Frequent, light watering is crucial in the early growth phase to keep the soil consistently moist and provide the hydration necessary for root establishment. Once the grass matures and its root systems deepen, watering can be gradually reduced.
The New Grass Schedule is engineered with this in mind. It supports multiple start times throughout the day, ensuring the soil stays consistently damp and the young grass has the best chance to thrive.
You can set up to 24 start times in a single New Grass Schedule—ideal for delivering short, frequent bursts of water to encourage strong root growth.
Yes. The Water Duration Expert™ tool is not available for this type of schedule. That means you’ll need to manually input the watering time for each zone. A general recommendation is 3–5 minutes per watering cycle.
4. Does the Duration Apply to the Entire Schedule or Each Cycle?
The watering duration you set applies to each individual watering cycle, not the total run time for the entire day. So, if you set a zone to run for 5 minutes and you have 4 start times, that zone will receive a total of 20 minutes of watering across the day.
Still need help?
In case the above method doesn’t work for you, please contact our technical support team directly using the contact information below. We will respond to you by email within 12h after your message reaches us.
Email: Support@imolaza.com
Author: Imolaza
Last update: 2025-04-17 08:40
ImoLaza’s Freeze Skip and Wind Skip features are smart tools designed to protect your irrigation system and conserve water under unfavorable weather conditions. This article will guide you through how they work, when they activate, and how you can configure or adjust them within your schedules.
Both Freeze Skip and Wind Skip check real-time weather data from your selected weather station 30 seconds before your scheduled irrigation begins. This includes current temperature and wind speed.
The Freeze Skip feature prevents irrigation if the weather is too cold. Here's how it operates:
. Initial Check (30 seconds before start): The controller checks the average temperature from the past hour. If it’s below your set threshold (e.g., 32°F), the irrigation schedule will be skipped.
. Second Check (45-minute mark): If your irrigation schedule runs longer than 45 minutes, the system will check the temperature again at that time. If it has dropped below the threshold, the system will stop watering.
. If the schedule duration is less than 45 minutes, no second check will occur.
Example: You’ve scheduled irrigation at 7:00 AM with a Freeze Skip threshold of 32°F.
. At 6:59:30, the controller checks the temperature. If it’s 30°F, watering will be skipped.
. If the temperature is above 32°F, the system starts watering.
. At 7:45, the controller checks again. If the temperature is now below 32°F, the system stops the irrigation.
This helps prevent freeze damage and reduce water waste during cold mornings.
The Wind Skip feature follows a similar logic but focuses on wind speed:
. 30 seconds before watering, the controller checks current wind conditions.
. If wind speed exceeds your set threshold, the system skips watering to avoid water being blown away or uneven distribution.
How to Set or Adjust Freeze/Wind Skip Thresholds
You can set or modify these features directly within the Fixed Schedule settings.
1. Select the Schedule
Go to the Schedules tab and choose the one you'd like to edit.
2. Open "Smart Weather Genius"
Tap the Smart Weather Genius tab within the schedule settings.
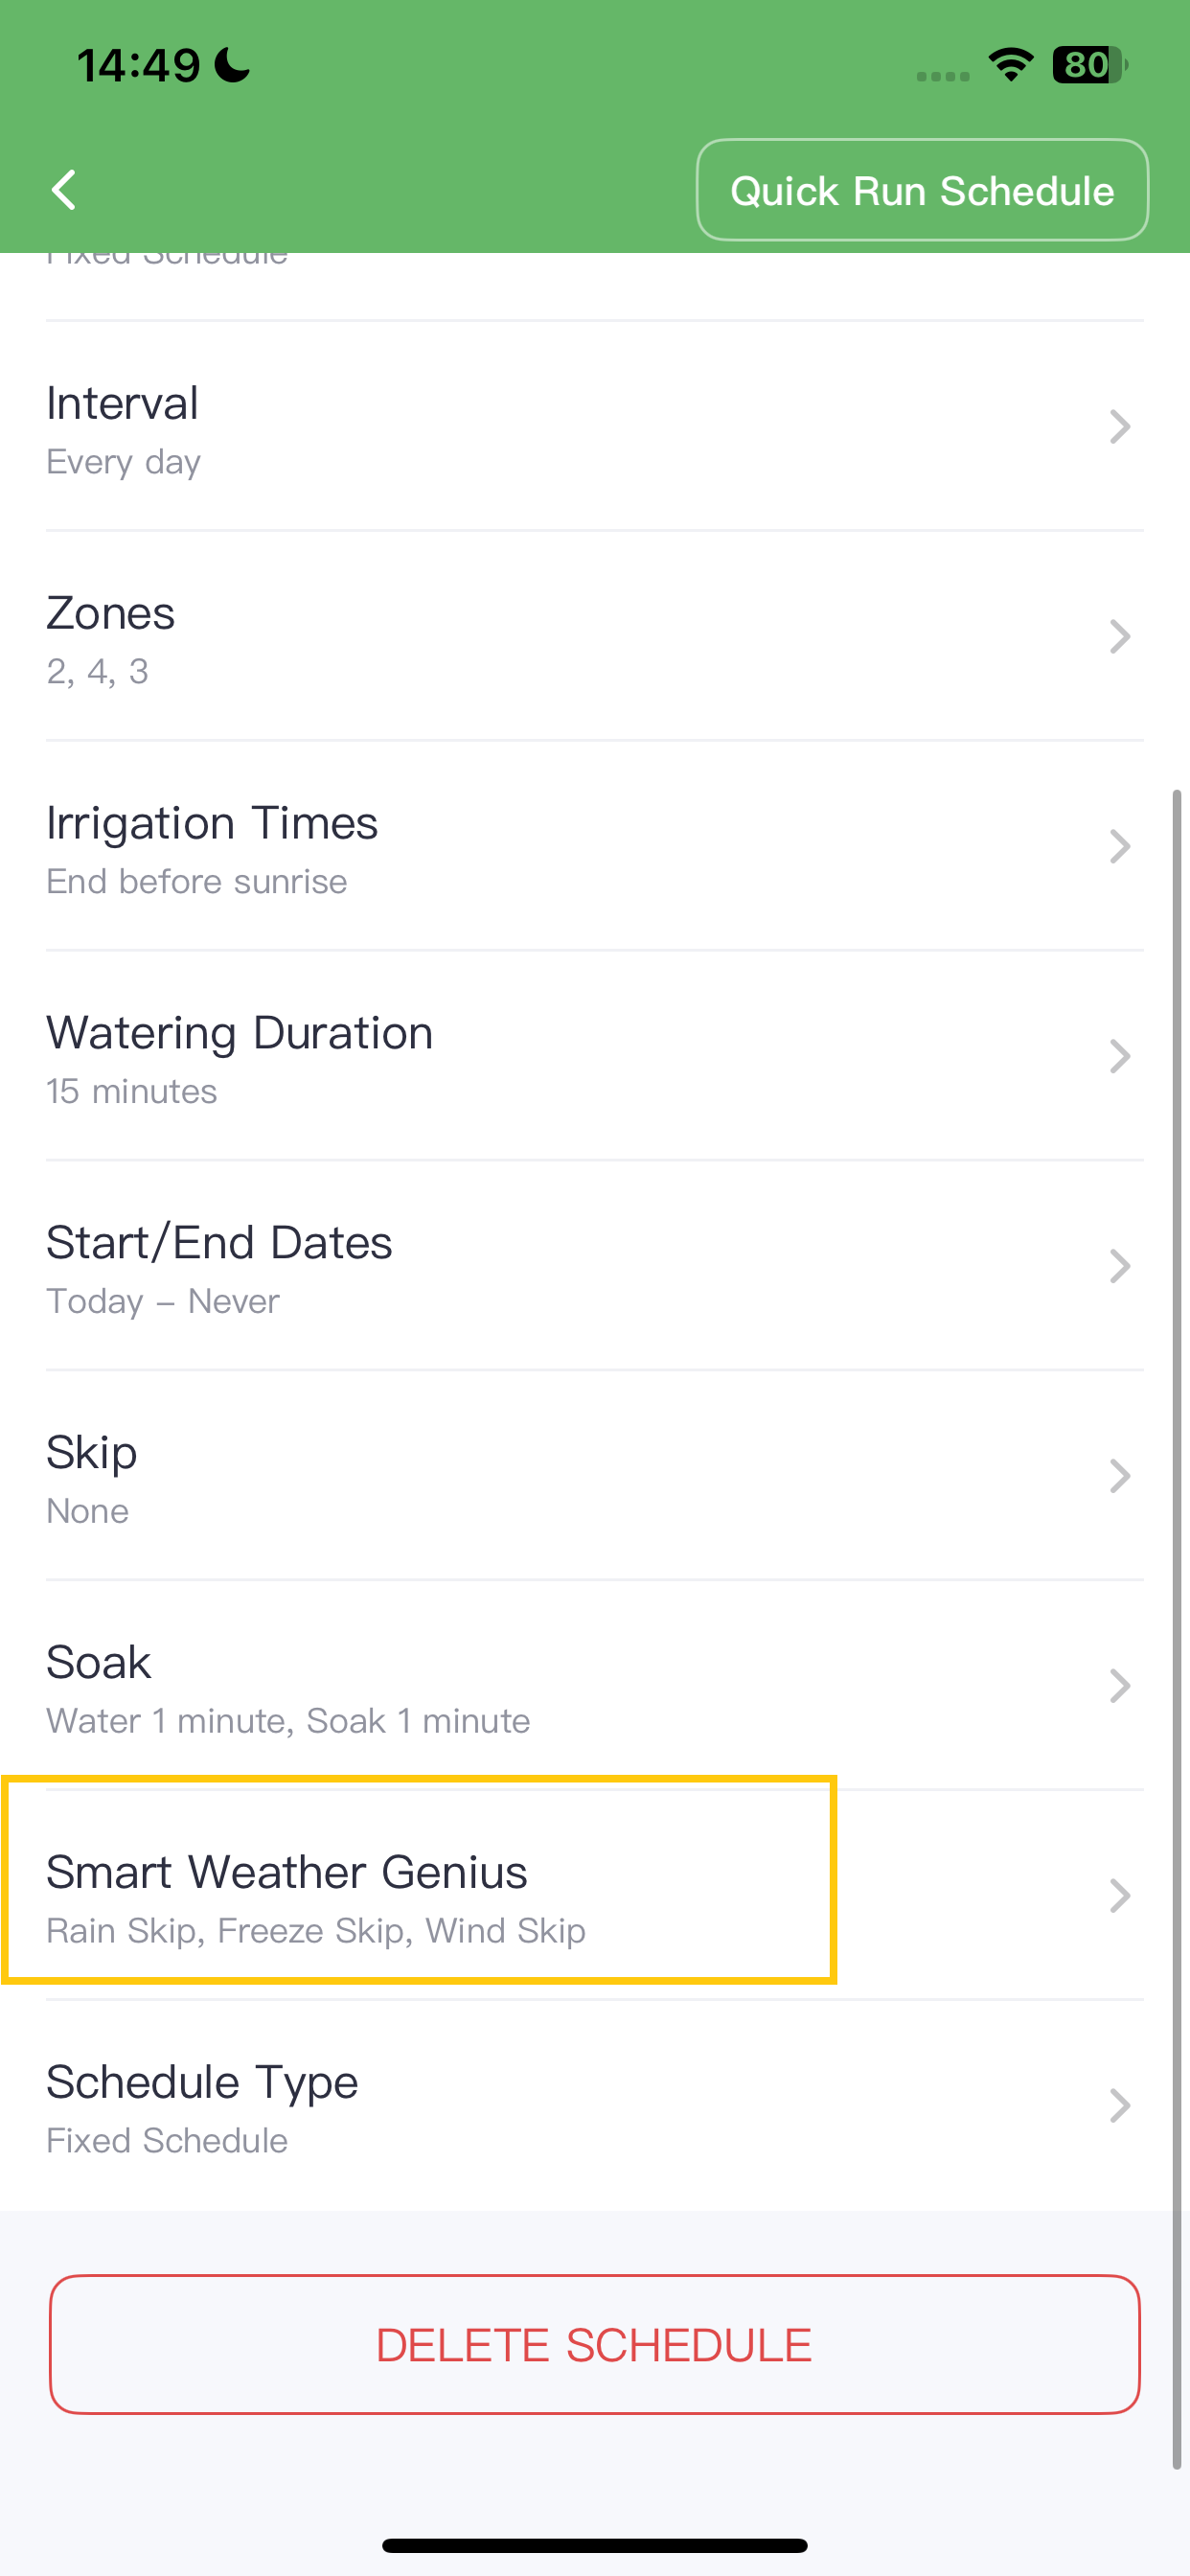
3. Adjust Thresholds
Choose your desired thresholds for Freeze Skip and Wind Skip according to your local climate and system sensitivity.
These adjustments ensure your irrigation system only runs under the right conditions, protecting both your lawn and water resources.
Still need help?
In case the above method doesn’t work for you, please contact our technical support team directly using the contact information below. We will respond to you by email within 12h after your message reaches us.
Email: Support@imolaza.com
Author: Imolaza
Last update: 2025-04-17 08:56
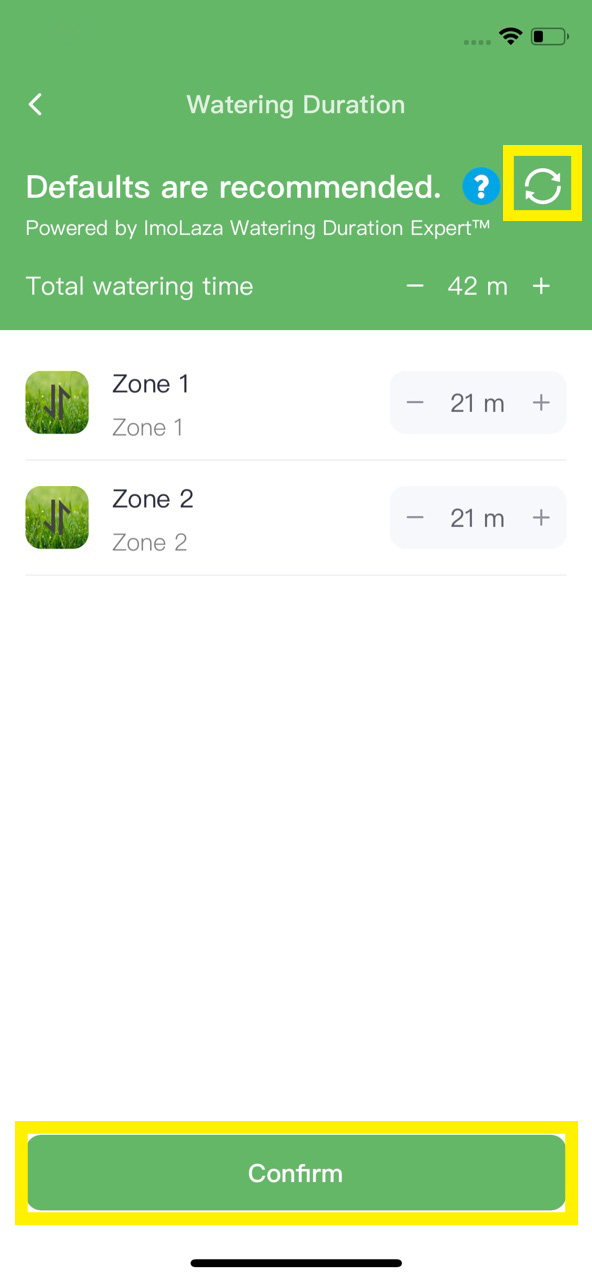
Generally speaking, it's not recommended to change the watering duration generated by the ET Smart Schedule, unless you are a professional. This watering duration is customized for your vegetation by the ImoLaza Watering Duration Expert advanced calculation model based on the area-related parameters you provide. If you change it, it may affect the watering effect. But if you really have special circumstances that need to be adjusted, you can use the following two methods:
1. Directly modify the watering duration value.
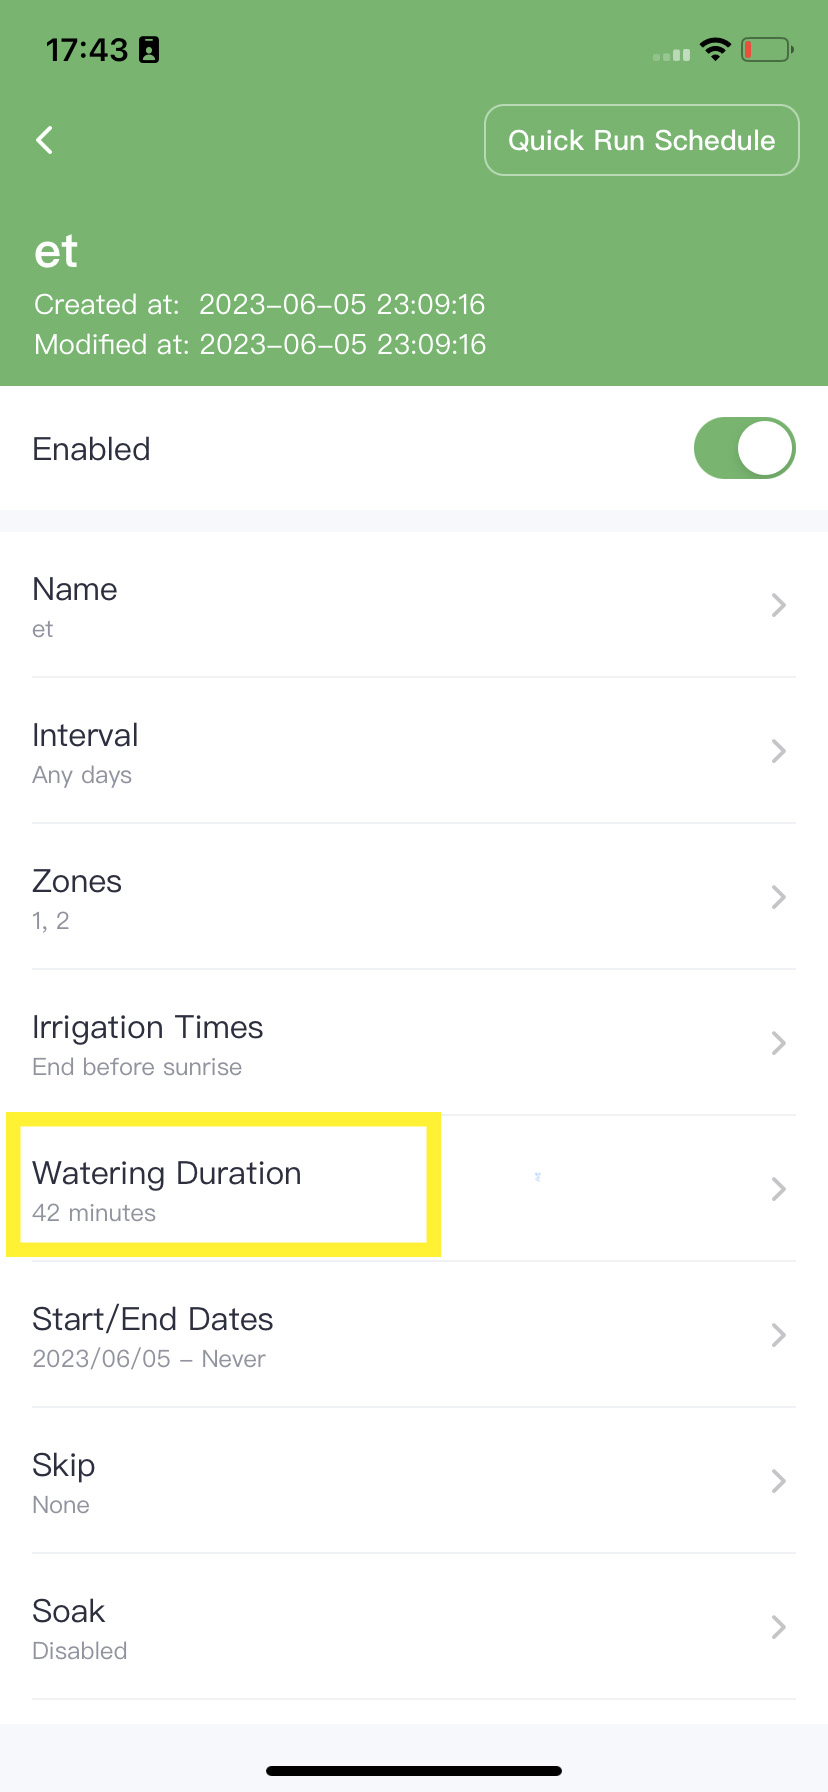
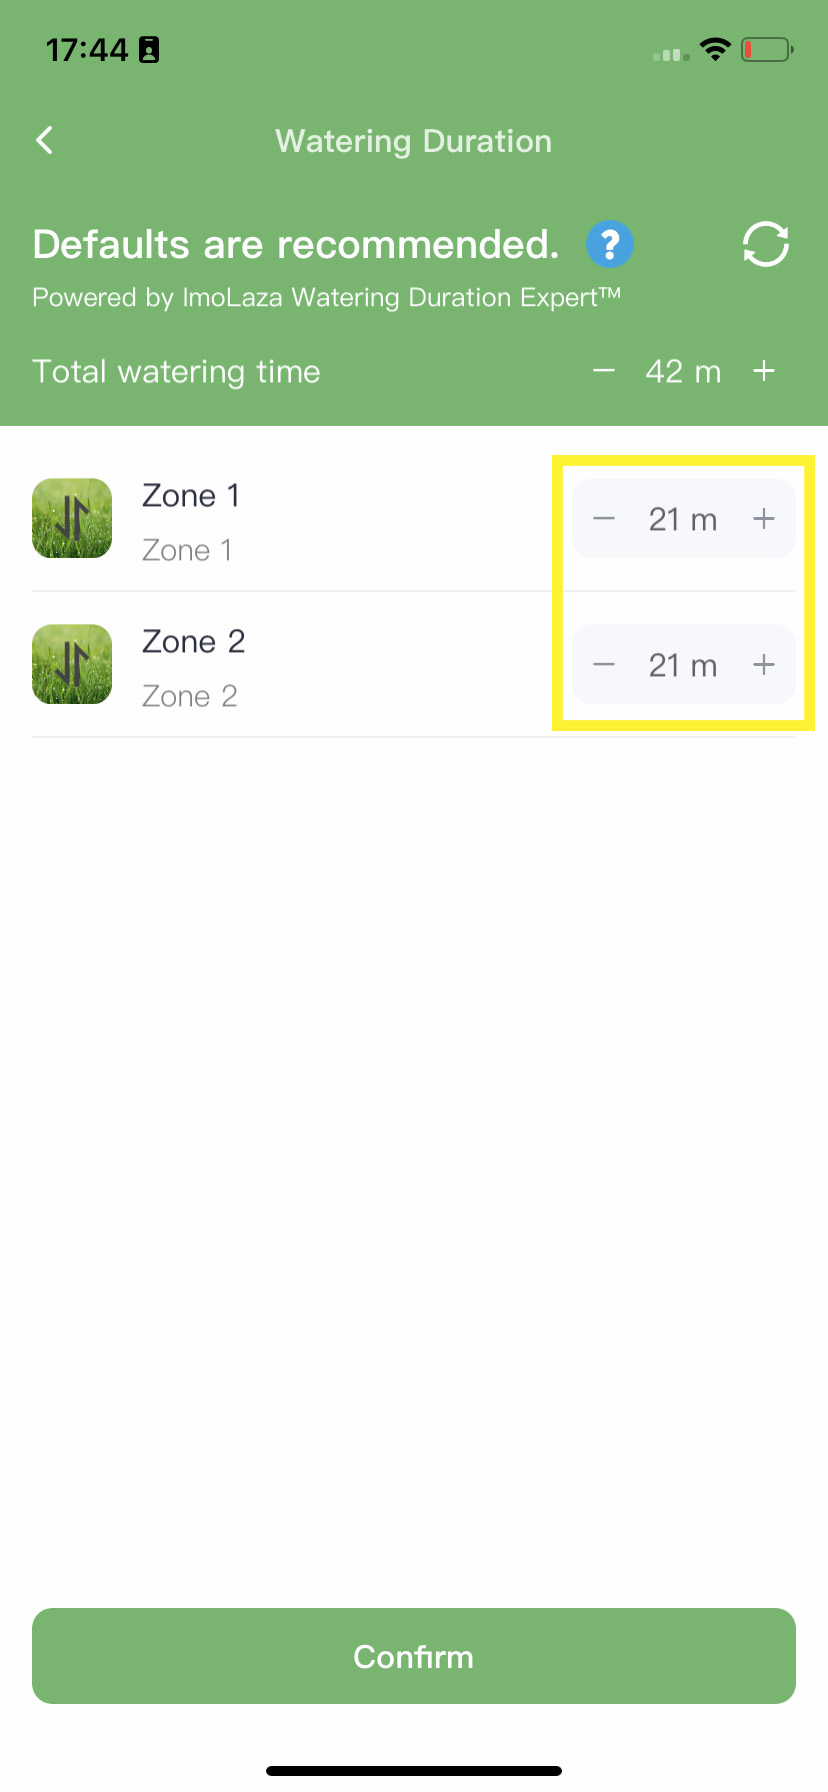
Tap the schedule you want to adjust the irrigation duration for and enter the schedule details page. Then tap “Watering Duration” and adjust the watering duration for each zone. Finally, tap “Confirm” to save the changes.
2. Fine-tuning the advanced zone settings.
The ET Smart Schedule utilizes multiple advanced zone settings as raw data for its data model to calculate irrigation duration and frequency. Each parameter adjustment directly affects the execution of the schedule. The following information will explain how advanced zone settings influence the schedule execution, and you can fine-tune these data parameters to adjust your schedule.
Here is a table summarizing how various parameters affect irrigation duration and frequency:
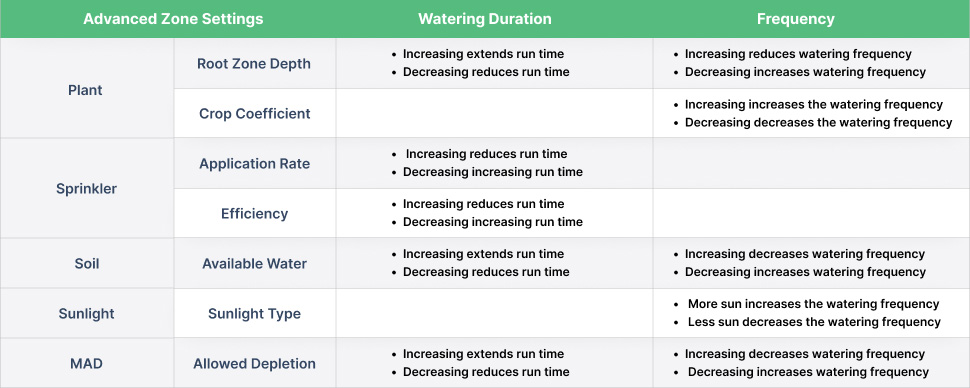
Crop Coefficients and Root Zone Depth
Crop coefficients are assigned to each crop type and are used to estimate evapotranspiration (ET) rates. These coefficients represent the ratio of observed ET for a specific crop. By adjusting the crop coefficient lever, you can modify the watering frequency accordingly. Increasing the crop coefficient will result in more frequent watering, while decreasing it will reduce the watering frequency. To achieve the desired watering schedule, it is recommended to adjust the crop coefficient in increments of +/- 10% and observe the effect. Remember to monitor the watering cadence and make further adjustments if necessary.
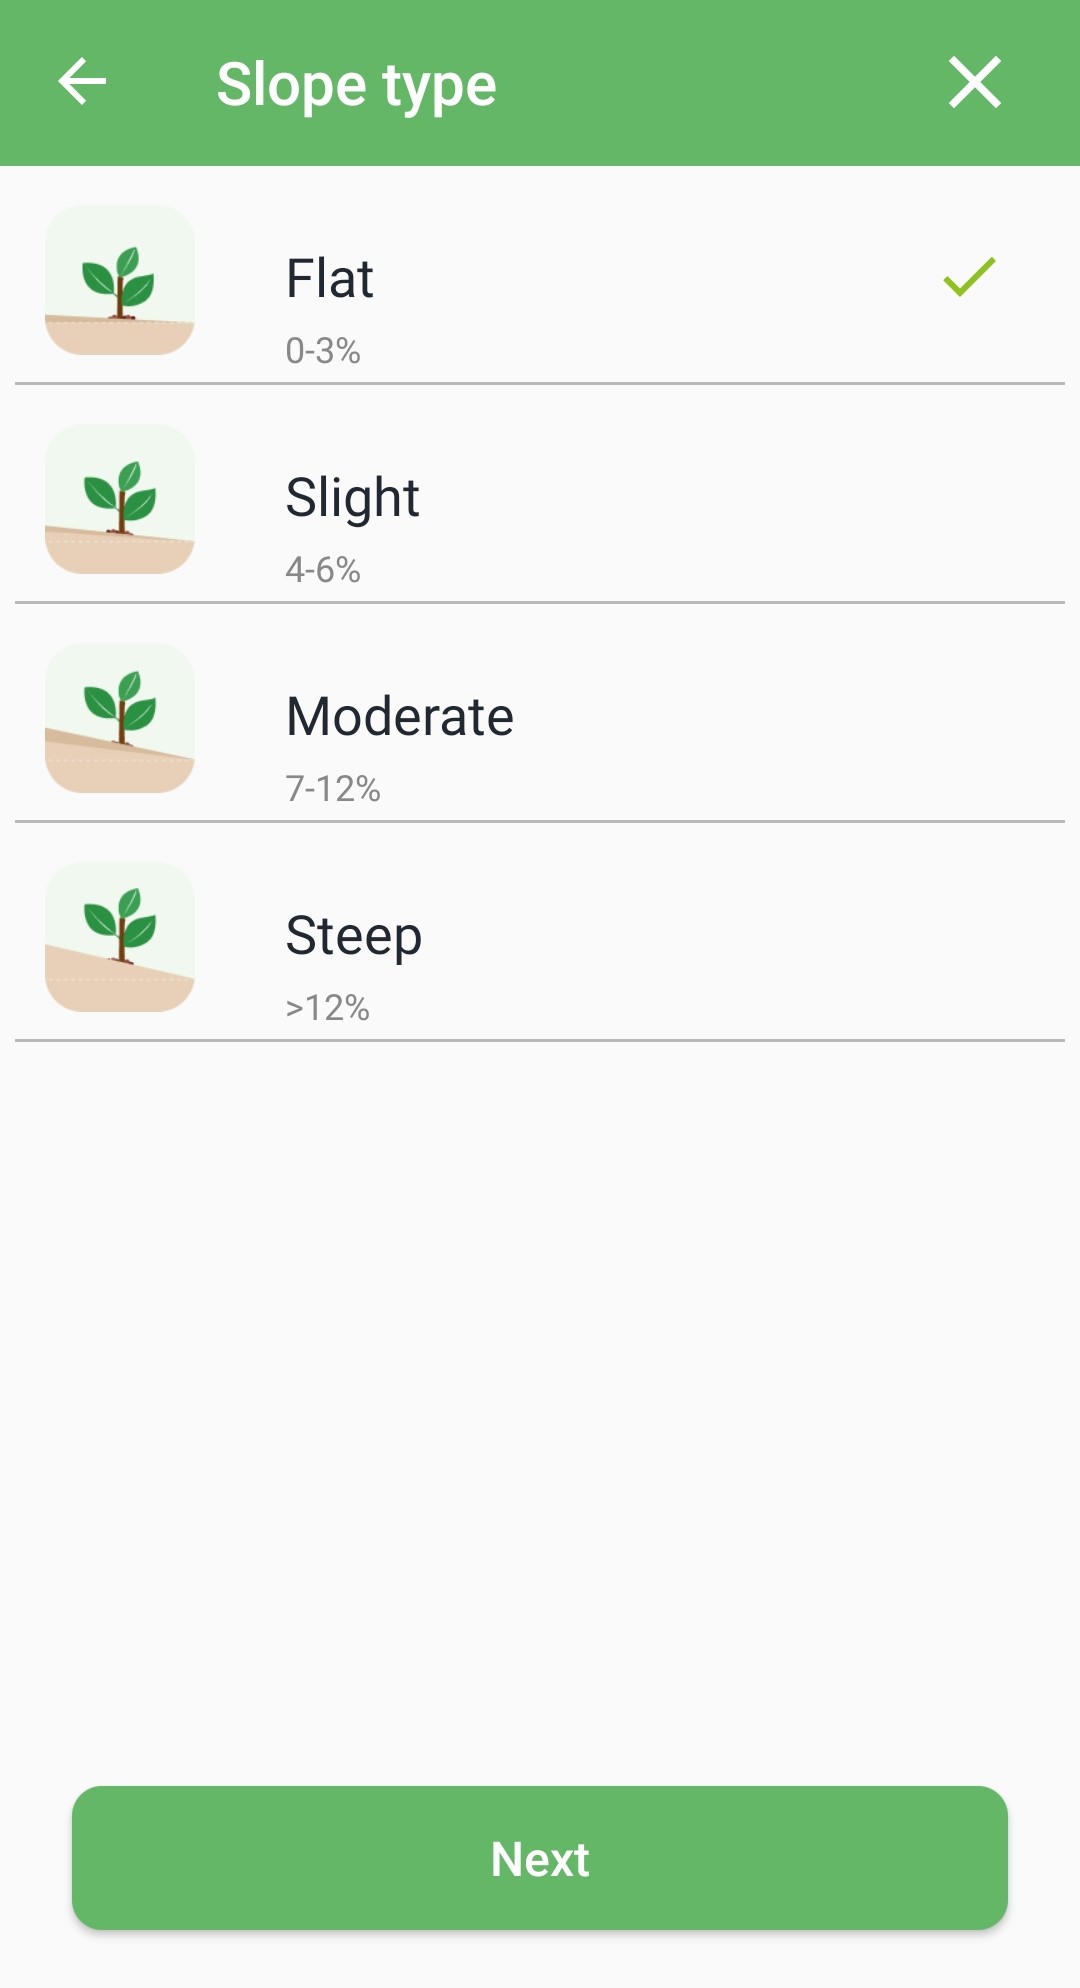
Root zone depth affects the irrigation demand and schedule. Each crop has a specific RZD value and a crop coefficient. Increasing the RZD value will increase the irrigation amount, which will extend the watering time and reduce the watering frequency. Decreasing the RZD value will decrease the irrigation amount, which will shorten the watering time and increase the watering frequency.
Here are the default values of root zone depth and crop coefficient for certain plants based on the industry standard.

Application Rate and Efficiency
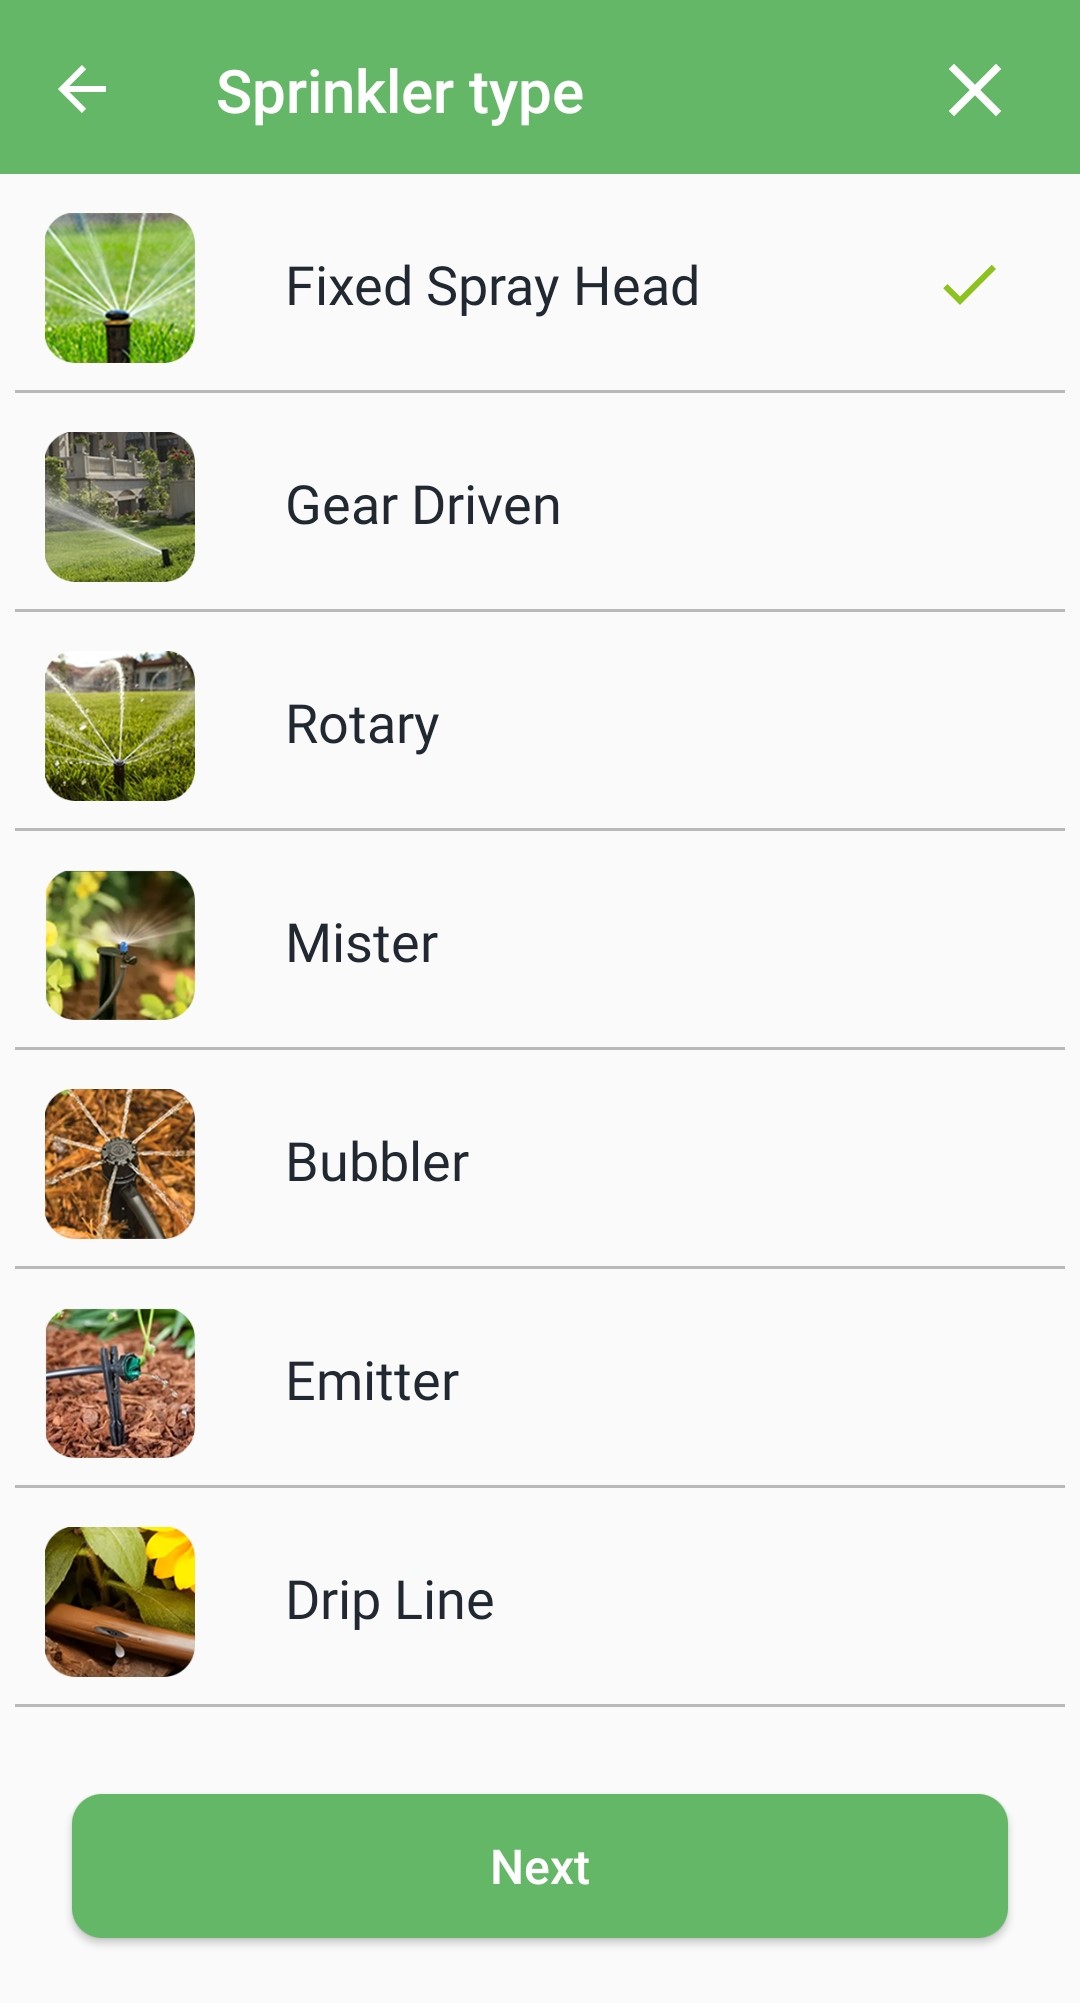
Sprinkler application rate means how much water your sprinkler heads are applying to your zone per hour. Spray head efficiency means how evenly your sprinkler heads distribute water across your zone. Higher application rate and efficiency result in lower total run time, and lower application rate and efficiency result in higher total run time.
Here are the default values of application rate and efficiency for certain plants based on the industry standard.

Available Water
Available water is the amount of water that can be stored in soil and be available for plants, and it is affected by soil type. The higher the available water value, the larger the irrigation amount, the longer the watering time, and the lower the watering frequency. The lower the available water value, the smaller the irrigation amount, the shorter the watering time, and the higher the watering frequency.
Here is the default value for each soil type.

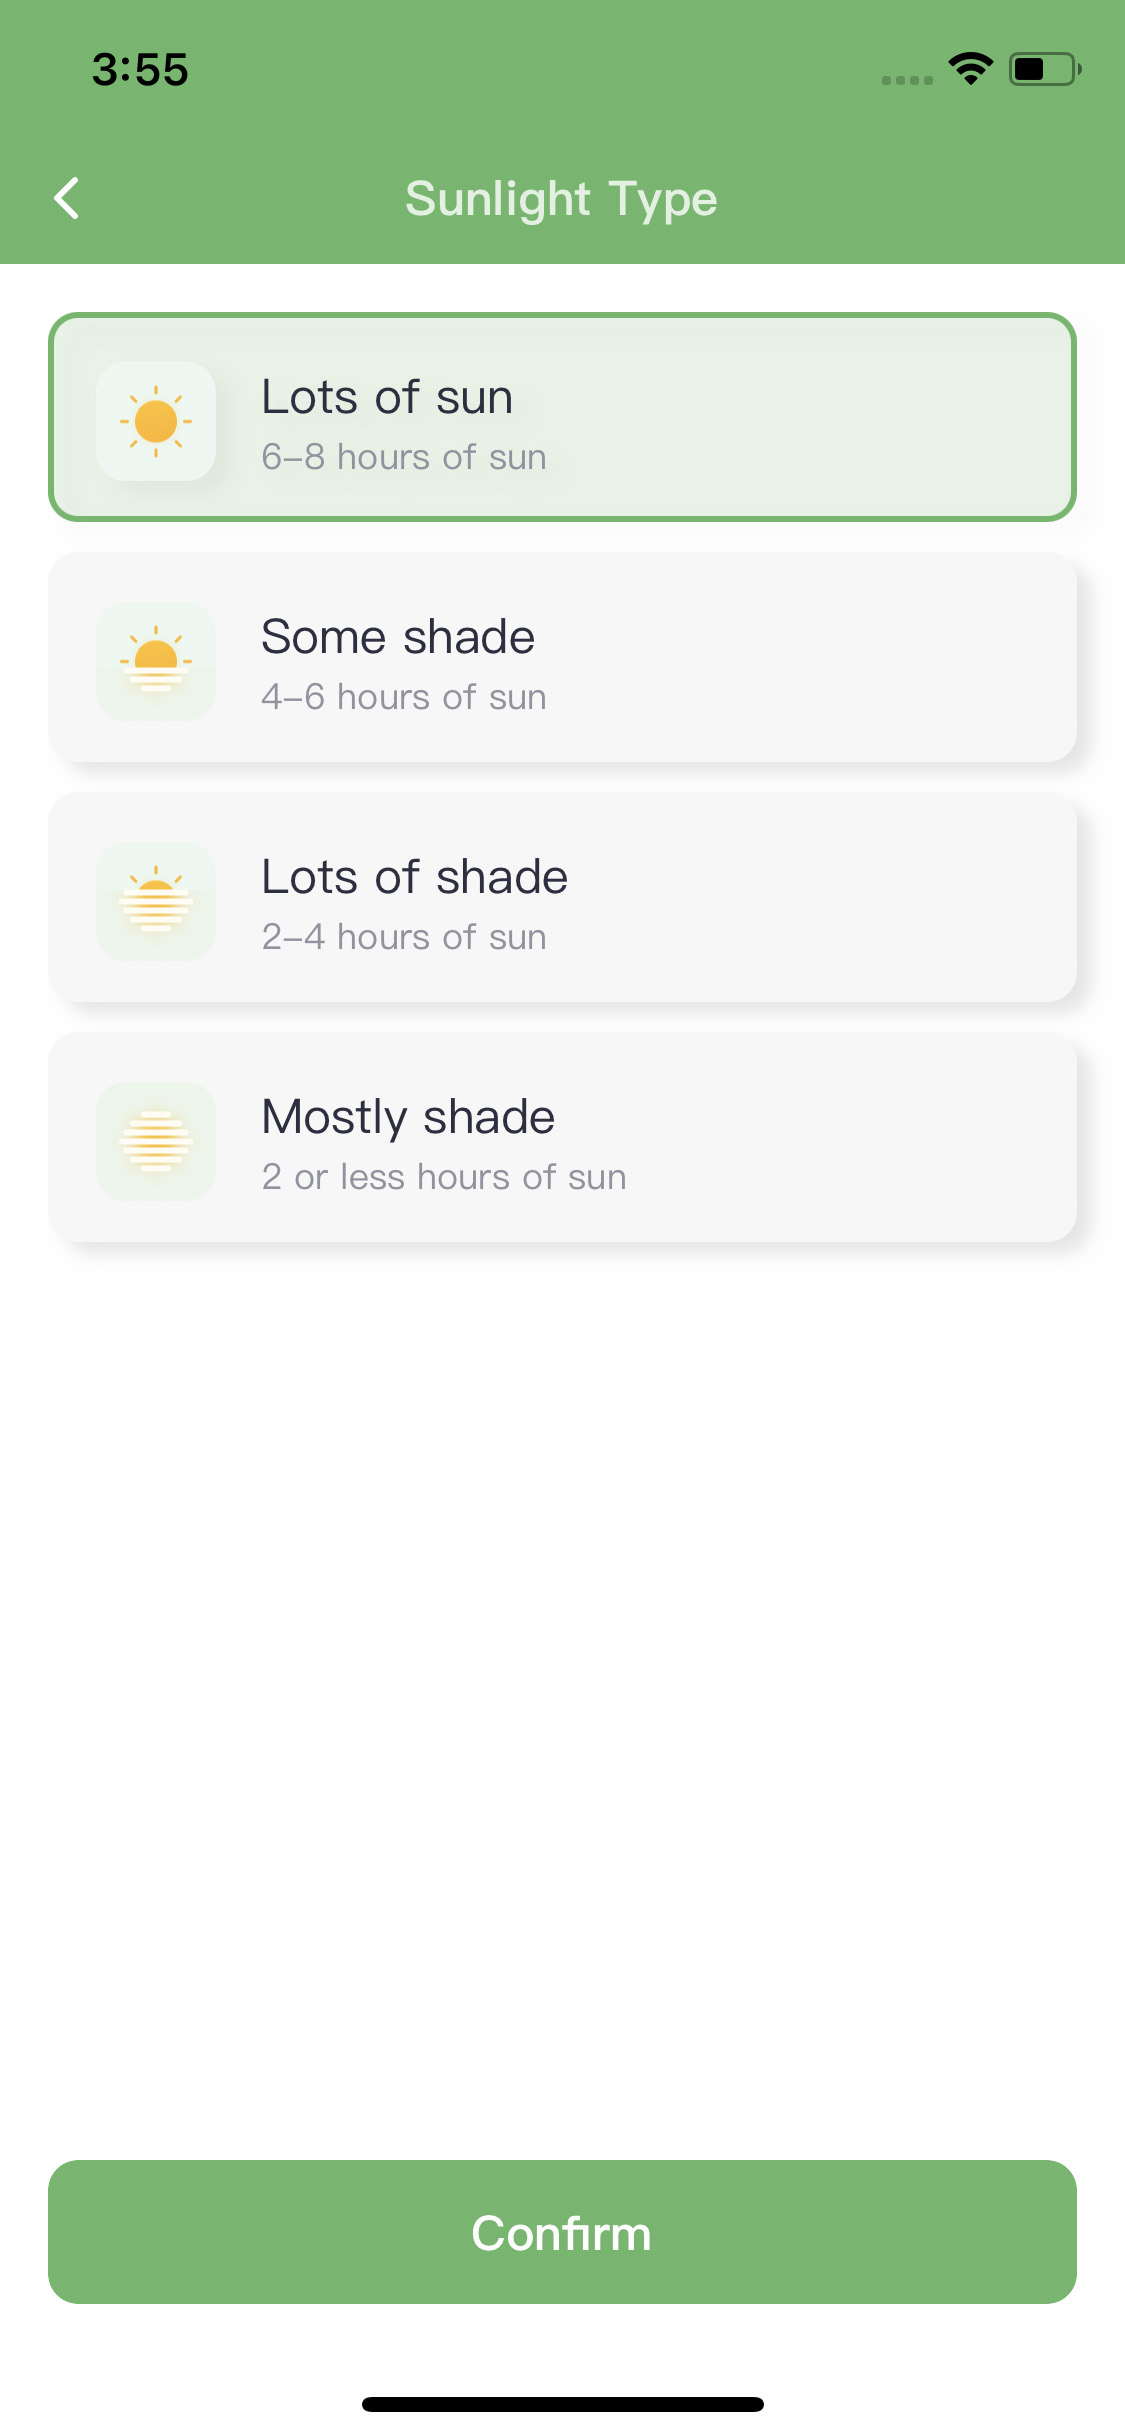
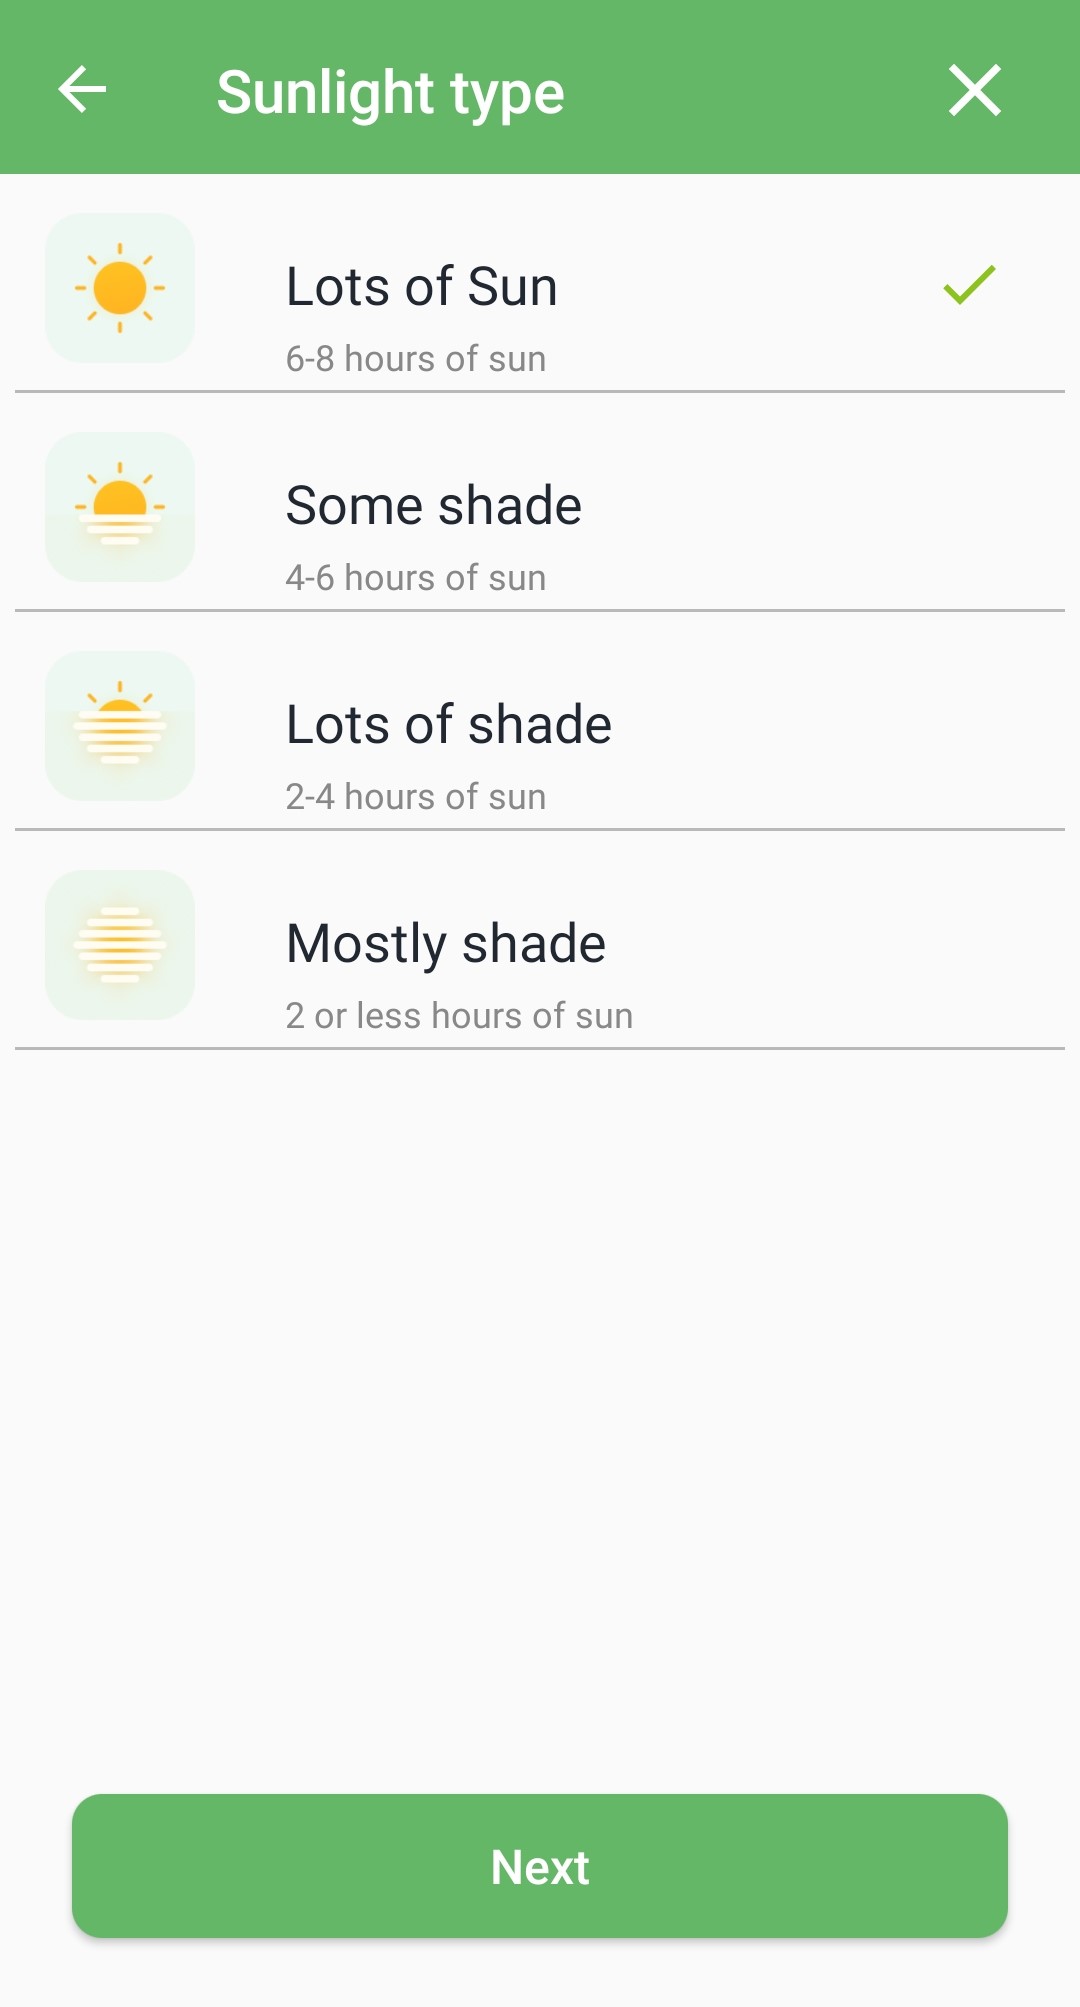
Sunlight Type
Sunlight type determines crop coefficient, crop coefficient determines ET value. A lower sunlight exposure for an area will result in a lower crop coefficient and ET value, which will lead to a lower watering frequency.
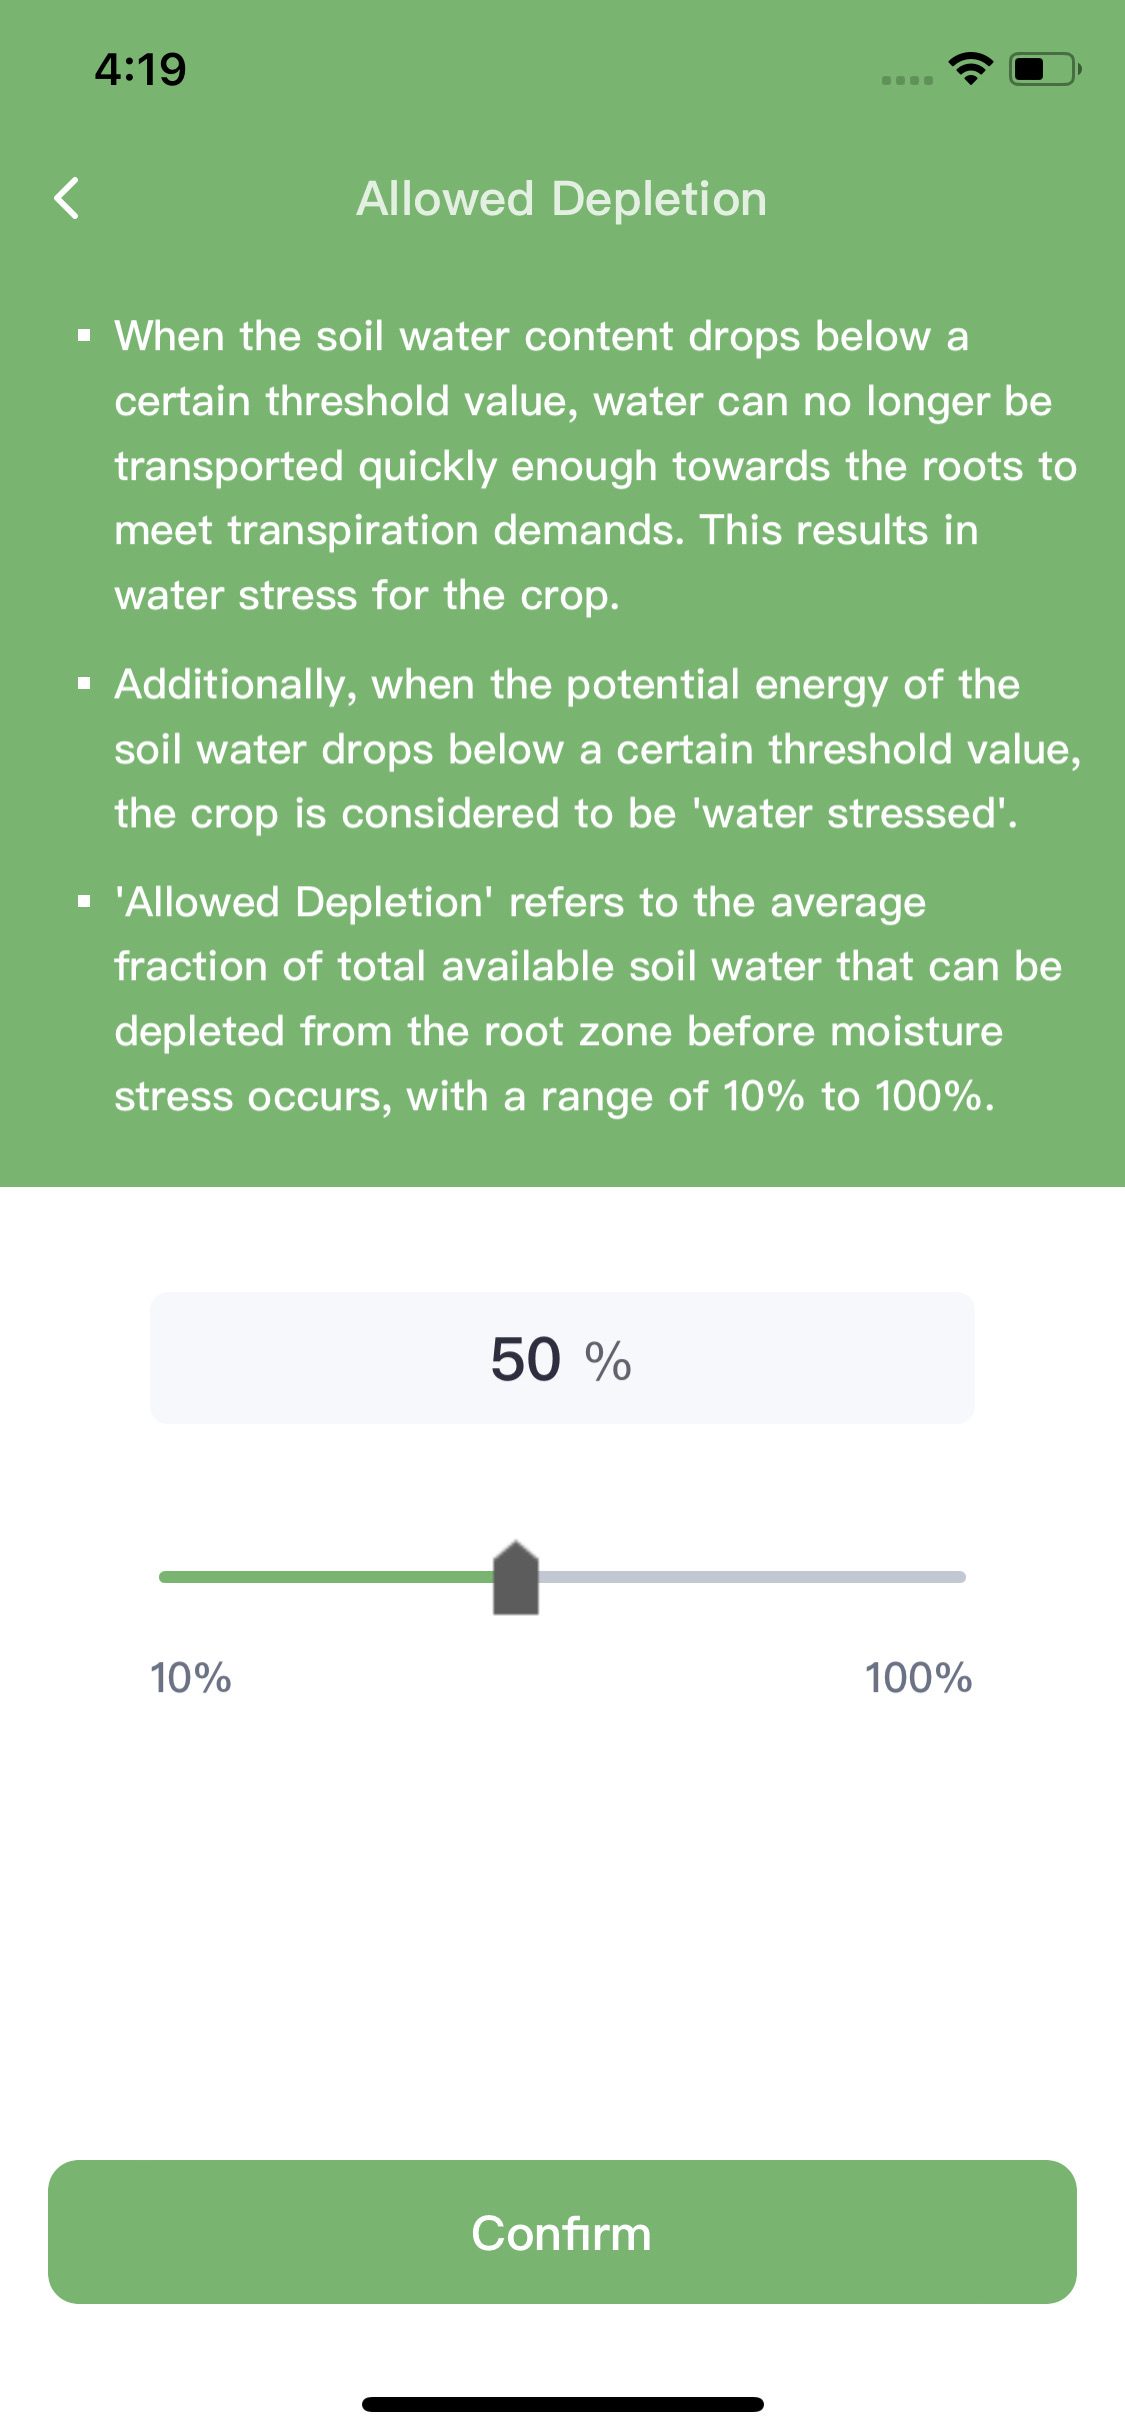
Allowed Depletion
Allowable depletion refers to the amount of water plants can consume from the soil before being stressed. It represents the percentage of water available in the root zone that plants can access before irrigation is needed. Increasing this percentage reduces the amount of water required for irrigation, resulting in shorter run times and increased watering frequency. Decreasing the allowable depletion percentage increases the amount of water needed for irrigation, leading to longer run times and reduced watering frequency. If you are not a professional, we recommend keeping the default value of 50%.
Please note, to modify the watering duration of an ET smart schedule by adjusting the zone attributes, you need to go to the schedule's details page and click on the circular icon in the top right corner of the "Watering Duration" section to update it. Finally, tap “Confirm” to save the changes.
In case the above method doesn’t work for you, please contact our technical support team directly using the contact information below. We will respond to you by email within 12h after your message reaches us.
Email: Support@imolaza.com
Author: Imolaza
Last update: 2025-04-17 08:59
What is Saturation Skip?
Saturation Skip is an intelligent feature in ET Smart Schedules that prevents overwatering by analyzing real-time and forecasted weather data. It calculates the soil’s moisture balance based on rainfall, irrigation, and evapotranspiration. If enough moisture remains in the soil, the system skips the next scheduled irrigation, helping conserve water and promote healthy plant growth.
How Does It Work?
Saturation Skip uses weather data from the past 15 days and forecasts for the next 7 days to estimate crop evapotranspiration and rainfall. It adds up natural rainfall, previous irrigation (including Quick Runs and manual watering), and compares it against plant water needs.
. If the soil moisture is above 0%, irrigation will be skipped.
. If soil moisture drops to 0%, irrigation proceeds as scheduled.
Zone-Based Logic
This feature operates independently per zone, not by schedule. Zones with different conditions—like soil type, slope, or sun exposure—may behave differently. Some zones may be skipped while others still run, based on their unique moisture needs.

How to Enable or Disable It?
. Enabled by default in all ET Smart Schedules.
. Cannot be turned off, as it replaces the basic Rain Skip with smarter logic.
Troubleshooting Tips
If things don’t seem right, try these steps:
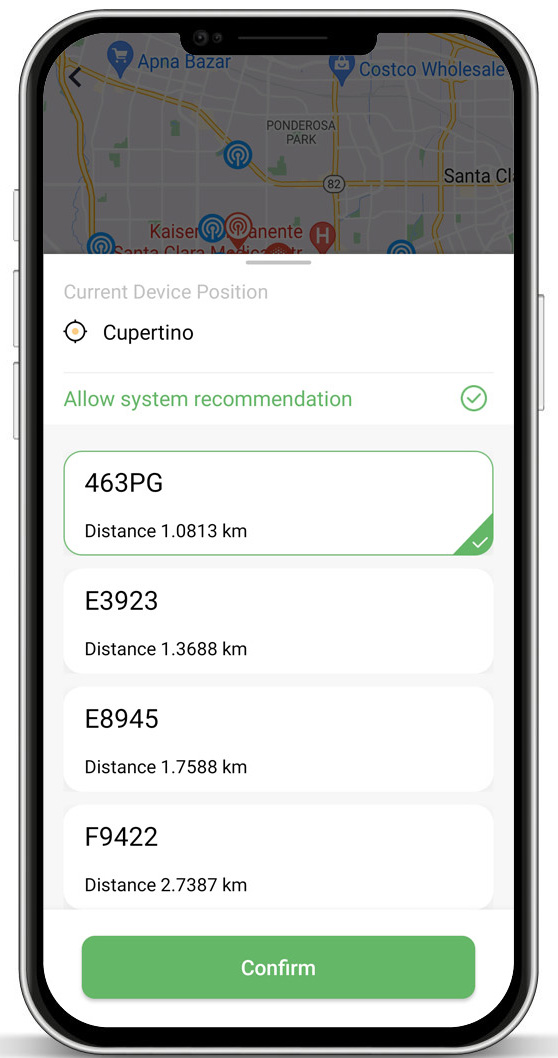
1. Weather Station
Go to Settings > Controller Settings > Weather Stations.
Make sure “Allow system recommendation” is enabled. We’ll auto-switch to a new station if your selected one goes down.
2. Zone Settings
Double-check all parameters: soil type, sprinkler type, slope, and sun exposure.
3. Hardware Check
If a zone doesn’t water as expected, inspect the valves and sprinklers. The issue might be mechanical, not software-based.
Still need help?
In case the above method doesn’t work for you, please contact our technical support team directly using the contact information below. We will respond to you by email within 12h after your message reaches us.
Email: Support@imolaza.com
Author: Imolaza
Last update: 2025-04-17 09:09
Author: admin
Last update: 2025-04-17 09:13
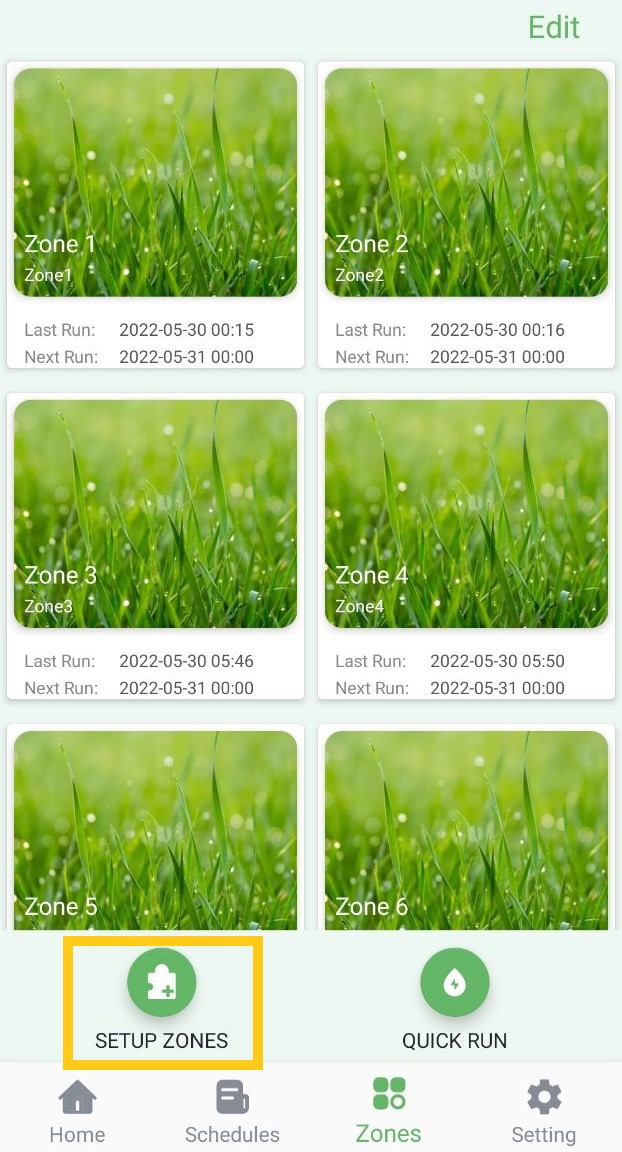
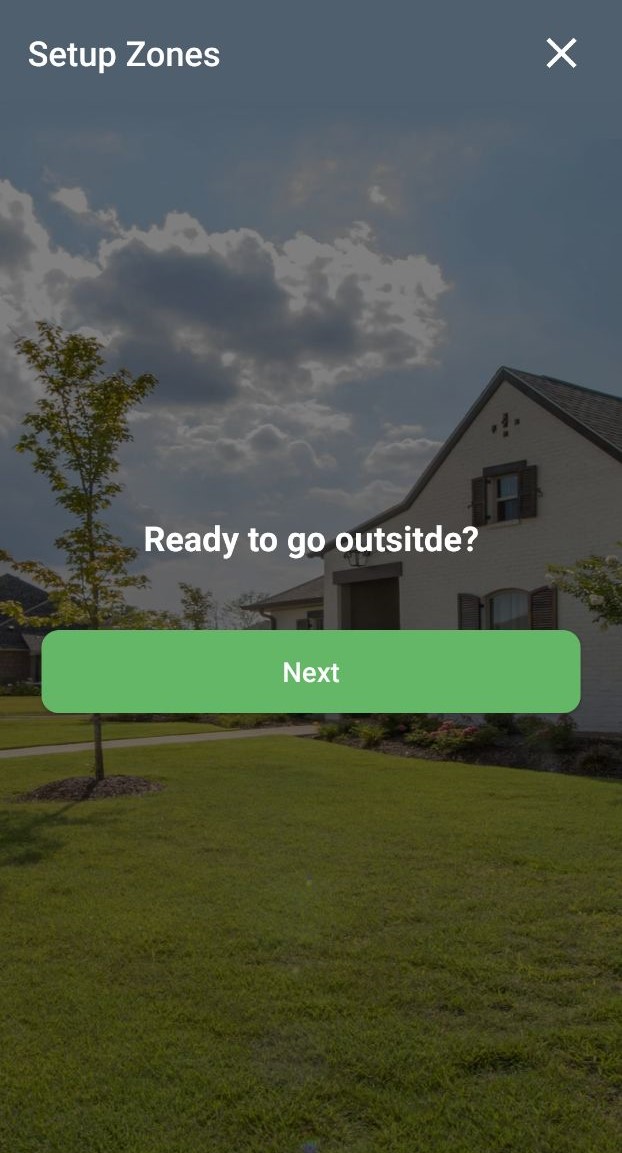
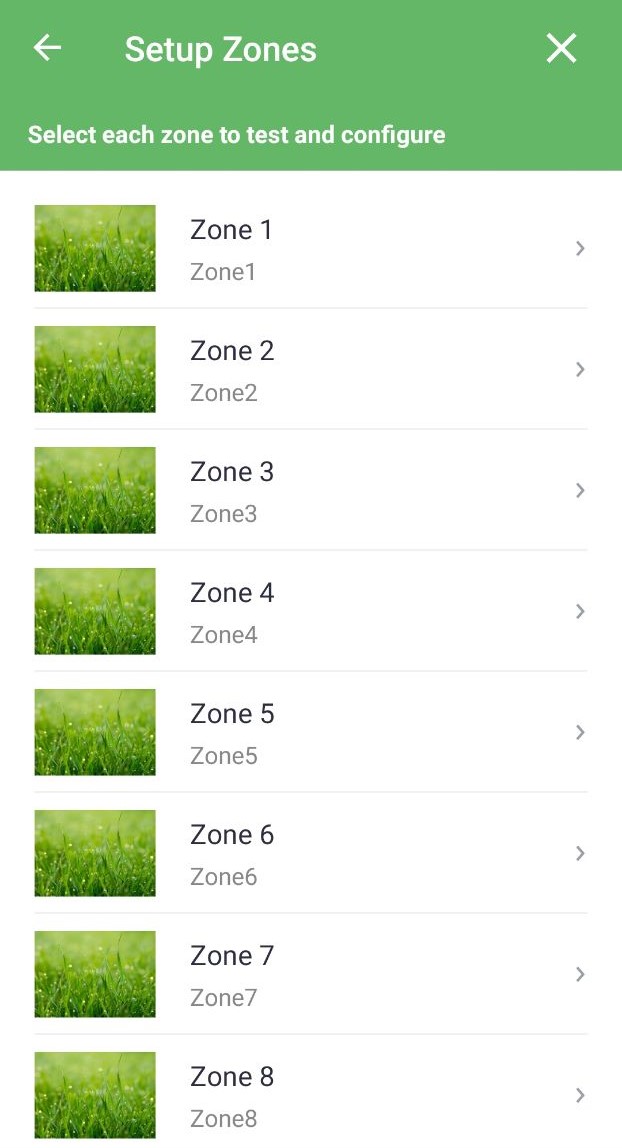
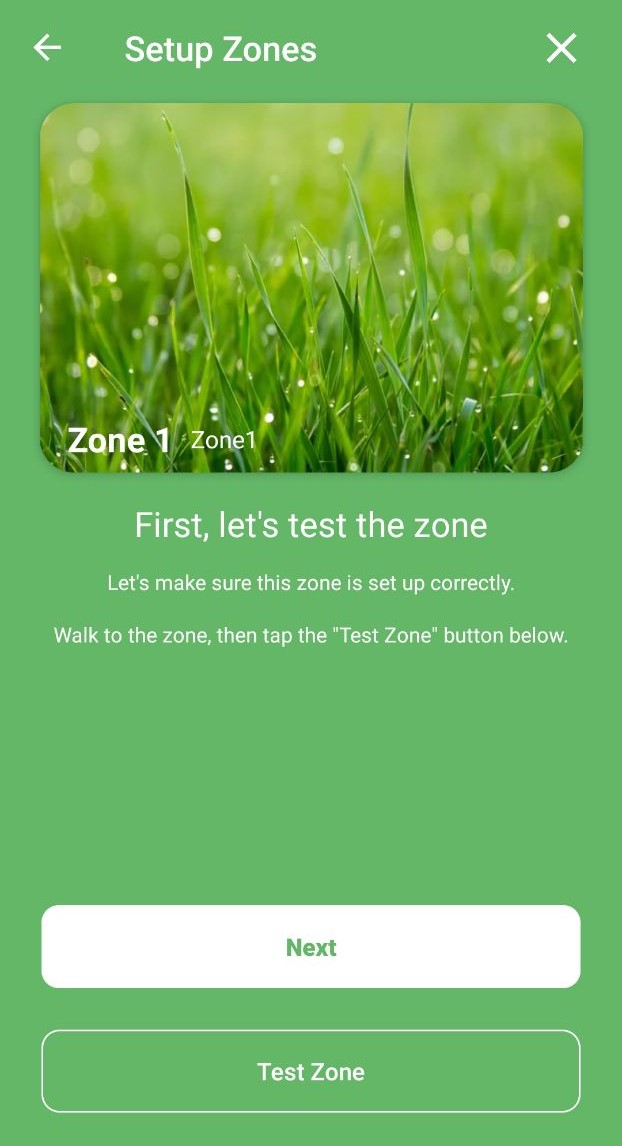
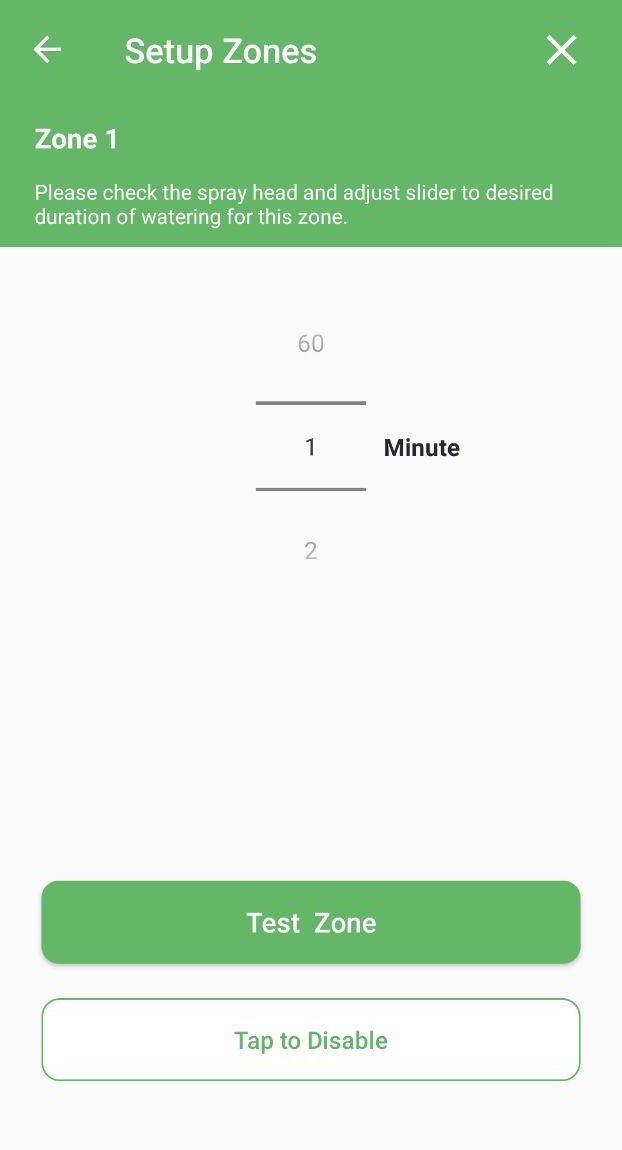
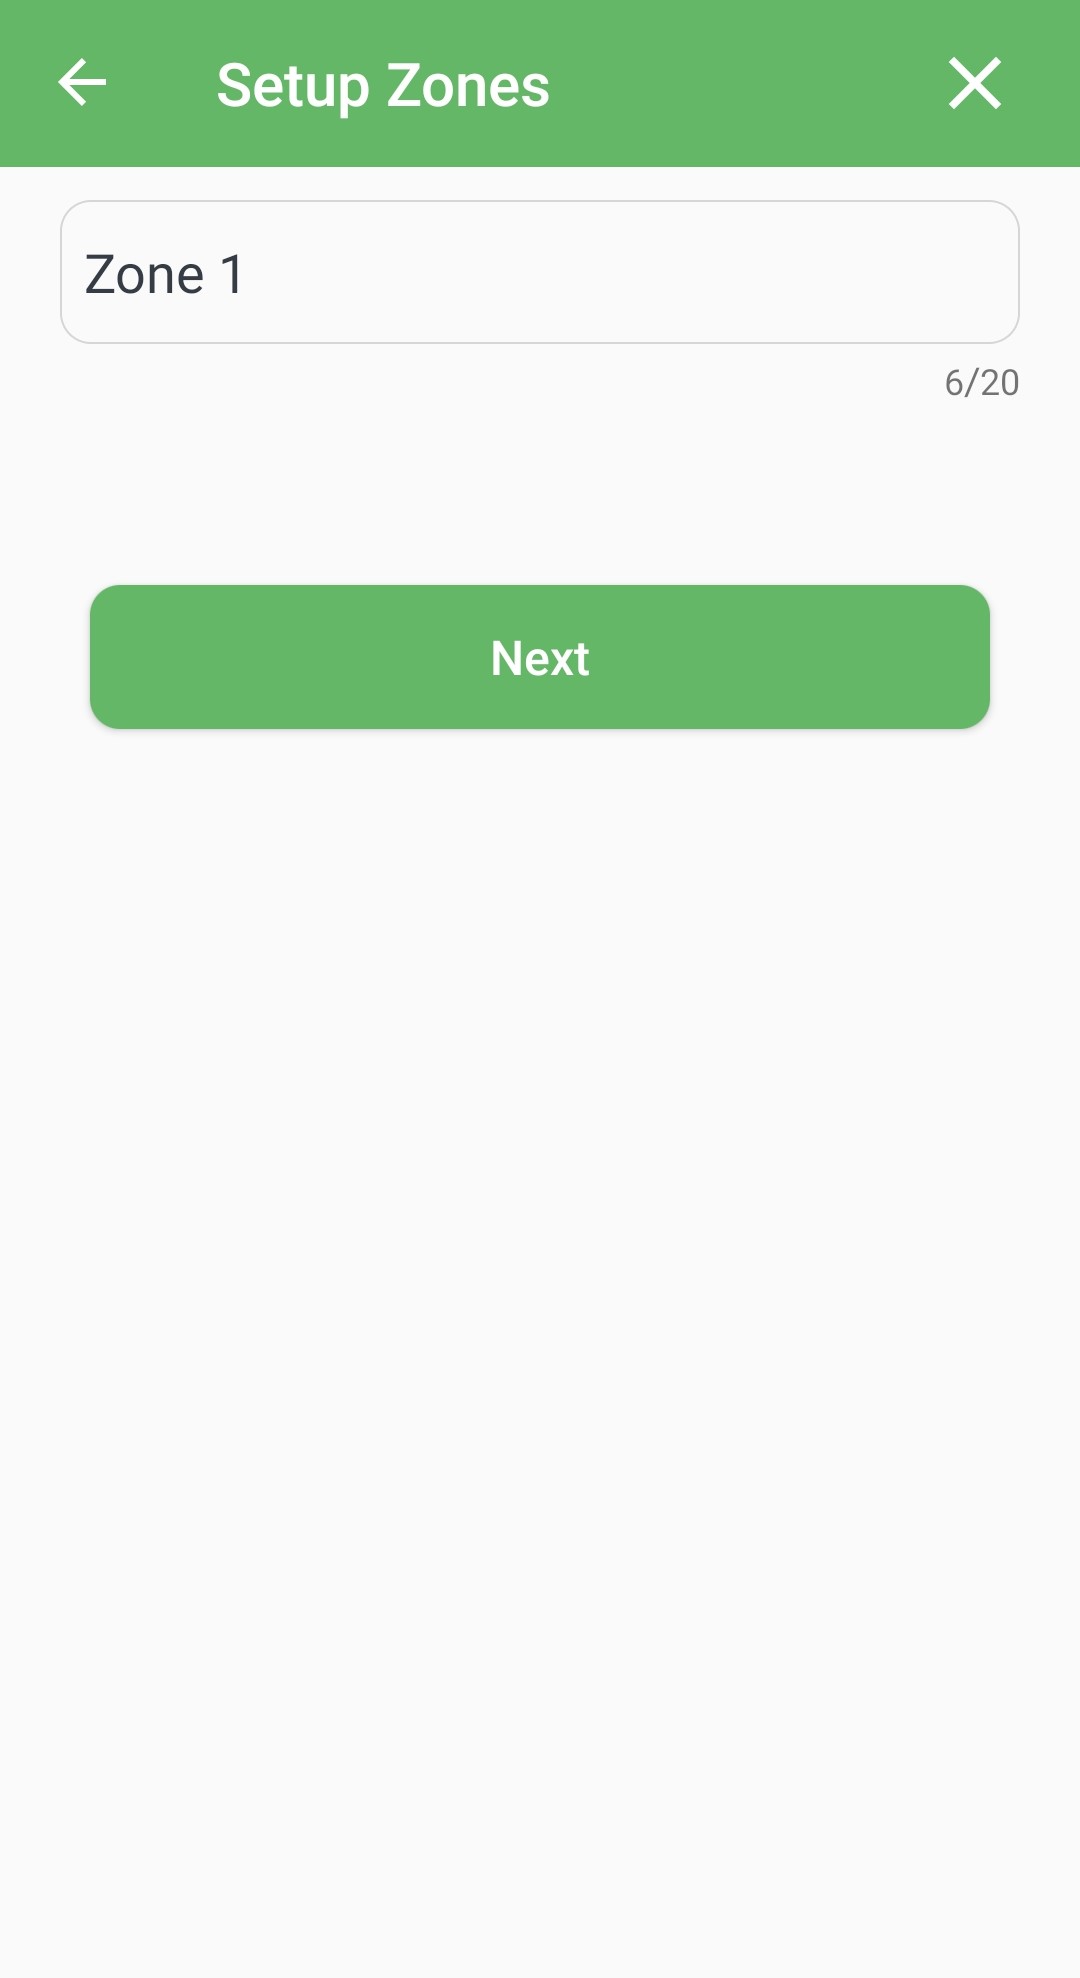
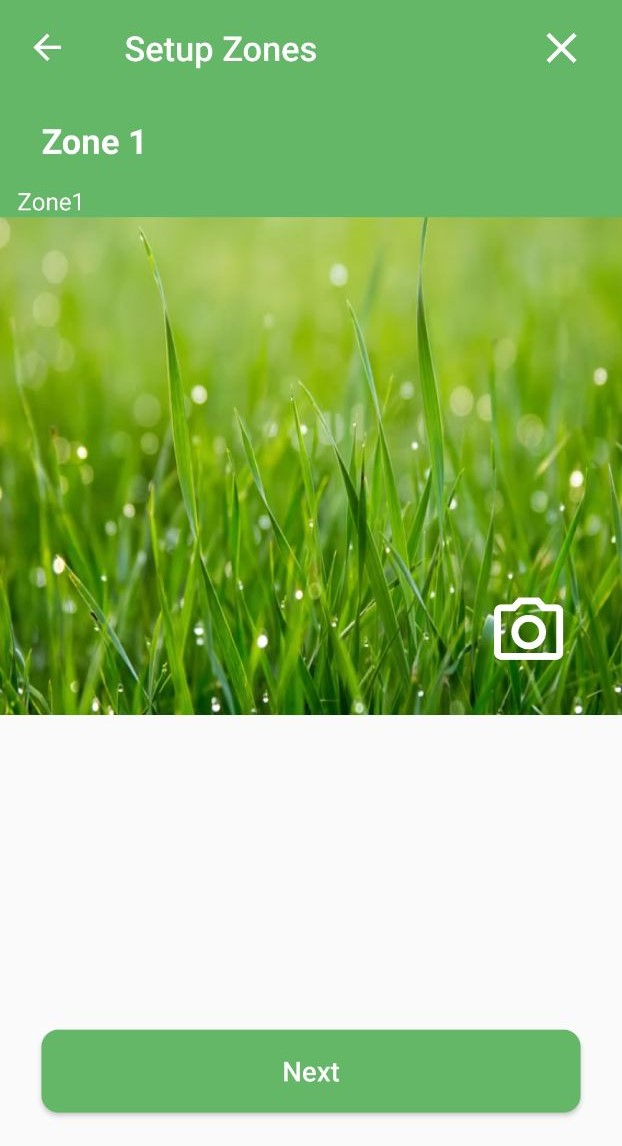
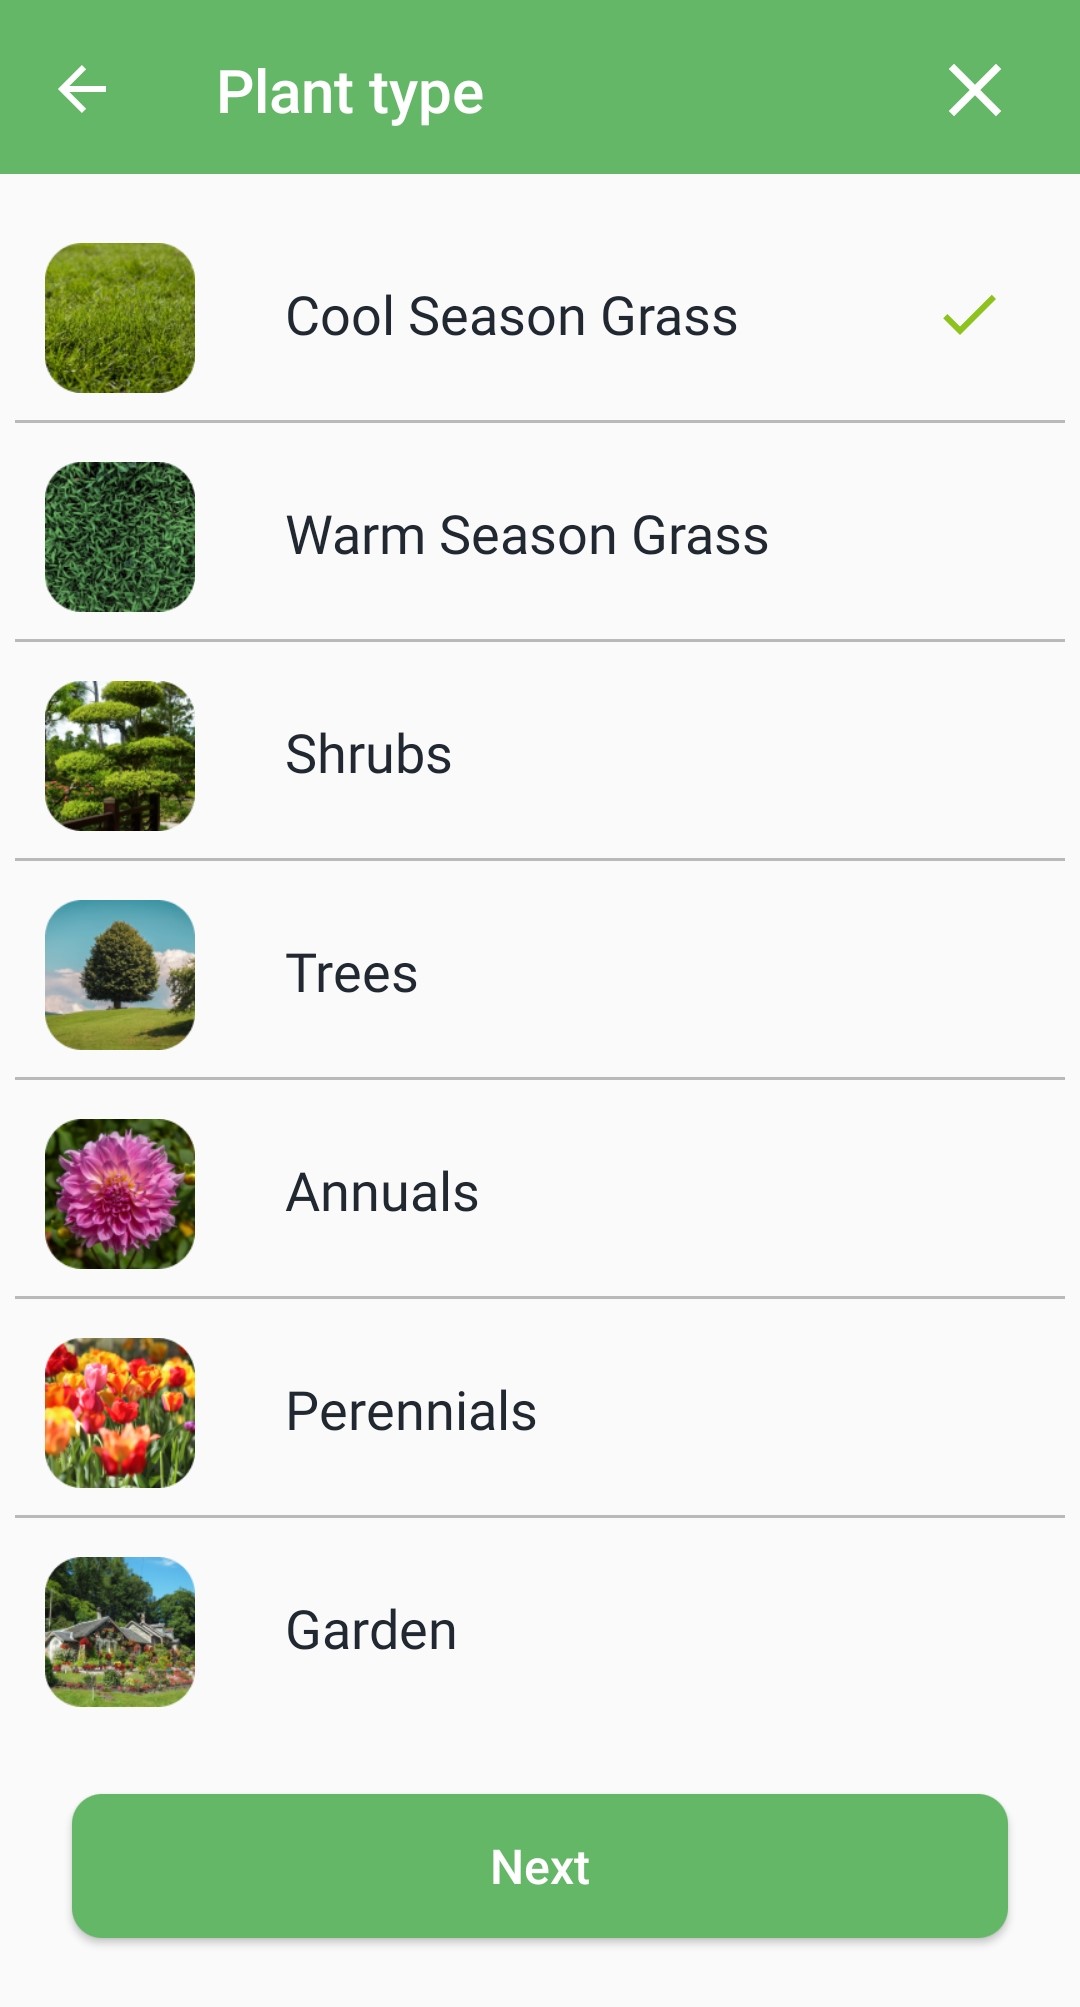
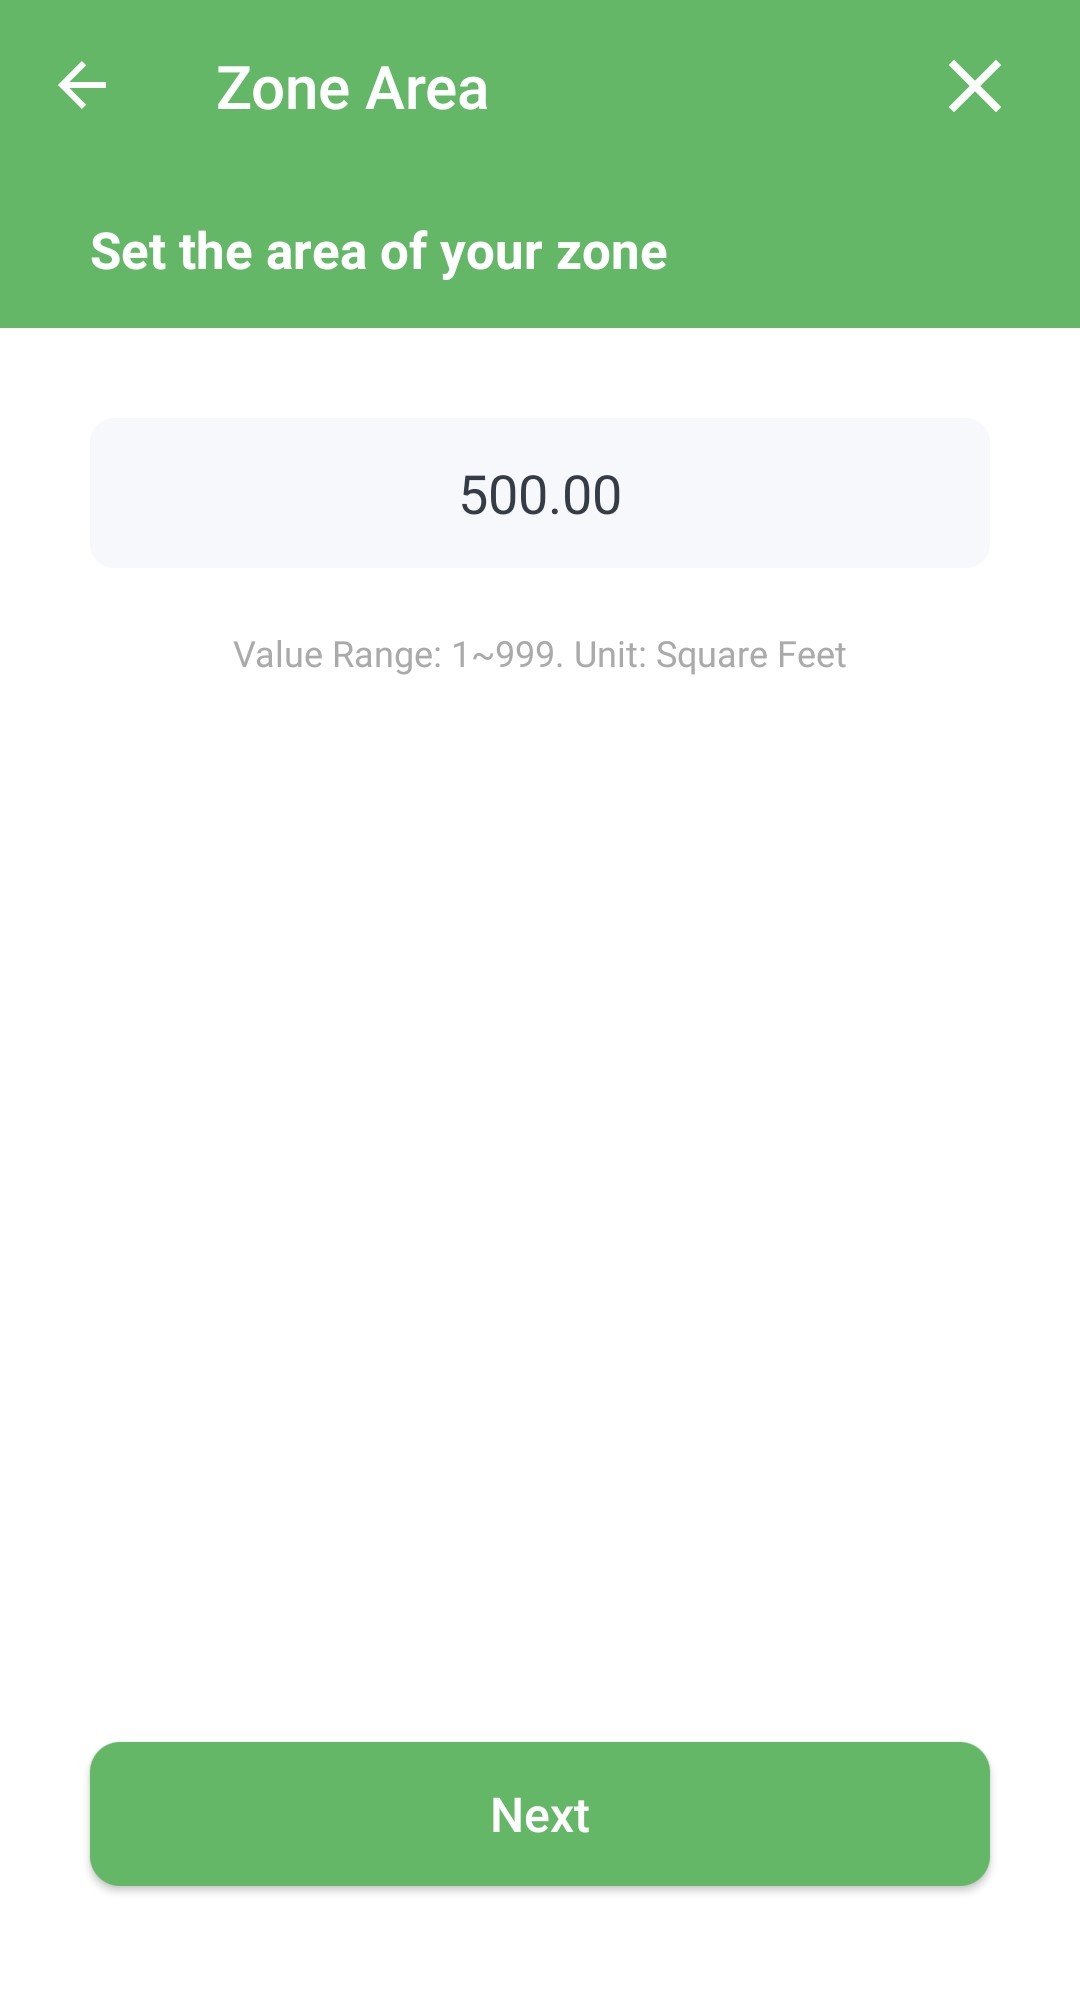
ImoLaza is designed to provide tailored care for each zone in your yard. The more details you provide, the smarter and more efficient your irrigation becomes. Follow these steps to set up your zones:
Go to the "Zones" screen. Tap "SETUP ZONES".


Still need help?
In case the above method doesn’t work for you, please contact our technical support team directly using the contact information below. We will respond to you by email within 12h after your message reaches us.
Email: Support@imolaza.com
Author: admin
Last update: 2025-04-17 09:56
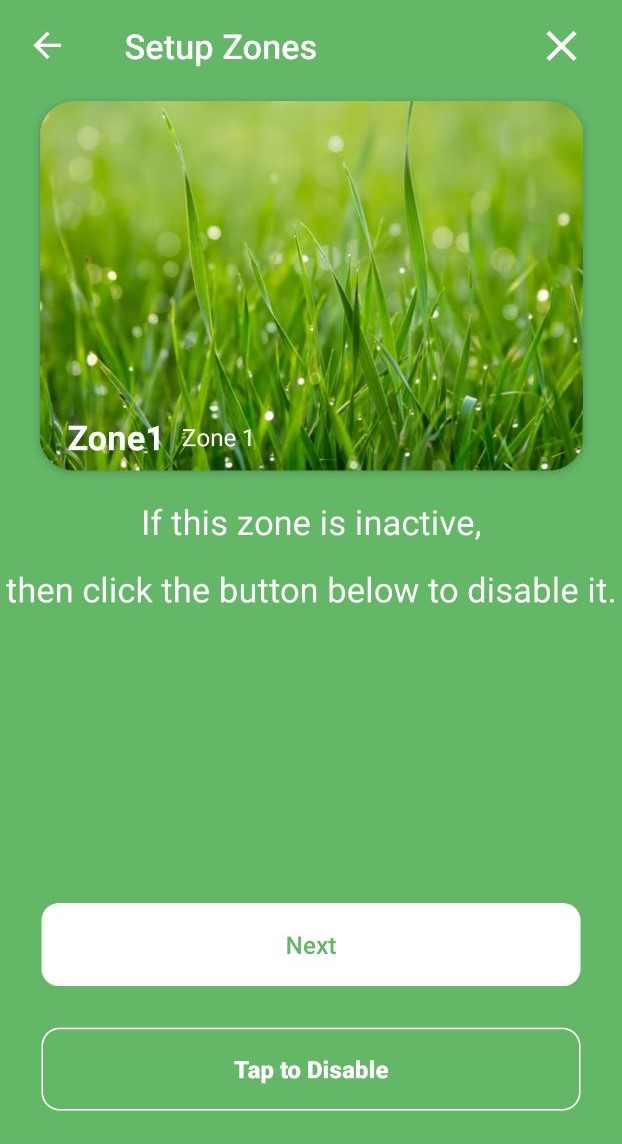
If you happen to have an idle zone and don't want to waste water by accidentally watering it, you'd better disable the zone. Here are the solutions for you.
1. Click the zone that needs to be disabled/enabled on the Zones screen, go to the details page and toggle the white icon to disable.
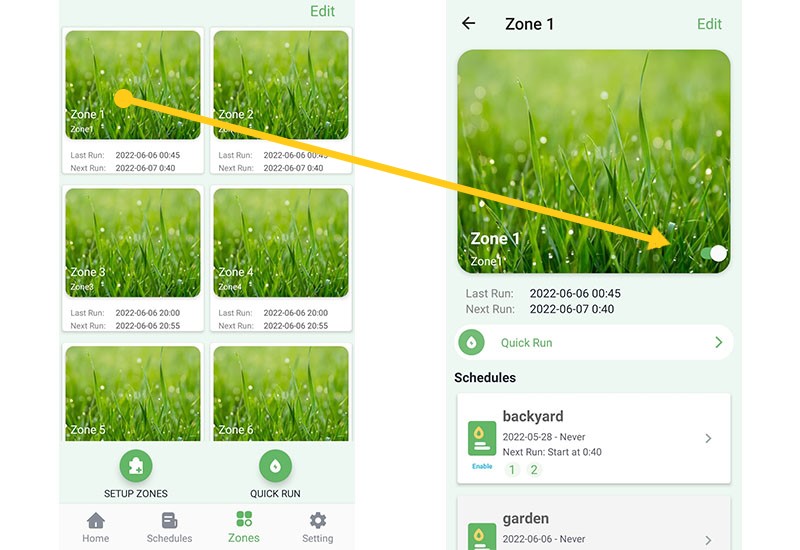
2. Hit "Edit" on the Zones screen and jump to the "Zone Enabled" page. Toggle the white icon to disable/enable zones.
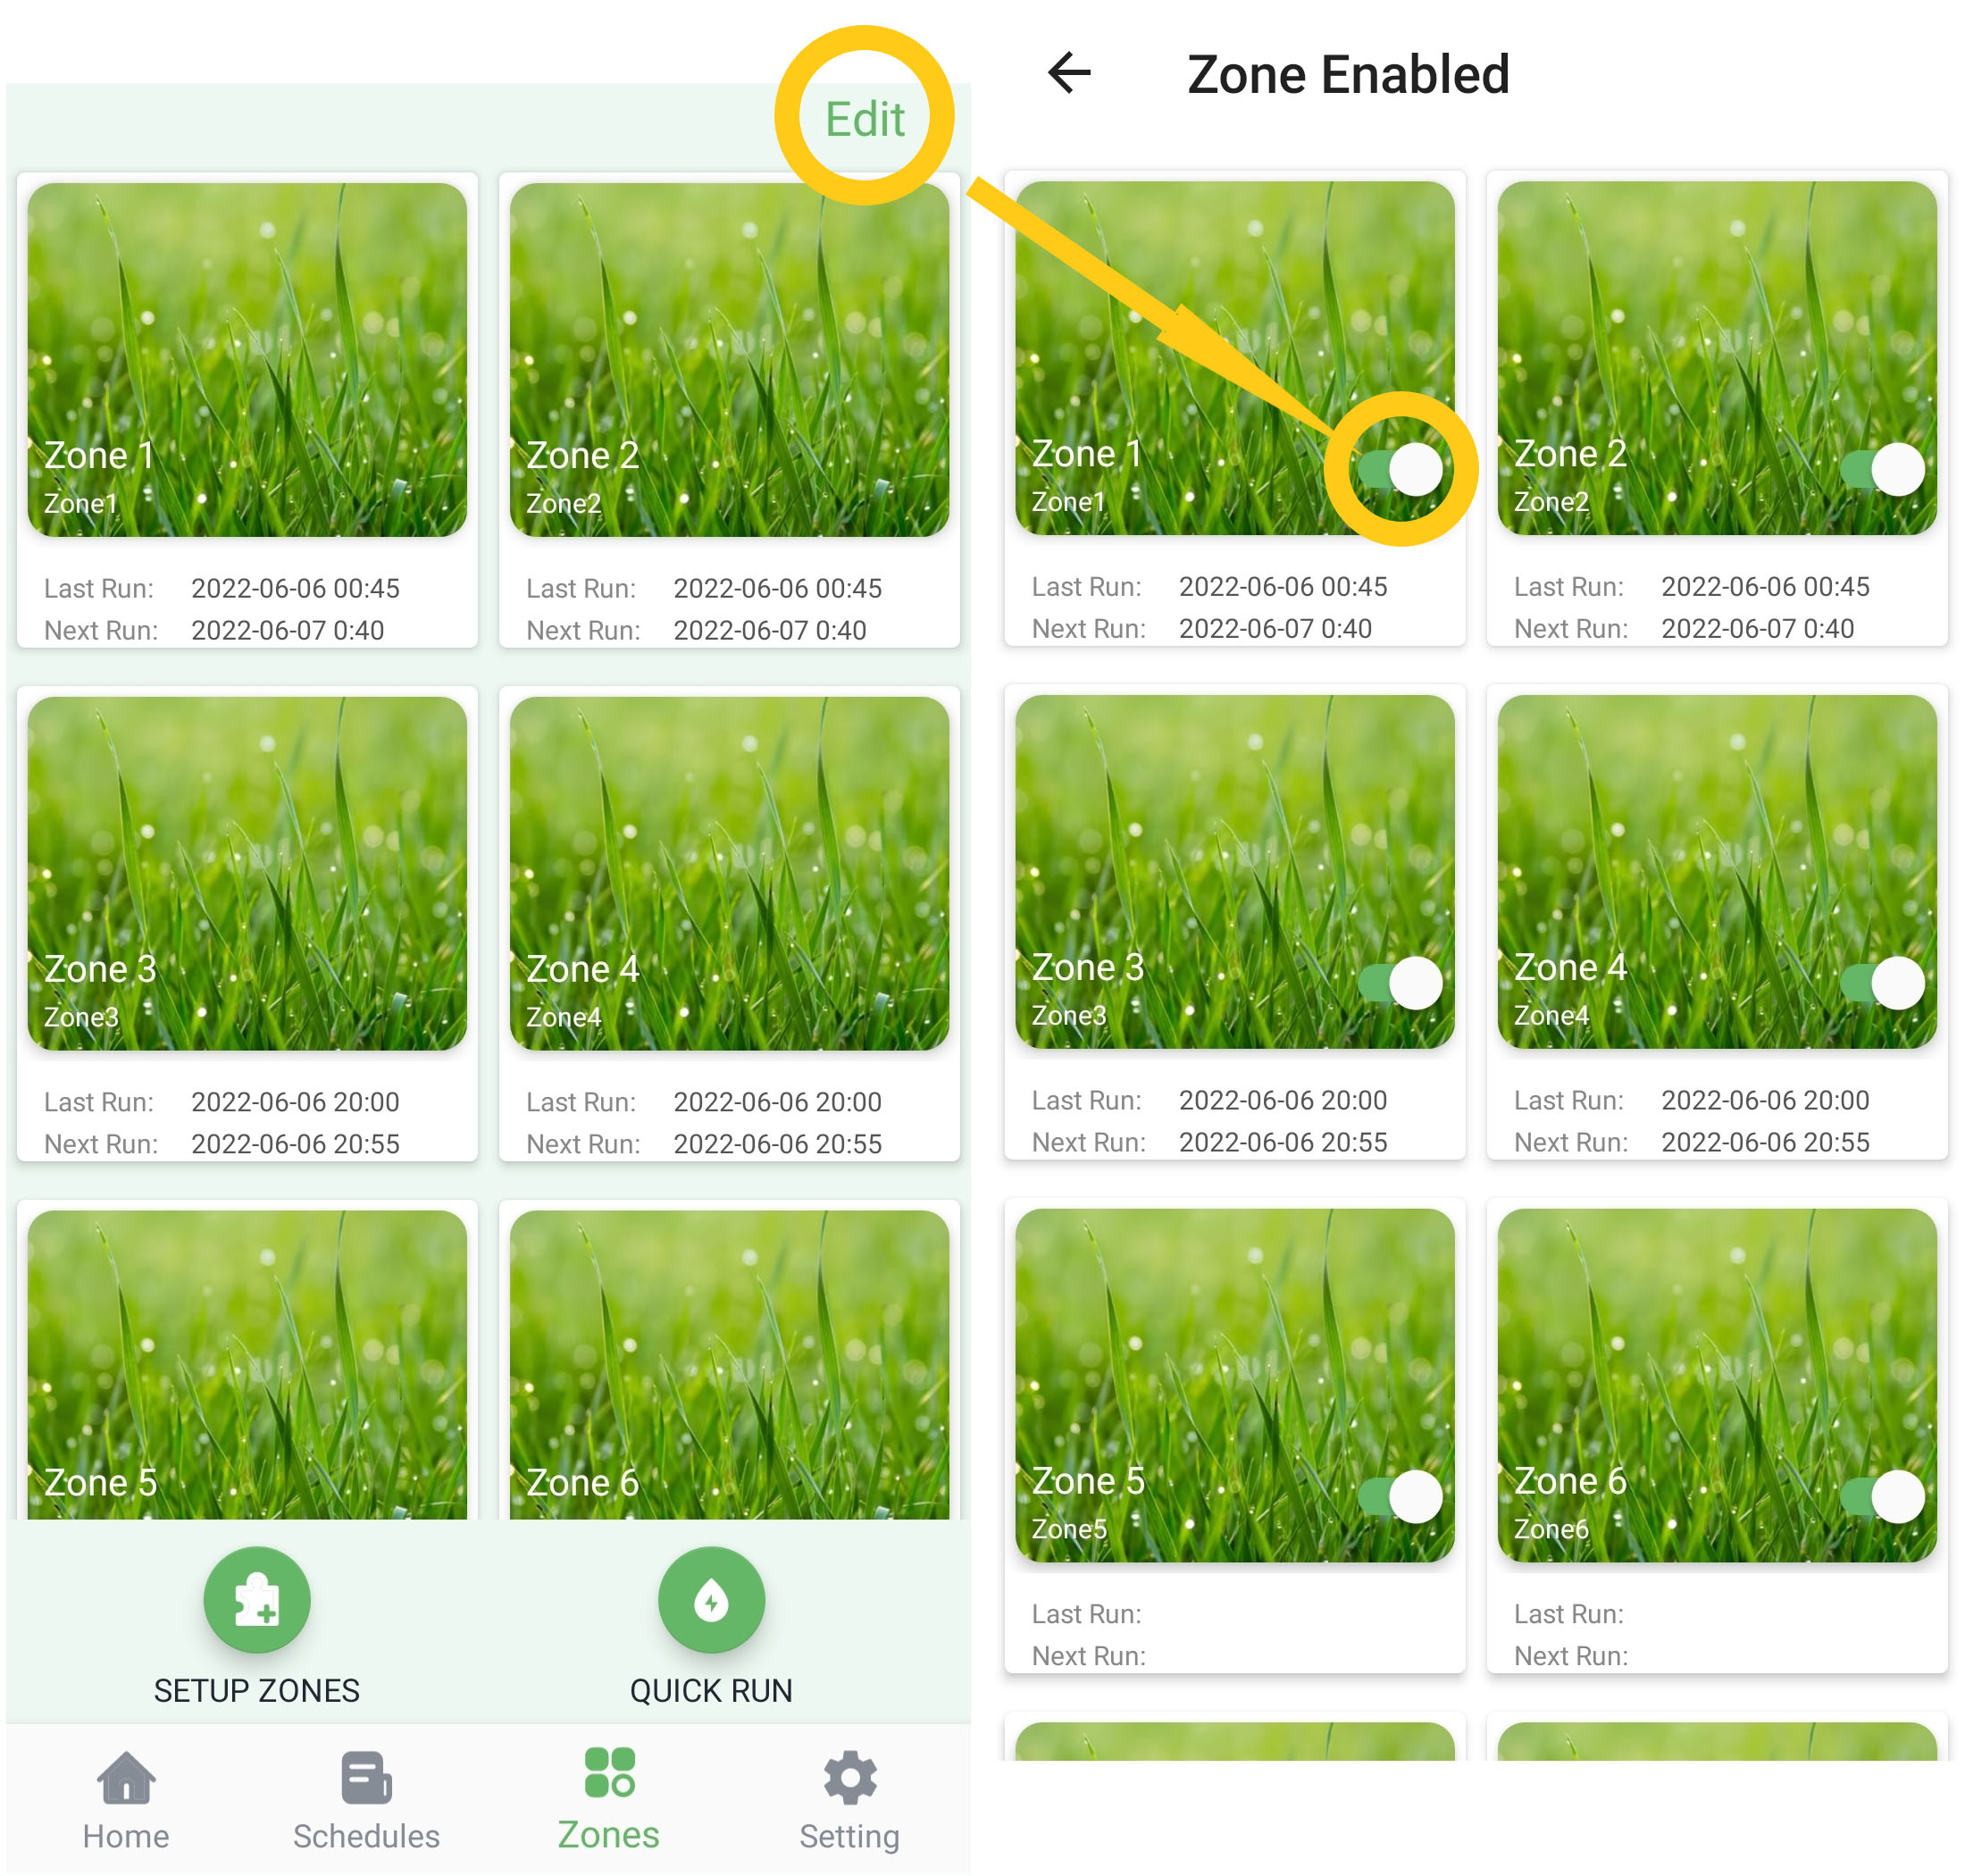
Disabled zones will not show up on the Zones screen.
Click "Edit" to reenable a zone.
Still need help?
In case the above method doesn’t work for you, please contact our technical support team directly using the contact information below. We will respond to you by email within 12h after your message reaches us.
Email: Support@imolaza.com
Author: admin
Last update: 2023-05-23 05:28
When you try to activate the zone for watering. You find that the app says "Controller Running" but no water is coming out of the sprinklers. This means that the zone has not been activated. Please follow the steps below to check.
1. Use the four buttons on the device to run all zones in turn.
1.1 If water is coming out of all zones, your wiring is OK.
1.2 If only one or two zones not running water. Please check for loose wiring at those two ports.
1.3 If water does not come out of all zones. Please rewire the controller according to the reference diagram in our manual.
2. If, after following the above steps, the water still does not come out through the app test. There may be an error in the operation of the app. Please take a photo of the wiring, then contact us via our official email address with the picture and your old controller's brand and model. We will solve the problem for you as soon as possible.
Still need help?
In case the above method doesn’t work for you, please contact our technical support team directly using the contact information below. We will respond to you by email within 12h after your message reaches us.
Email: Support@imolaza.com
Author: Imolaza
Last update: 2023-05-23 05:24
Soil type is a crucial factor in determining the attributes of a zone. Different soil types have varying water capacities, directly influencing the watering duration and frequency in an ET smart schedule. Accurate characterization of soil type attributes is vital for creating an effective ET smart schedule. The following provides a simple and practical method to identify soil types in different zones.
What is Soil Texture?
To begin, let's gain an understanding of soil texture. Soil texture is determined by the size of mineral particles present in the soil, including Sand, Silt, and Slay.
. Sand consists of the largest and coarsest mineral particles, ranging from 2.00 to 0.05 mm in diameter. It has a gritty texture when rubbed between your fingers.
. Silt particles are smaller, ranging from 0.05 to 0.002 mm, and have a texture similar to dry flour.
. Clay particles are extremely fine, smaller than 0.002 mm. When wet, they feel sticky and tend to clump together, making it difficult to distinguish individual particles.
The proportions of these mineral particle sizes in the soil determine its texture.
What is Soil Texture Triangle?
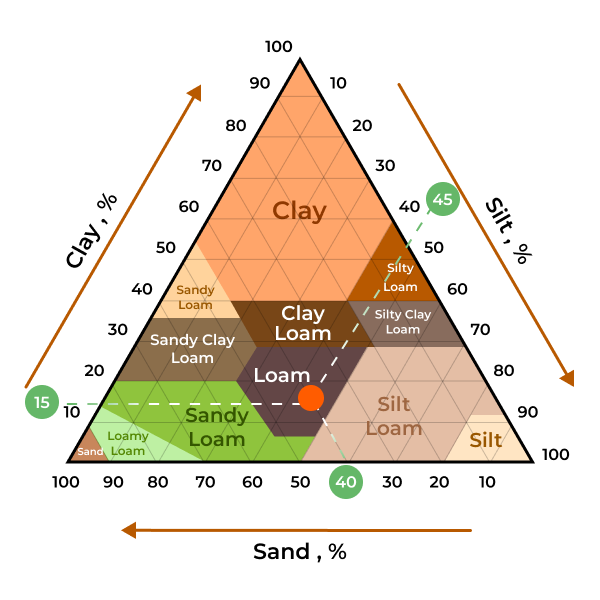
The Soil Texture Triangle, also known as the USDA Soil Textural Triangle, is a graphical tool used to classify soil textures based on the proportions of sand, silt, and clay particles in the soil. It provides a visual representation of different soil types based on these proportions. The triangle is divided into sections representing specific soil texture classifications, such as sandy loam, silty clay, or clay loam. By determining the percentages of sand, silt, and clay in a soil sample and plotting them on the triangle, one can identify the corresponding soil texture classification.
The Soil Texture Triangle is widely used in soil science, agriculture, and engineering to understand soil properties and make informed decisions regarding irrigation, drainage, and land use. It helps in assessing water holding capacity, permeability, and other characteristics crucial for plant growth and soil management. The triangle simplifies the process of soil texture classification, providing a practical and standardized approach to categorizing different soil types based on their particle size distribution.
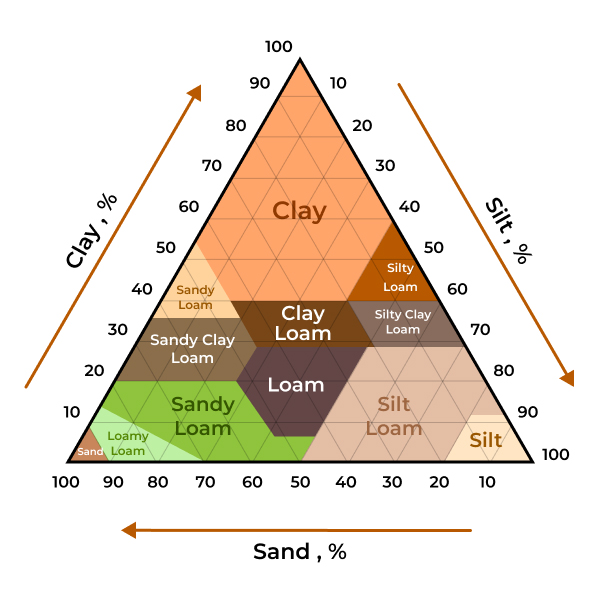
USDA Soil Textural Triangle
Identify your soil type.
1. Fill a transparent container with about two-thirds of water. Then, add enough soil to almost fill the jar. You can also add a small amount of laundry detergent to aid in better separation of soil components. Shake the jar vigorously and then place it in an undisturbed location.
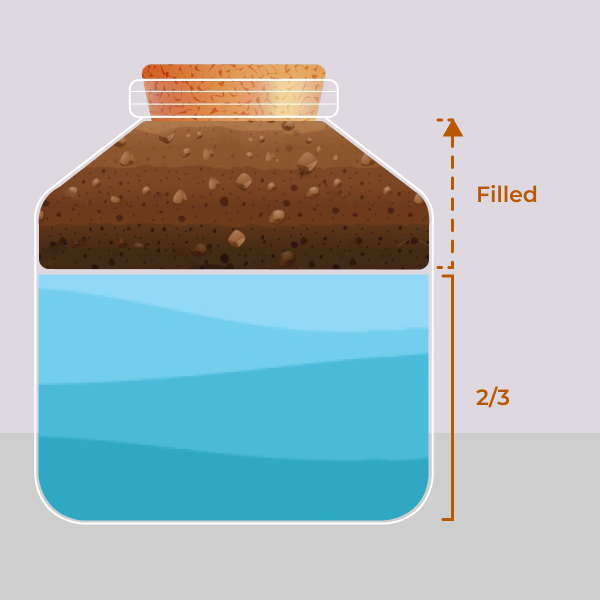
2. Observe the jar over the next few days as the particles will start to stratify. Larger sand particles will settle at the bottom, followed by a layer of silt, and then a layer of clay. The clay may remain suspended and make the water turbid for several days, which is why the sample needs to be left undisturbed. Organic matter may float on the surface or sink to the bottom of the water.
Measure the height of each layer and the total height of the soil. Then, by dividing the height of each component by the sample's height, you can make a preliminary estimation of the relative content of sand, silt, and clay in the soil. In the following example, the three components account for 15%, 45%, and 40% of the total, respectively.
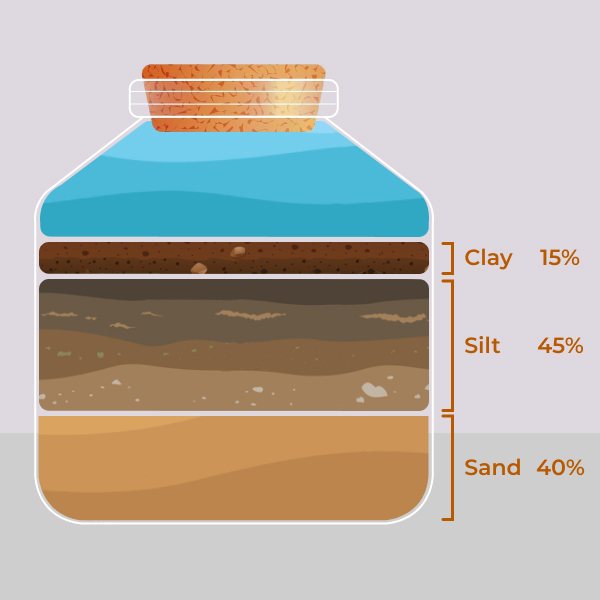
3. By utilizing the Soil Texture Triangle provided by the Natural Resources Conservation Service of the United States Department of Agriculture, soil types can be determined by plotting the percentages of the three soil components and connecting the points to identify the specific soil type. As shown in the diagram below, the intersection of the three lines falls within the "Loam" region, indicating that the detected soil type is "Loam."
Set the Soil Type attribute.
You will find that we do not provide so many soil types for you to choose from, because in general, you are unlikely to have a zone that is all silt. The options we provide basically cover all the soil types that residential areas will have. If you find that the soil type tested is not within the range of options provided, please select “Others” and then manually enter the value of “Available Water”.
If highly accurate results are required, it is recommended to seek the assistance of professionals.
In case the above method doesn’t work for you, please contact our technical support team directly using the contact information below. We will respond to you by email within 12h after your message reaches us.
Email: Support@imolaza.com
Author: Imolaza
Last update: 2023-07-05 05:55
Have you ever been curious about the application rate in ImoLaza's regional settings? Do you find yourself unsure of what this value really means and how it is calculated? This article will explain it all to you.
In simple terms, the application rate refers to the amount of water applied to a specific area per unit of time. It is typically measured in inches per hour (or metric units such as millimeters per hour) and indicates the speed at which water is distributed to the soil or plants in a given area. Controllers use this parameter to ensure the delivery of an appropriate amount of water to meet the needs of the plants without over-irrigating or under-irrigating. ImoLaza uses the application rate to calculate irrigation schedules and make informed decisions about when to run the irrigation system and for how long.
How to calculate it?
A catch cup is typically a measurement tool used in irrigation systems to determine the application rate and uniformity. These cups usually have standard sizes and markings for measuring the amount of water collected within a specific time frame. Here are the general steps for using catch cups to calculate the application rate:
Prepare Catch Cups: Ensure you have an adequate number of catch cups, typically with the same capacity. Clean and calibrate the catch cups to ensure accuracy.
Placement of Cups: Place the catch cups evenly within the irrigation area where you want to measure the application rate. Typically, these cups should be distributed throughout the area to obtain information on uniformity.
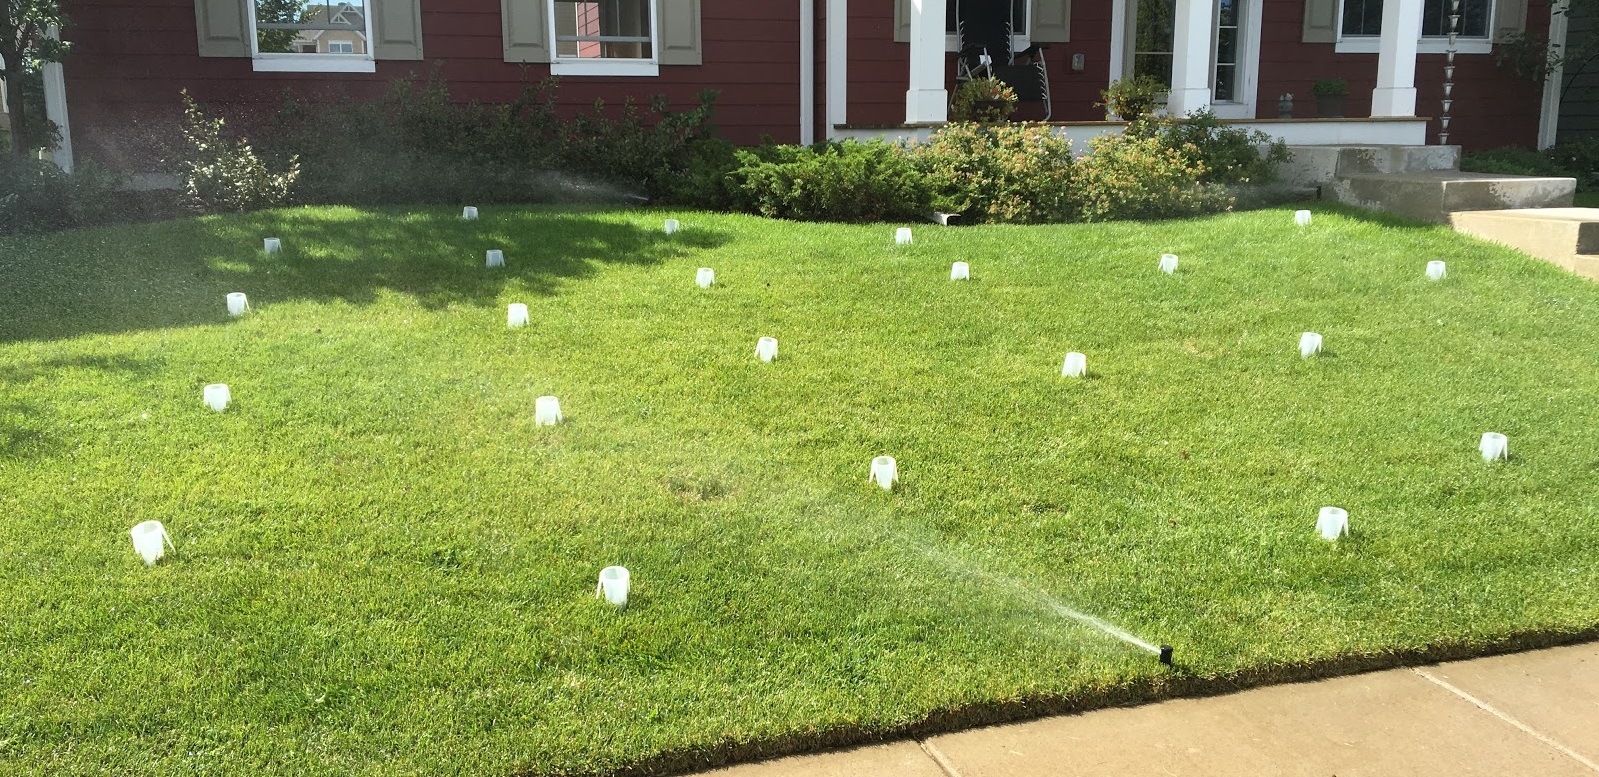
Initiate Irrigation: Start your irrigation system and let it run for a set period, usually between 15 minutes to 1 hour, depending on your needs. During this time, the catch cups will collect water sprayed from sprinklers or emitted by drip irrigation systems.
Record Data: After irrigation is complete, record the amount of water in each catch cup. You can use a ruler or other measuring tools to accurately measure the water level.
Calculate Application Rate: Calculate the application rate using the following formula:
AR = A_height / T (for cylindrical catch cans);
AR = (A_amount / C_area) / T;
AR = Application Rate
A_height = Average Heights of Collected Water
A_amount = Average Amount of Collected Water
C_area = Catch Cup Orifice Area
T = Measurement Time
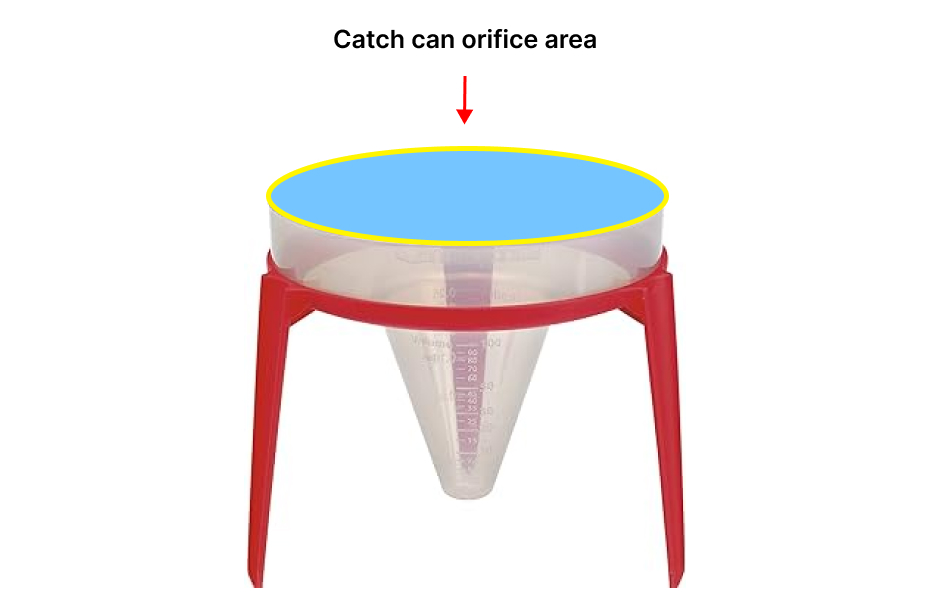
Ensure you use consistent units, such as inches or millimeters, for measuring both water quantity and time to obtain the correct results.
Assess Uniformity: Assess the irrigation uniformity by comparing the data from different locations of the catch cups. If there is significant variation in the water collected in catch cups at different locations, adjustments to the irrigation system may be needed to improve uniformity.
Using catch cups is a relatively simple and effective method to calculate the application rate and ensure that your plants receive the appropriate amount of water.
If you find this method too cumbersome, you can also try a simpler approach, which is to calculate the application rate based on your water meter.
In fact, there is a formula for calculating the application rate here.
AR = (Q_total * 96.25 ) / A;
AR = Application Rate
Q_total = the sum of the flow rates of all nozzles (gpm, if multiple sprinklers in a zone)
A = Zone Square Footage (area in ft2)
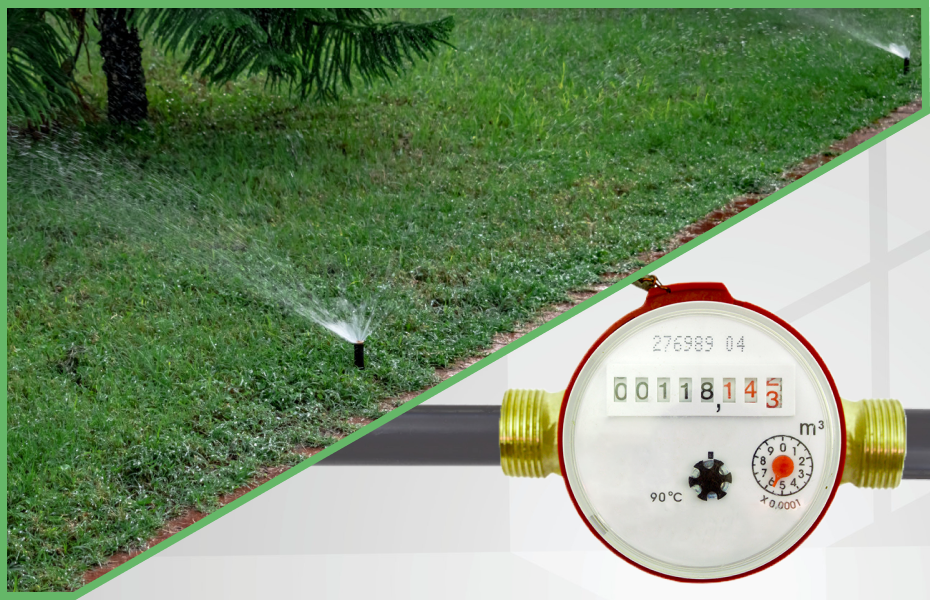
You can choose a specific time when all water-consuming activities in your home are turned off, leaving only irrigation running. Then, run the irrigation system for a period of time, measure the amount of water consumed during this time using your water meter, and plug that data into this formula to calculate your application rate.
In case the above method doesn’t work for you, please contact our technical support team directly using the contact information below. We will respond to you by email within 12h after your message reaches us.
Email: Support@imolaza.com
Author: Imolaza
Last update: 2024-03-18 09:28
If you are not very familiar with those less common zone parameters, this article will introduce how to edit the advanced settings of a zone and explain in detail the function of each setting. These advanced settings are mainly applied to ImoLaza's ET Smart Schedule. These settings can help ImoLaza calculate the duration and frequency of an irrigation schedule based on attributes like plants' water needs, application rate, and soil water holding capacity.
Advanced Zone Attributes
Root Zone Depth
The "root zone depth" refers to the effective depth in the soil from which a plant extracts water and nutrients. Root depth is an important parameter that determines a plant's water absorption capacity and irrigation requirement. Generally, the more developed the root system and the deeper the utilizable soil layer, the stronger the plant's ability to acquire water and nutrients. Calculating root depth requires considering factors like soil type, vegetation type, groundwater level, etc. Root depth also varies for different plant species. To obtain accurate root depth data, it is recommended to take samples using a soil probe, which minimizes soil disturbance and yields high quality samples. Specifically, take out a soil core containing roots from the probe, look for fine roots to determine the depth (in inches) from the top of the core to the deepest root near the bottom. This sampling procedure should be repeated at multiple locations in the test area to determine the average root depth.
Crop Coefficient
The crop coefficient can be seen as a tool to help ImoLaza and irrigation experts determine when and how much water to irrigate crops.
Different types of plants require different amounts of water at different growth stages. The crop coefficient represents how much water each type of crop needs at each growth stage, typically expressed as a decimal or a percentage. For example, a particular crop may require only a small amount of water during its early growth stage, resulting in a low crop coefficient. However, during the mid-growth stage, the same crop may need more water, leading to an increased crop coefficient. ImoLaza uses fixed crop coefficient values, which are derived from the annual average crop coefficient values for that type of plant as determined by the Food and Agriculture Organization (FAO) of the United Nations. If you are not an irrigation expert, it is not recommended to modify these parameters.
The controller uses the crop coefficient to develop irrigation schedules to ensure that crops receive adequate water without wasting water resources.
Application Rate
In the irrigation industry, "application rate" refers to the intensity of water application during irrigation or spray/drip irrigation. It is the speed at which an irrigation system applies water to the field, lawn or plant area over a period of time. It is usually expressed as the depth of water per unit of time, such as inches per hour or millimeters per hour.
Understanding application rates is crucial for determining irrigation system efficiency and water distribution. It helps decide how much water needs to be applied over a given period of time to meet crop or plant needs. Different types of irrigation systems (e.g. spray irrigation, drip irrigation, rotating sprinklers, etc.) apply water to the land at different rates. The main factors affecting application rate include sprinkler/emitter models, operating pressure, spacing, wind speed, etc. Moreover, the water supply capacity of the irrigation system also limits the application rate. A reasonable application rate can improve irrigation uniformity and avoid waste of water resources. When designing an irrigation system, various factors must be considered to select suitable sprinklers to achieve the required application rate. Monitoring and adjusting application rates can optimize irrigation effects.
If you wanna figure out the application rate for your system, check out this article that shows how to calculate it.
How to Calculate the Application Rate?
Efficiency (DU)
Efficiency, also referred to as Application Efficiency or Distribution Uniformity (DU), is an important parameter that describes the ability of an irrigation system to distribute water resources evenly. It measures the relative evenness of water applied to each zone in the system.
DU is expressed as a percentage and typically ranges from 0% to 100%. A higher DU percentage indicates more uniform and efficient water distribution, while a lower percentage suggests uneven distribution.
Here are some of the key factors that affect the Distribution Uniformity (DU) of an irrigation system:
DU is typically calculated using the following formula:
DU (%) = Minimum irrigation amount / Average irrigation amount
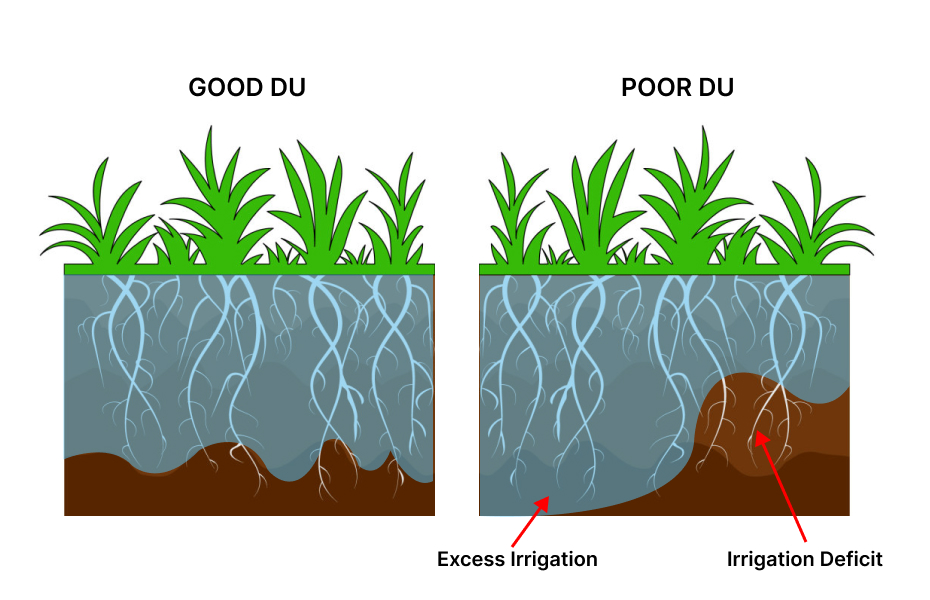
Available Water
Available Water (AW) or Available Water Capacity (AWC) is the maximum amount of water that soil can store to be extracted by the plants. It is the water held between field capacity and the permanent wilting point. This capacity depends on soil texture and structure, with soils having a porous structure, like those rich in organic matter, capable of retaining more available water. Typically expressed as inches of water per inch of soil, it quantifies the reservoir of moisture accessible to plants in the root zone. Understanding available water capacity based on soil type and root depth is crucial for effective irrigation management, ensuring optimal crop water requirements are met.
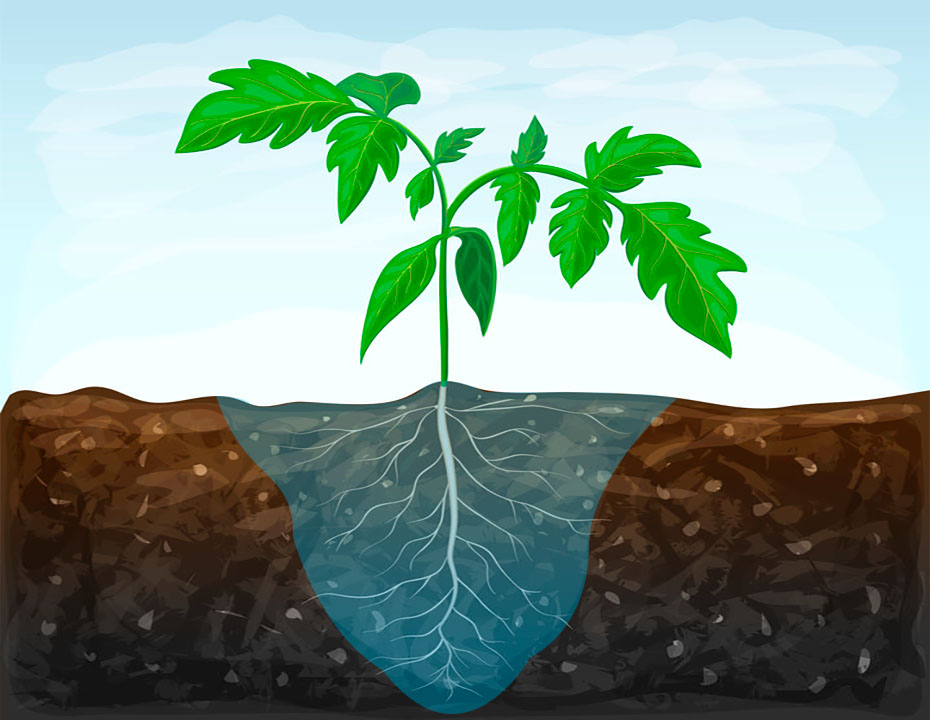
Area
"Area" represents the size of the selected area. When your account is set to use "Gallon" or "Liter" instead of "Time" as the water unit, the controller calculates your water usage based on the area size and the type of sprinklers you have. Having an accurate area size helps you monitor your water consumption.
Allowed Depletion (MAD)
Management allowable depletion specifies the maximum amount of soil water the irrigation manager chooses to allow the crop to extract from the active rooting zone between irrigations. Only a portion of the available water-holding capacity is easily used by the crop before crop water stress develops.
For most landscape purposes, 50% MAD represents a reasonable overall value; For sensitive, shallow-rooted plants, or heavily compacted soils, a smaller depletion should be considered (30-50% MAD). For stress-tolerant plants, deep root zones or lighter soils, a larger depletion can be used (50-70% MAD).
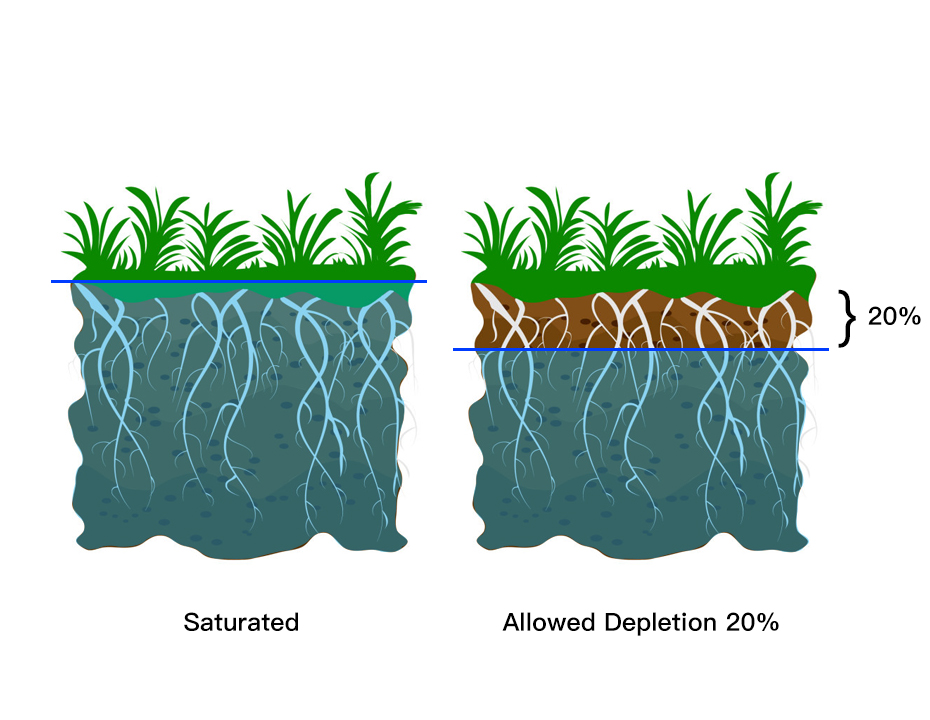
If the above method still does not solve your problem, don't hesitate to get in touch with our technical support team directly through the following contact information. We will reply to you by email within 12h after receiving your message.
Email: Support@imolaza.com
Author: Imolaza
Last update: 2023-10-11 11:53
Sprinkler manufacturers typically provide estimated efficiency values for different types of sprinklers. However, actual irrigation efficiency is influenced by various factors such as water pressure, pipe layout, and the spacing between sprinklers. But there's no need to worry; you can easily measure the actual efficiency of your system at home. Here are the detailed steps:
Preparation: First, ensure you have purchased 8 to 12 collection cups and choose a day with calm weather for accurate measurements.
Step 1: Check the Sprinkler Condition: Before you start the measurement, it's essential to check that all your sprinklers are in good working order. Ensure the sprinklers pop up and spray water without blockages or damage. If you find any issues, clean or replace the problematic sprinklers to ensure they function correctly.
Step 2: Arrange the Collection Cups: Proper placement of collection cups is crucial for accurate measurements. Place a collection cup around each sprinkler at a distance of 2 feet. Additionally, position cups in the middle between adjacent sprinklers, covering both lateral, longitudinal, and diagonal positions to ensure they capture the entire spray pattern.
To facilitate data recording, you can create a sketch or label the positions of each collection cup on paper. Next, turn on your irrigation system and run it for 10 to 15 minutes.
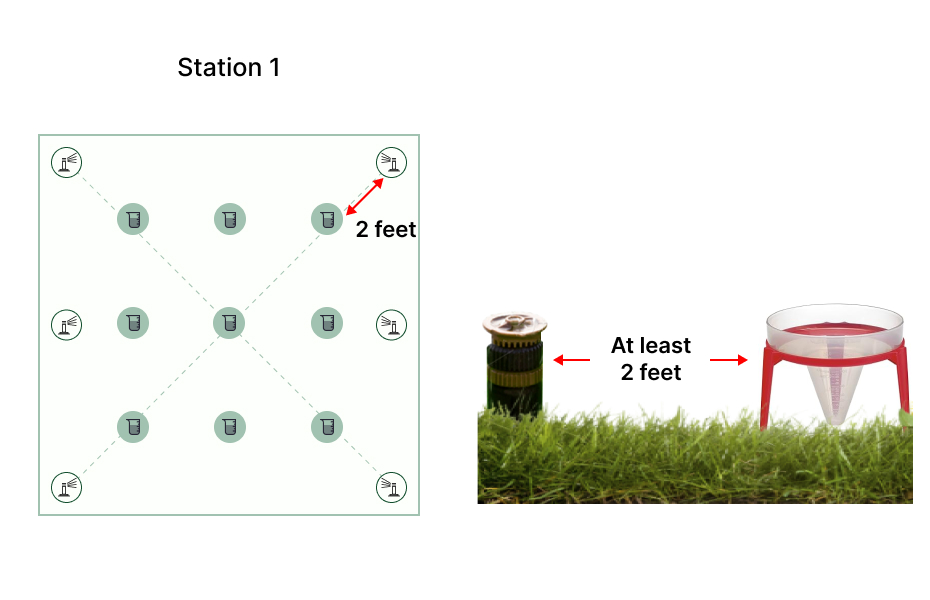
Step 3: Measure the Water Amount: After irrigation is completed, examine the water amount in each collection cup and record it at the corresponding location on your sketch or paper. This will help identify areas with uneven irrigation and any zones that might require adjustments to improve efficiency.
Step 4: Calculate Distribution Uniformity (DU): Use the following formula to calculate the actual efficiency of your sprinklers:
DU (%) = Average (Minimum Irrigation Amount) / Average (Irrigation Amount)
DU stands for Distribution Uniformity. Select two to three collection cups with the lowest water amounts and calculate their average, representing the Average (Minimum Irrigation Amount). If you have adjacent irrigation zones, be aware that there may be overlapping coverage in the border area.
When calculating the irrigation efficiency of two adjacent zones, run each zone separately and consider the total water amount from both irrigation cycles in the overlapping border area as the water collected in the collection cups.
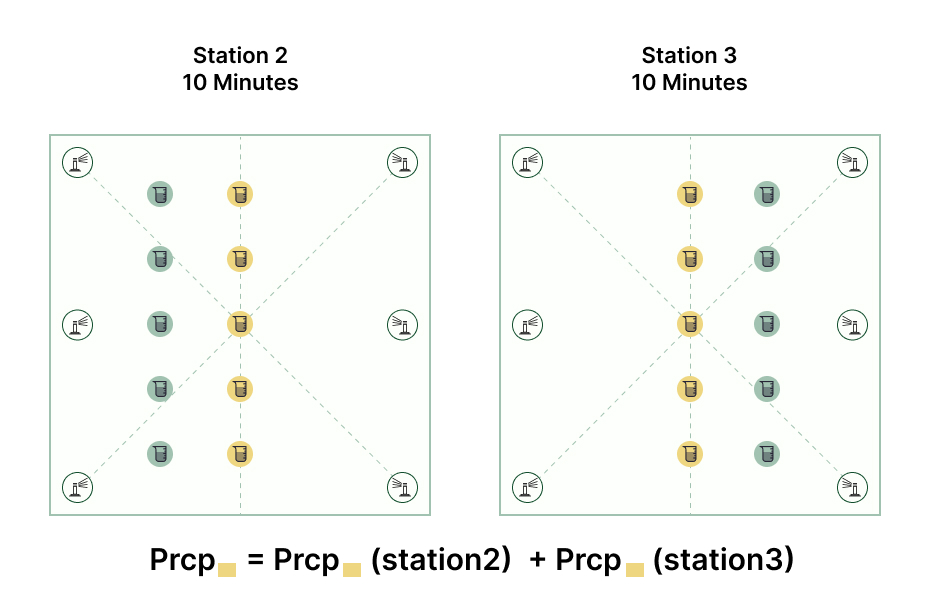
This process allows you to gain a more detailed understanding of your sprinkler system's performance, identify areas with uneven irrigation, and make necessary adjustments to sprinklers or pipe layouts to ensure plants receive uniform water distribution. This helps conserve water resources and enhance irrigation efficiency.
If the above method still does not solve your problem, don't hesitate to get in touch with our technical support team directly through the following contact information. We will reply to you by email within 12h after receiving your message.
Email: Support@imolaza.com
Author: Imolaza
Last update: 2025-04-17 09:13
Now you have downloaded the ImoLaza App yet(If not, download the Imolaza app from the App Store or Google Play), you will need to create an account and add controllers. The following article will help you with that.
Step1: Click "CREATE ACCOUNT" on the sign-in page. Follow the prompts to fill in the username, email address, password and confirm the password as required, and then click "Create Account".
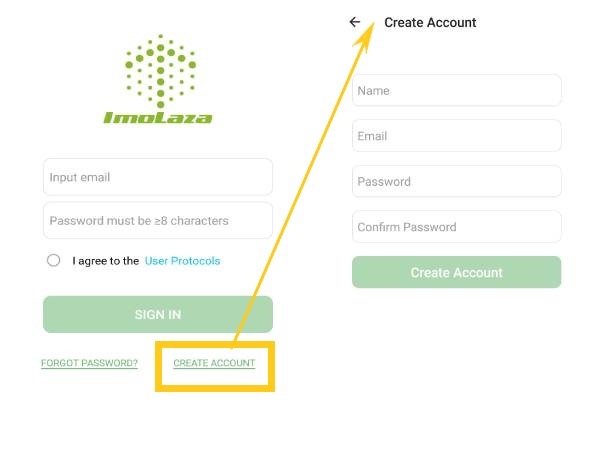
Step2: Check the email for the message from ImoLaza, and click "Confirm" to finish the registration.
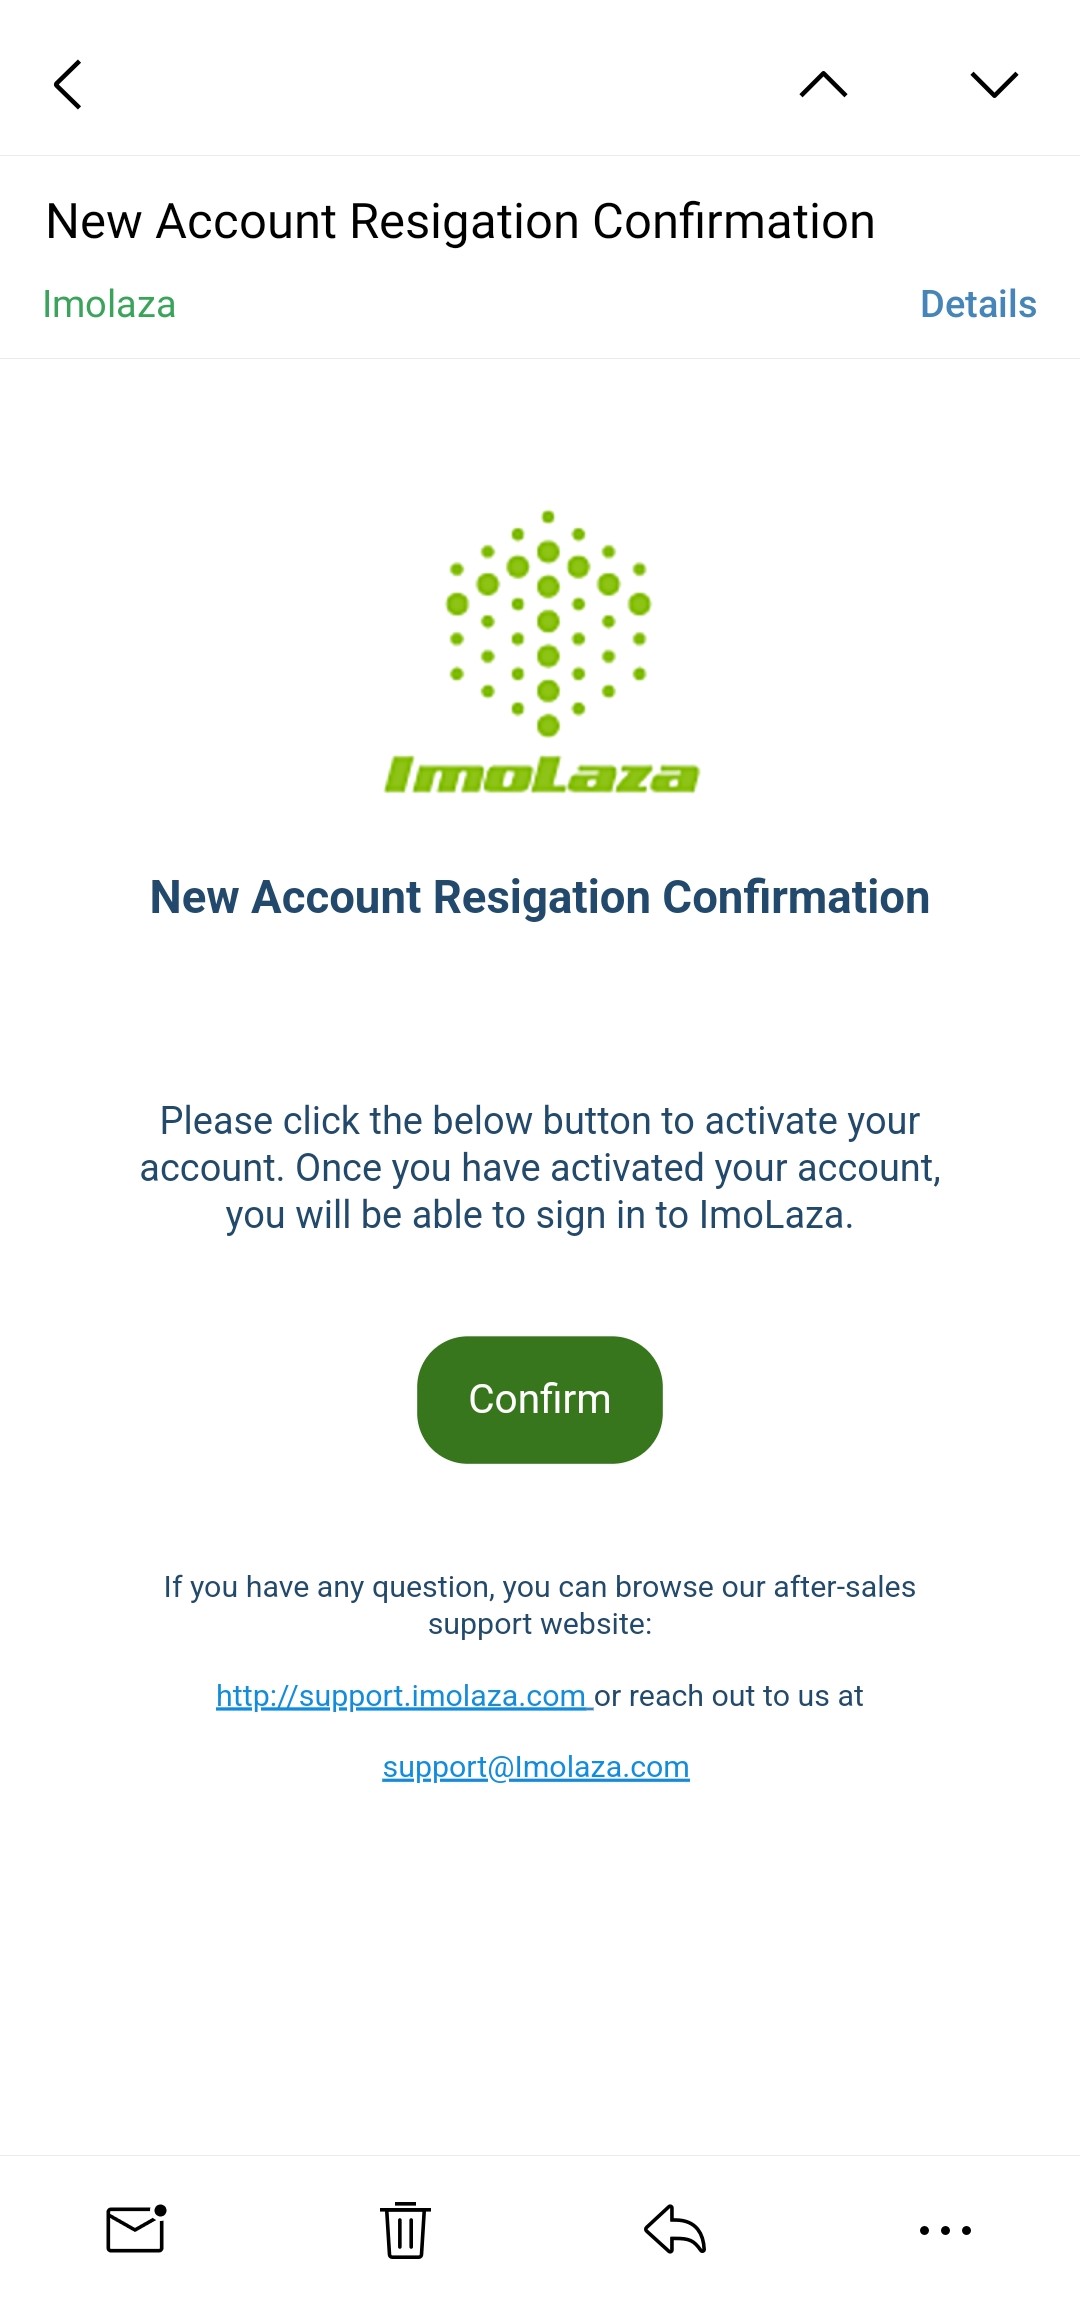
Now you have an ImoLaza account, log in and start your ImoLaza trip.
Enter your email address and password, select User Protocols, and then click "SIGN IN" to log in.
Following the step-by-step process to add and set up your device, the ImoLaza App would guide you to connect to the device.
Step1: Hit "Add a new device" to start adding controllers.
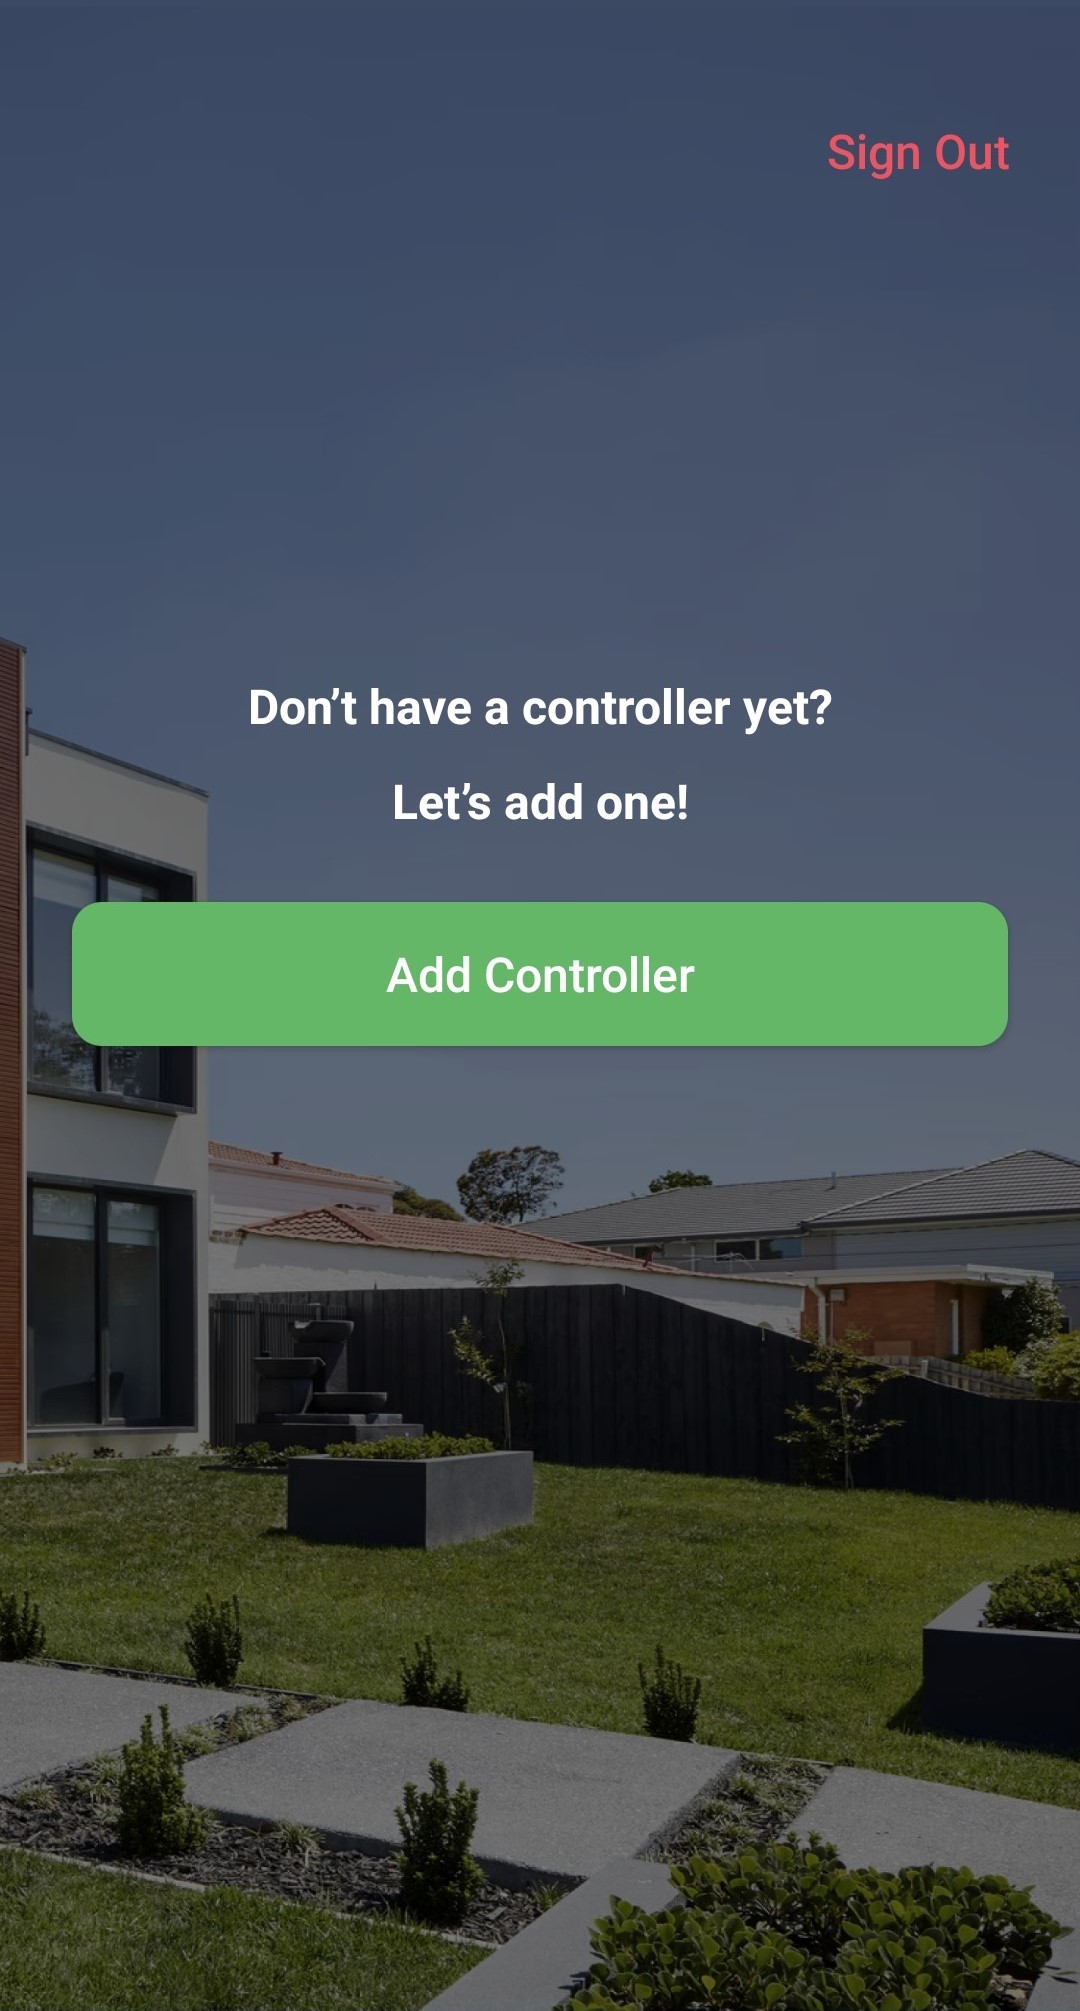
Step2: Add an address or a zipcode, then confirm your location. This step ensures your controller gets the accurate weather forecast for your watering schedules.
Step3: Remove the faceplate, press and hold the reset button for five seconds and wait for the indicator light to flash blue and green.
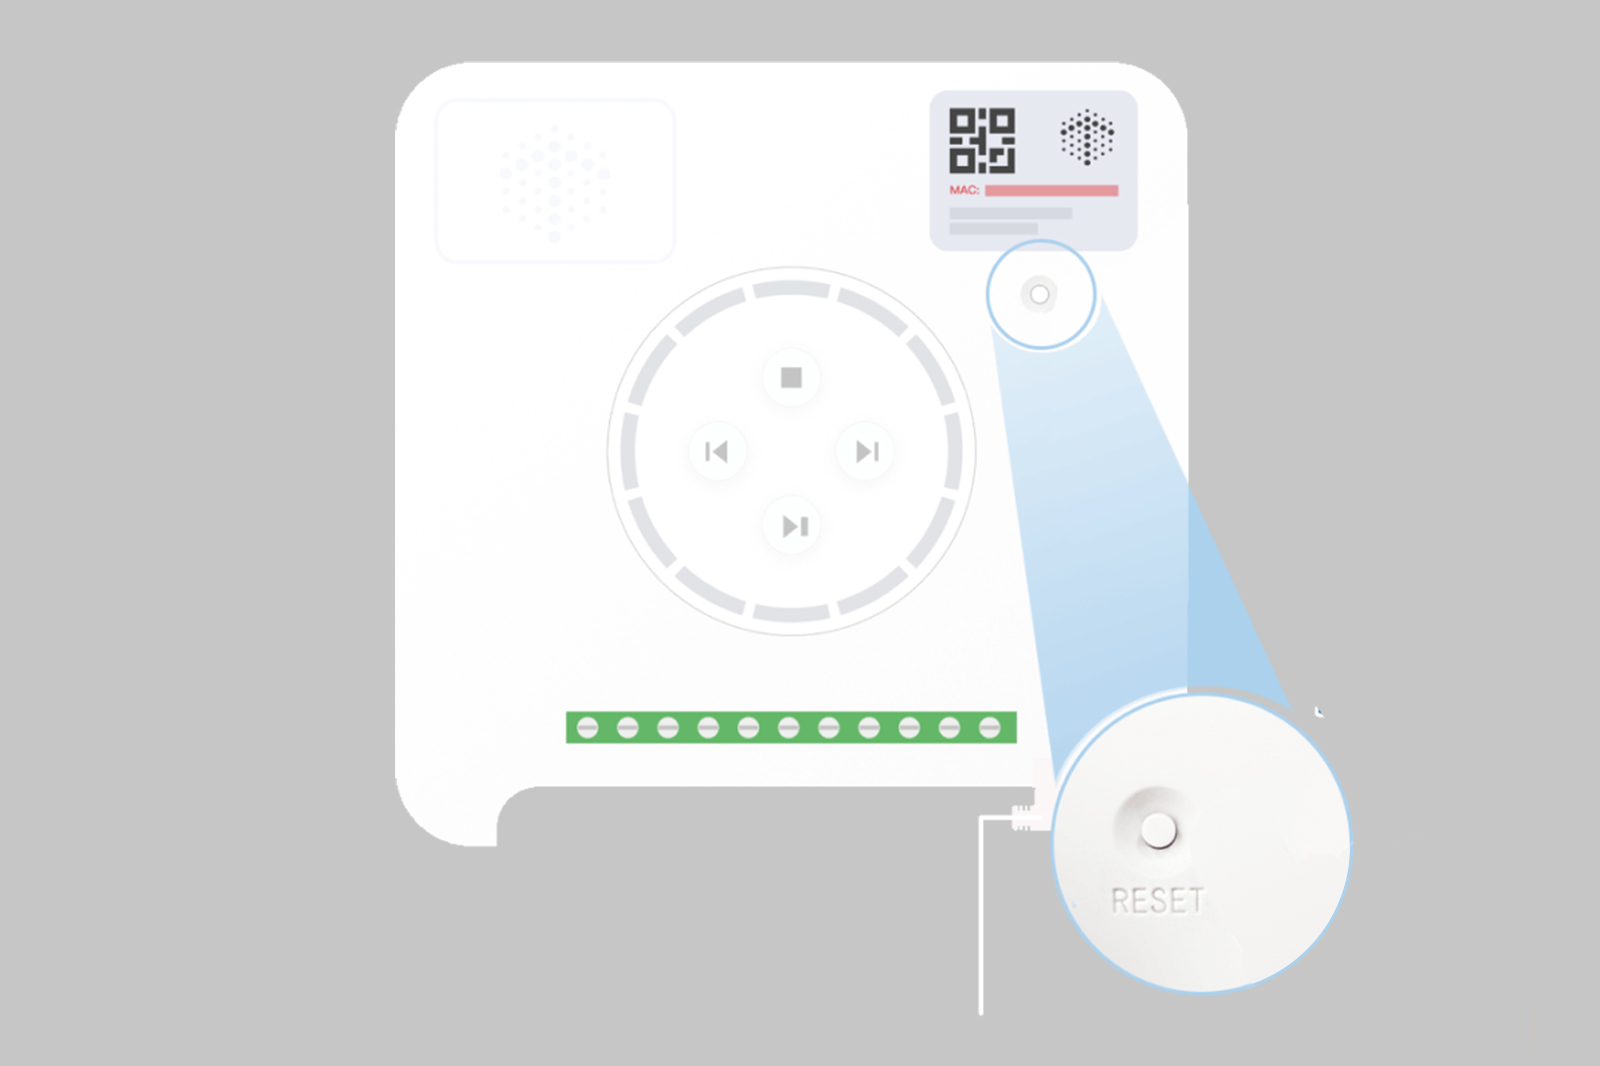
Step4: Scan the QR code on the controller or enter the device's Mac address manually. You can find the QR code or the MAC address in the top right corner of your controller.
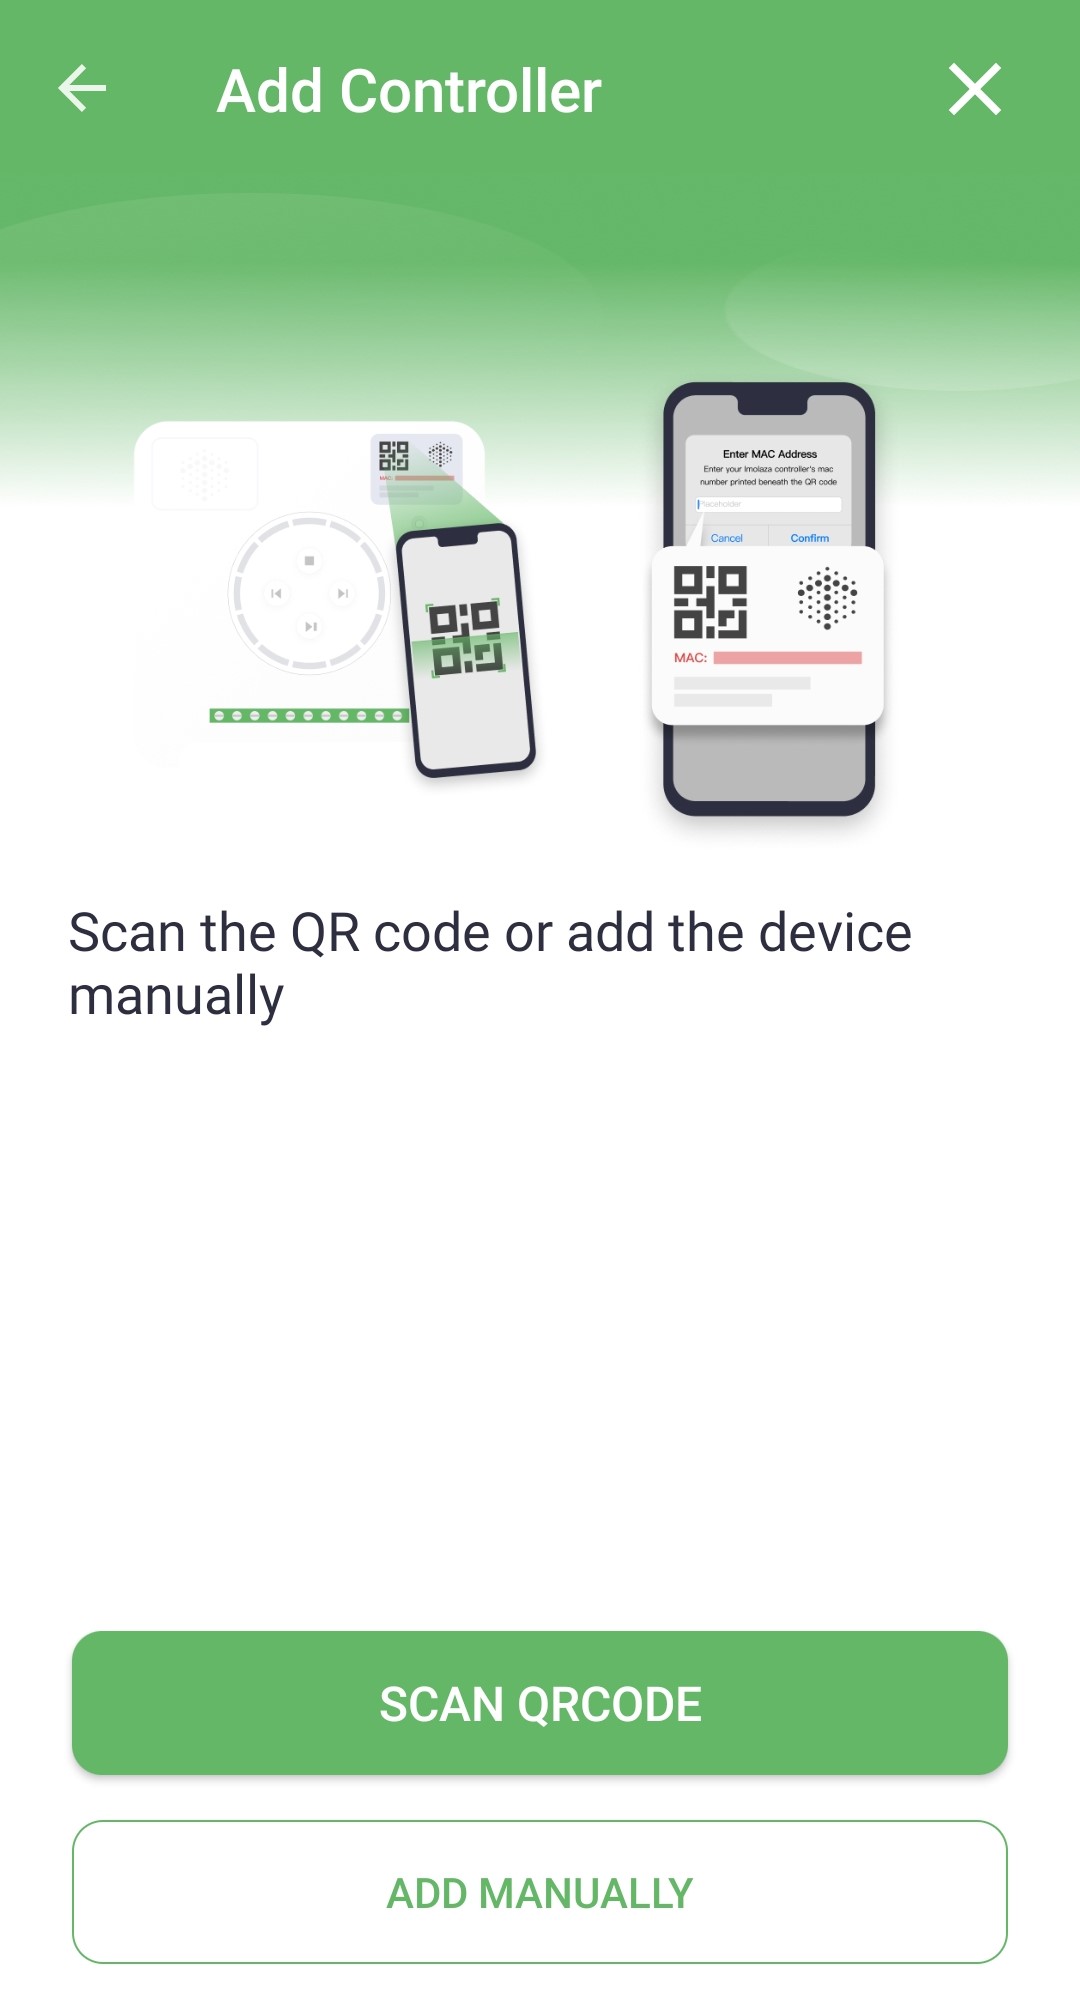
Step1: Tap the Wi-Fi network named "ImoLaza_XXXX" to connect. You can also add your device manually by entering the Mac address when prompted.

Step2: Then get a list of available networks, tap your Wi-Fi router SSID and enter the password to complete the configuration.
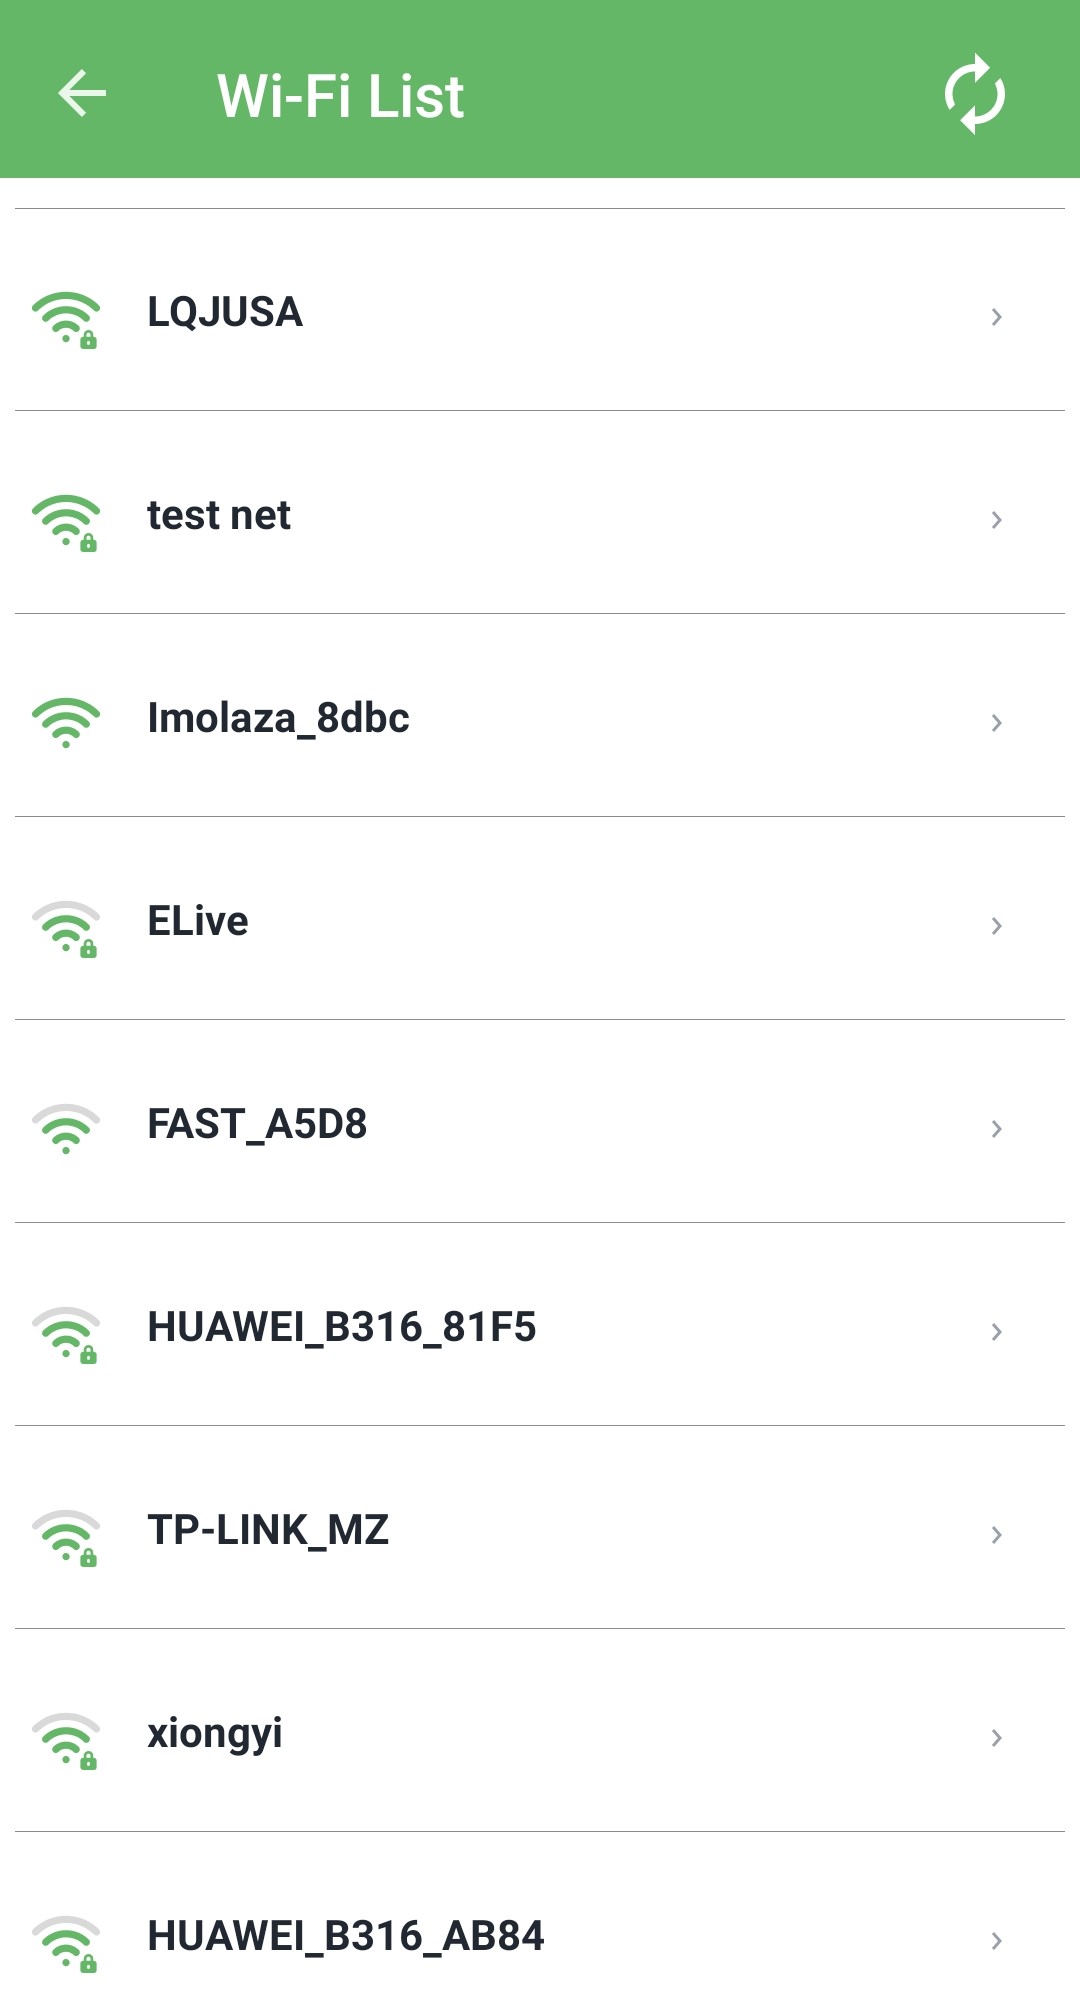

Step3: Waiting for Imolaza smart controller to finish setting up your device. If your ImoLaza App shows "Online" and the indicator light flashes blue, it means that your controller has been activated successfully.

Step1: When you see the following screen that says "Not connecting to device". Open the Wi-Fi settings on your phone and find a Wi-Fi network named "Imolaza_XXXX" to connect.
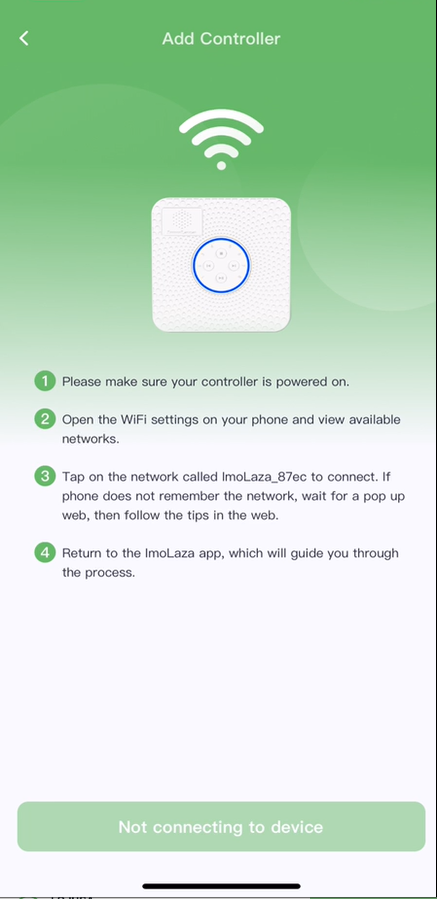
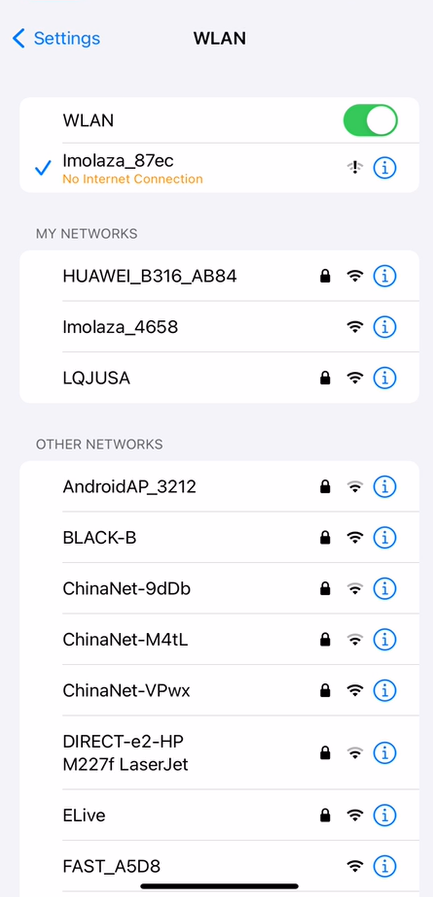
Step2: Once you connected with the ImoLaza Wi-Fi network, a prompt will show up. Follow the prompt to click the "Cancel" button on the top right corner, then click the "Use Without Internet" option to close the prompt.
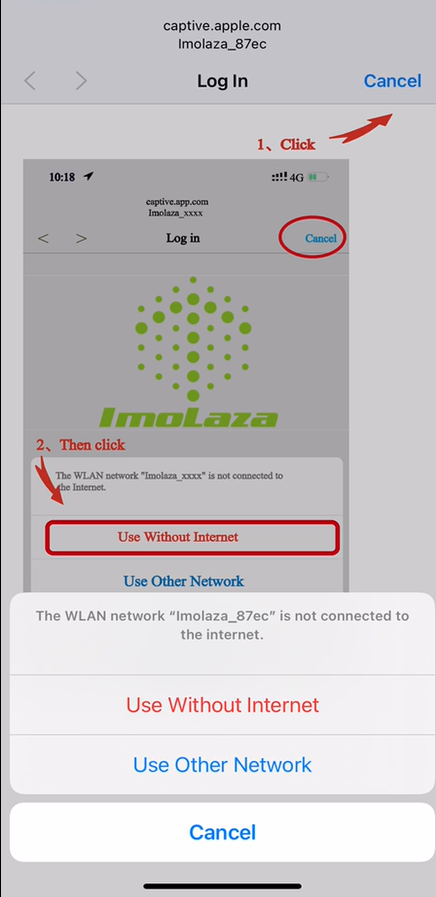
Step3: Go back to the ImoLaza App, wait for the bottom button to become available and then click. Choose your wifi network for your ImoLaza device to connect, tap your Wi-Fi router SSID and enter the password.
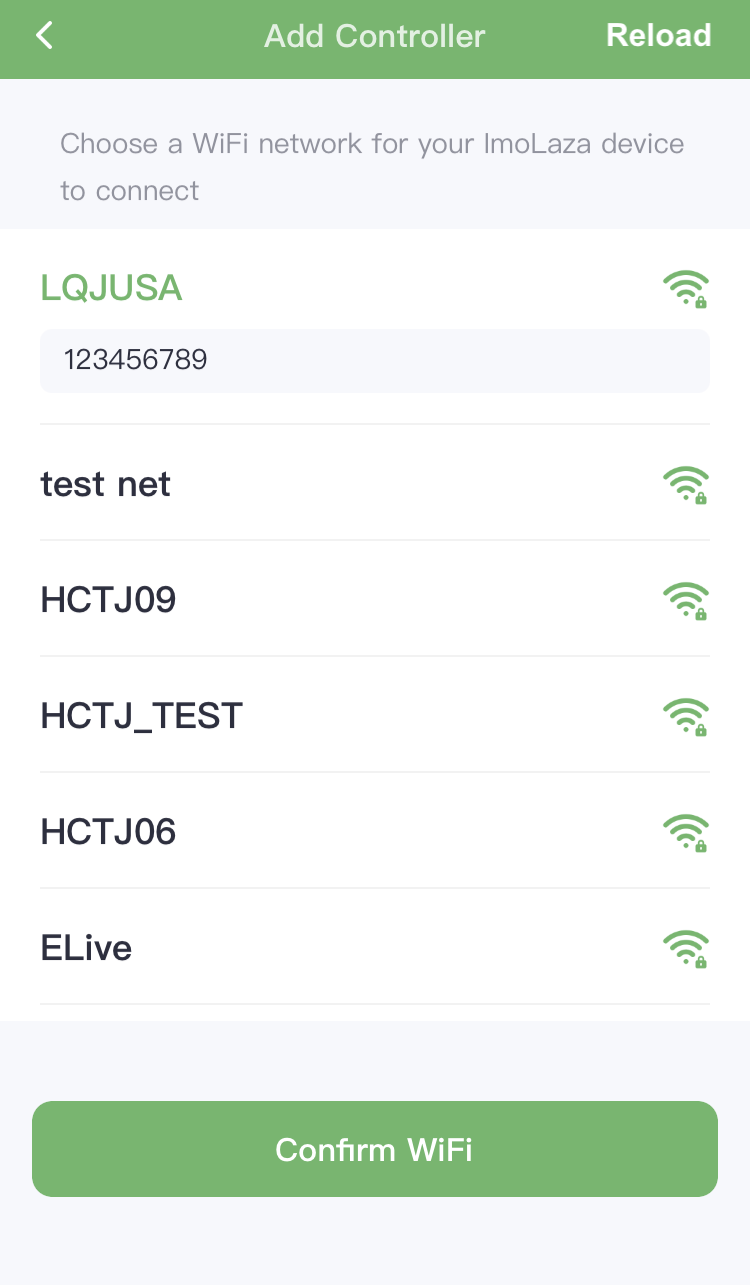
Step4: Waiting for ImoLaza smart controller to finish setting up your device. If your ImoLaza App shows "Online" and the indicator light flashes blue, it means that your controller has been activated successfully.
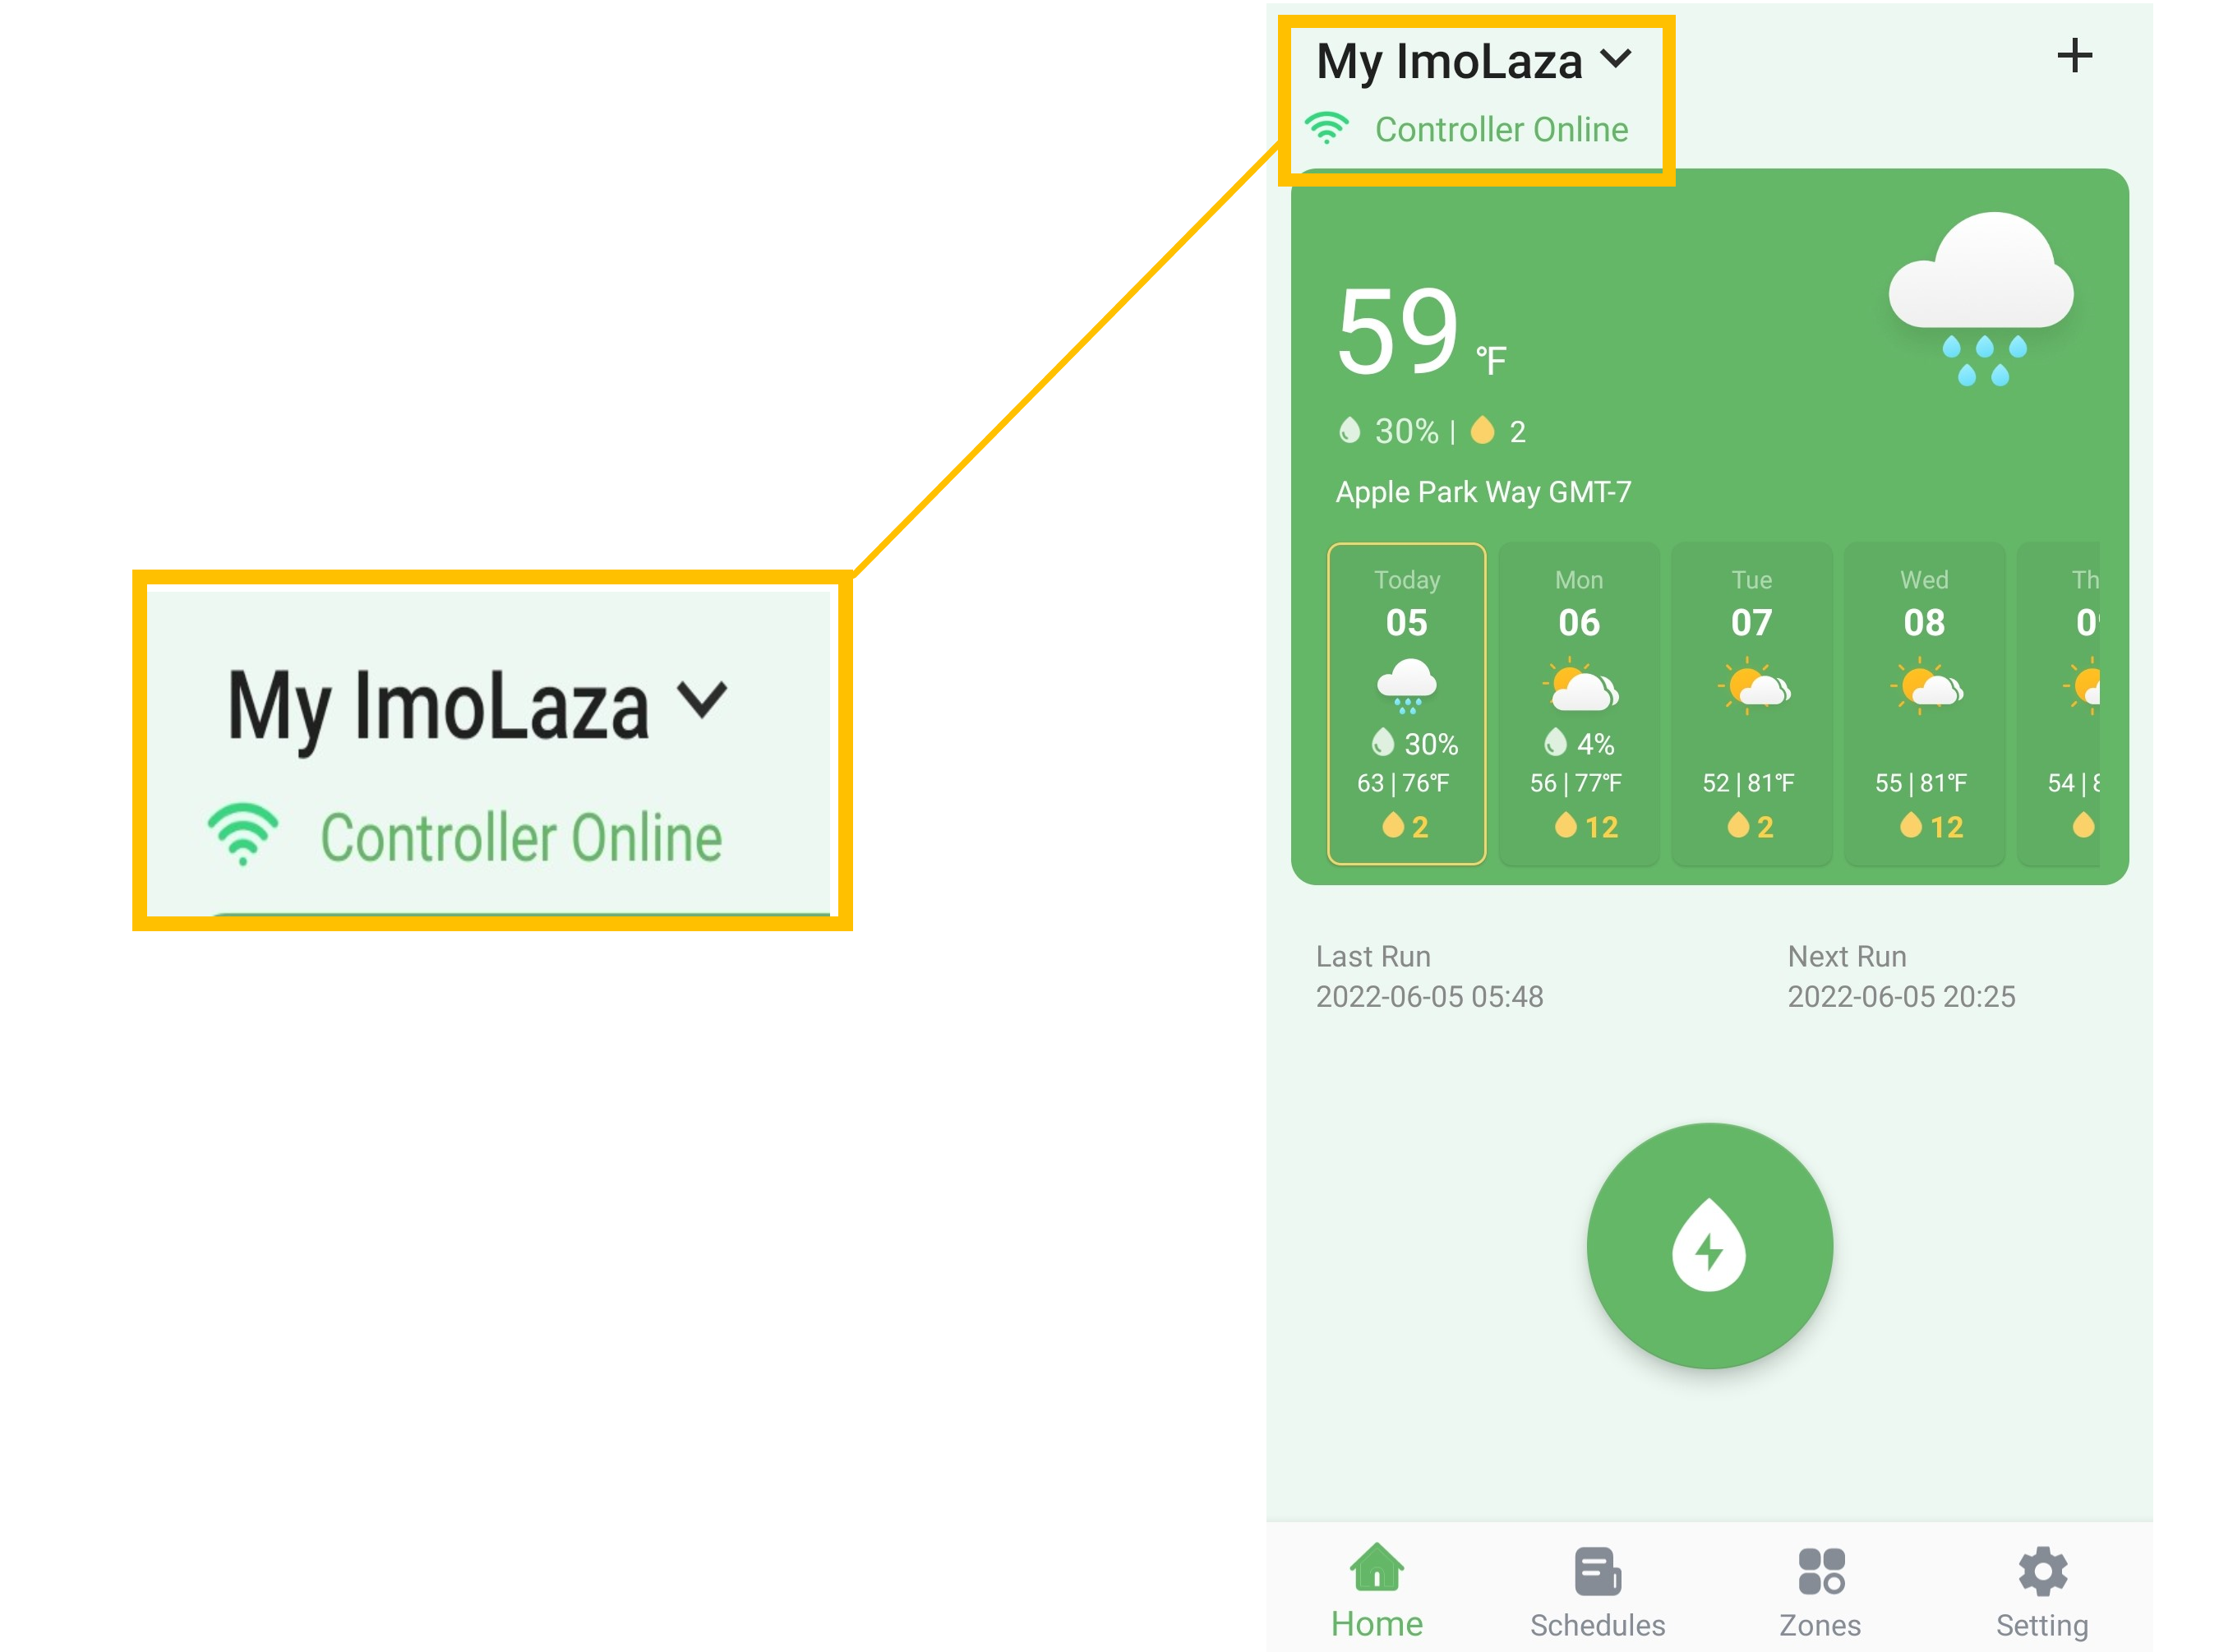
Now your ImoLaza app is ready to use.
You can use the quick run by clicking the green drop button on the homepage and selecting all the zones to test if your sprinklers are working as expected.
If you have questions about using the app, don’t hesitate to contact our technical support team directly by scanning the QR code or emailing us. We will reply to you by email within 24 hours of receiving your message.
In case the above method doesn’t work for you, please contact our technical support team directly using the contact information below. We will respond to you by email within 12h after your message reaches us.
Email: Support@imolaza.com
Author: admin
Last update: 2023-10-20 10:05
If you are new to this app, this article will show you how to navigate the ImoLaza App.
Home Screen
Connection Status: This area will display the status of your controller. A total of three statuses will be displayed, online, offline, and watering. When the controller shows offline, there will be a ![]() icon, tap it to see the cause of offline.
icon, tap it to see the cause of offline.
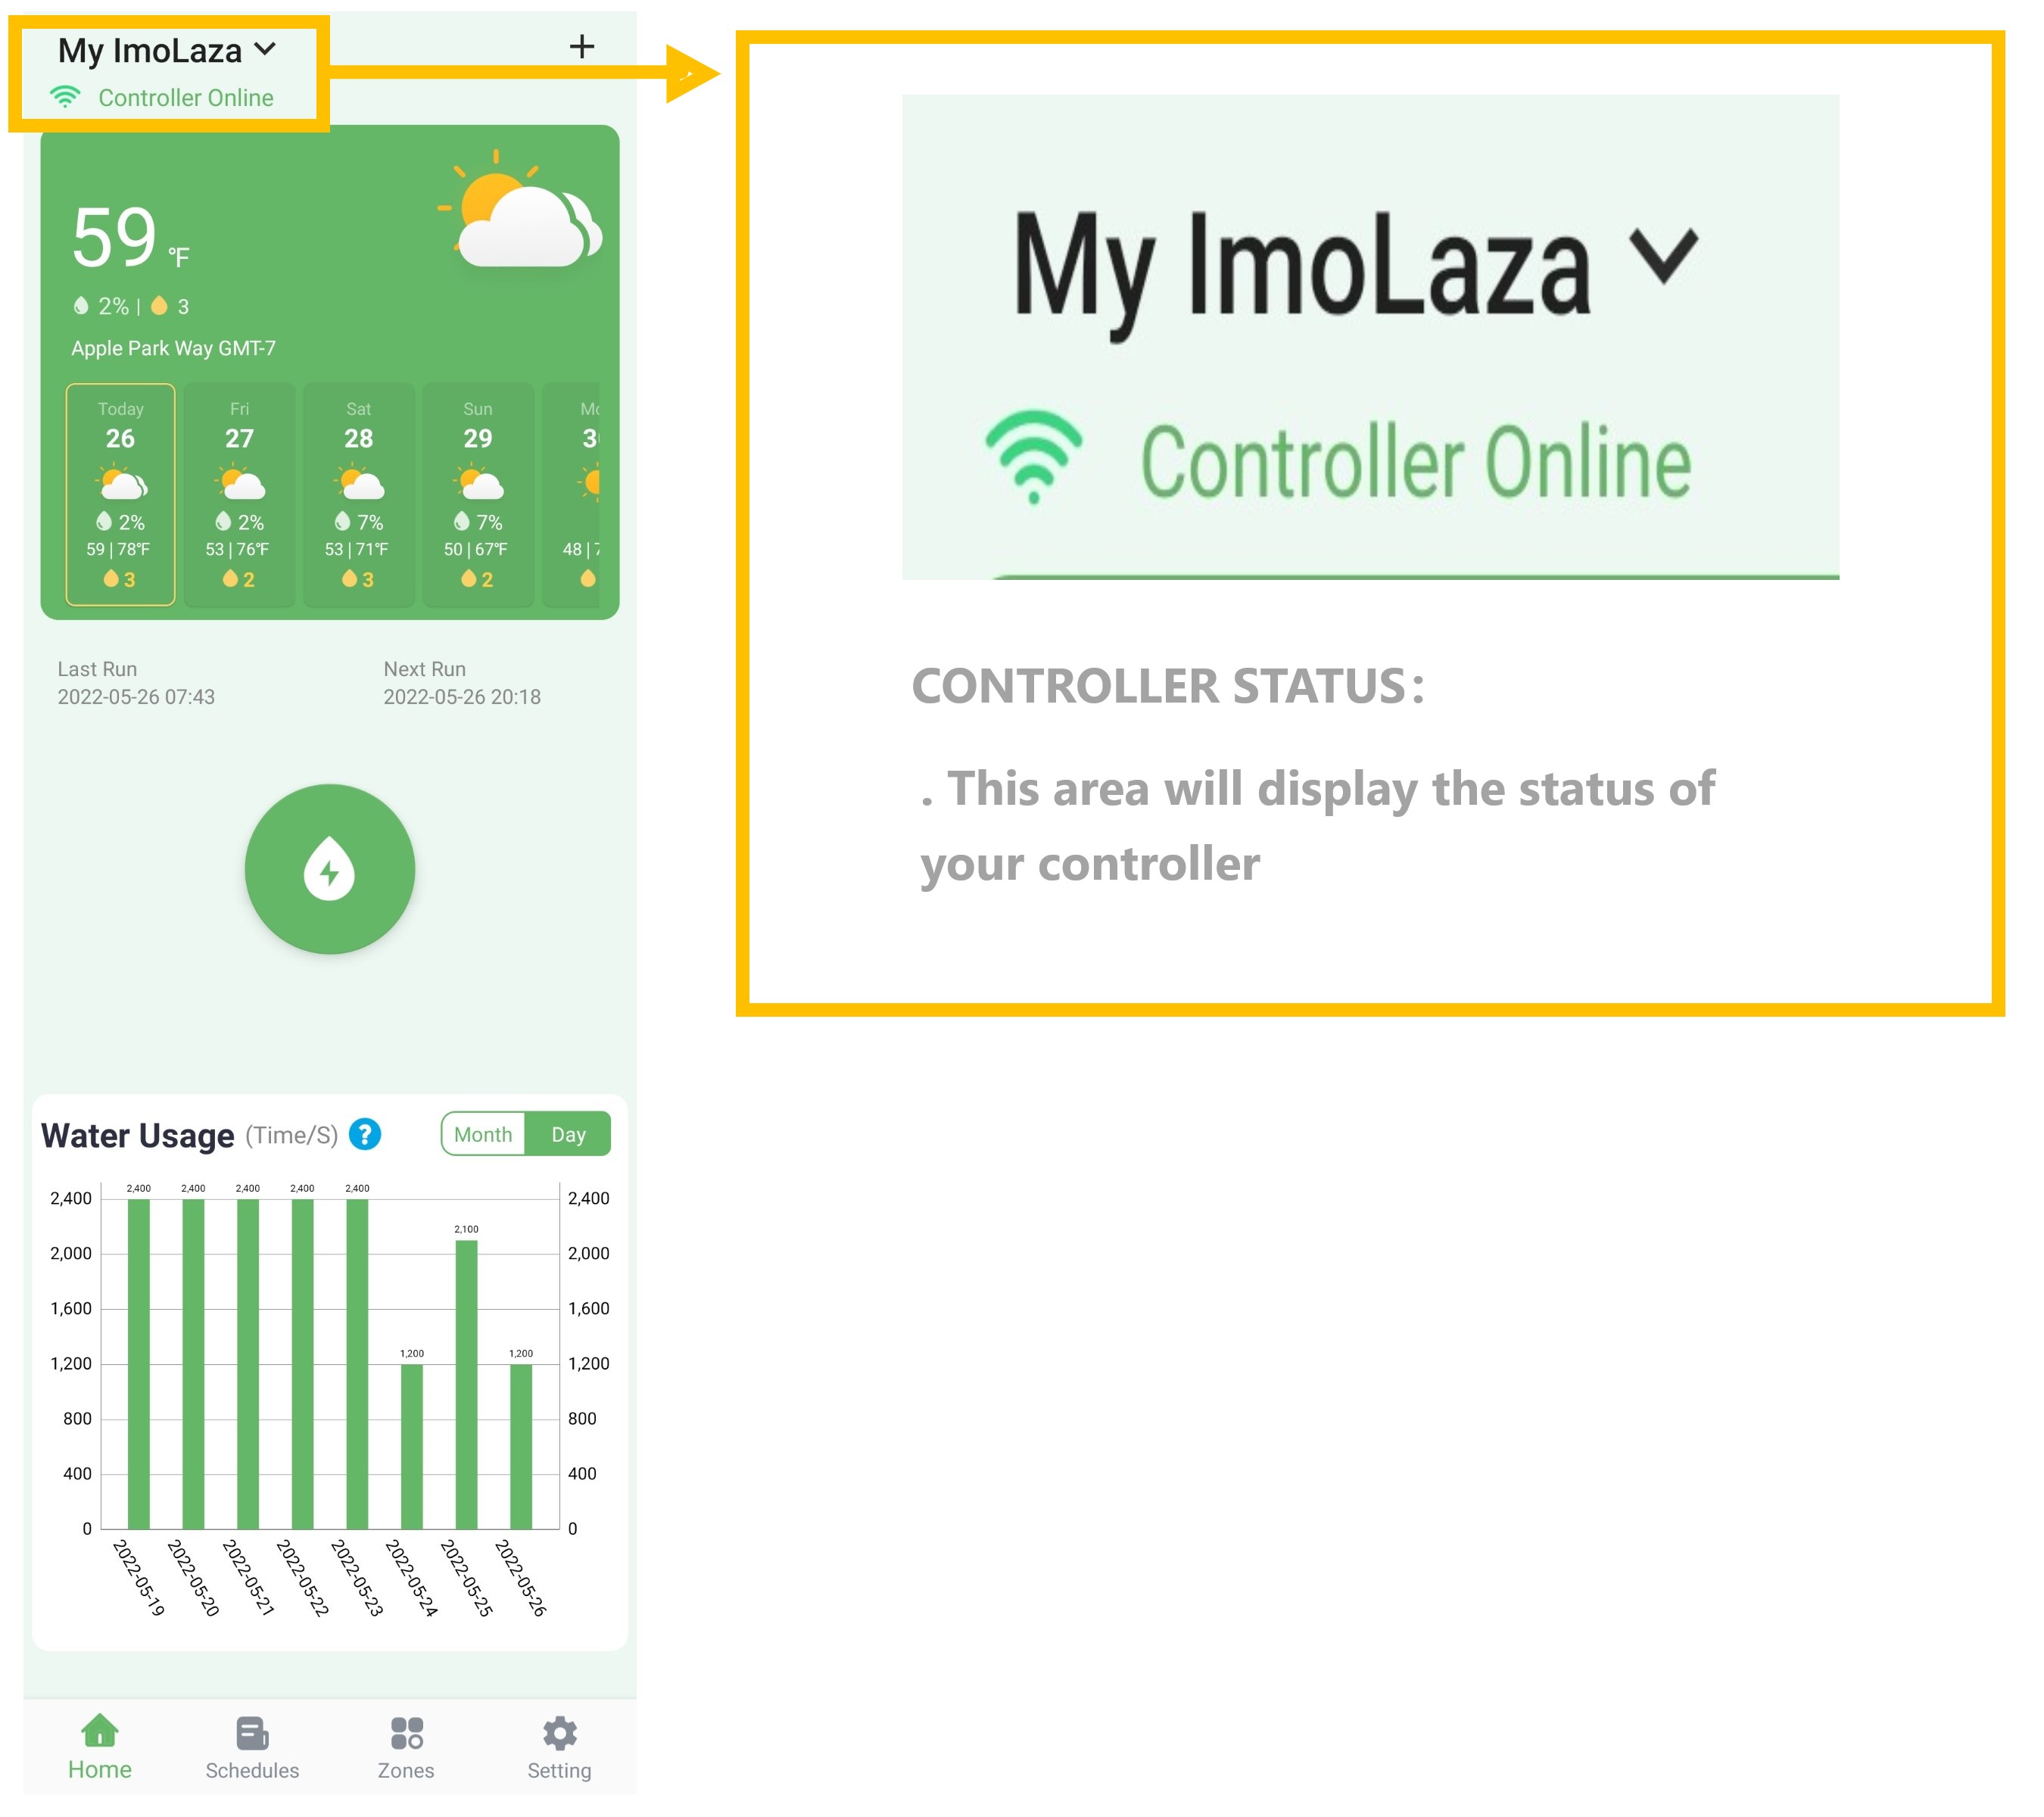
Weather Forecast: This area displays the weather forecast information. Including the percentage chance of rainfall, temperature range, and the number of watering times on that day.
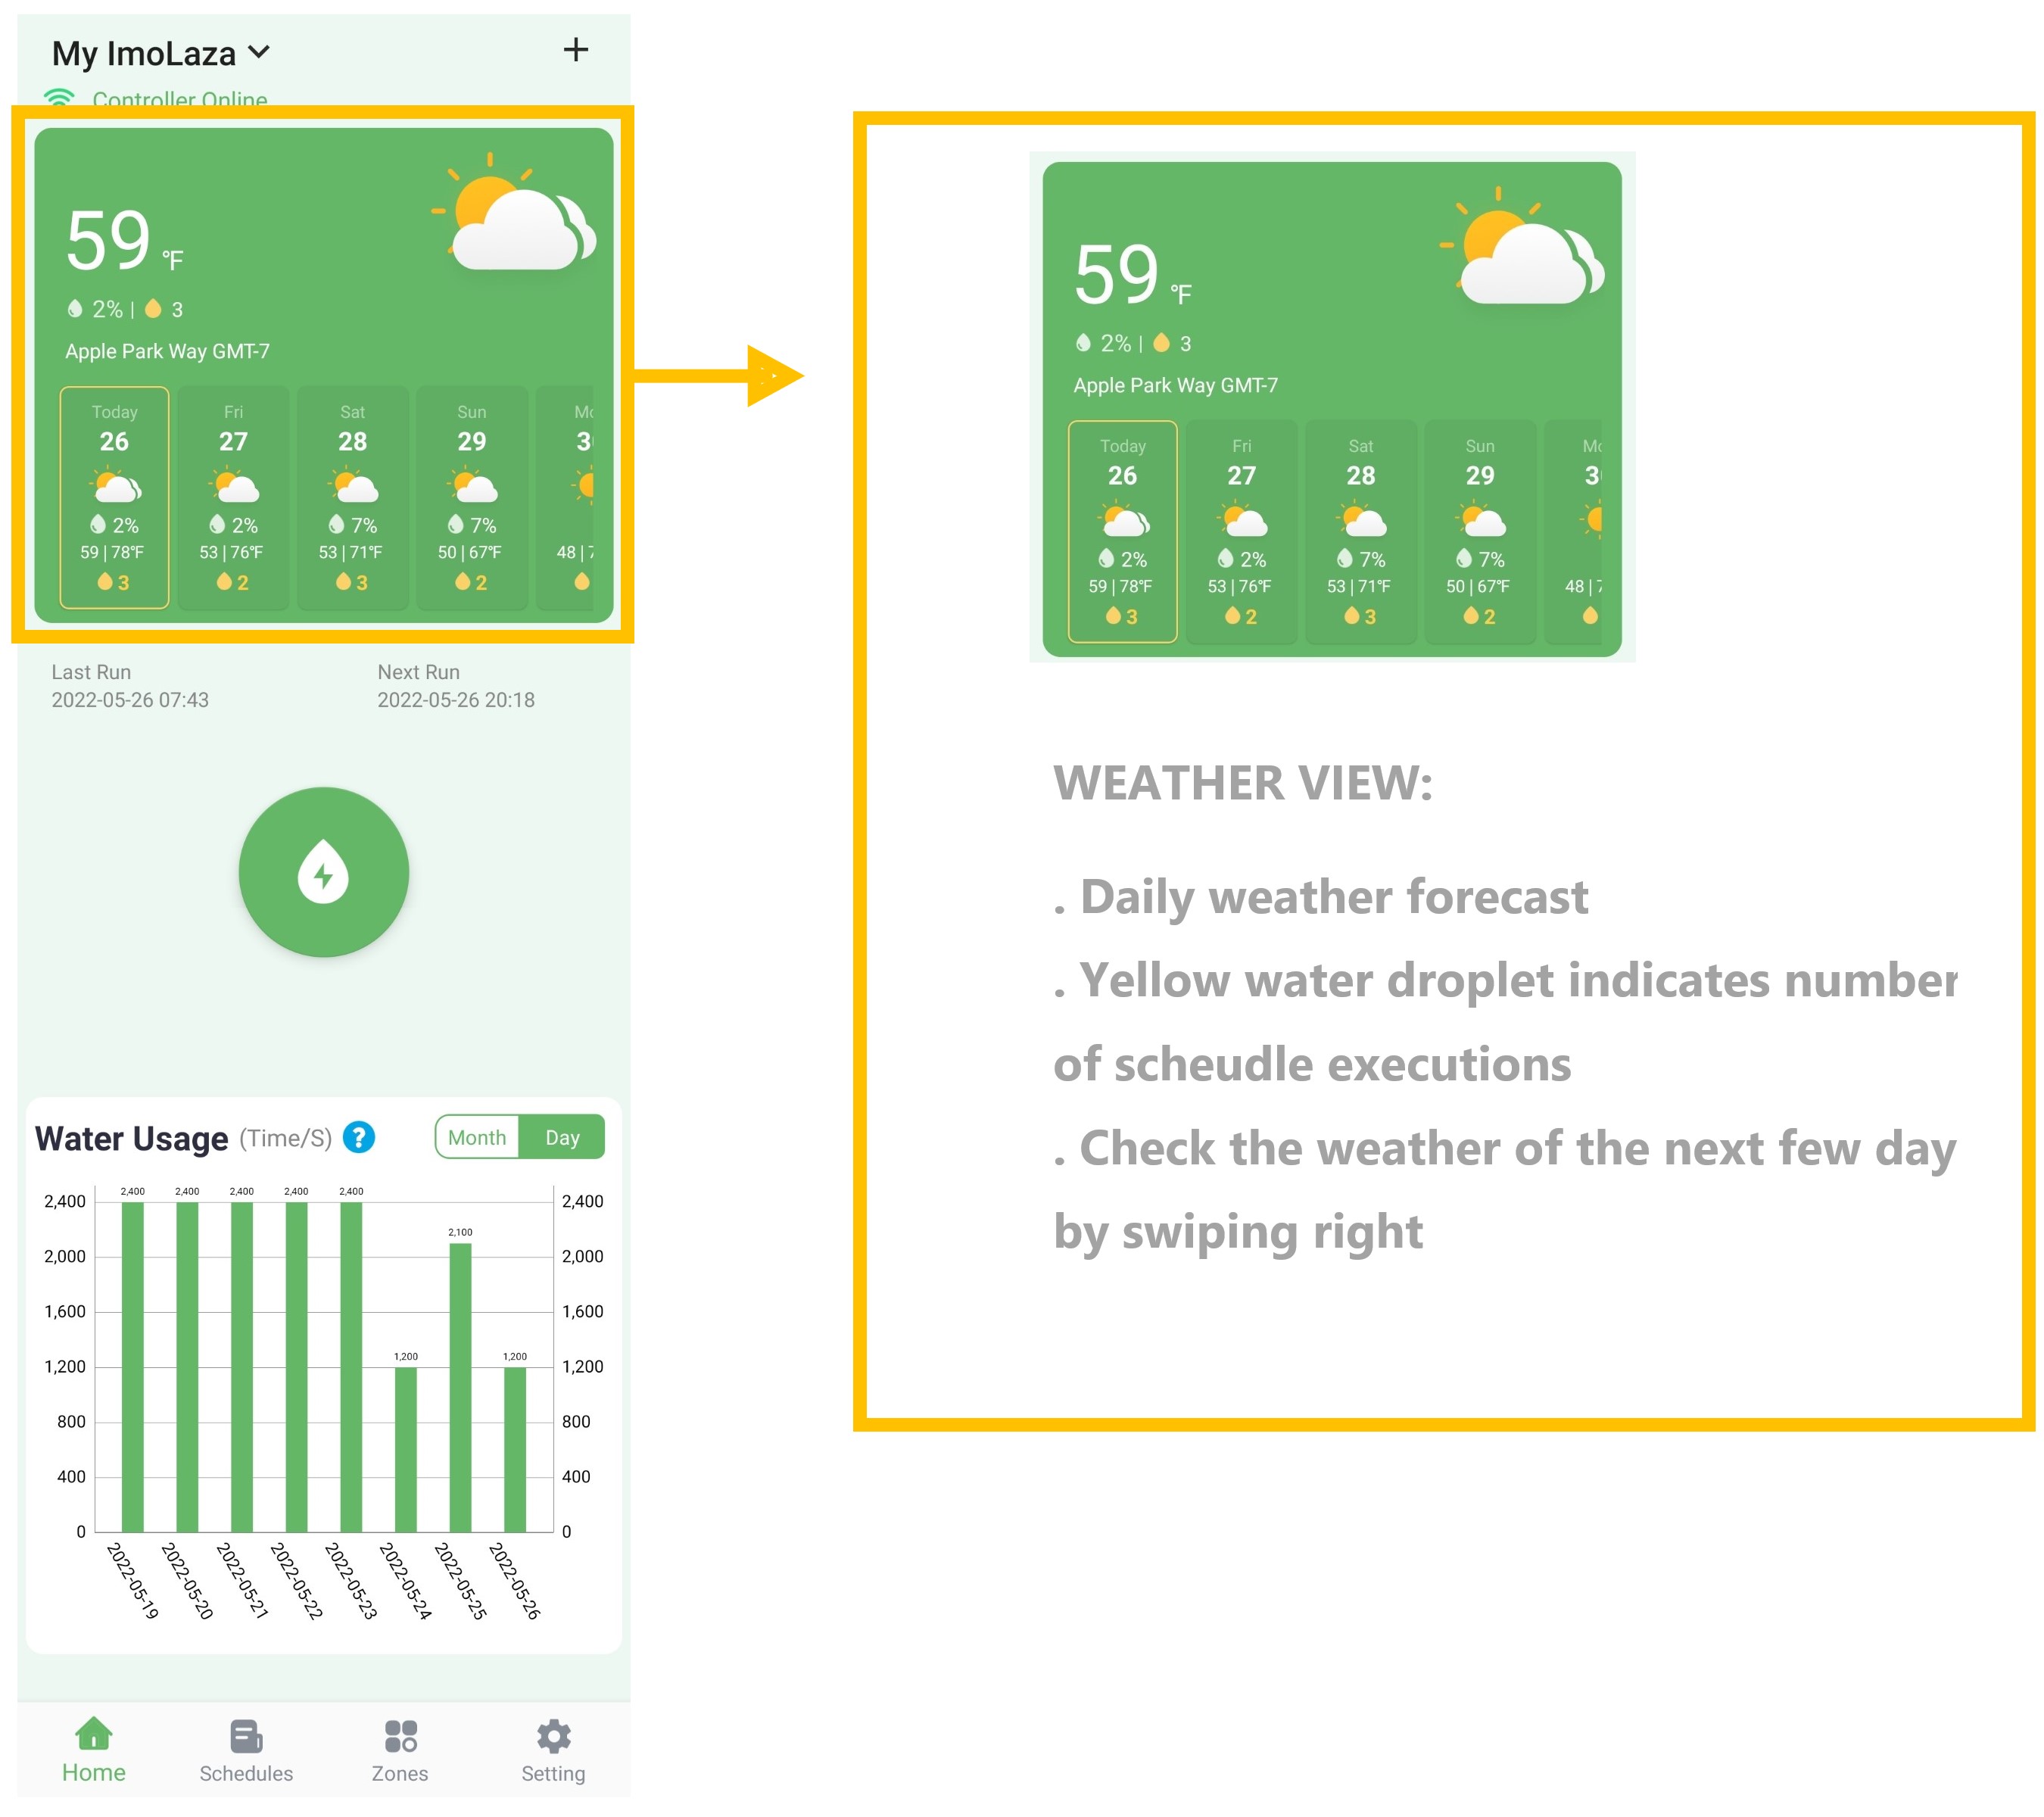
Last and Next Schedule Run:
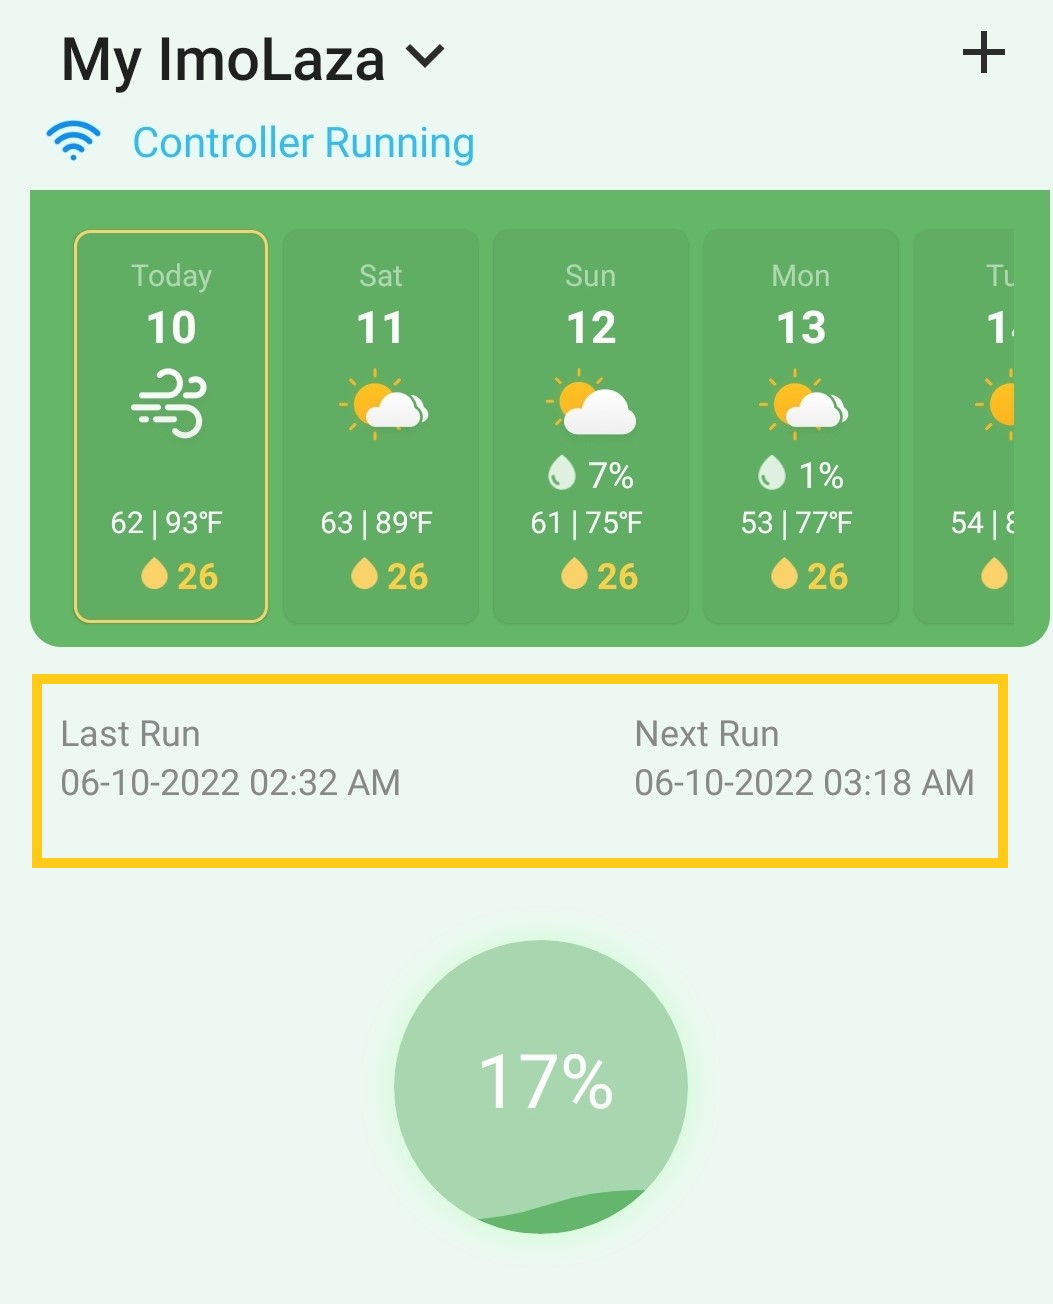
QuickRun Shortcut: This button allows you to select zones to water immediately. Tap it to jump to the "Select Zones" page. Choose the zones that need watering, and click "Next" to the "Zone Set" page to set the watering length. Finally, tap "Next" to run.
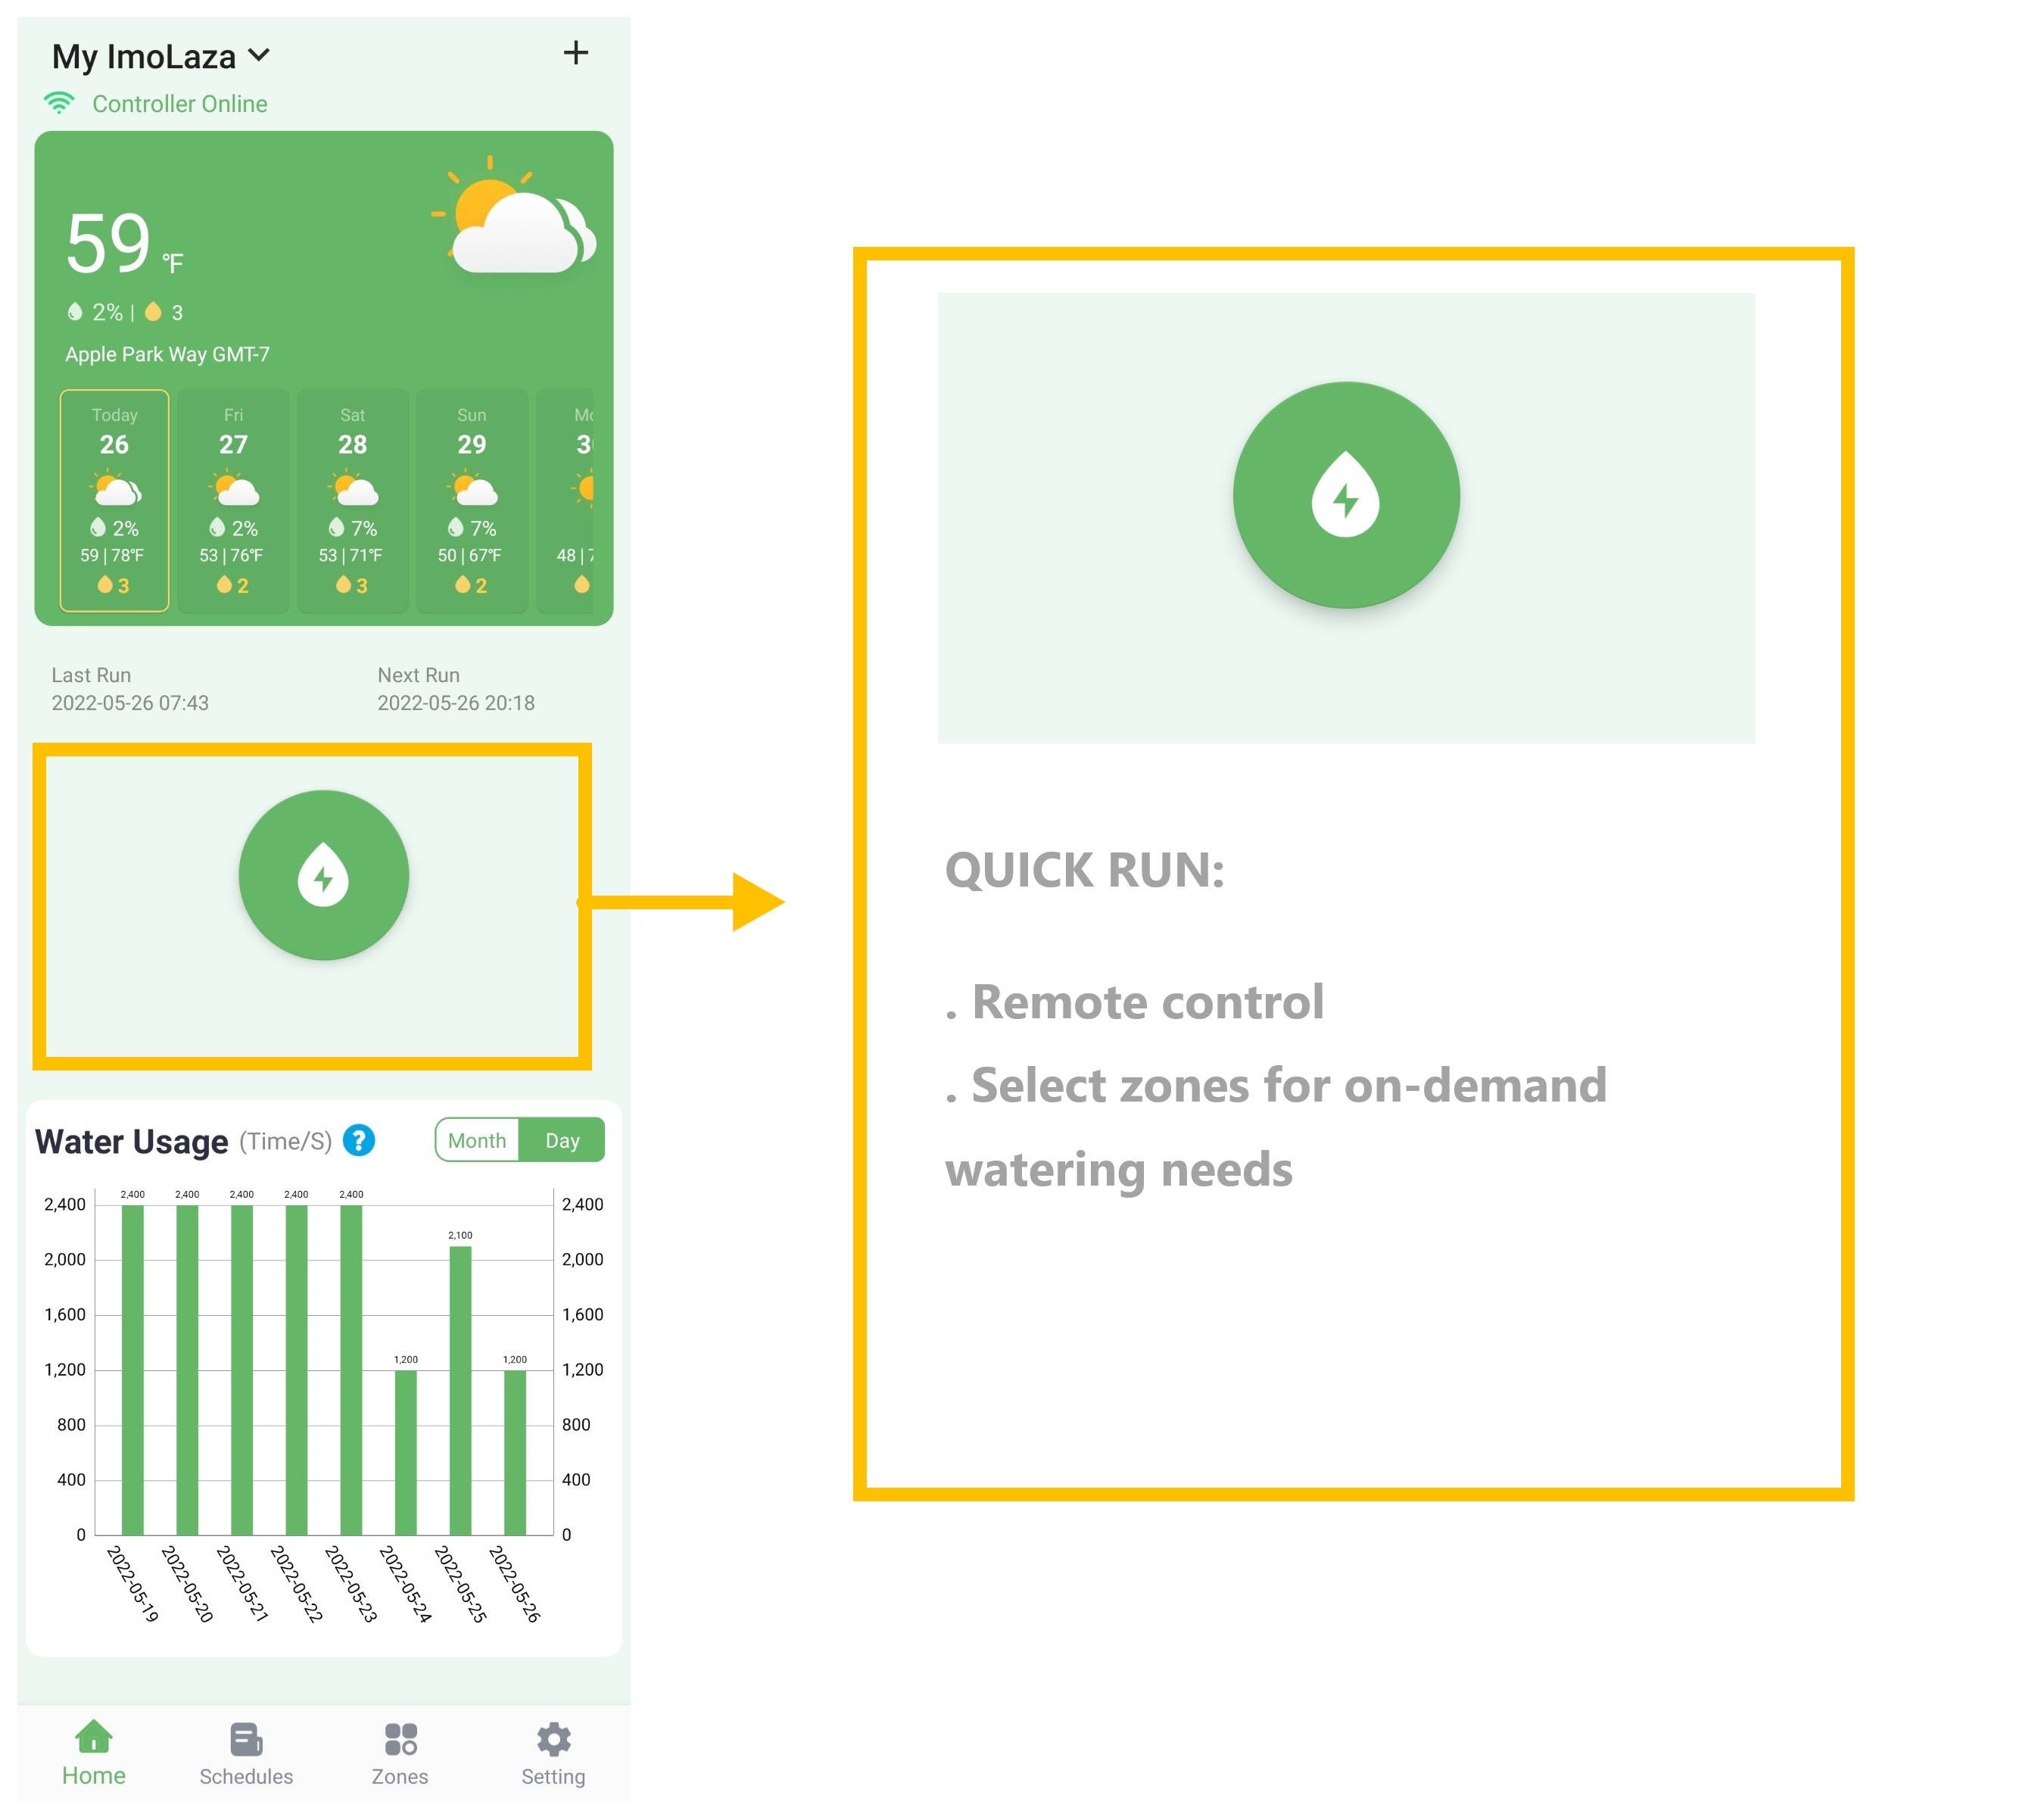
Water Usage Summary: This area displays a histogram of water consumption. You have a choice whether to view it by month or by day.
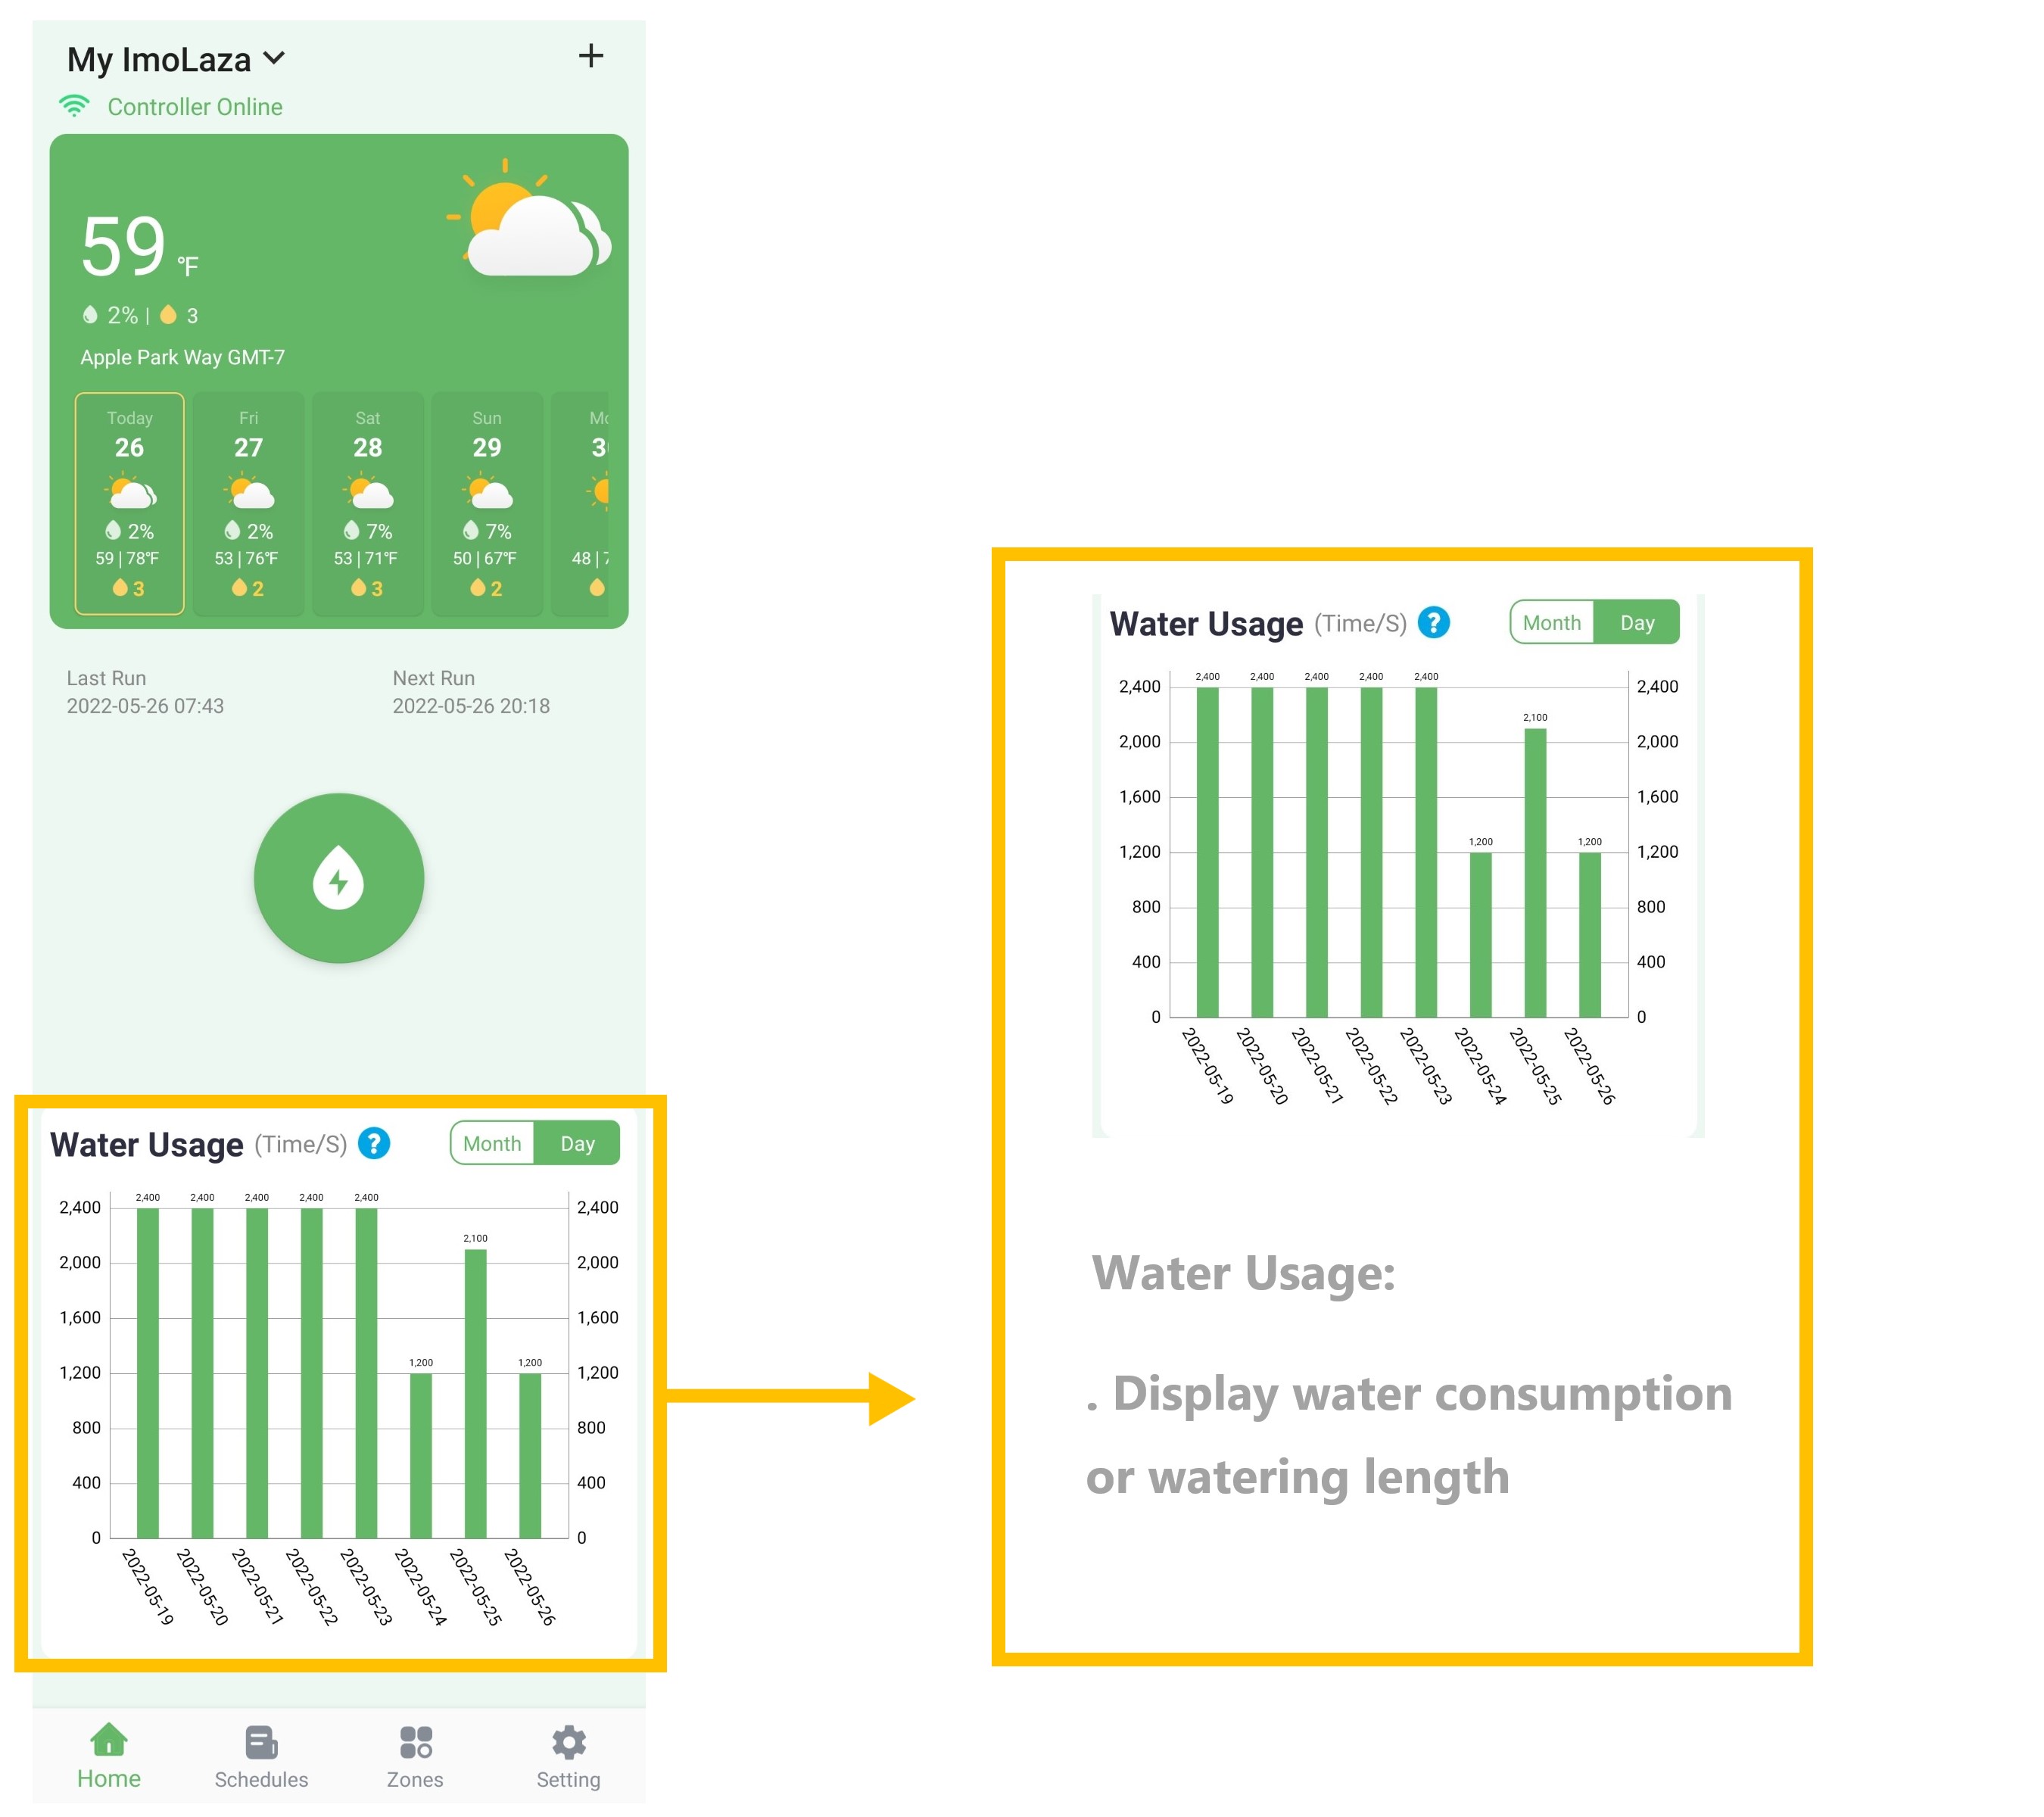
Schedules Screen
Calendar View: You can view the total number of scheduled executions for the day.
Add Schedules button: Click "Add Schedule" to add a new watering schedule.
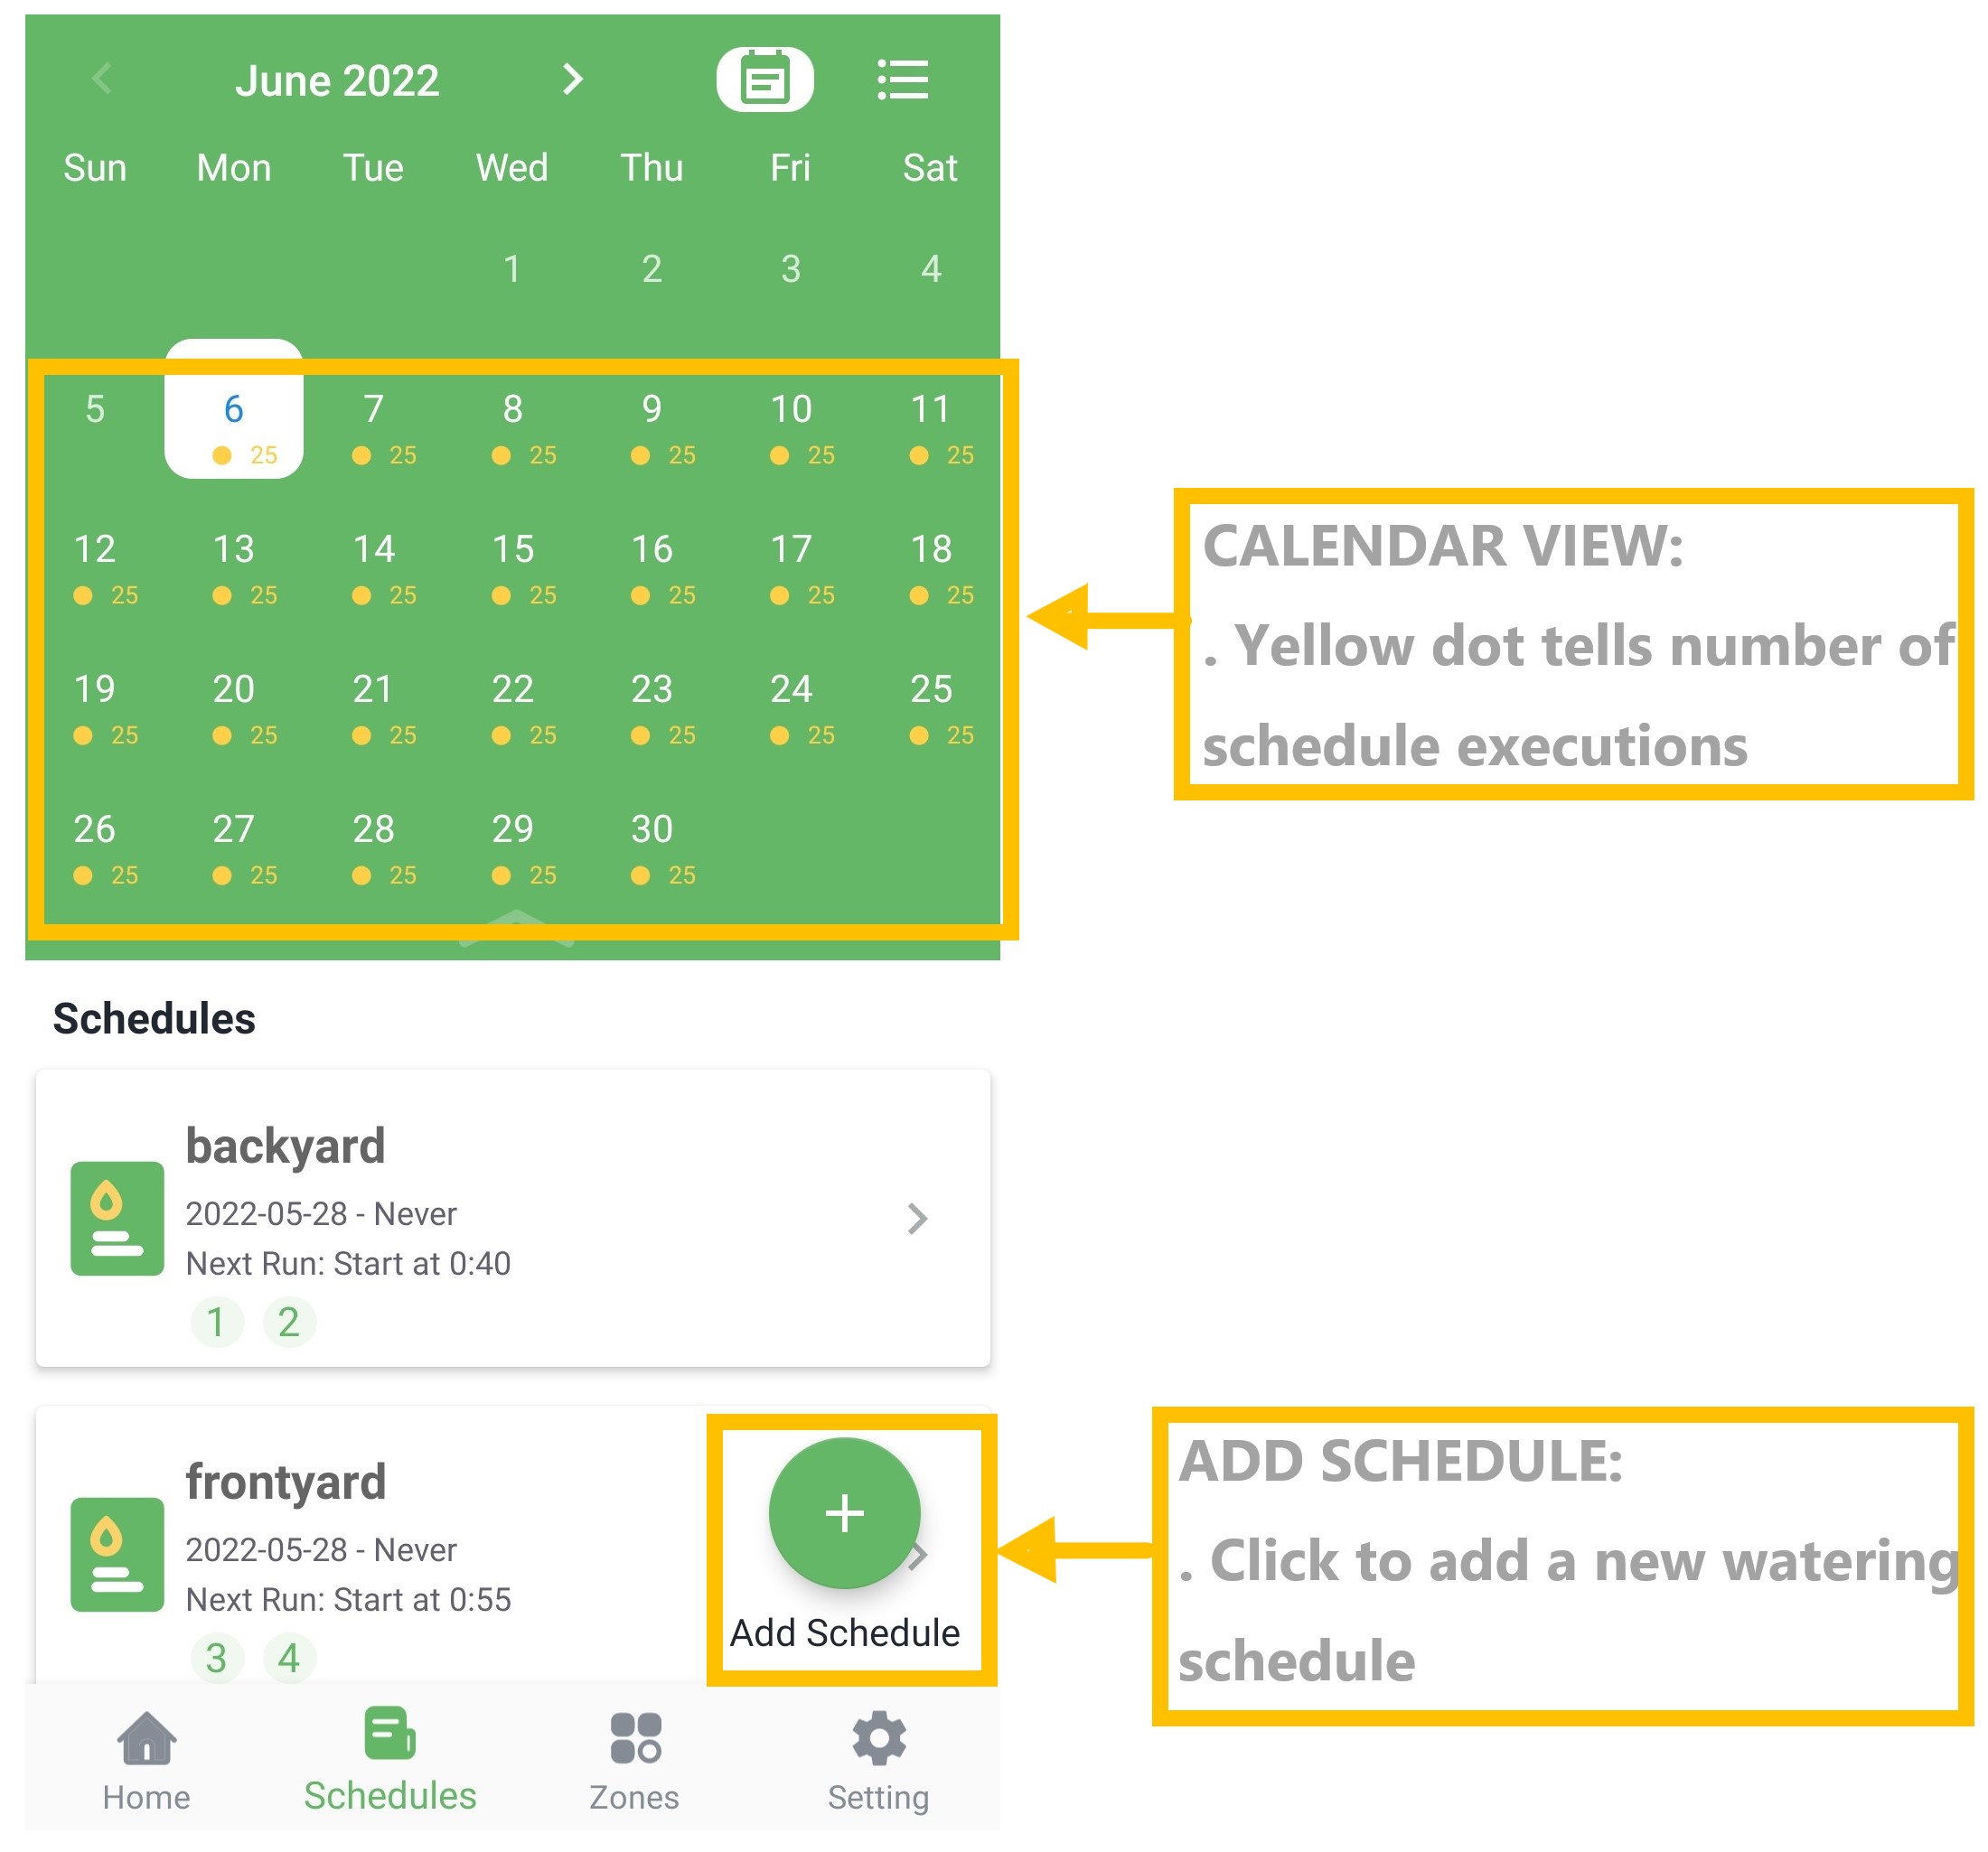
Schedules List: Show all set schedules, both enabled and disabled.
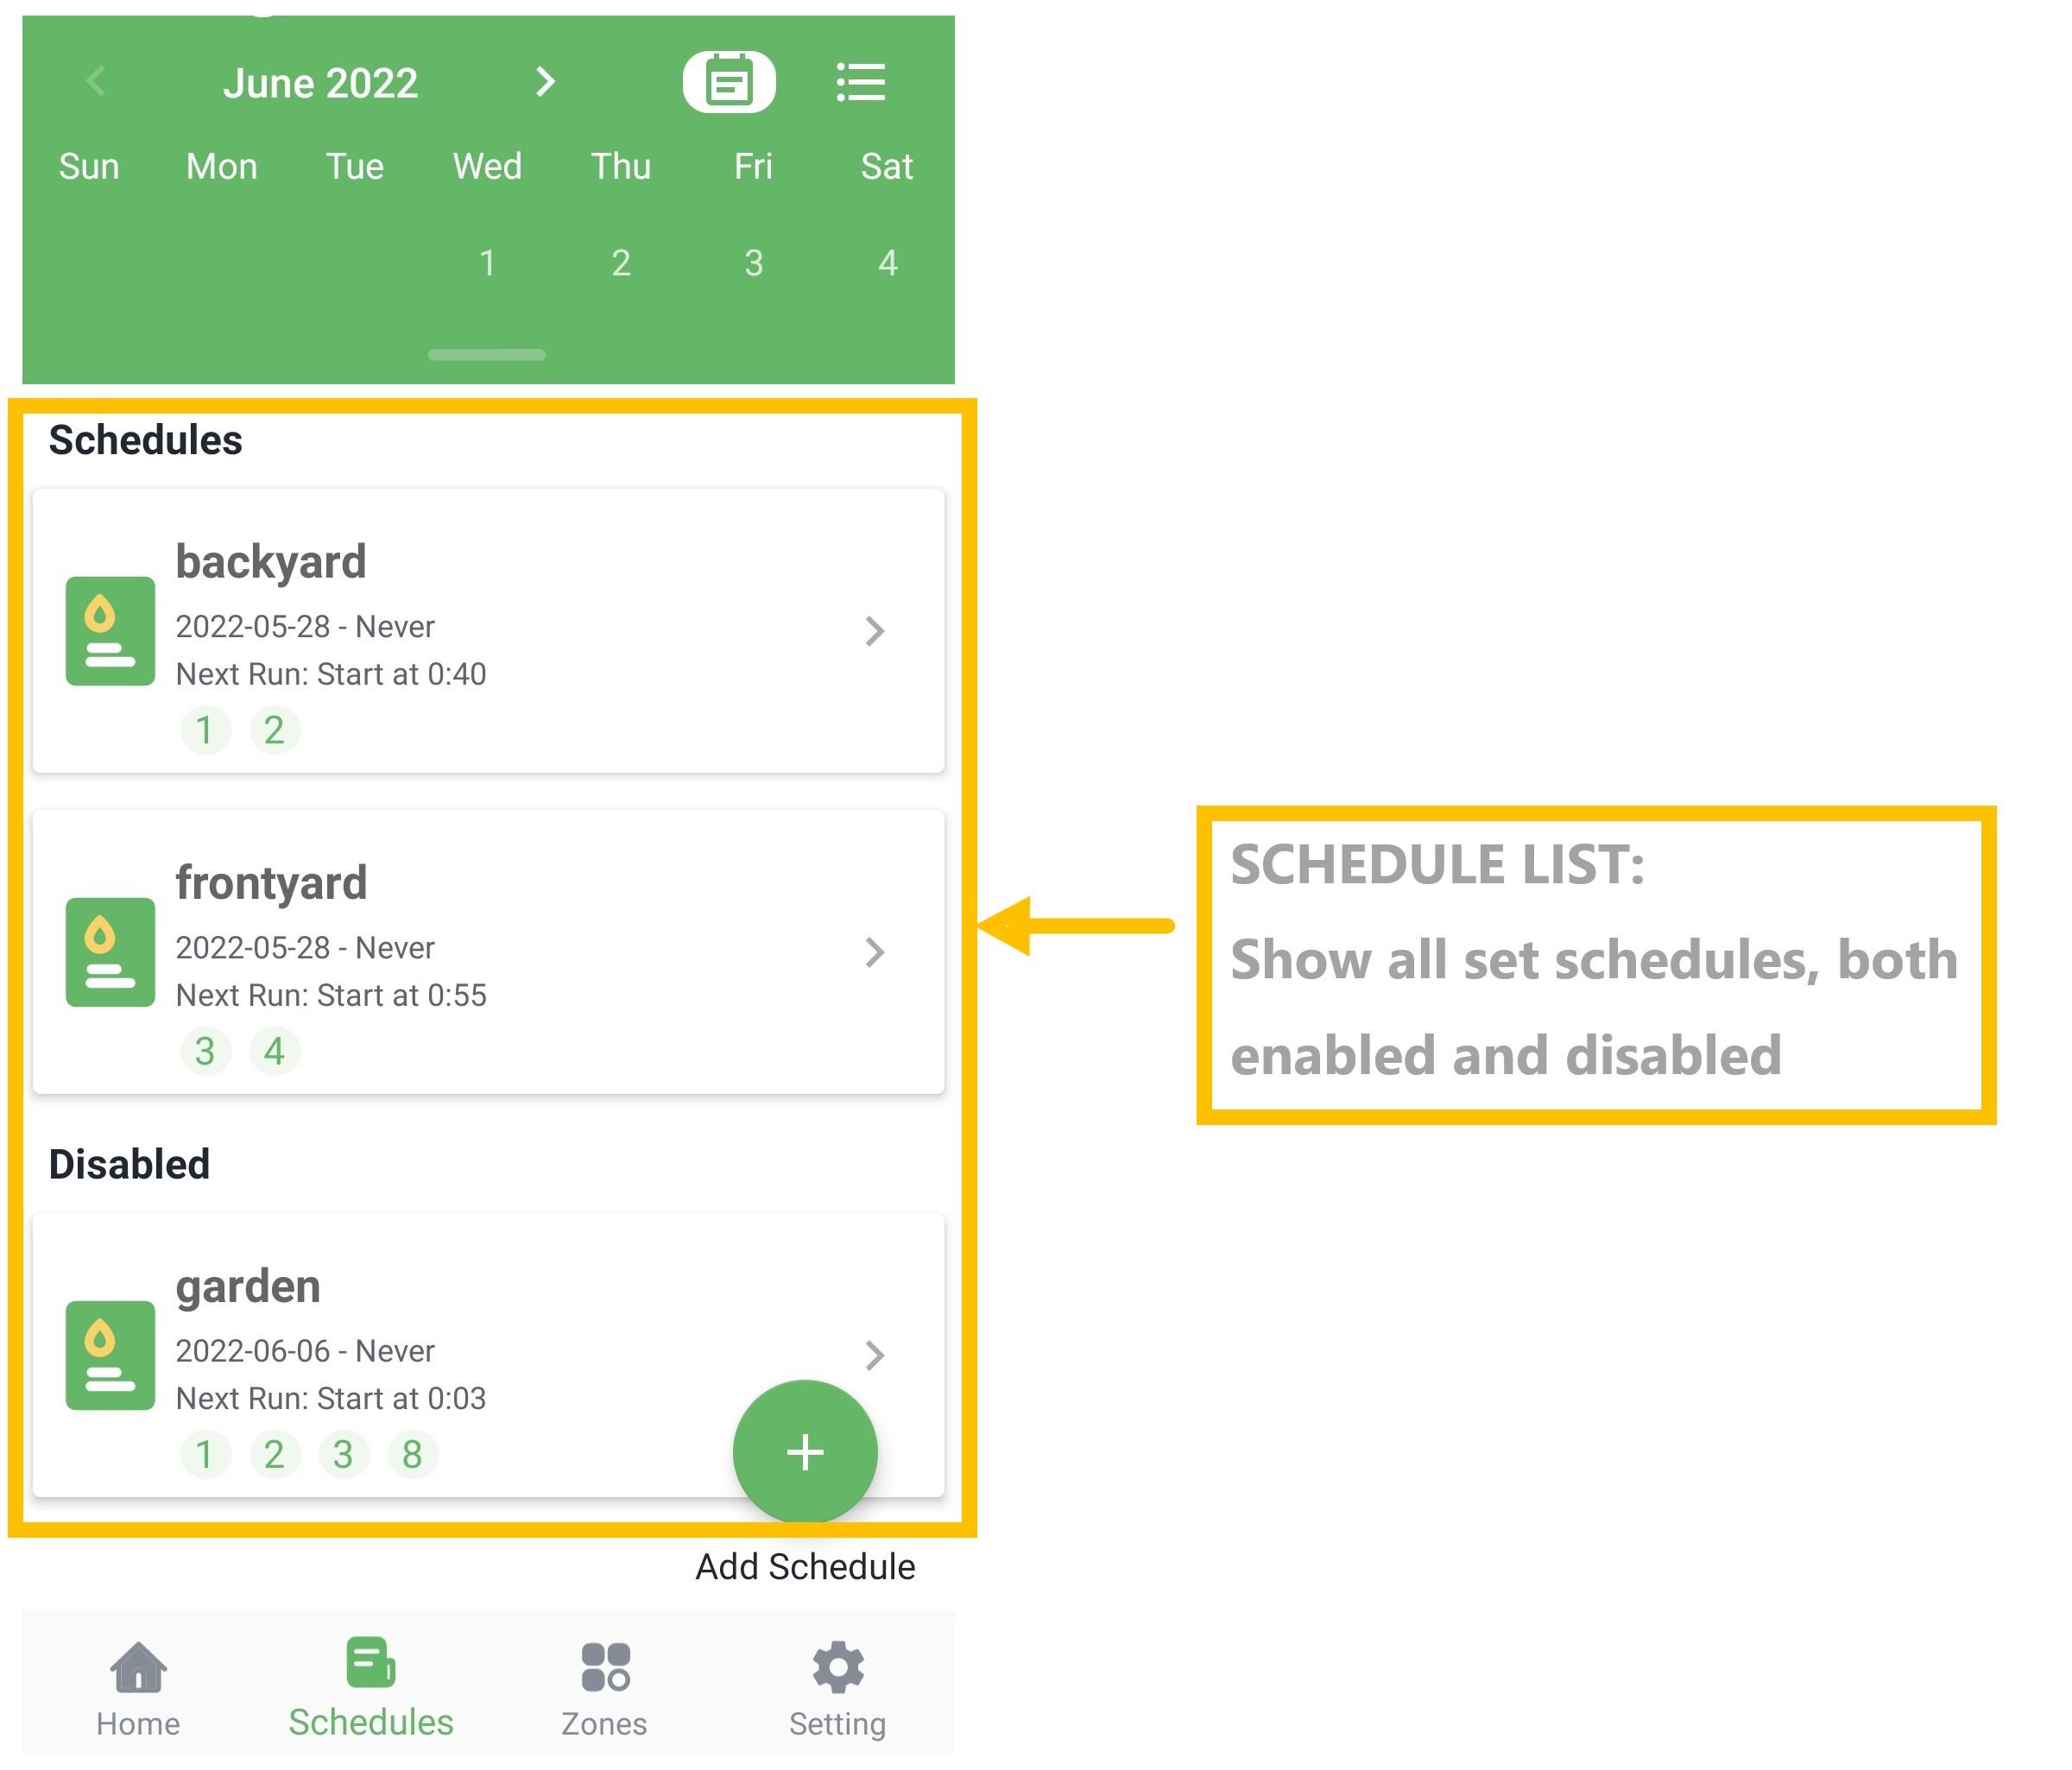
Zones Screen
Zone List: Show all enabled zones, click "Edit" in the upper right corner to edit zones.
SETUP ZONES: Click to customize your zones.
QUICK RUN: Click to select zones for manual waterings.

Setting Screen
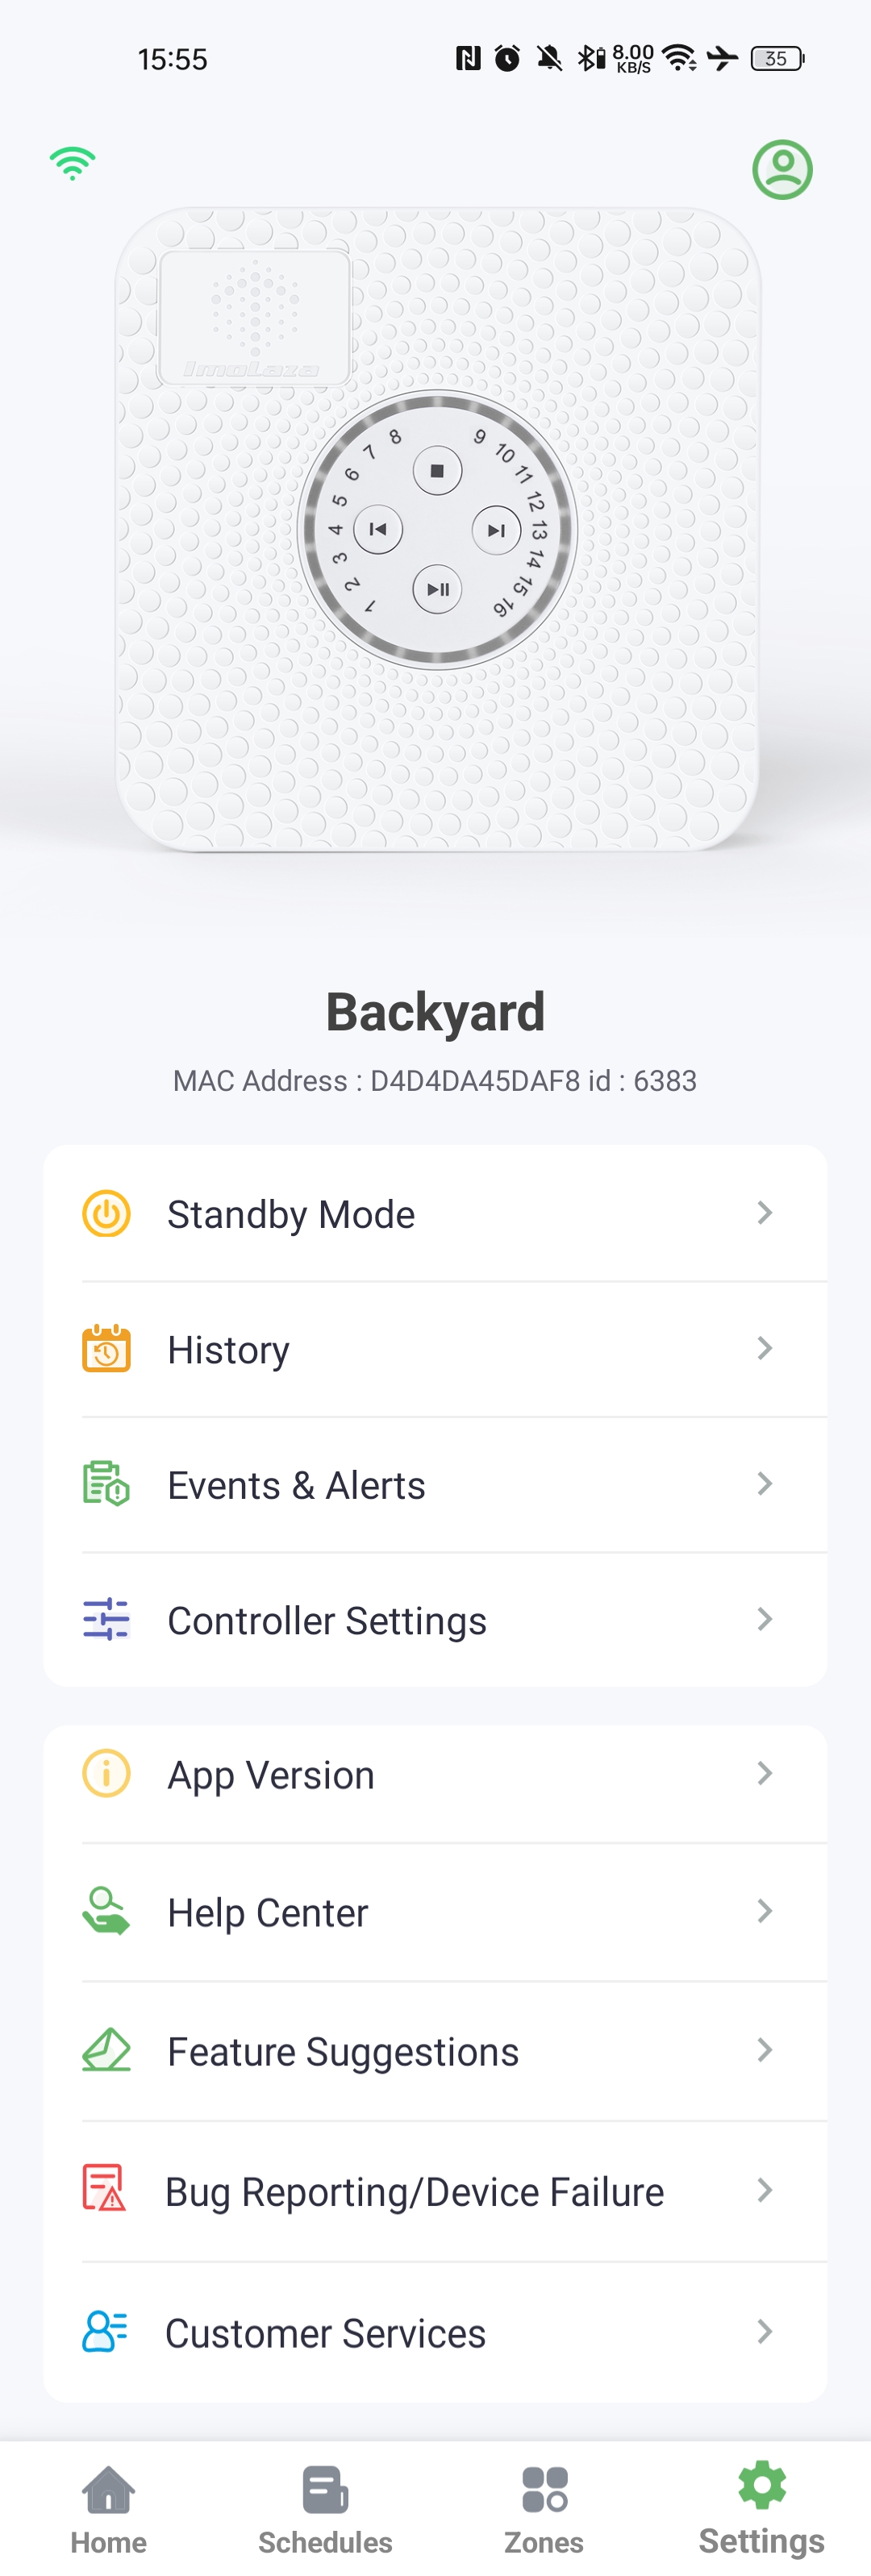
Standby Mode: A controller in Standby Mode will not execute any schedules. It will enter an ultra-low power consumption state, but still maintain minimal power to keep the clock/calendar running.
ImoLaza Standby Mode: What is it and Why is it Useful?
History: The history feed consolidates all the historical information on your ImoLaza controller, including updates and changes.
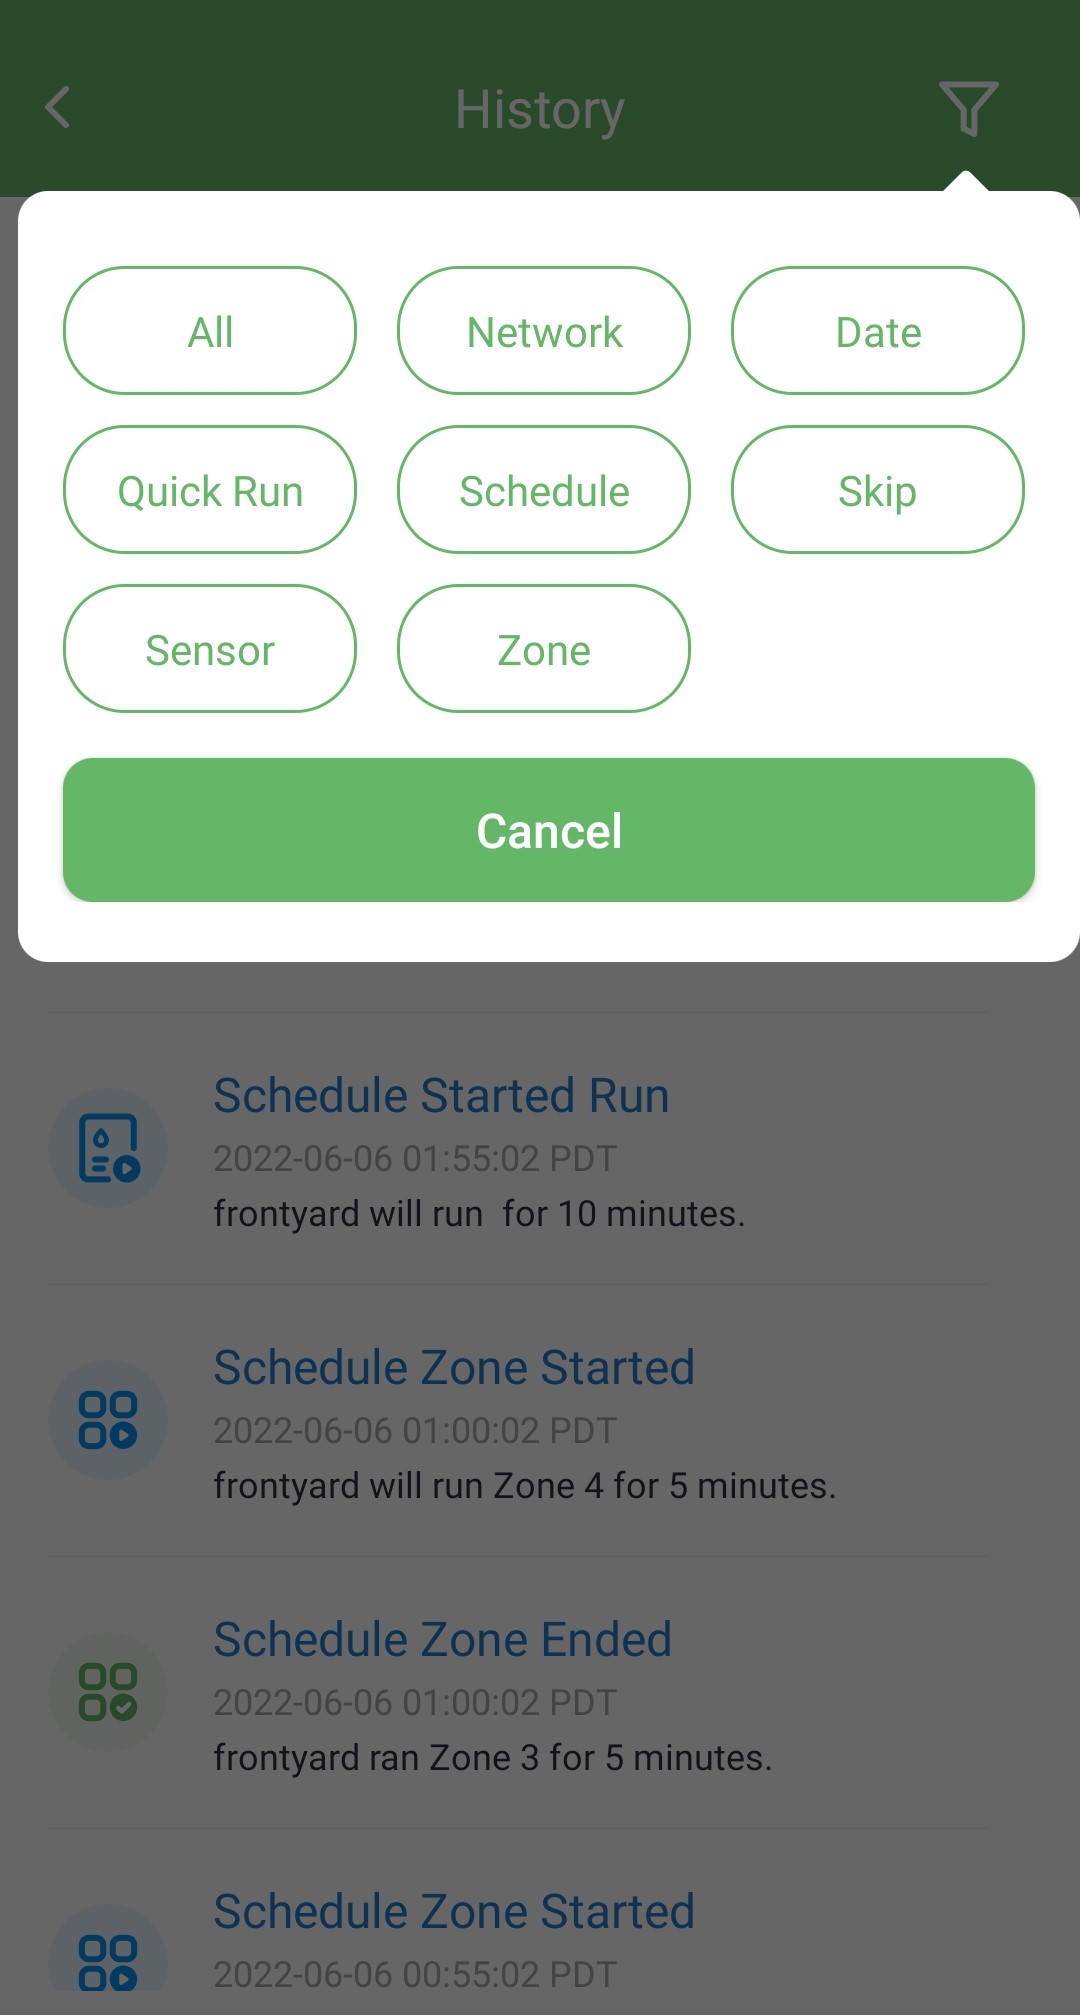
Account:
. Review and adjust notifications settings.
. Change temperature, water, and usage unit.
. Delete the account.
. Change the account password.
. Sign out of the account.
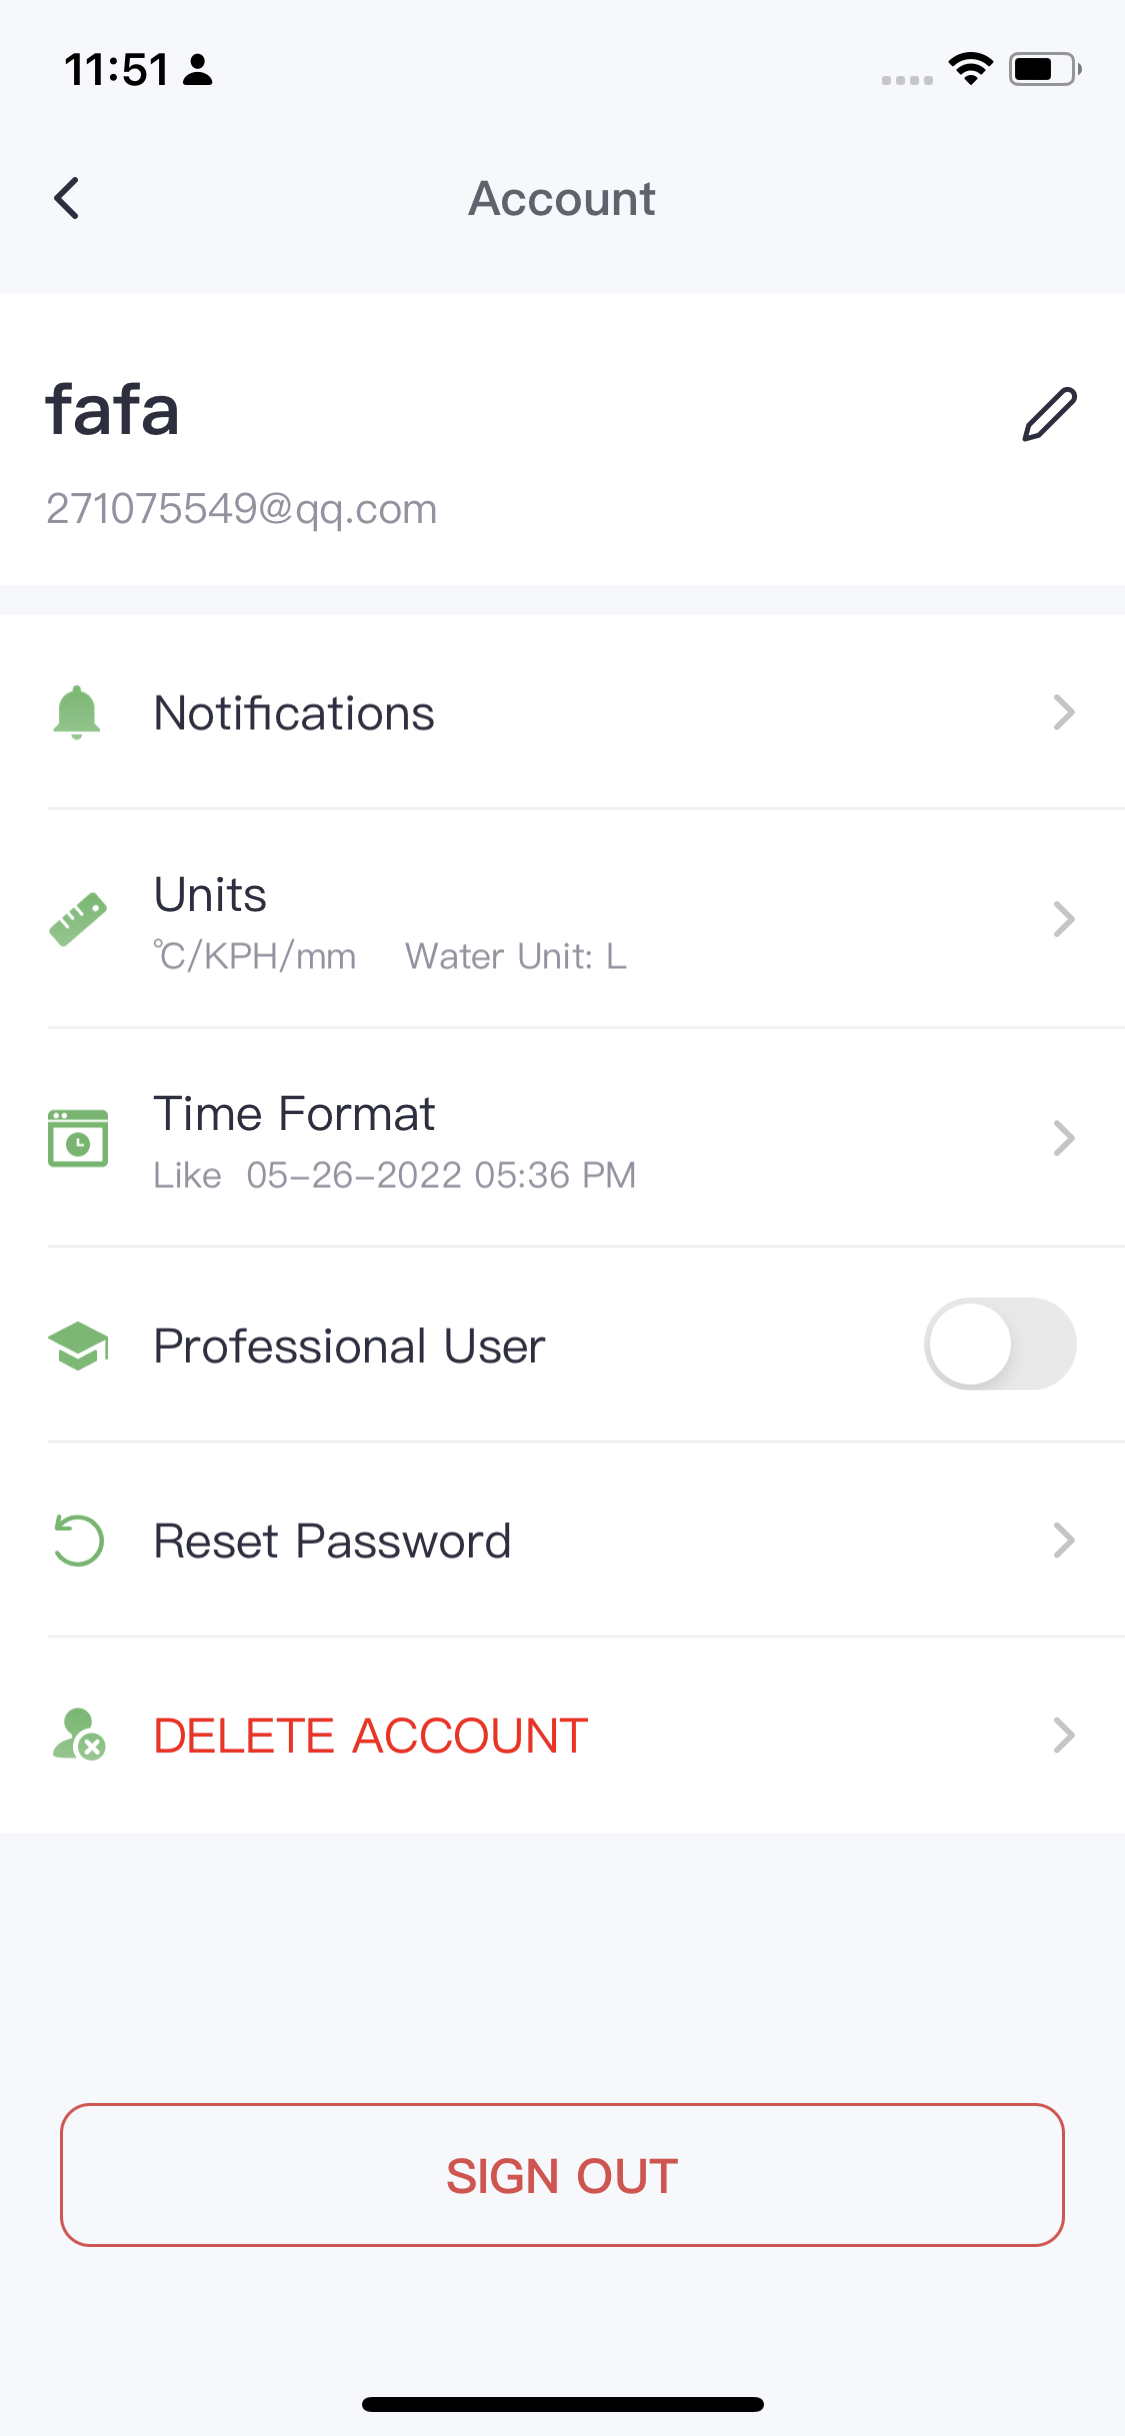
Controller Settings:
. Change device name and location.
. Check the device's Mac address and firmware version.
. Adjust the brightness of the equipment lights.
. Change the Wi-Fi network connected to the controller.
. Remove the current controller.
App Version:
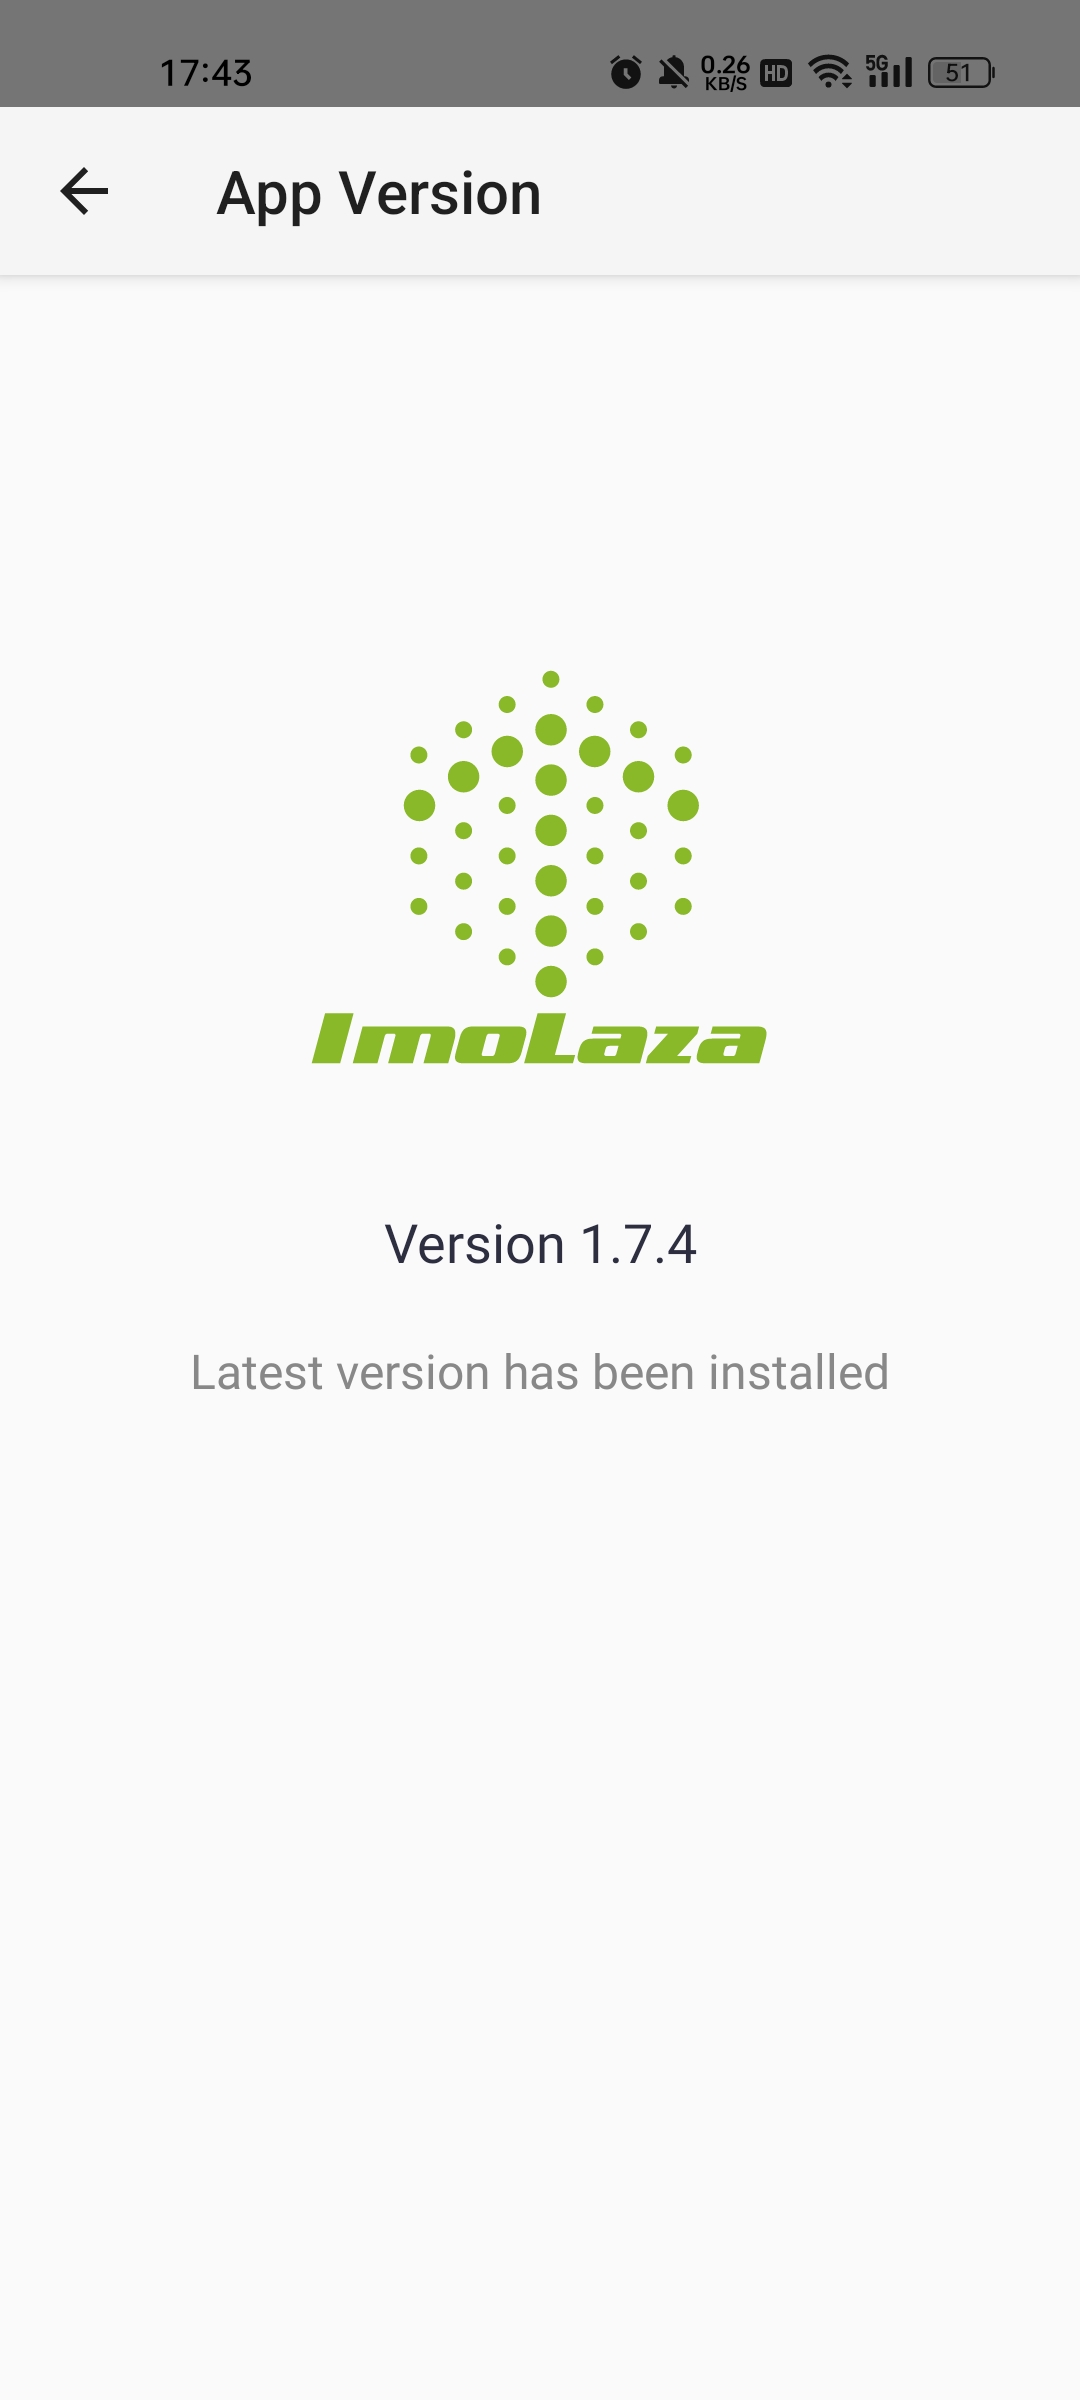
Any Questions: If you encounter problems in the use of the process that can not be solved, you can describe them on the "Feedback" page, and leave your email, we will solve them and reply to you later.
Still need help?
In case the above method doesn’t work for you, please contact our technical support team directly using the contact information below. We will respond to you by email within 12h after your message reaches us.
Email: Support@imolaza.com
Author: admin
Last update: 2024-10-17 10:05
Of course, ImoLaza offers a remote feature that provides two ways for manual watering. Once your ImoLaza controller is connected to your home Wi-Fi. You can use your email address and password to log in and control it from anywhere, as long as you are connected to the Internet. ImoLaza does not require any wiring or additional components to enable remote control functionality. If your previous device had things like that, do not install or connect them to the ImoLaza controller.
Click Schedule's Quick Run and Zone's Quick Run to learn more about manual watering.
Still need help?
In case the above method doesn’t work for you, please contact our technical support team directly using the contact information below. We will respond to you by email within 12h after your message reaches us.
Email: Support@imolaza.com
Author: admin
Last update: 2023-10-20 05:45
If you need assistance from others to help manage your yard, ImoLaza allows you to share access without revealing your account credentials (username and password). We offer three types of shared access: full access, limited access, and transfer of ownership. Please refer to the following instructions for details. We hope this guide will be helpful to you.
Complete Access
. A ImoLaza account required.
. Full access shared; modify configurations & run zones.
. Changes can be made & saved by either party.
. Access does not expire unless manually removed by the primary account holder.
. Grant access to trusted individuals.
. A ImoLaza account required.
. Partial access shared; view configurations & run quick runs.
. Access does not expire unless manually removed by the primary account holder.
. Grant access to the lawn guys or other service calls.
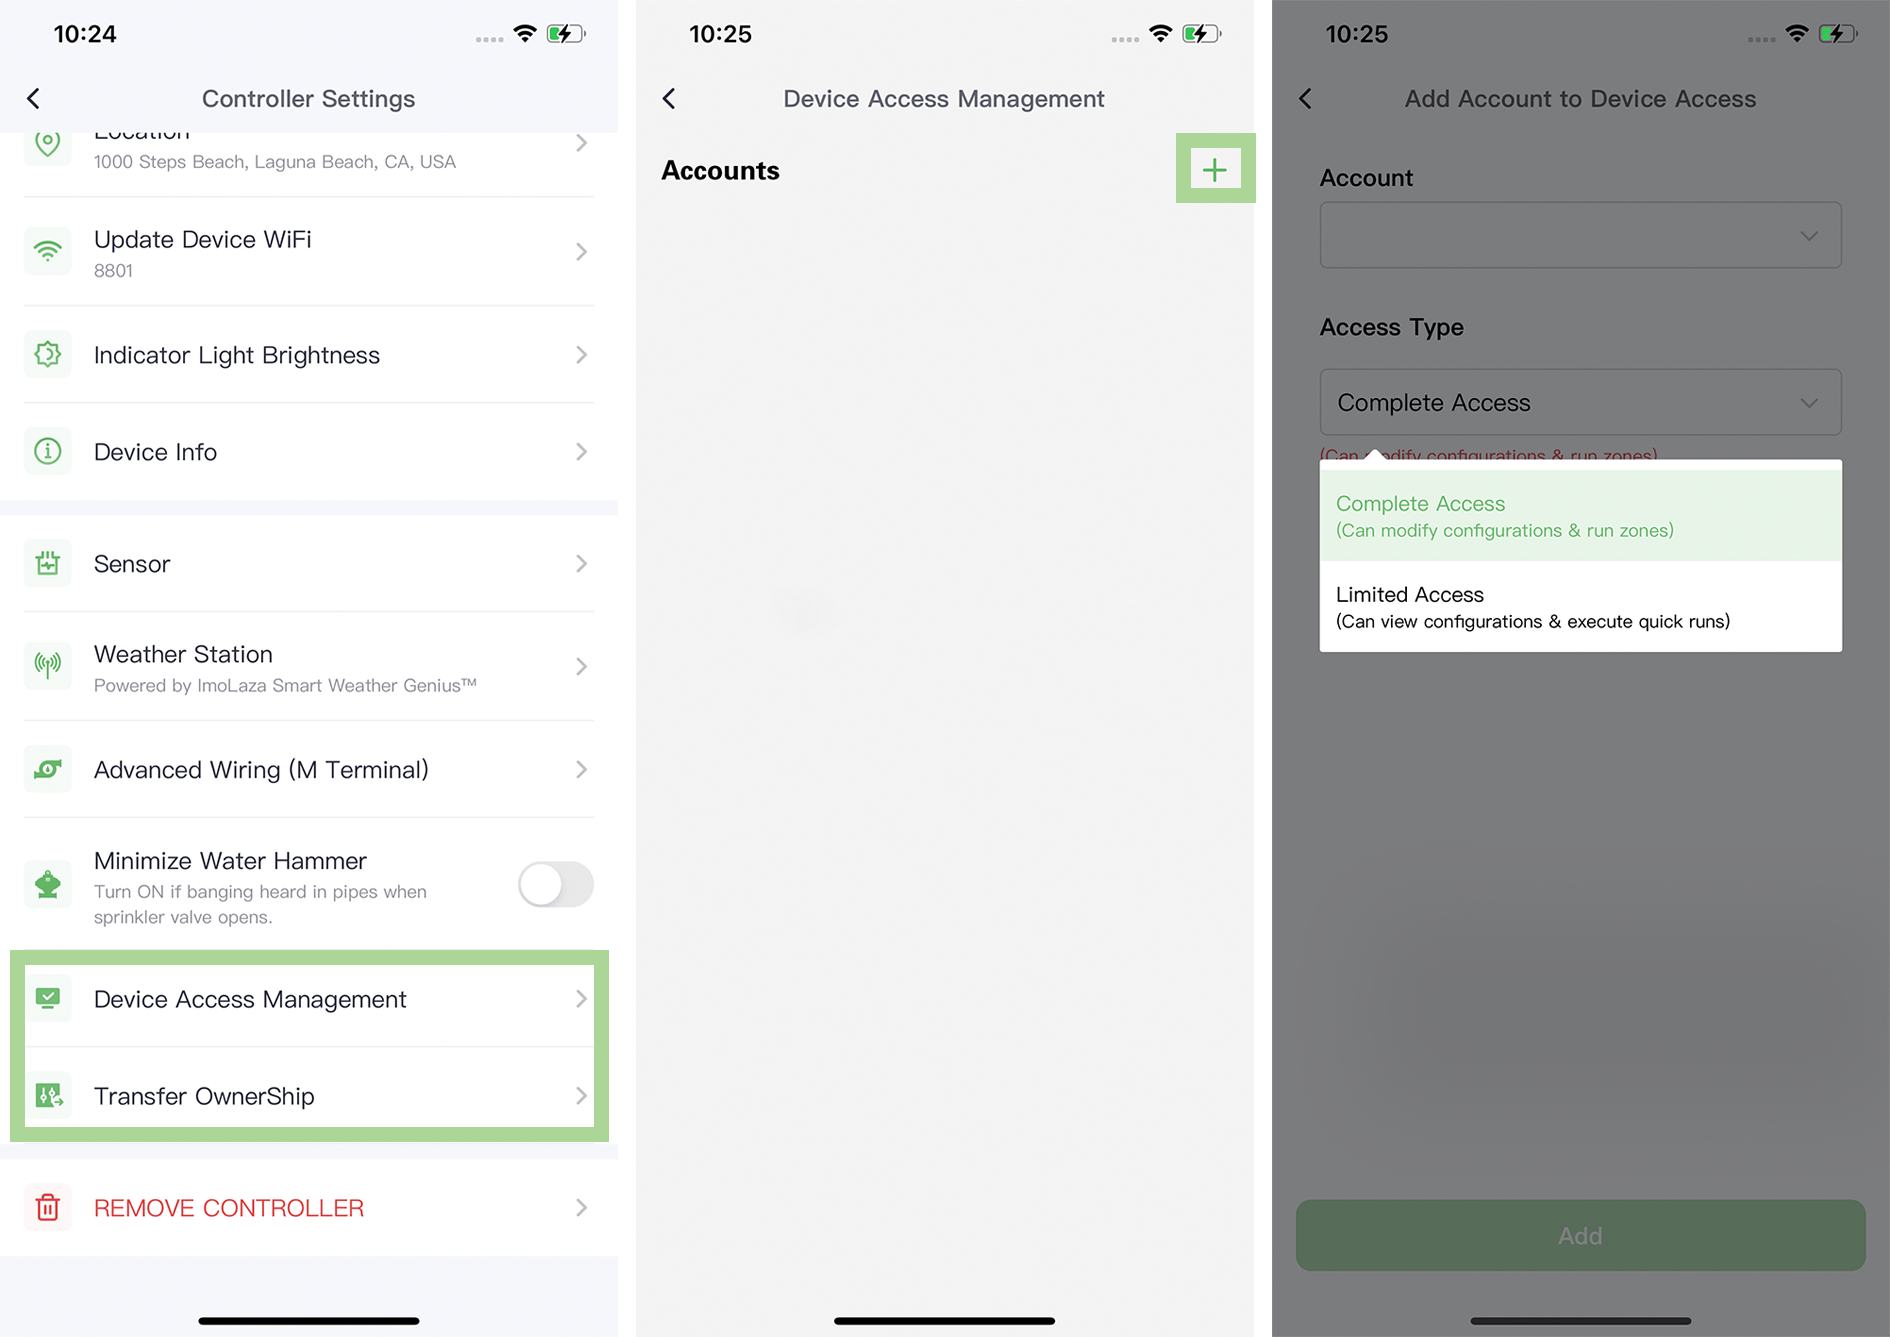
Transfer Ownership
. A ImoLaza account required.
. After the transfer, the controller will be moved to the target account, and it will no longer be visible in your current account.
. The target email account must be already registered in the ImoLaza app.
. Great if you recently moved into a home with an existing ImoLaza controller and want to add the controller to your account, or transfer ownership to a new homeowner.
. Great if you purchased a used ImoLaza and want to control it from your account.
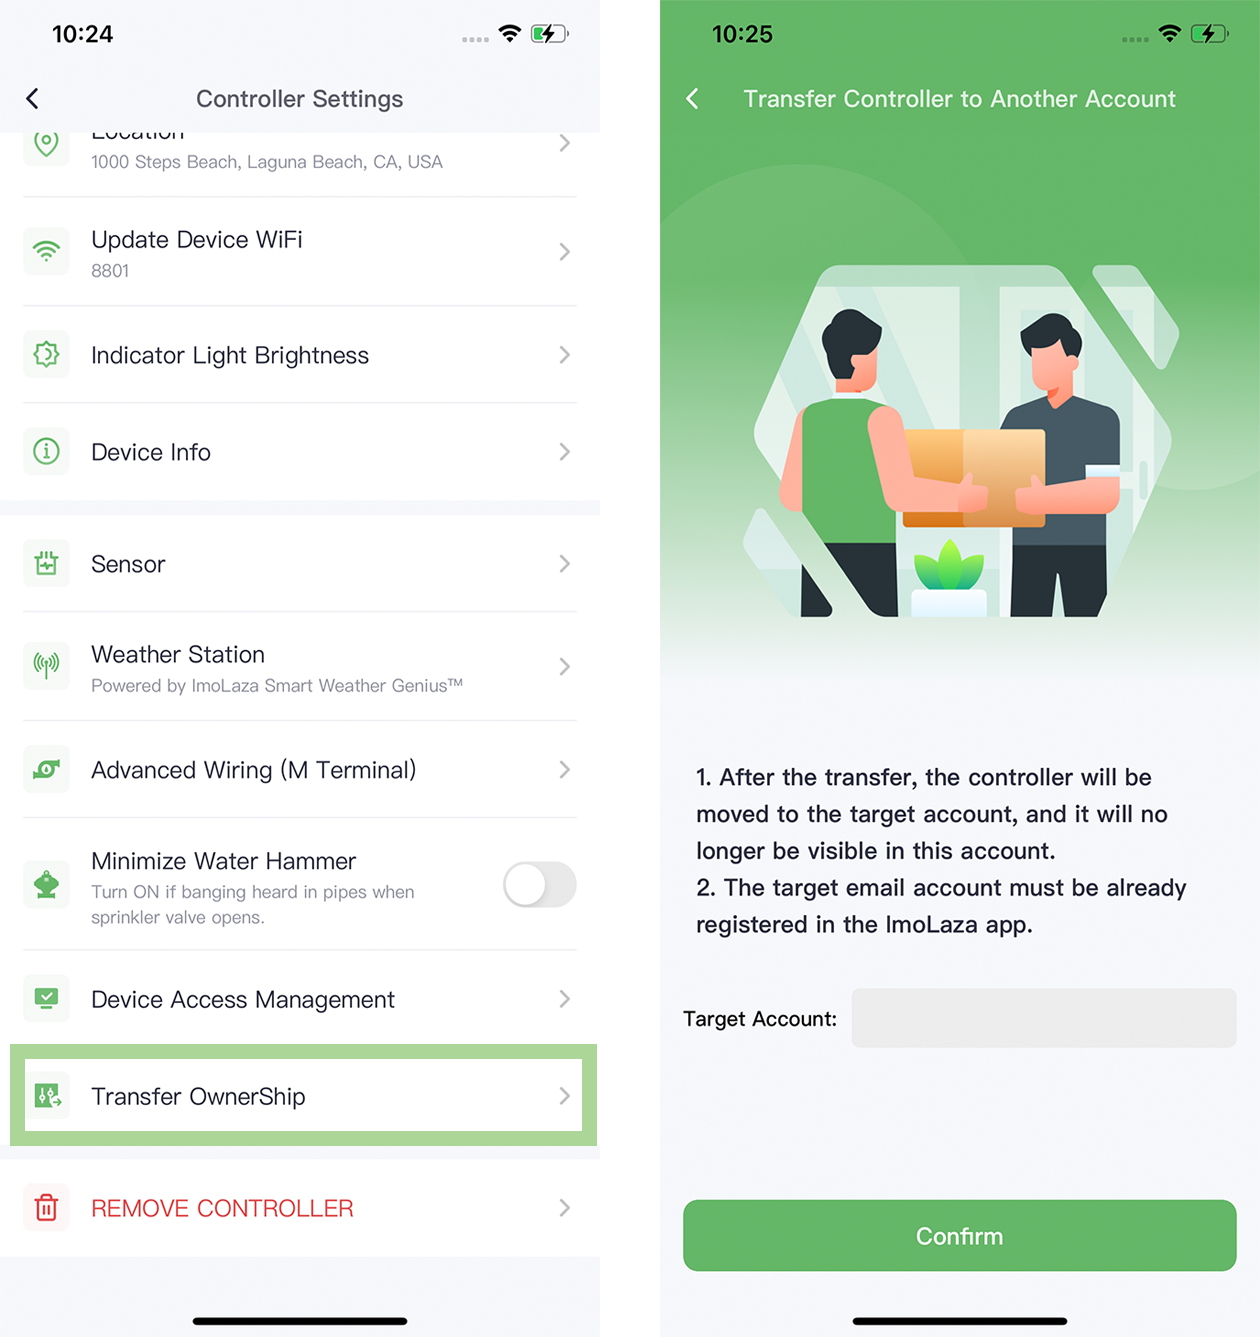
Still need help?
In case the above method doesn’t work for you, please contact our technical support team directly using the contact information below. We will respond to you by email within 12h after your message reaches us.
Email: Support@imolaza.com
Author: admin
Last update: 2025-01-10 06:50
"Standby Mode" is specifically designed for controllers to winterize. Its purpose is to stop all irrigation activities during winter without modifying the irrigation schedule, without having to unplug the controller. Additionally, Standby Mode can maintain the status of the controller to prevent device malfunctions due to prolonged inactivity.
What is ImoLaza's "Standby Mode"?
"Standby Mode" is a low-power state that the ImoLaza controller enters when it's not actively running an irrigation schedule. In this mode, the controller uses very little power, which helps to conserve energy and extend the life of the device. Despite being in standby mode, the controller remains connected to your Wi-Fi network and can still receive updates. This means that you can still make changes to your watering schedule and monitor your irrigation system. What's even better? A controller in "Standby Mode" can still perform Quick Run and manual run, even when the controller is in standby mode.
Why is "Standby Mode" Useful?
There are several reasons why the "Standby Mode" feature on the ImoLaza controller is useful. First, it helps to conserve energy. When the controller is not actively running an irrigation schedule, it doesn't need to use as much power. This not only helps to reduce your energy bill, but it's also better for the environment.
Second, "Standby Mode" can help to extend the life of your ImoLaza controller. By using less power, the device is less likely to experience wear and tear on its components. This means that it's less likely to break down or require maintenance over time.
Finally, the "Standby Mode" does not affect the functionality of the ImoLaza controller, and you do not need to modify your watering schedule for this. Even when the device is in standby mode, it remains connected to your Wi-Fi network and can still receive updates. This means that you can still make changes to your watering schedule, monitor your irrigation system, and receive alerts if there are any issues.
How to Enable "Standby Mode"?
There are two modes in "Standby Mode": "Repeats Every Year" and "Set Specific Time". When "Repeats Every Year" is enabled, you only need to set the start and end months and specific dates. Then, every year when the start date arrives, the controller will automatically enter Standby Mode, and so on in a repeating cycle.
On the other hand, "Set Specific Time" is just a one-time period for entering Standby Mode and will not repeat. Therefore, you need to set the specific start and end dates.
How to Tell If The Device is in "Standby Mode"?
If the device is in "Standby Mode", there will be a yellow icon in the top left corner of the ImoLaza App home page, with "Standby On" displayed. Clicking on "Turn Off" next to it will take you to the "Standby Mode" page, where you can modify relevant settings. Similarly, a yellow icon will be displayed in the top left corner of the "Settings" page.
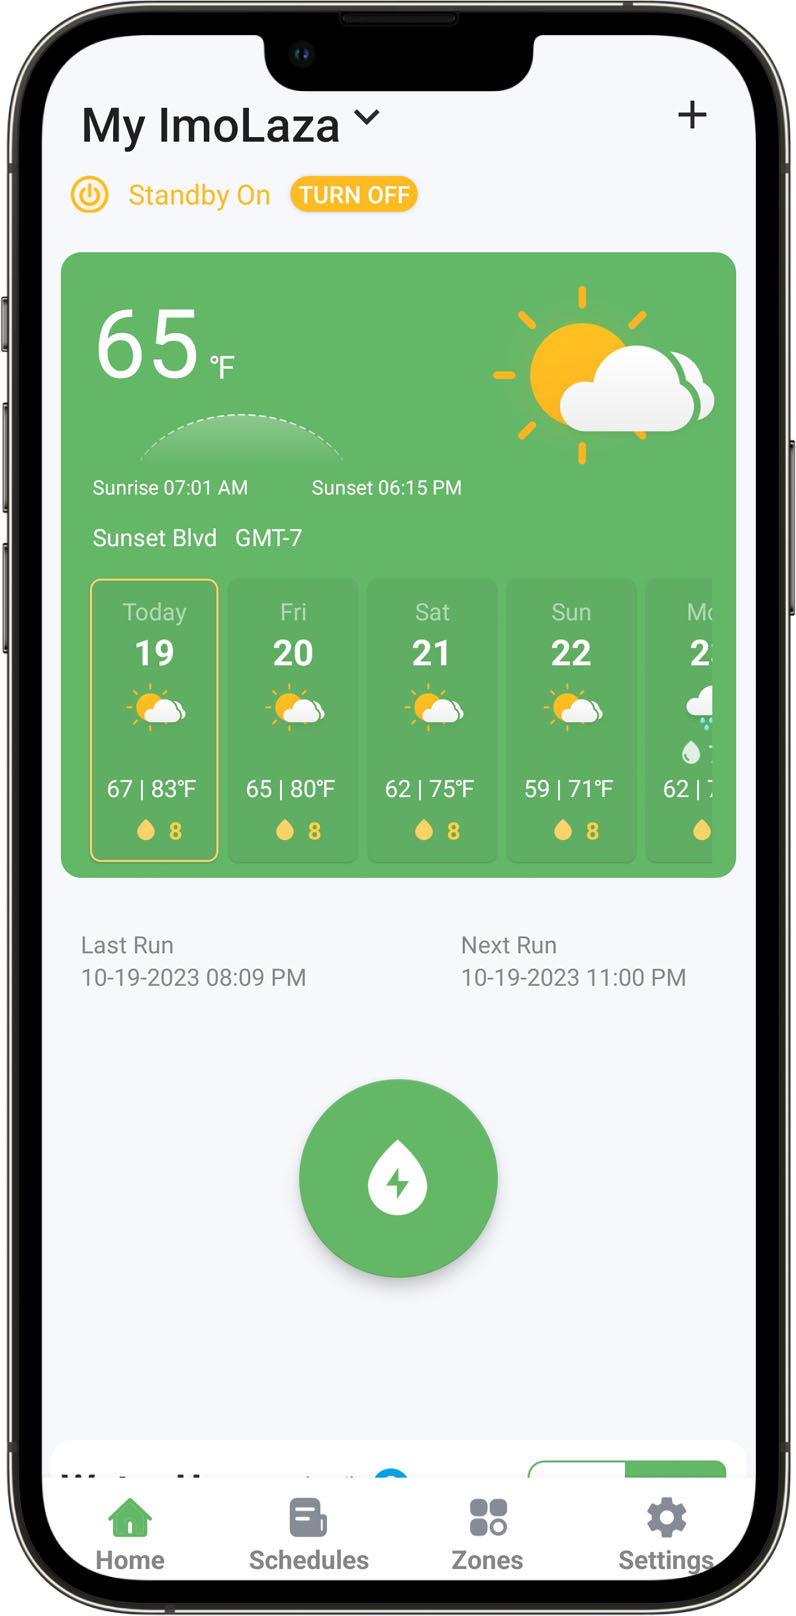
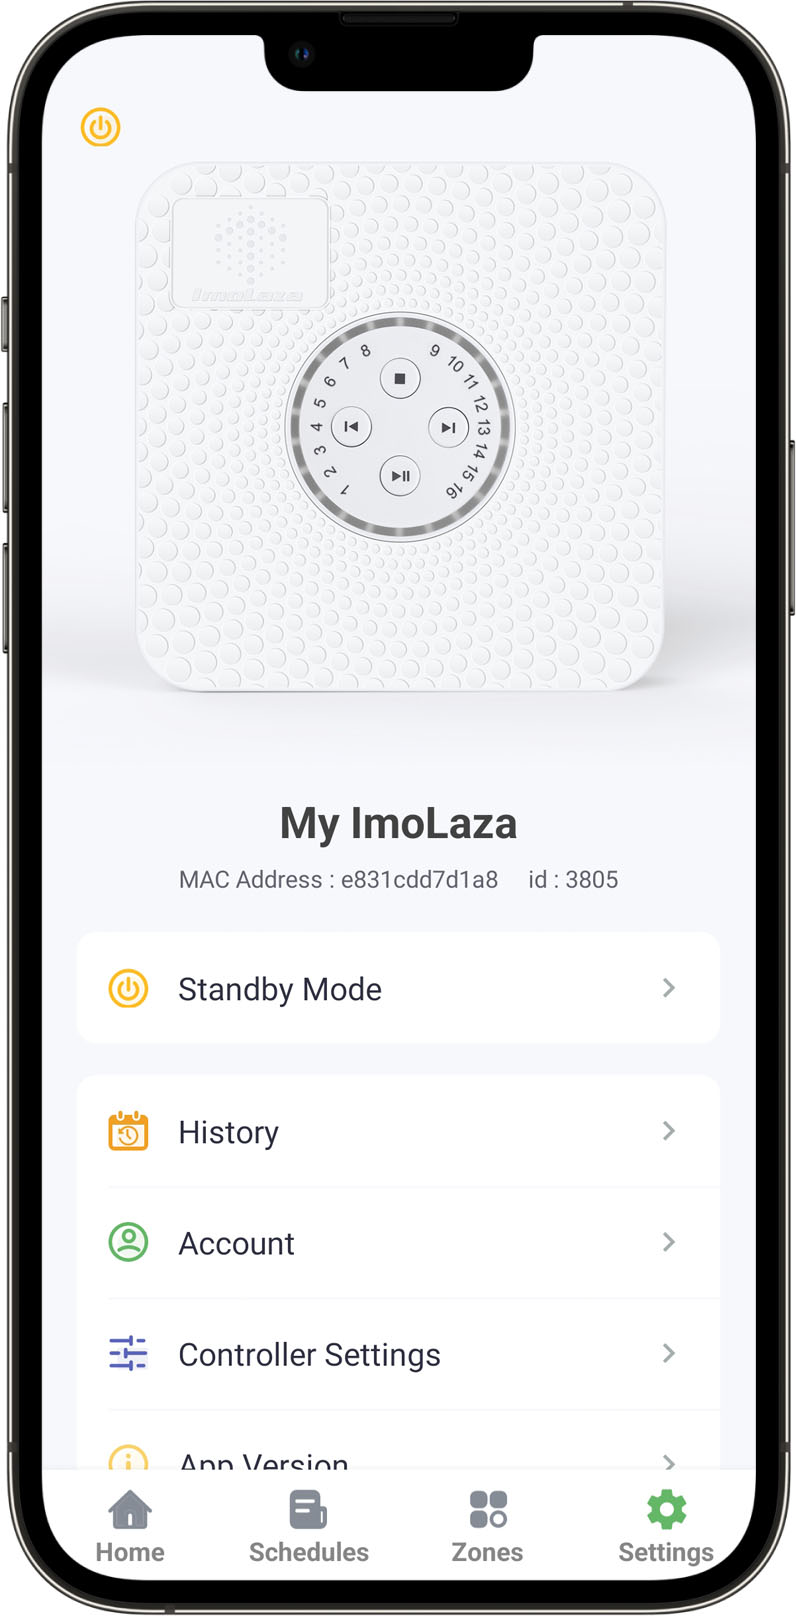
Still need help?
In case the above method doesn’t work for you, please contact our technical support team directly using the contact information below. We will respond to you by email within 12h after your message reaches us.
Email: Support@imolaza.com
Author: Imolaza
Last update: 2023-10-20 05:41
Following the firmware upgrade to version 1.4.001, the controller introduces some changes in the device addition process compared to previous versions. This article aims to provide detailed guidance on the new approach, offering clear instructions and explanations to ensure a seamless device addition experience and maximize the capabilities of your ImoLaza smart irrigation controller. Read on for comprehensive guidance and instructions.
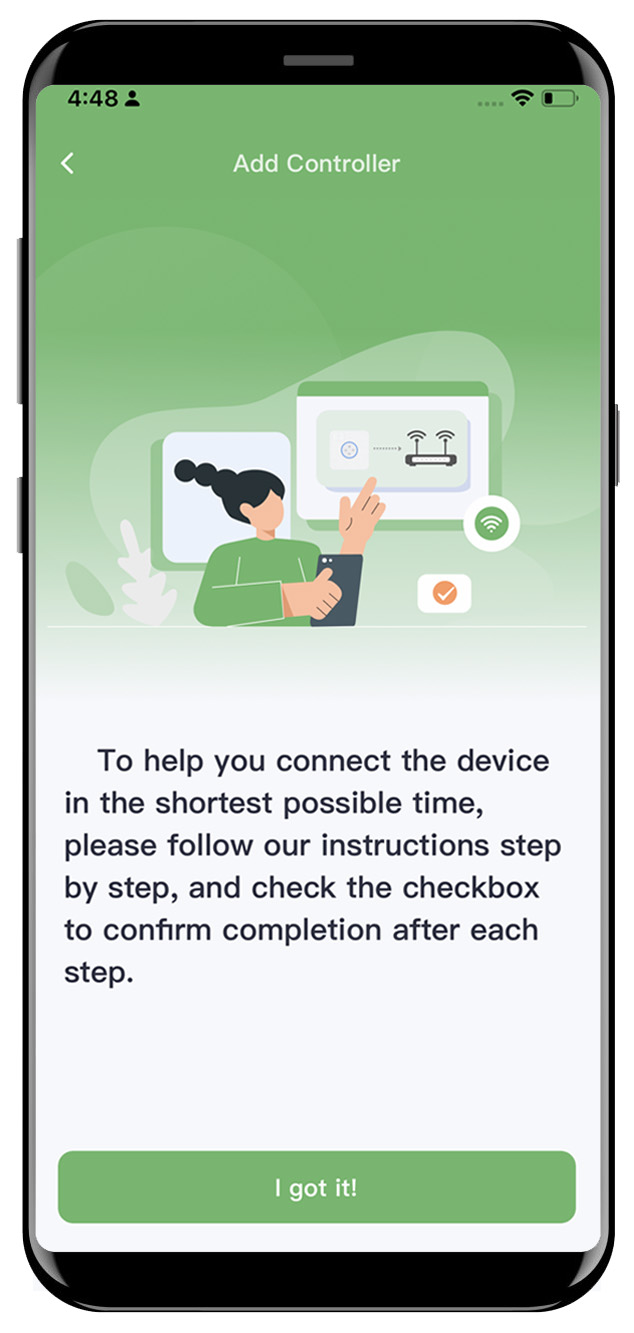
Step1: Please follow the instructions provided in the application and observe the indicator lights on the controller to complete the reset process.
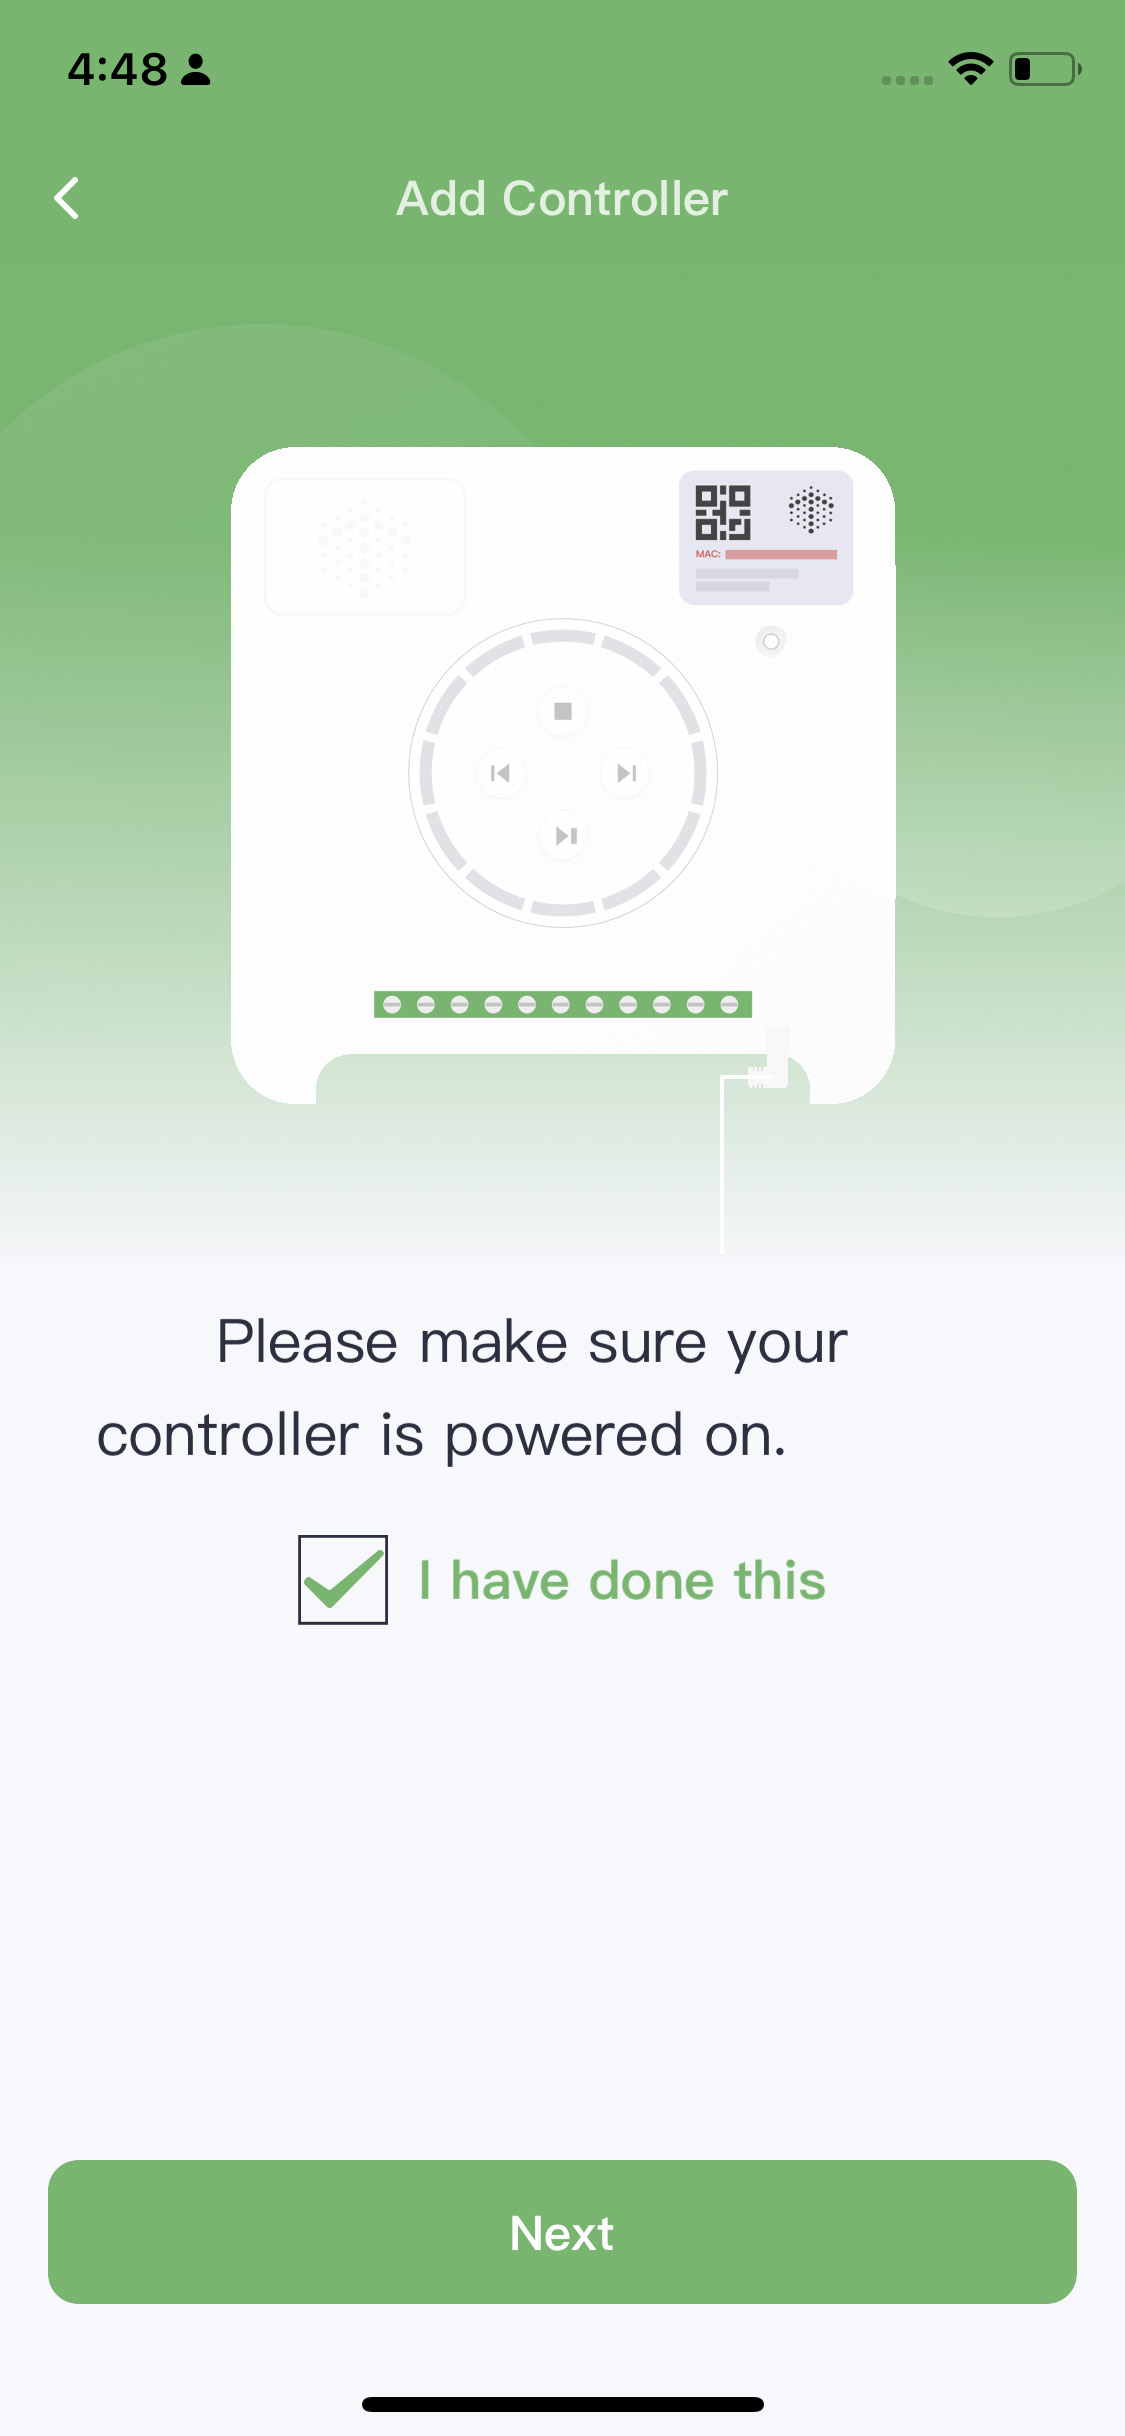

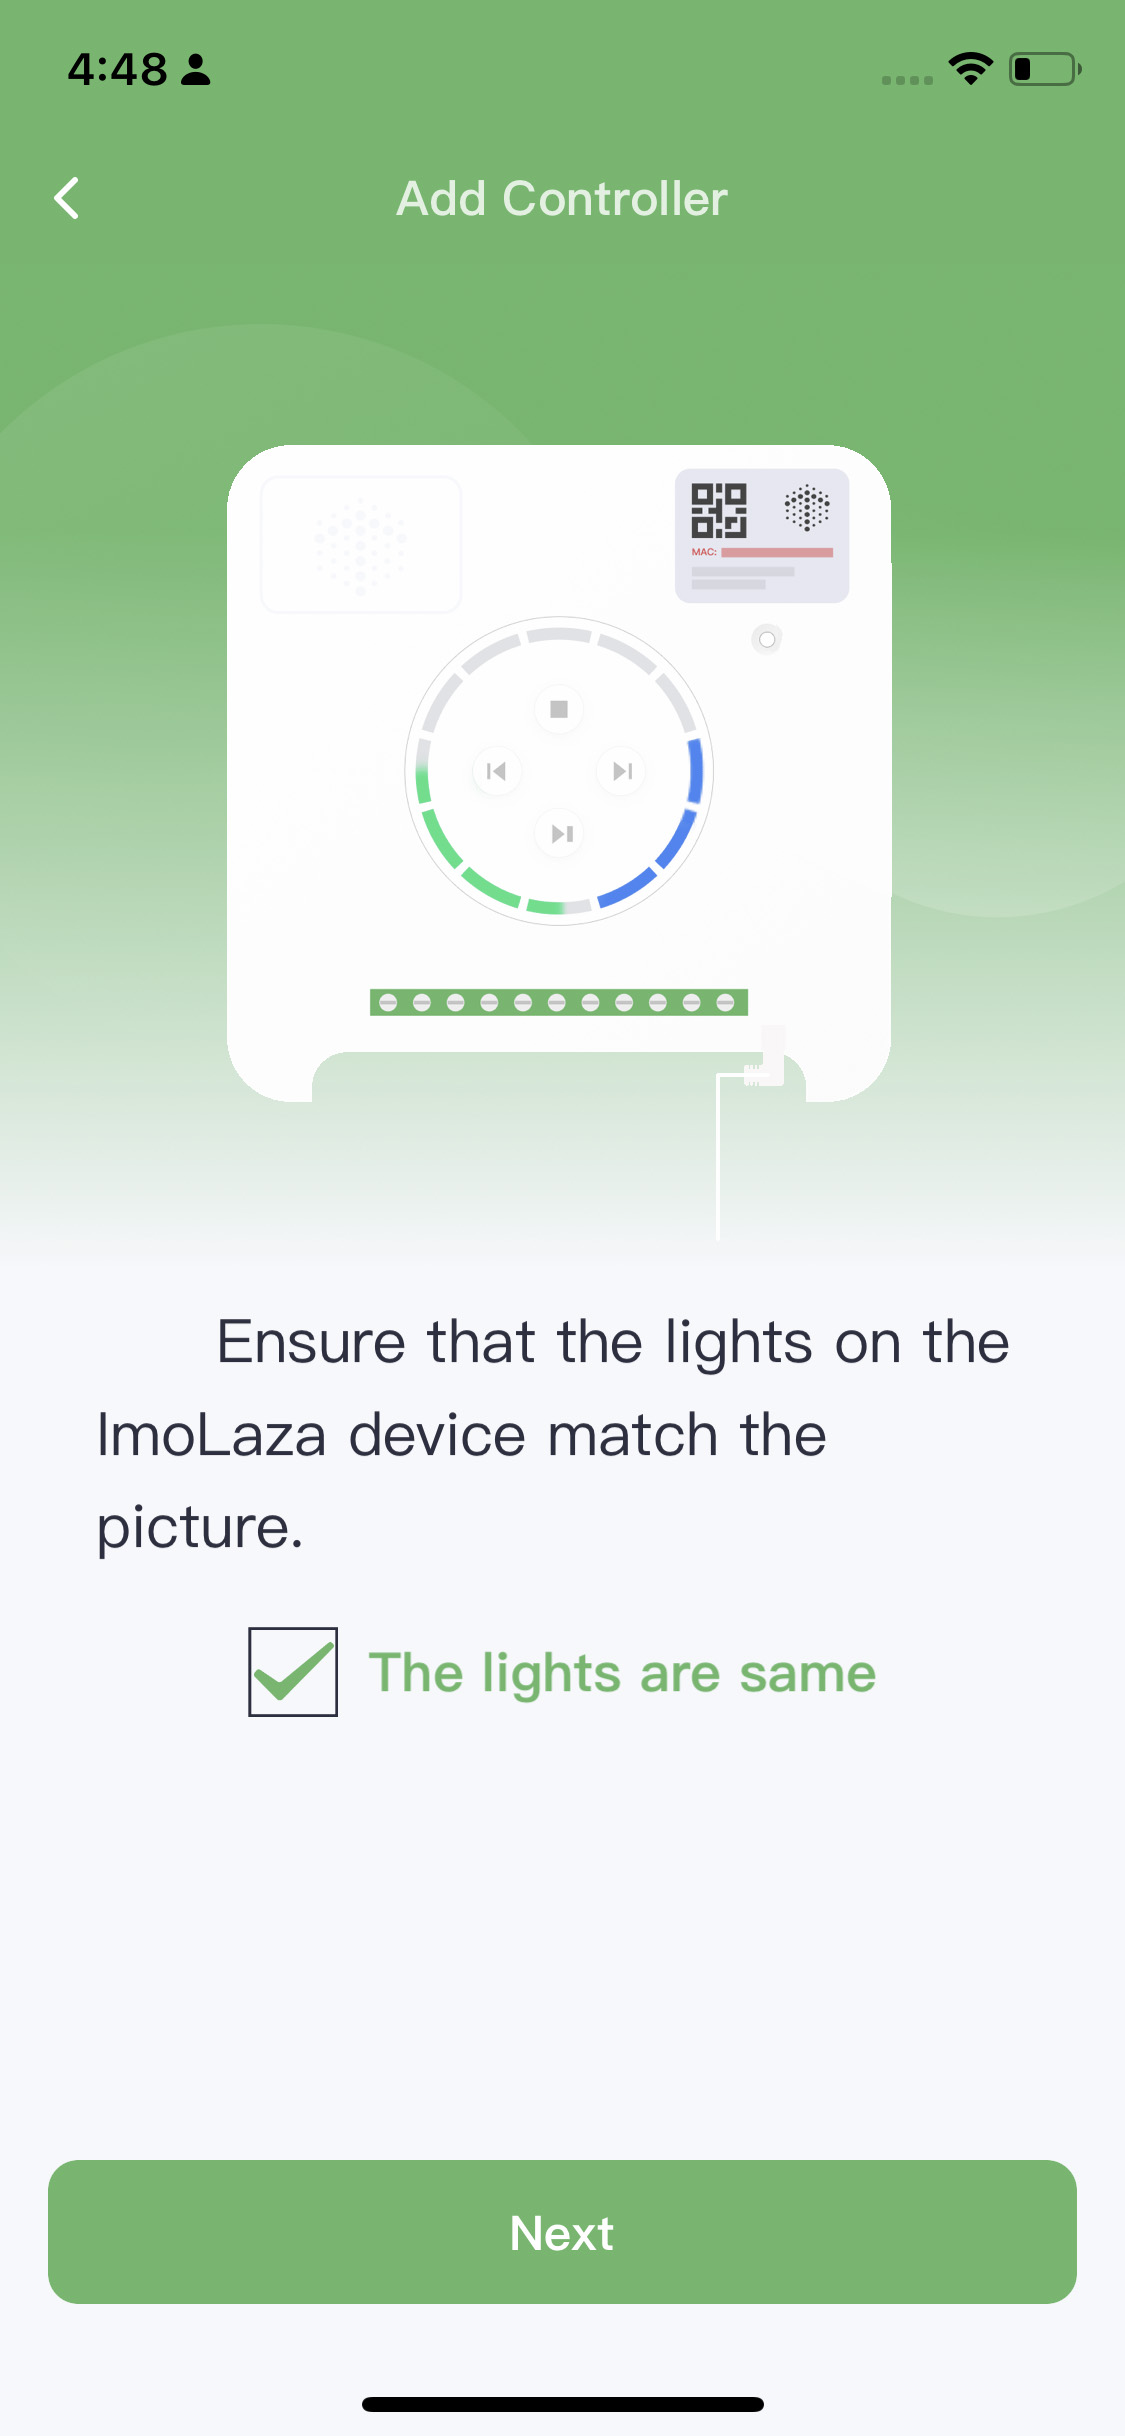
Power On Reset Match
Step2: Scan the QR code or input the MAC address manually.
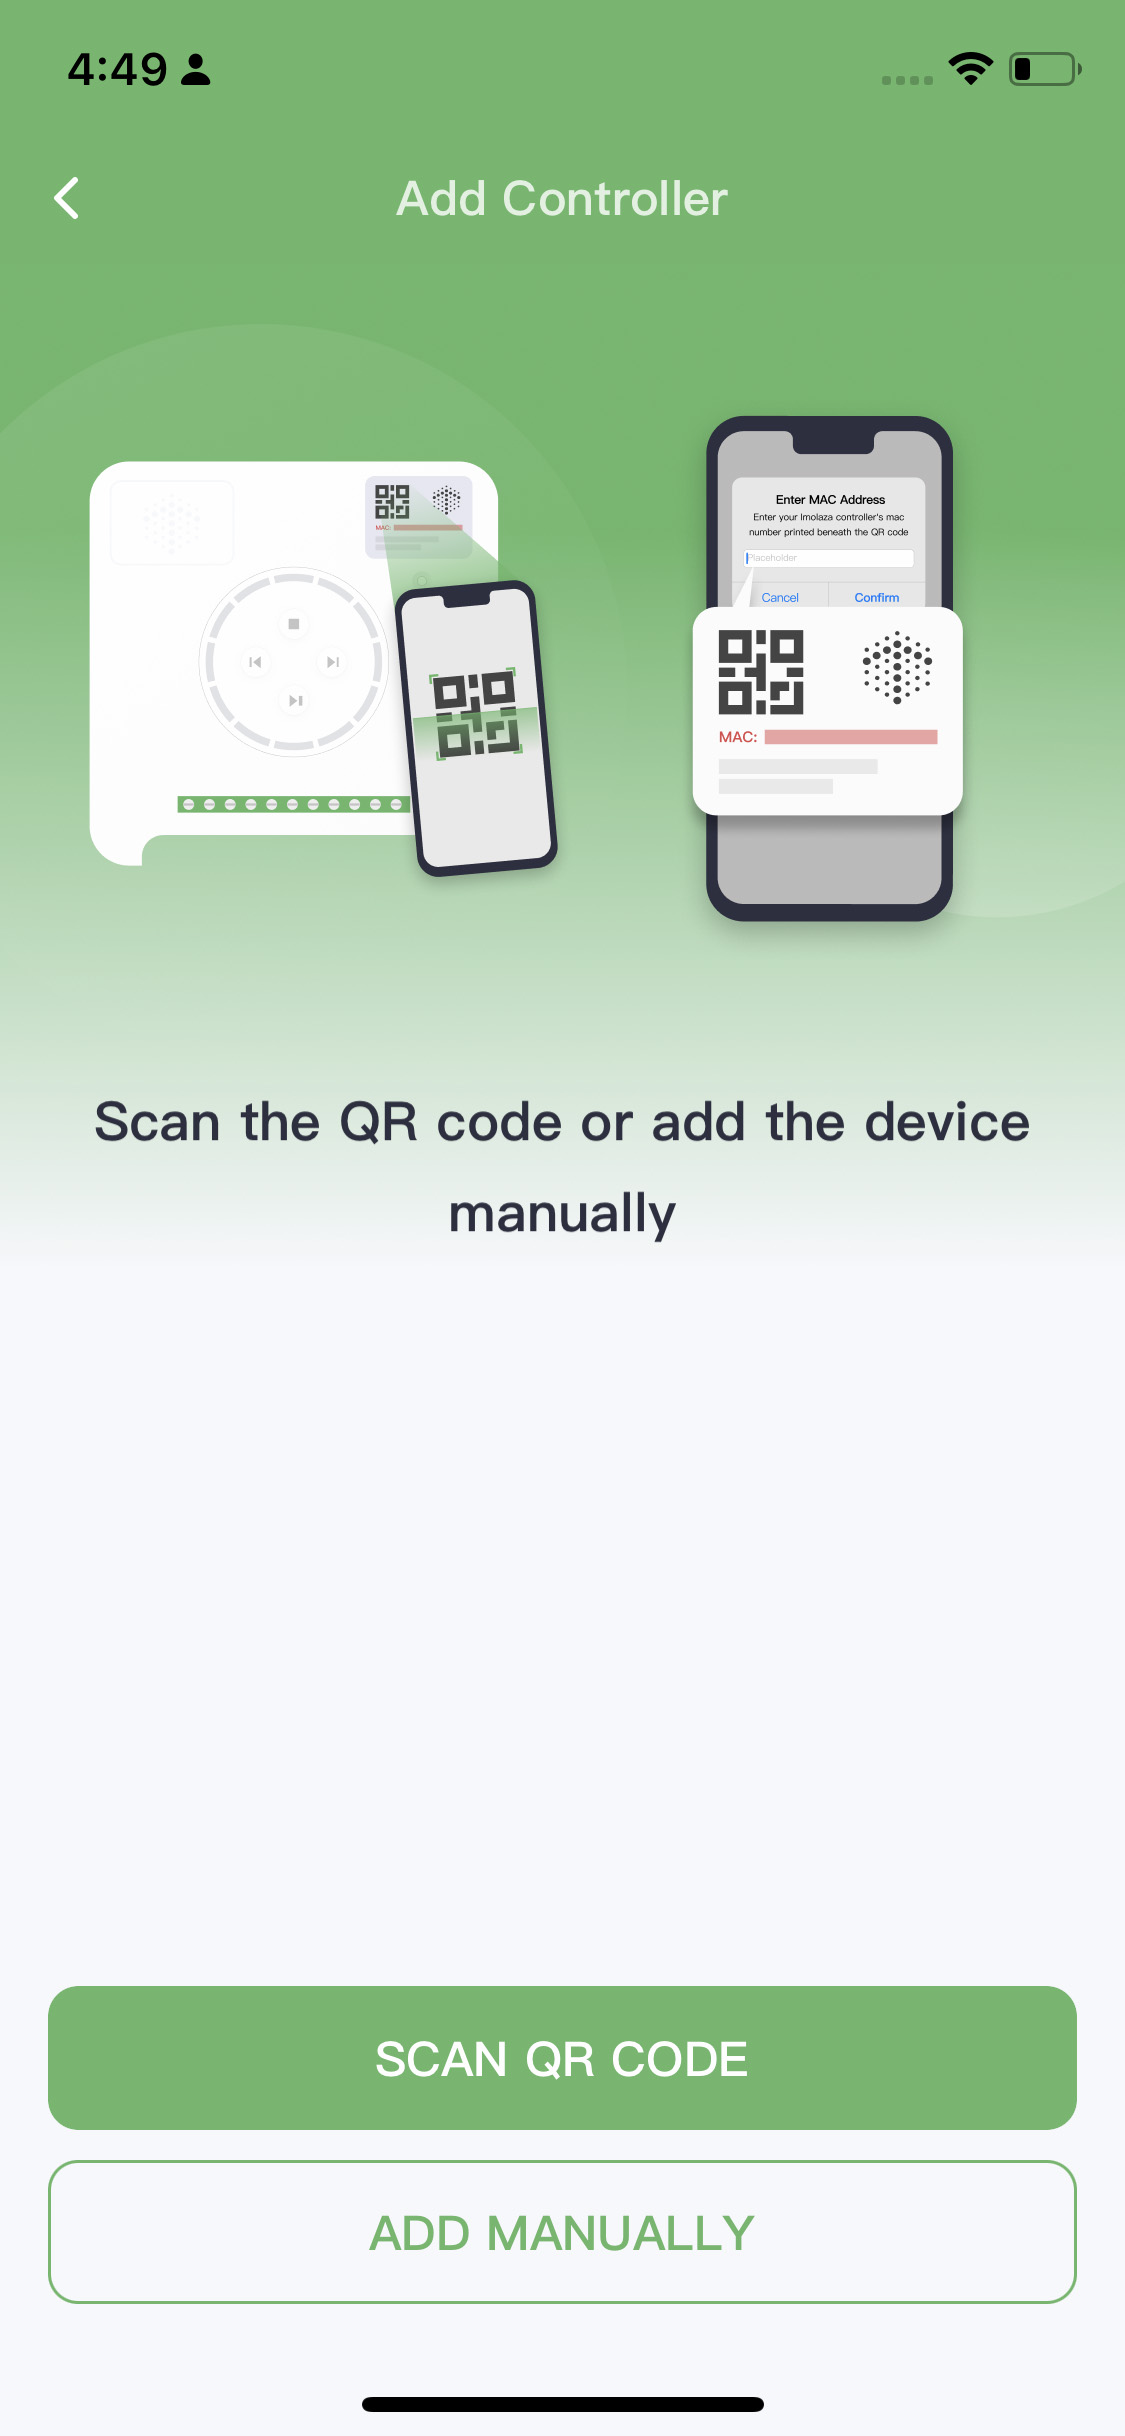
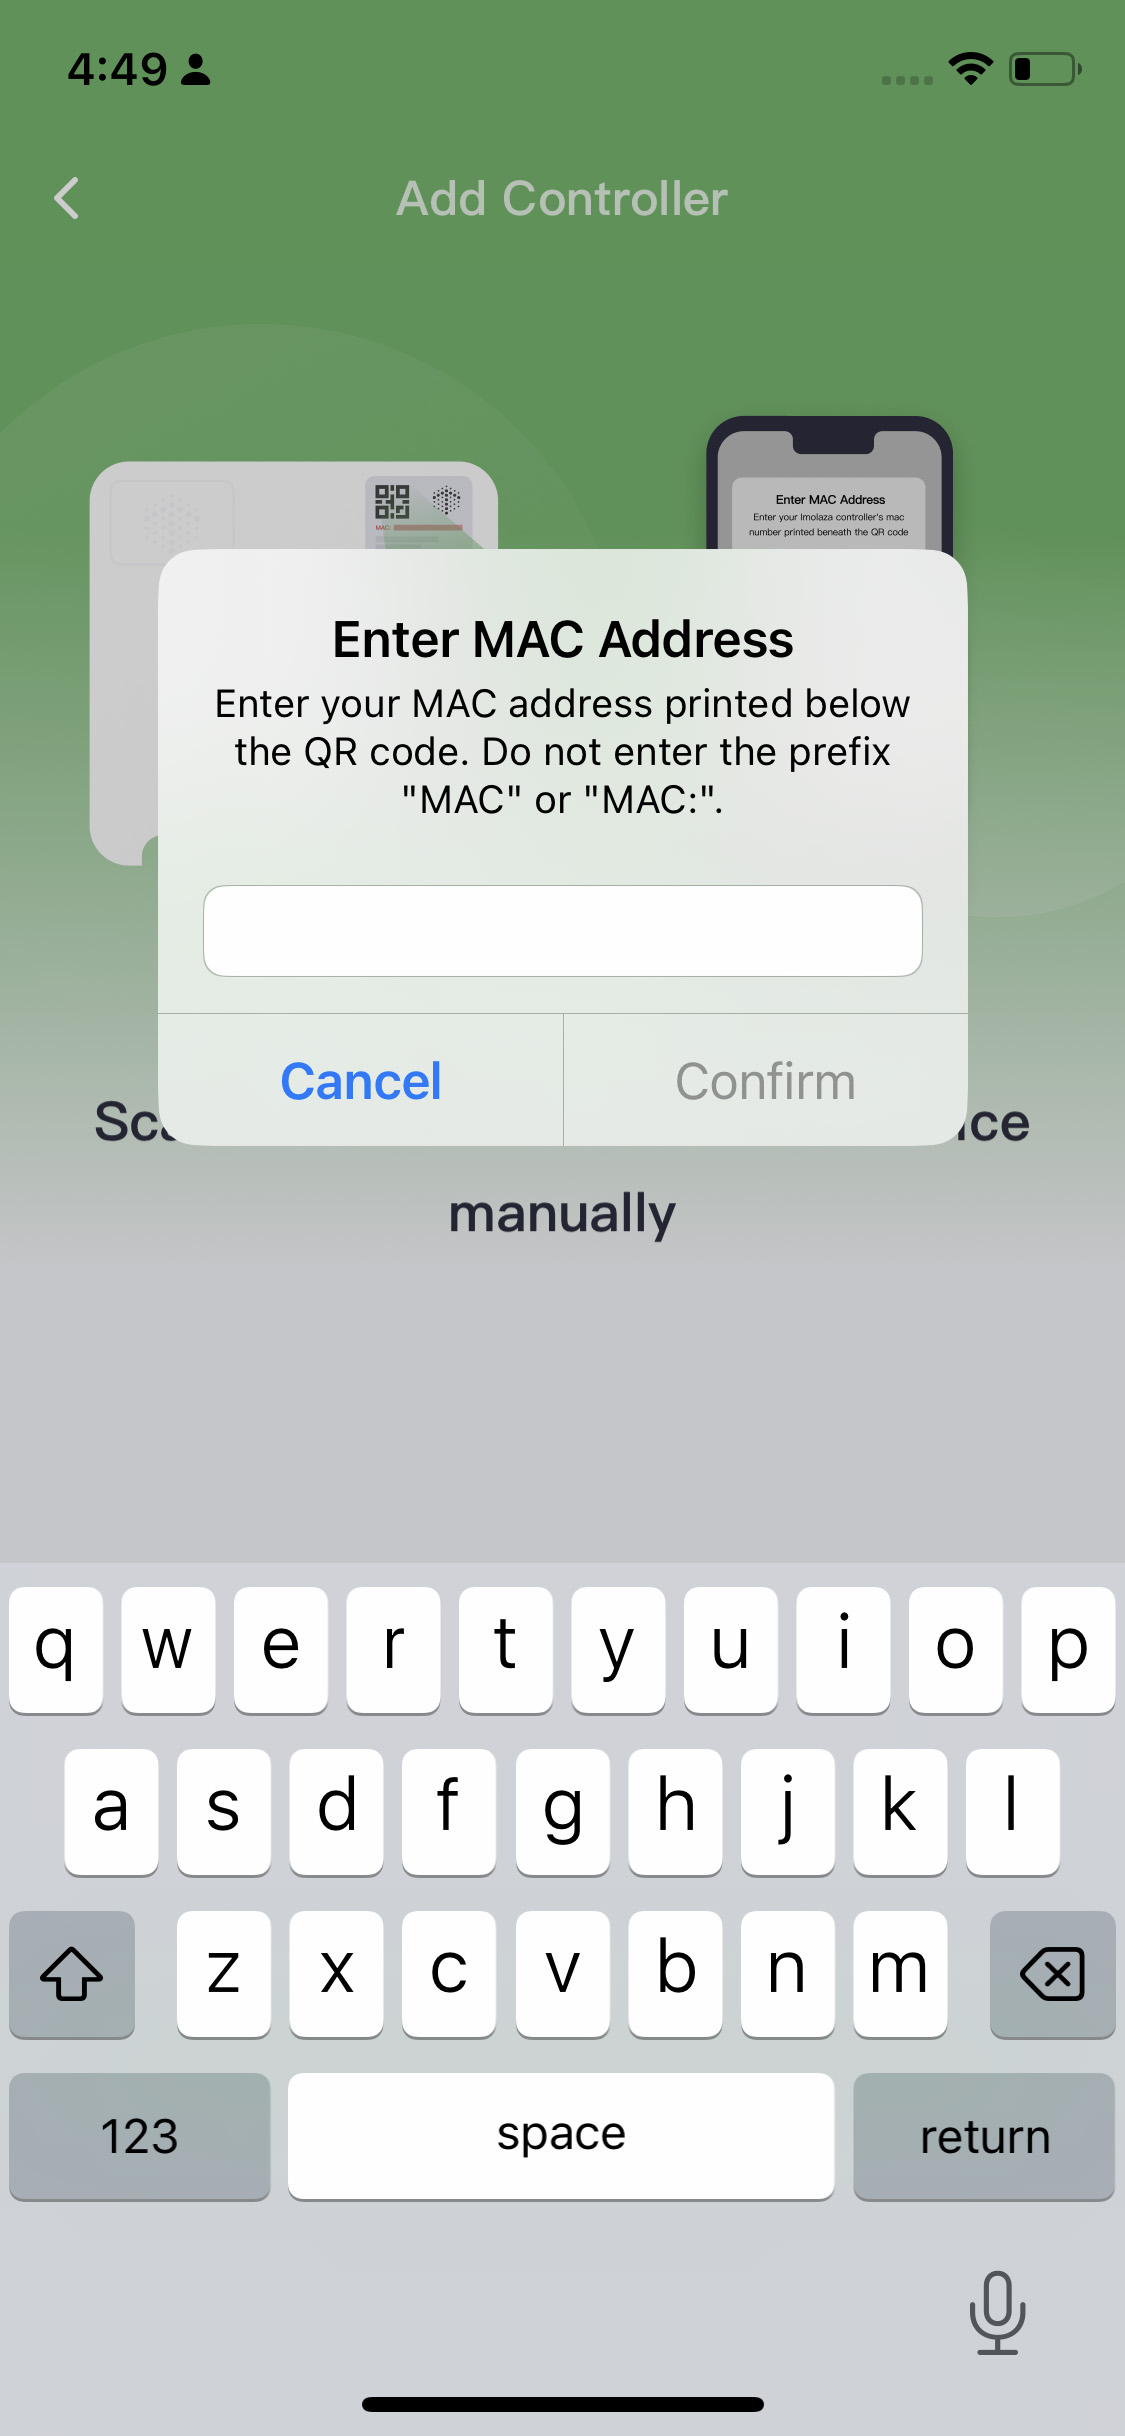
IOS WiFi Connection
Step1: Name your controller.
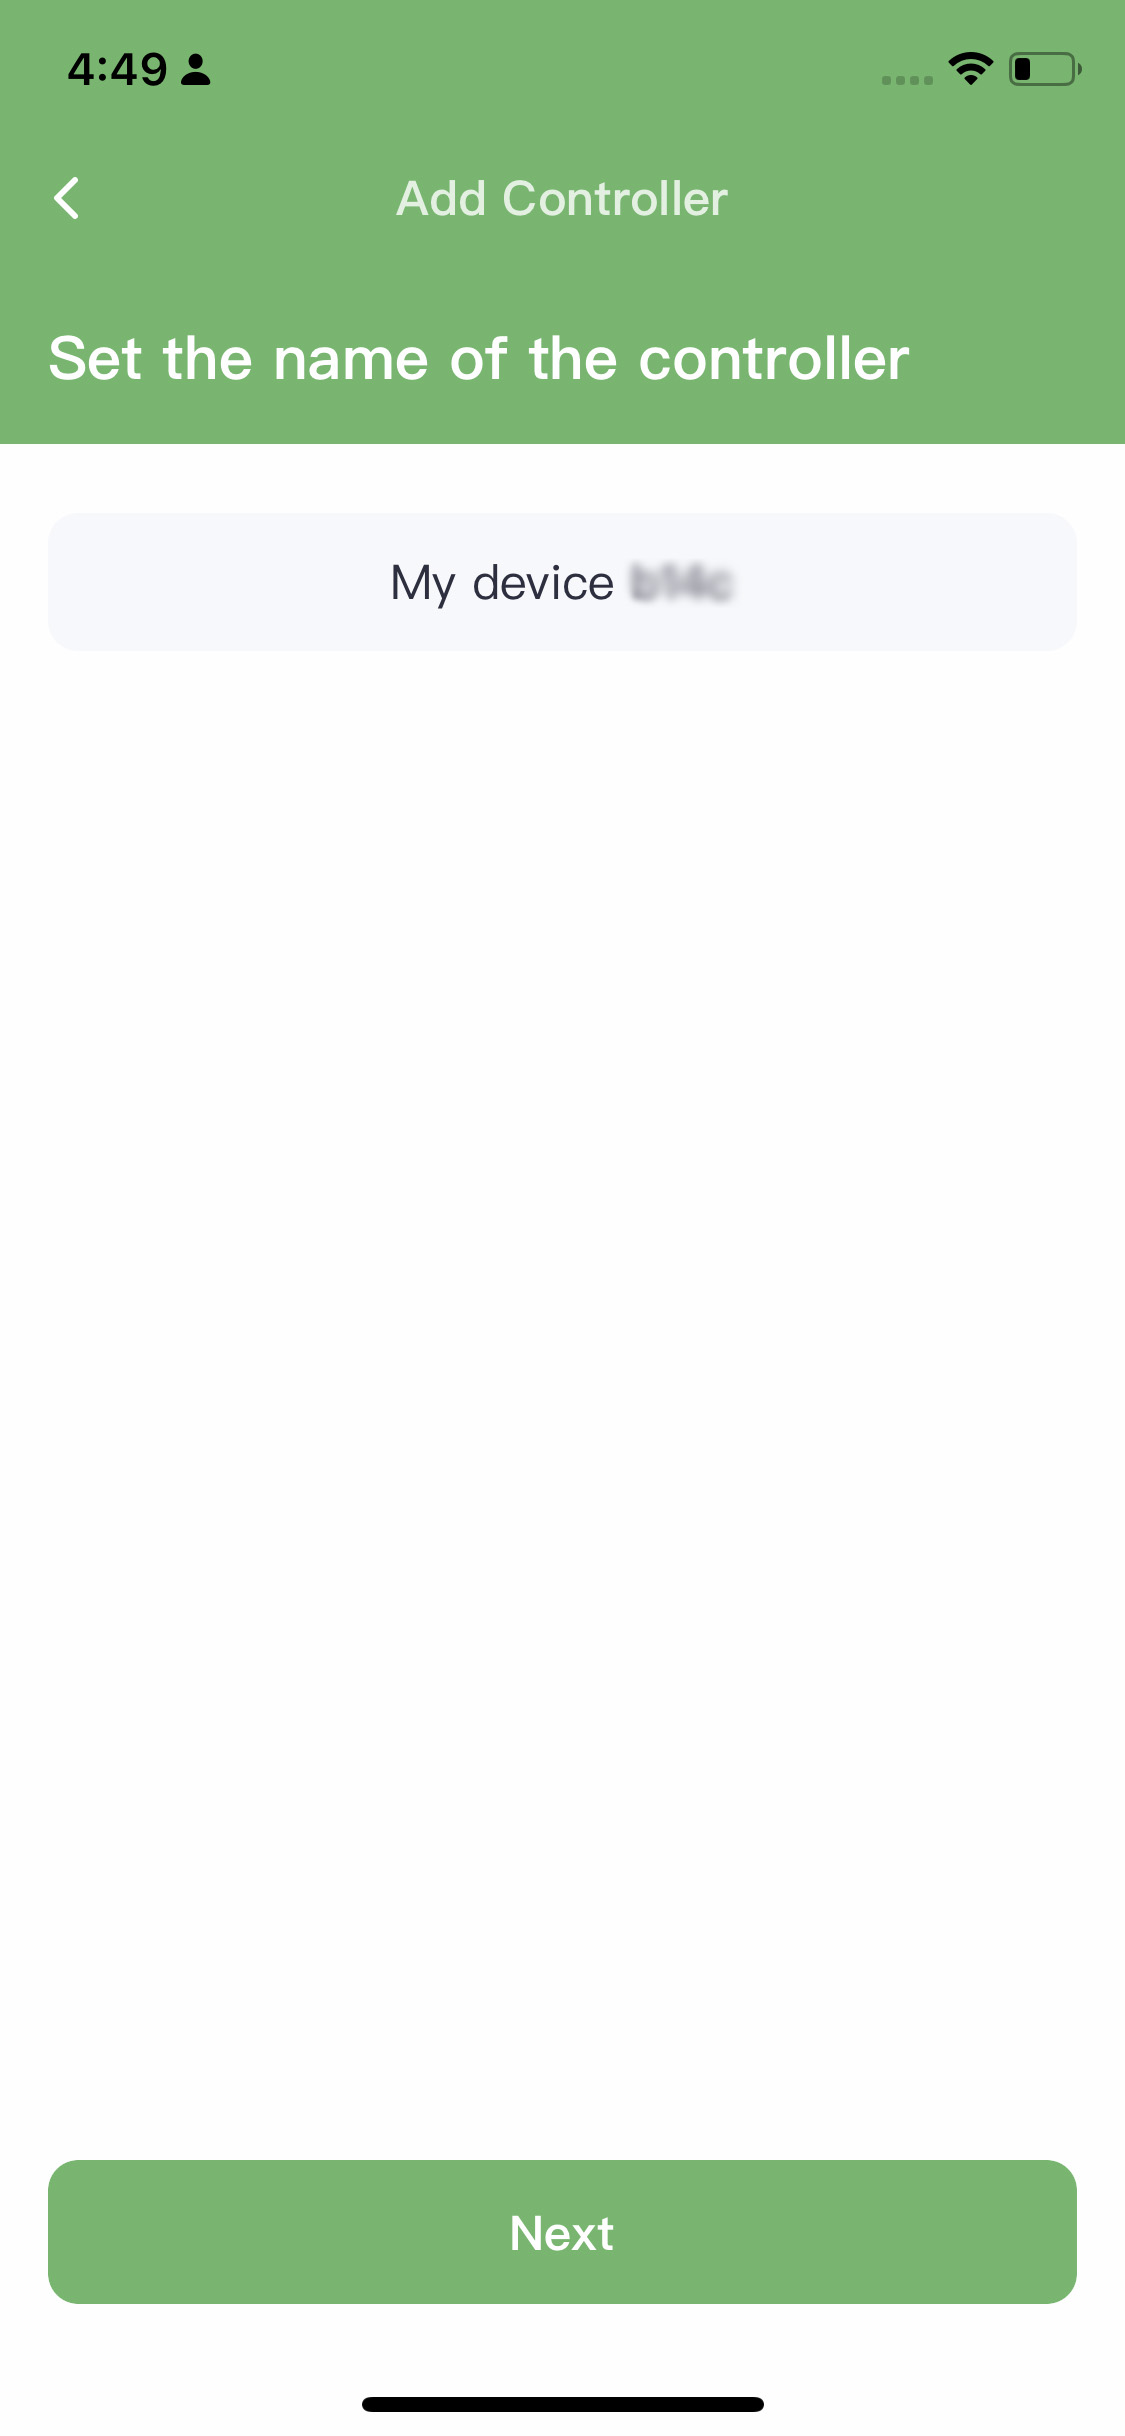
Step2: To connect the controller, please note that it only supports 2.4GHz wifi. Make sure your iPhone is also connected to a 2.4GHz wifi network, as the controller will use the same one. If not, change it in your "WLAN Settings" on your phone. Finally, enter the password.
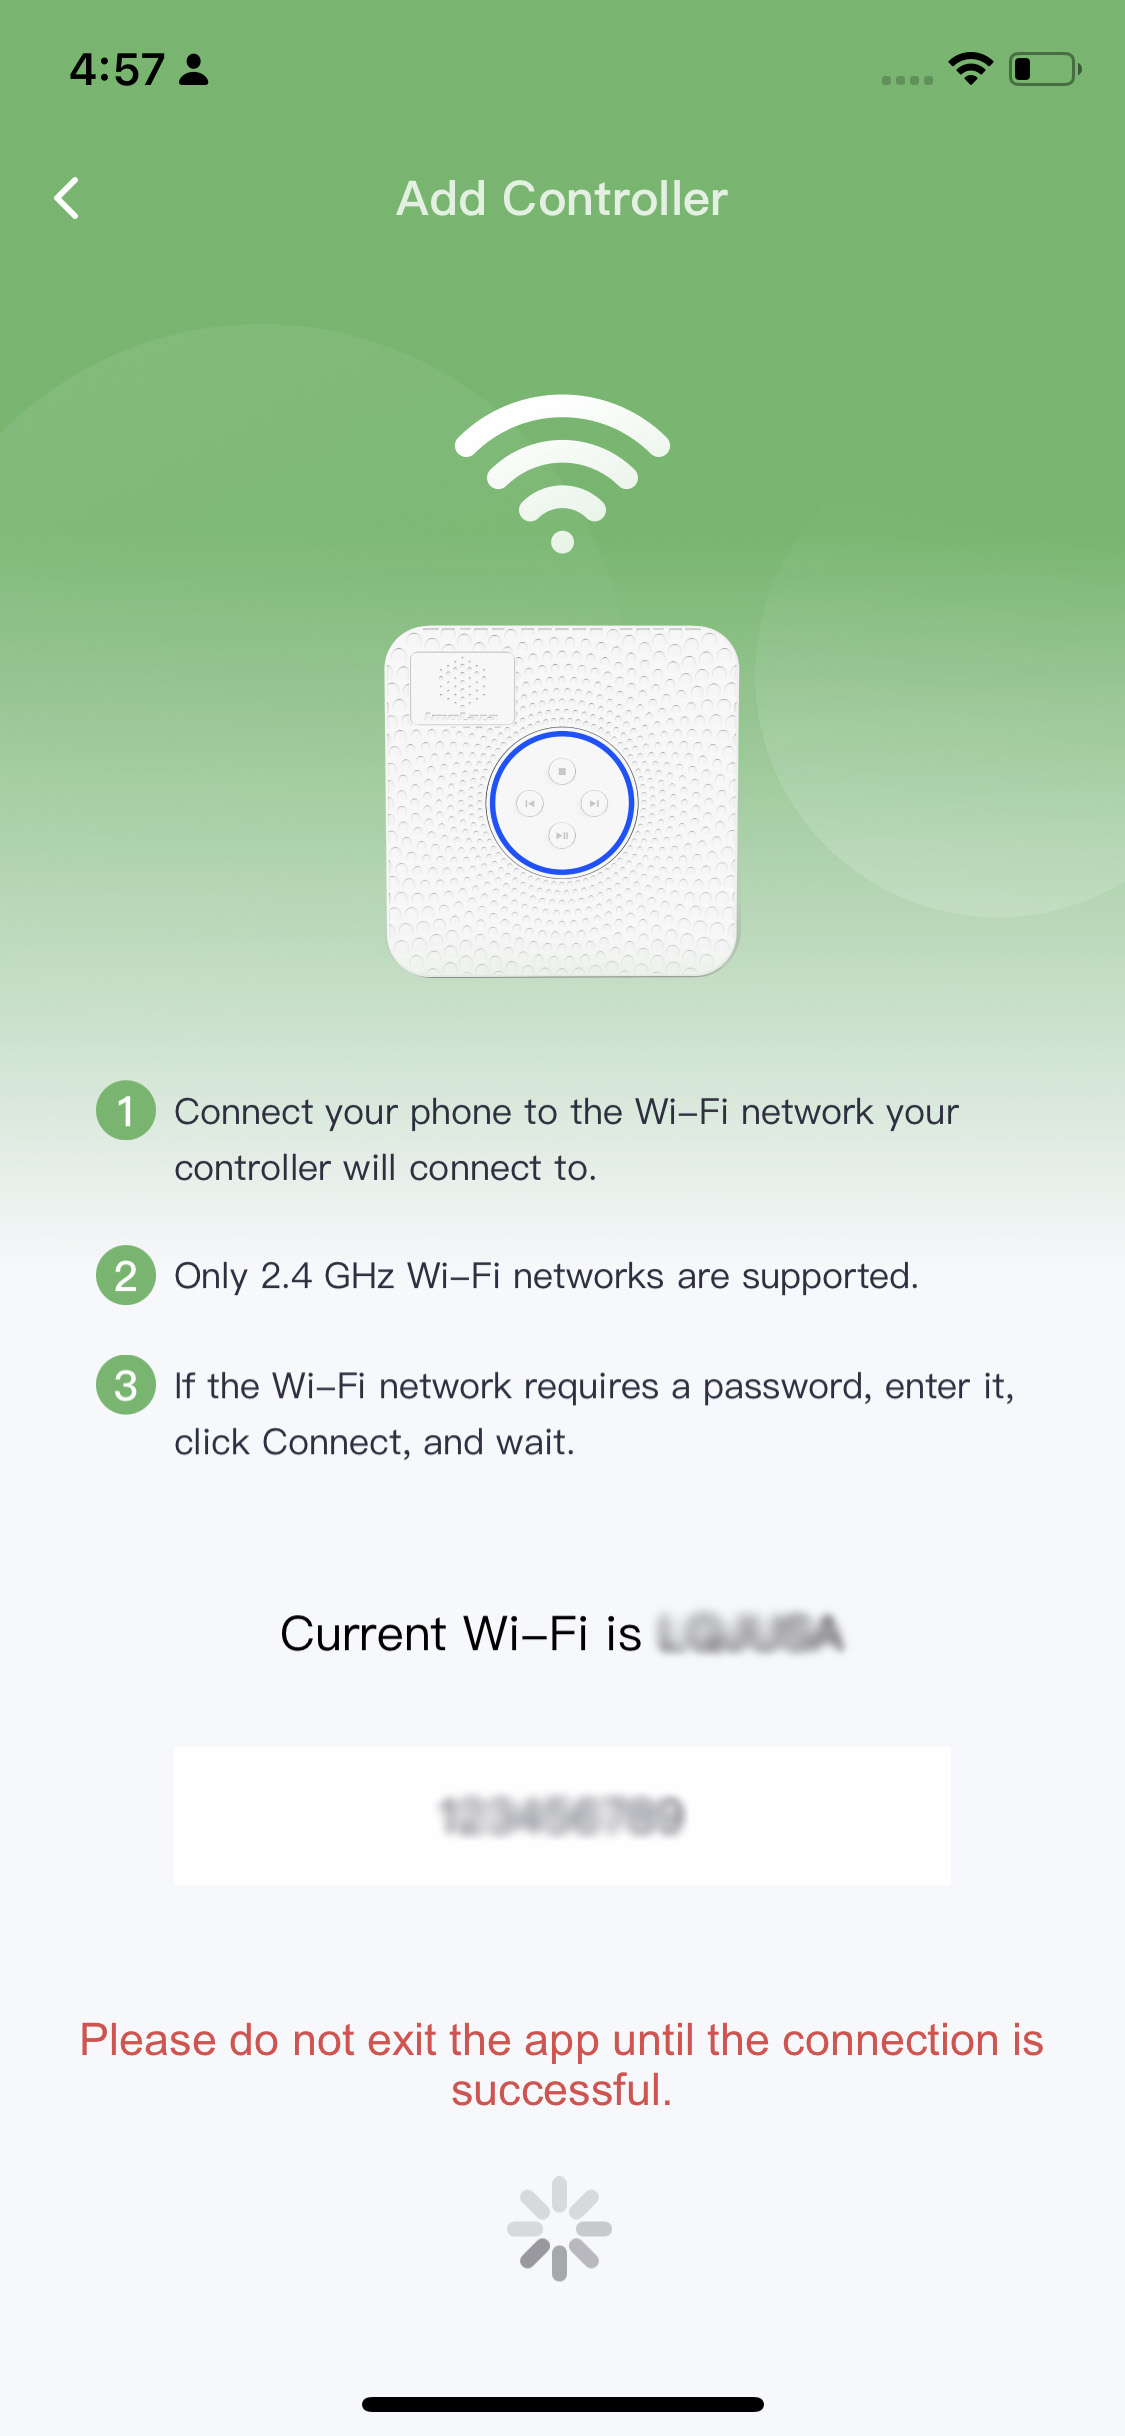
Step3: If you get this screen, it means that you have already added the controller to your account.
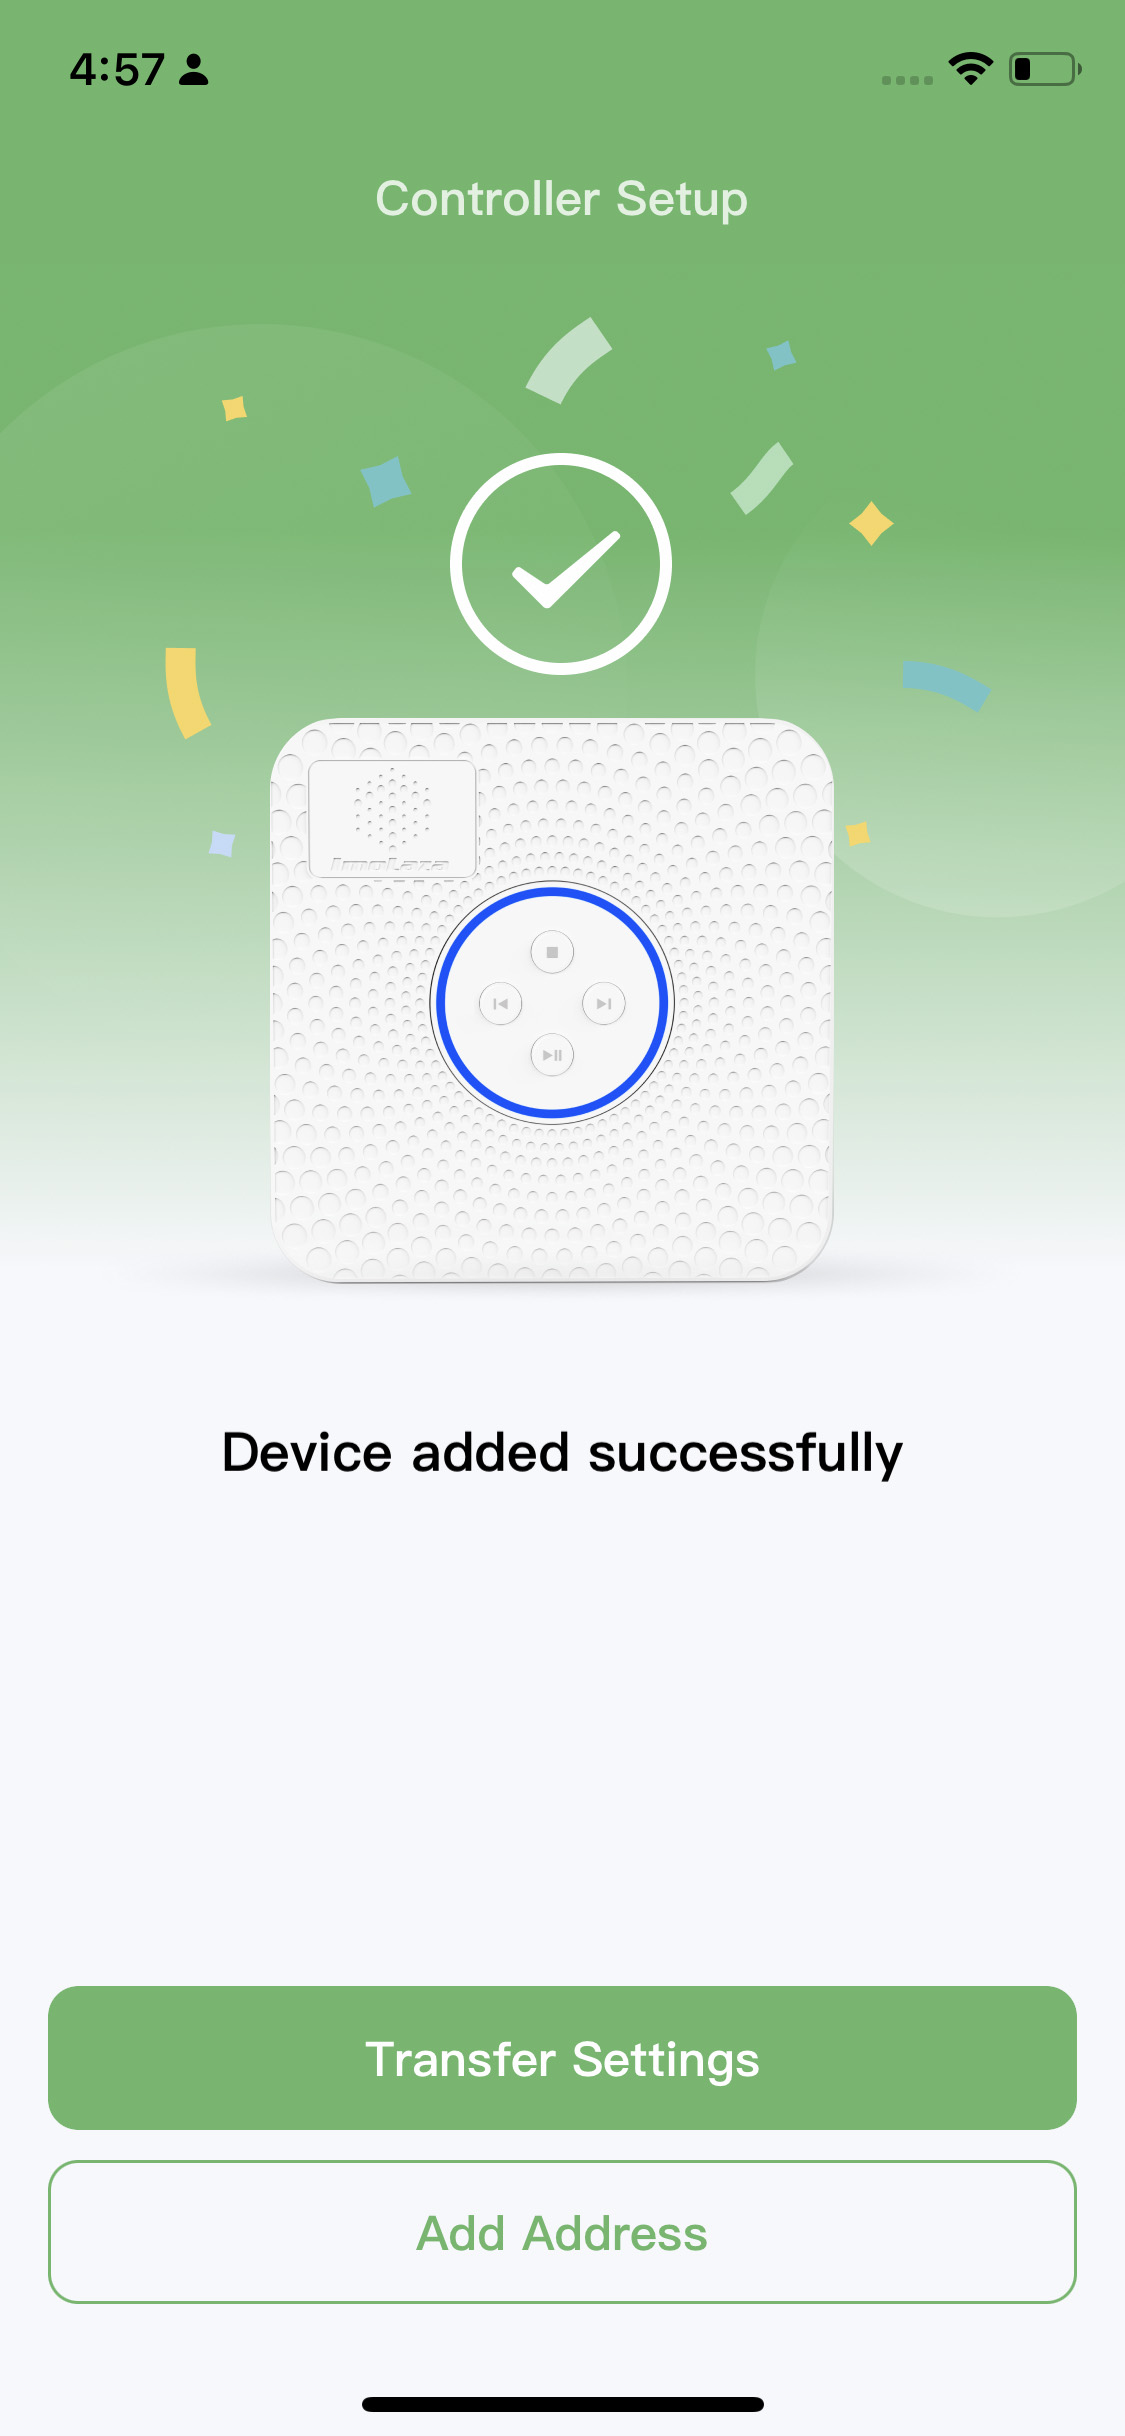
Step4: Set the address, the more accurate, the better.
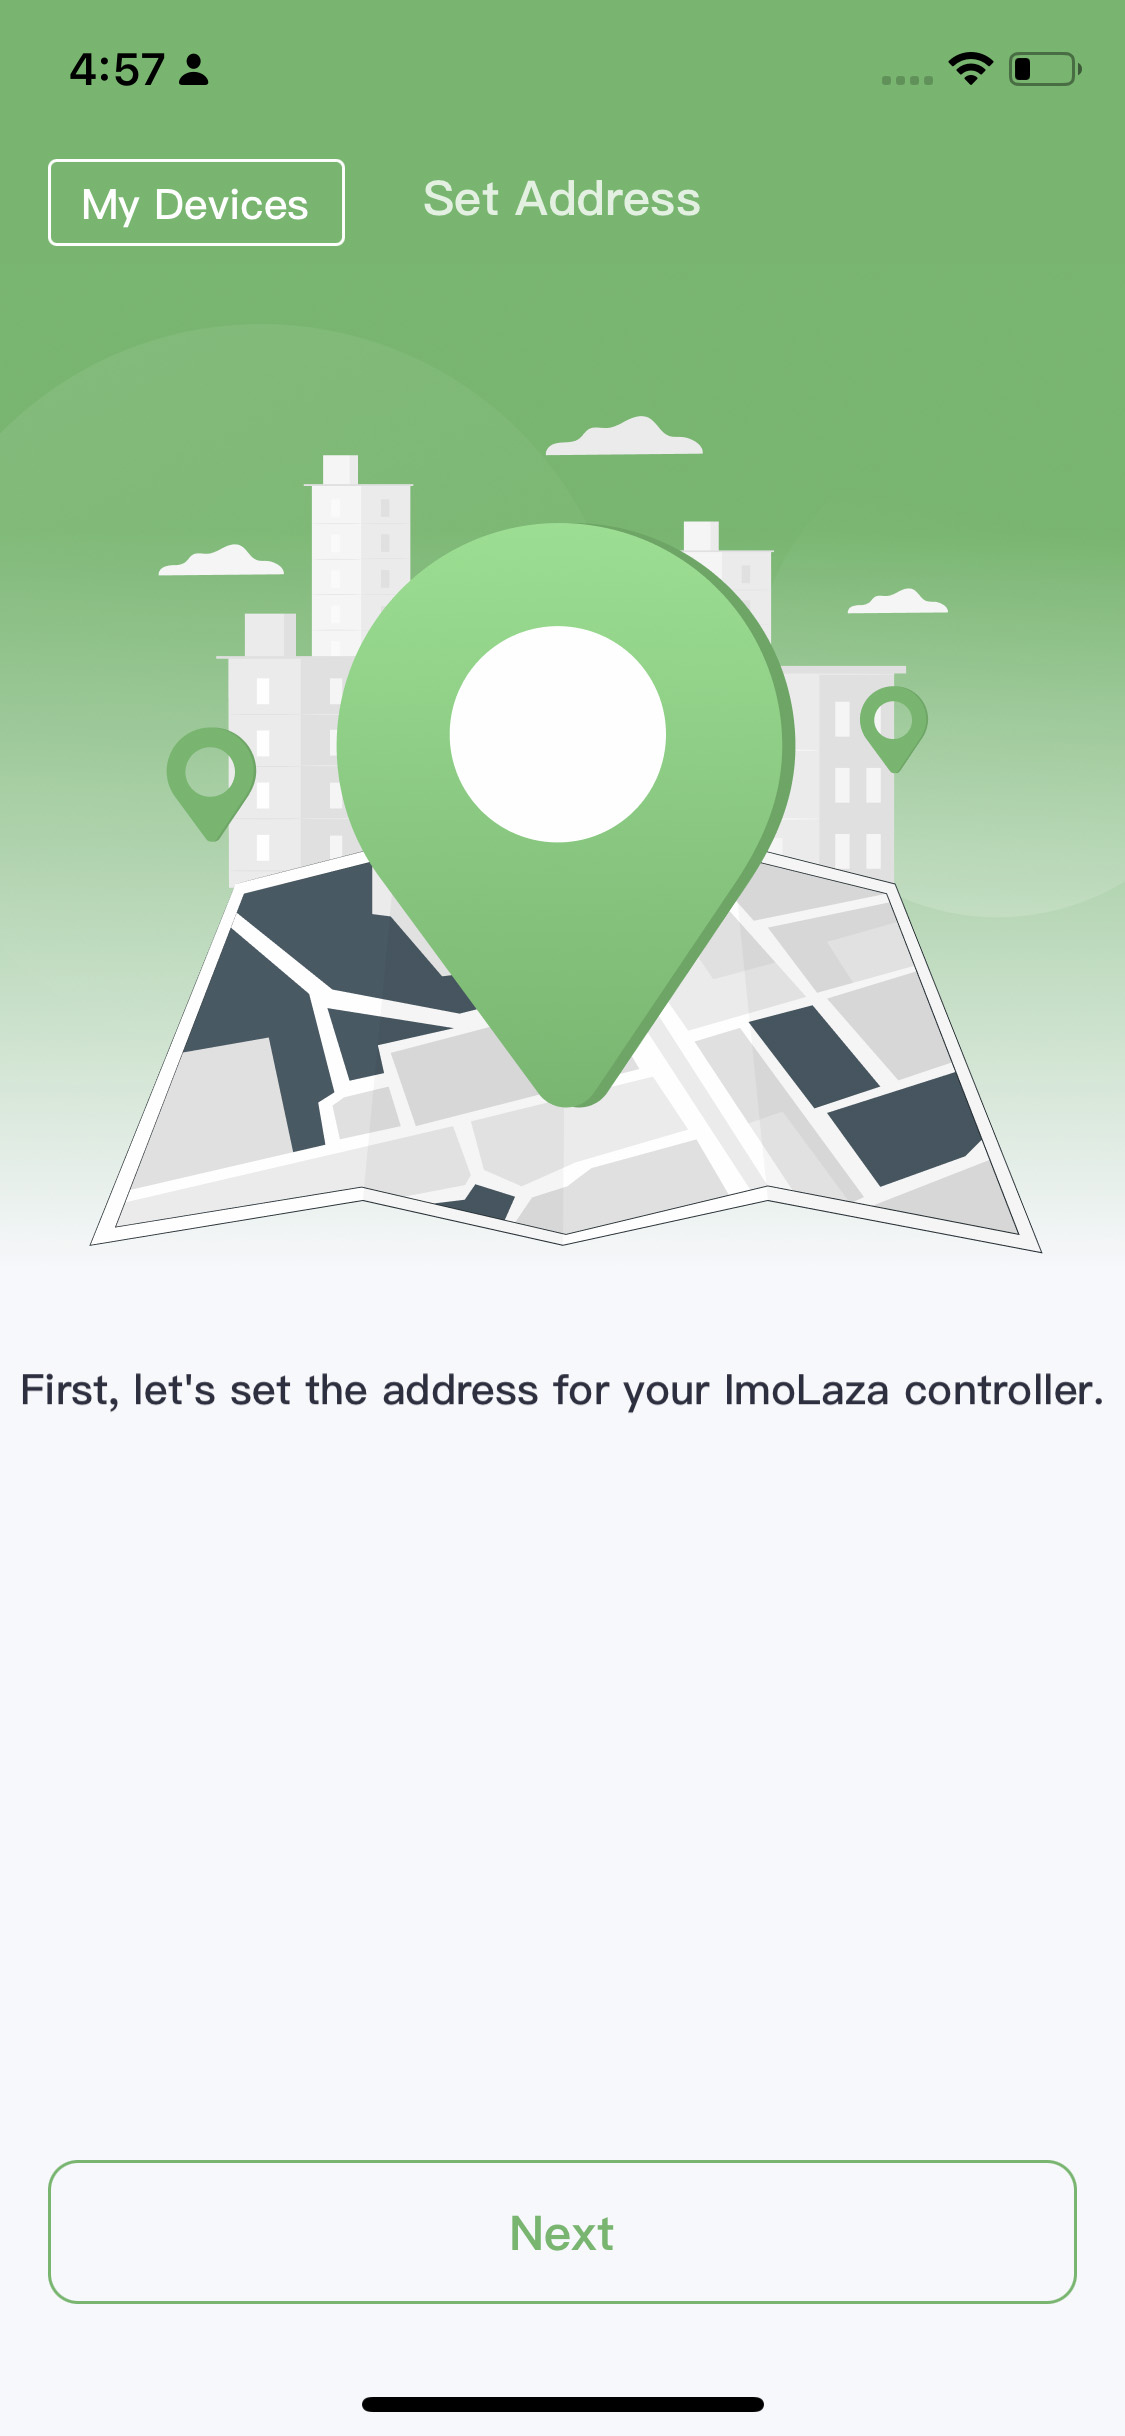

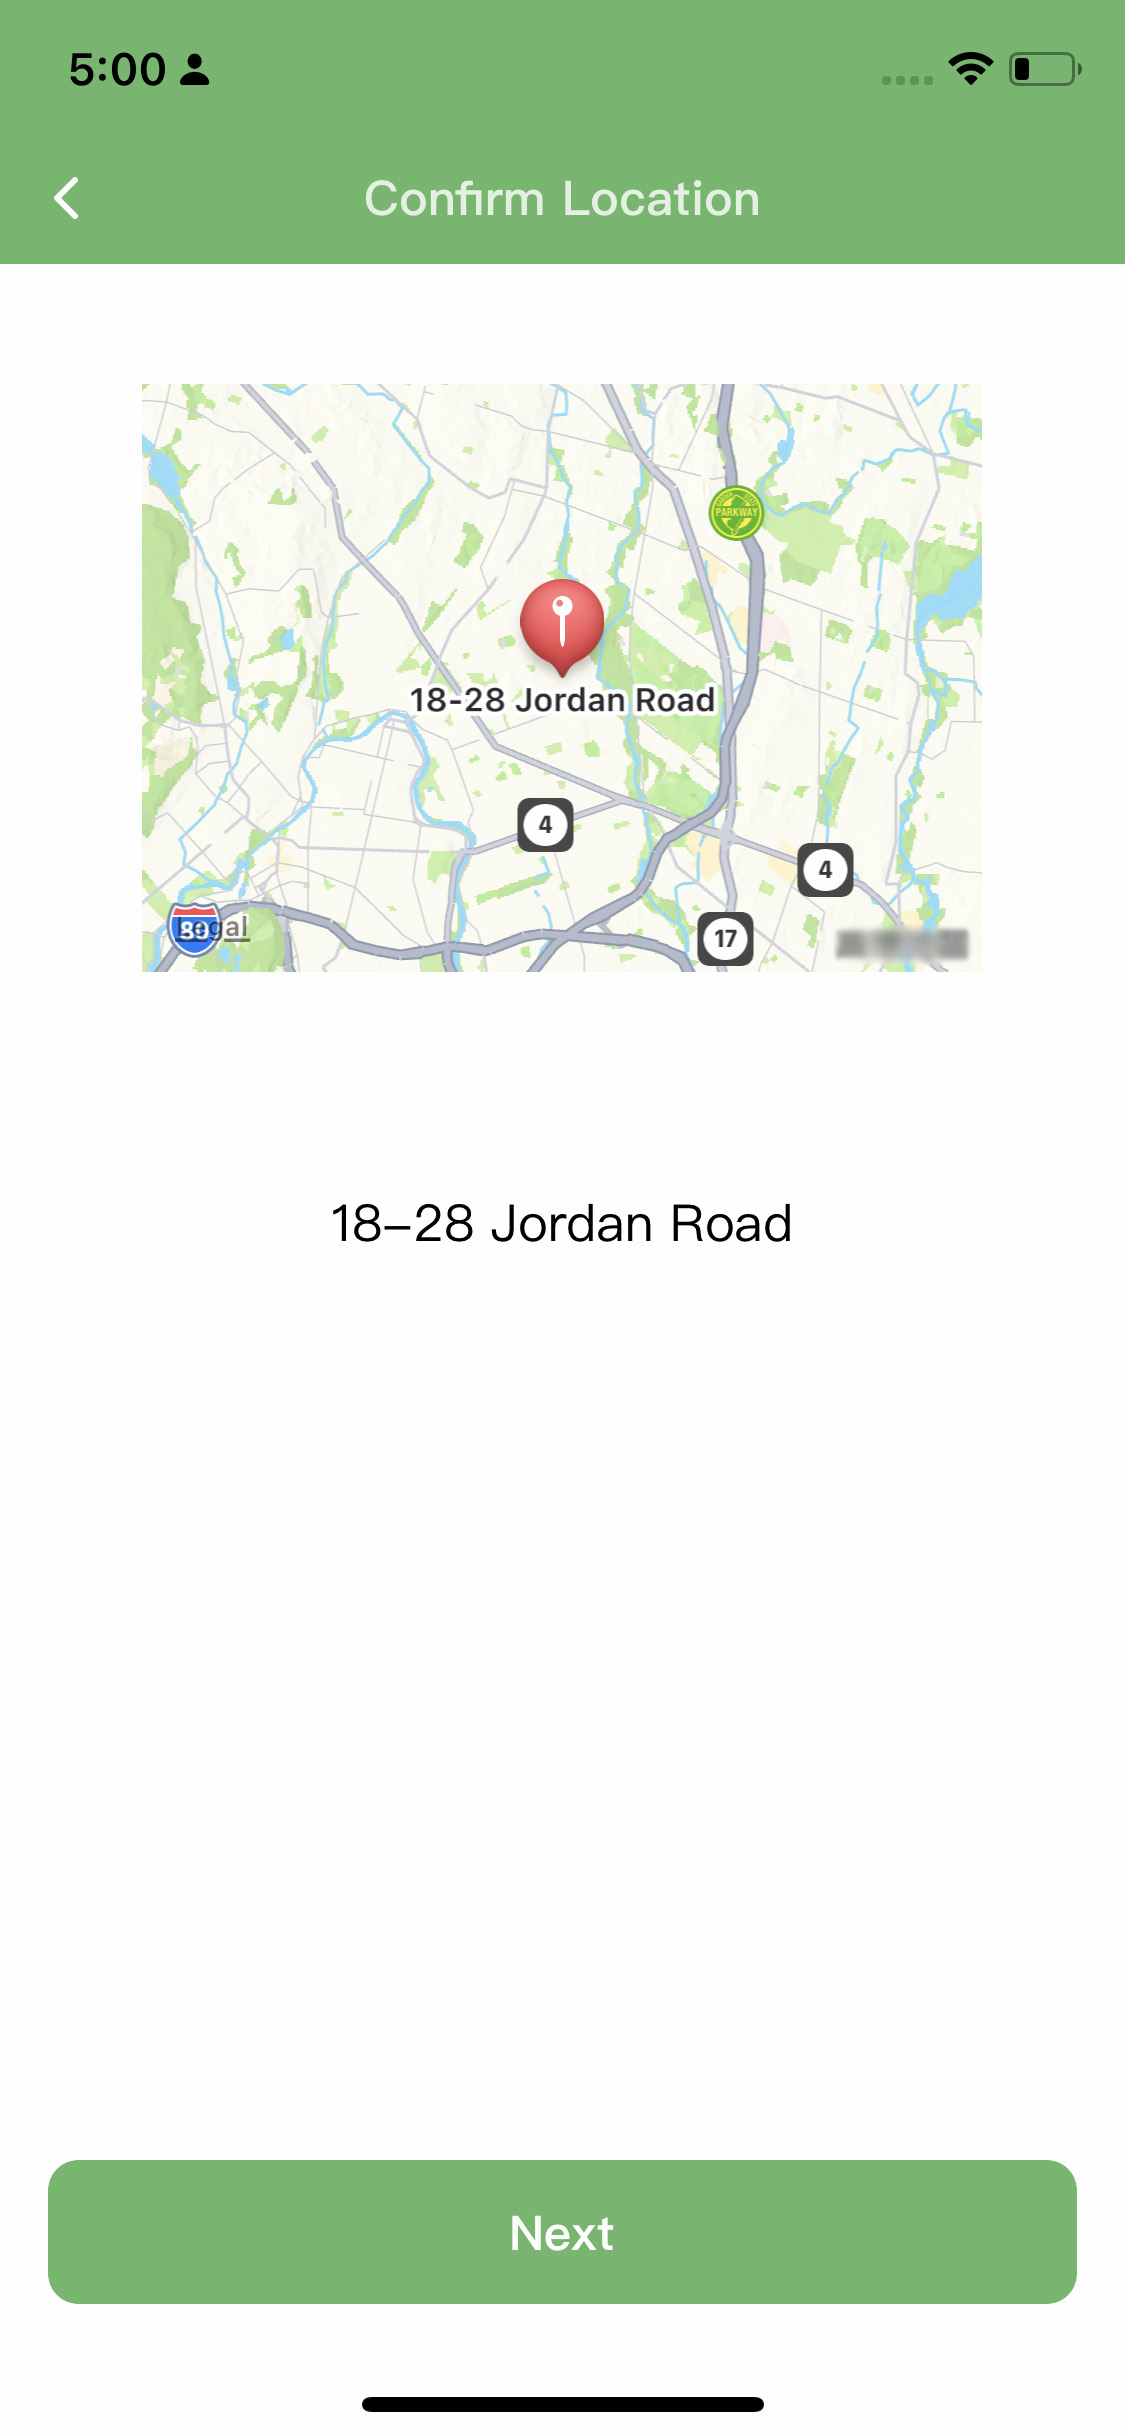
Step5: Please select a weather station. You don't need to actually purchase a personal weather station because we have taken care of that part for you. Simply choose the weather station closest to your location, as its data will guide the execution of the schedule. Additionally, we recommend selecting the option "Allow system recommendation" so that we can automatically switch to other weather stations in case of any malfunction with the chosen station.
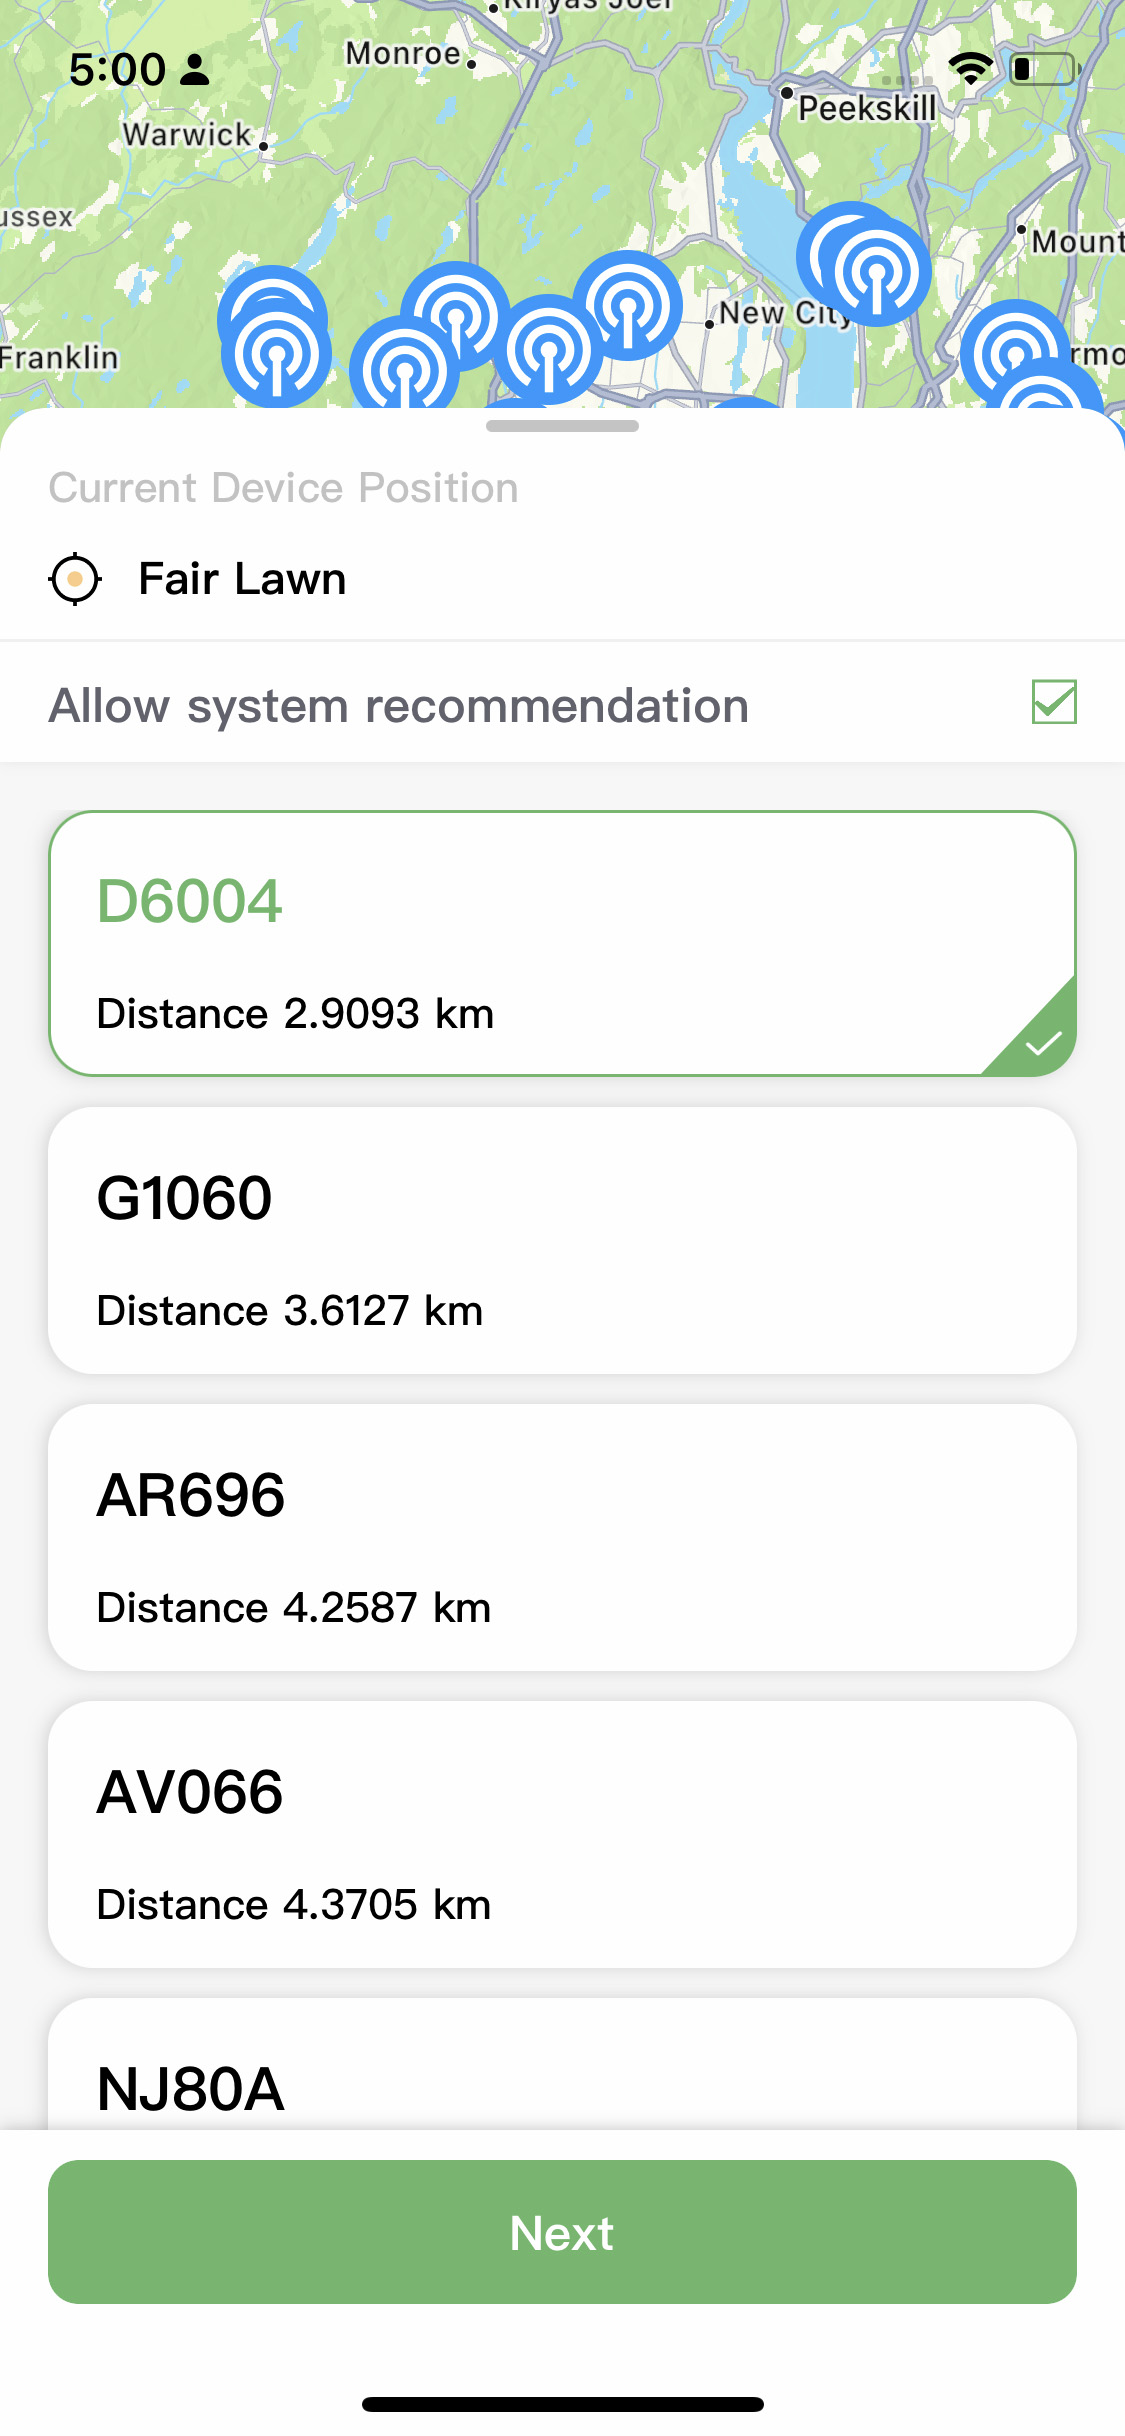
Step6: Job finished.
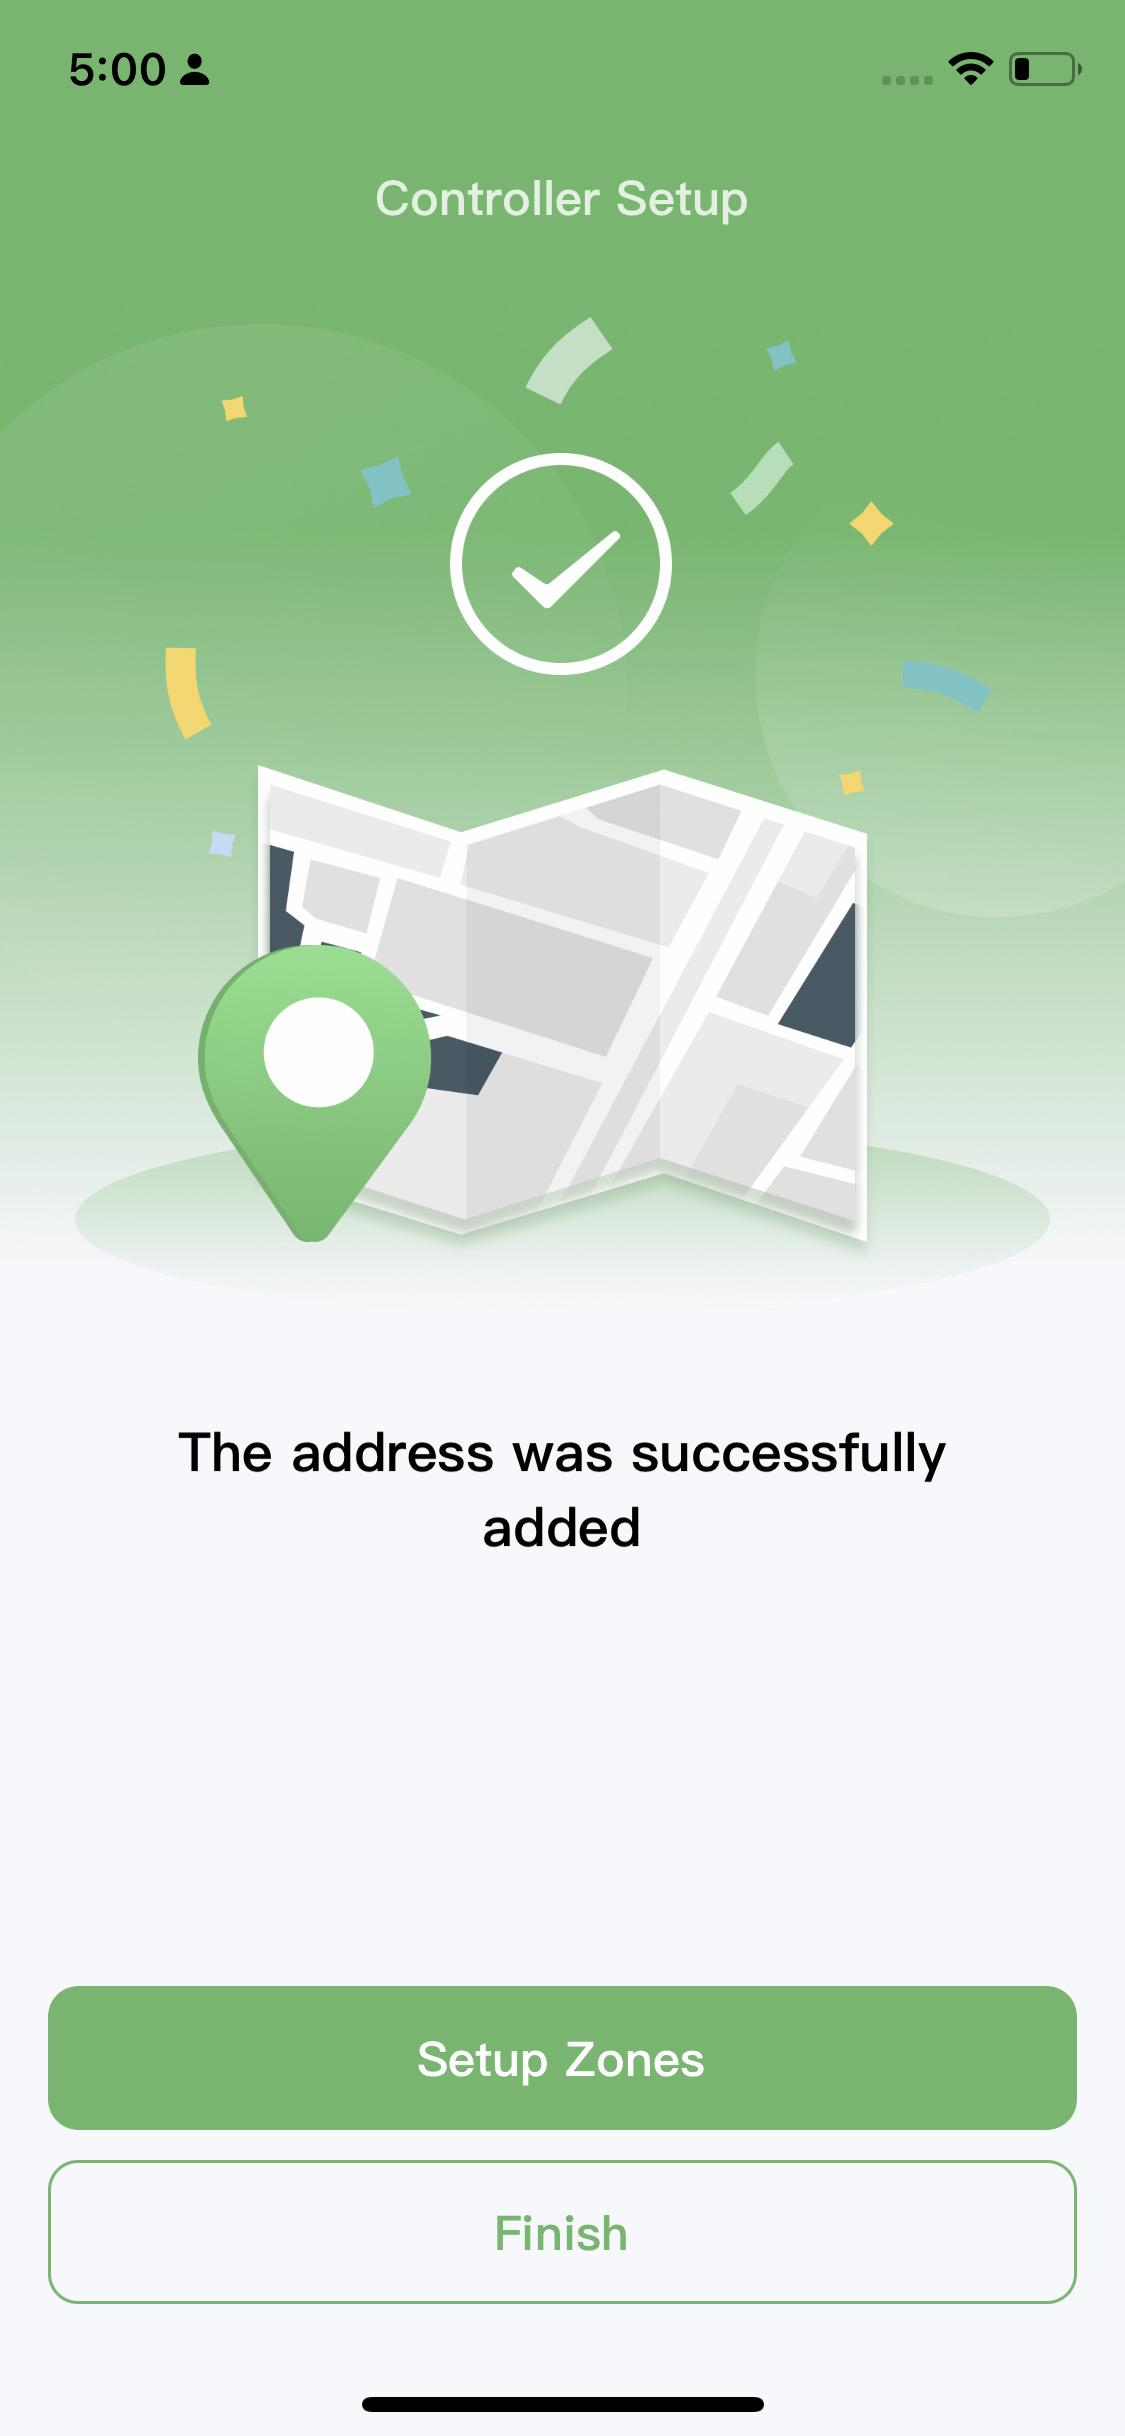
Android WiFi Connection
Step1: Connecting wifi. If you see the first interface, it means that your phone is currently connected to a 2.4GHz WiFi network. You can directly connect the controller to this WiFi network. If you see the second interface, it means that your phone is connected to a 5GHz WiFi network, which is not compatible with the controller. Please click on "Switch WiFi" and choose another WiFi network from the list. All the networks listed there are 2.4GHz WiFi networks.

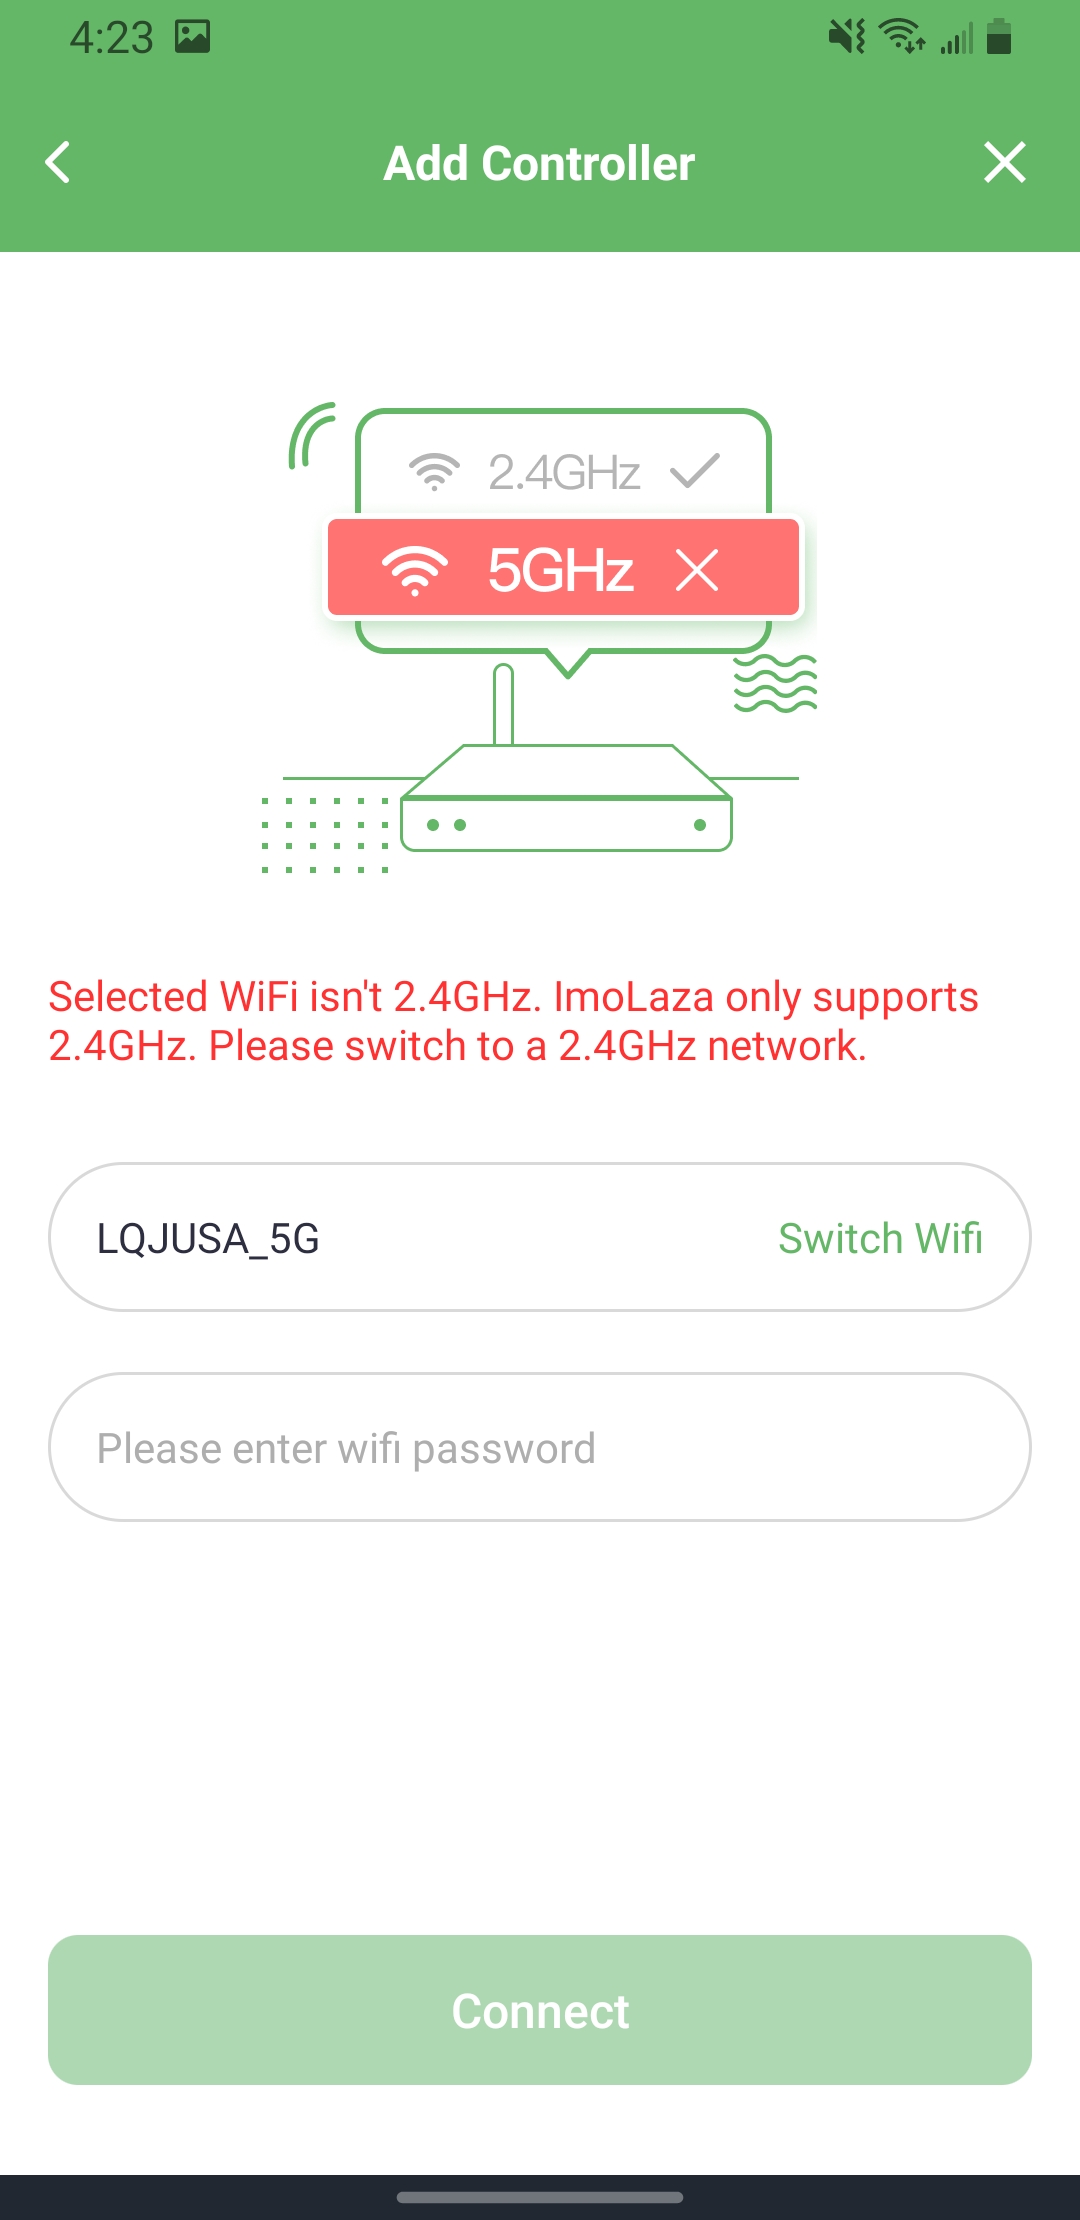

2.4GHz 5GHz Switch WiFi
Step2: Name your controller.
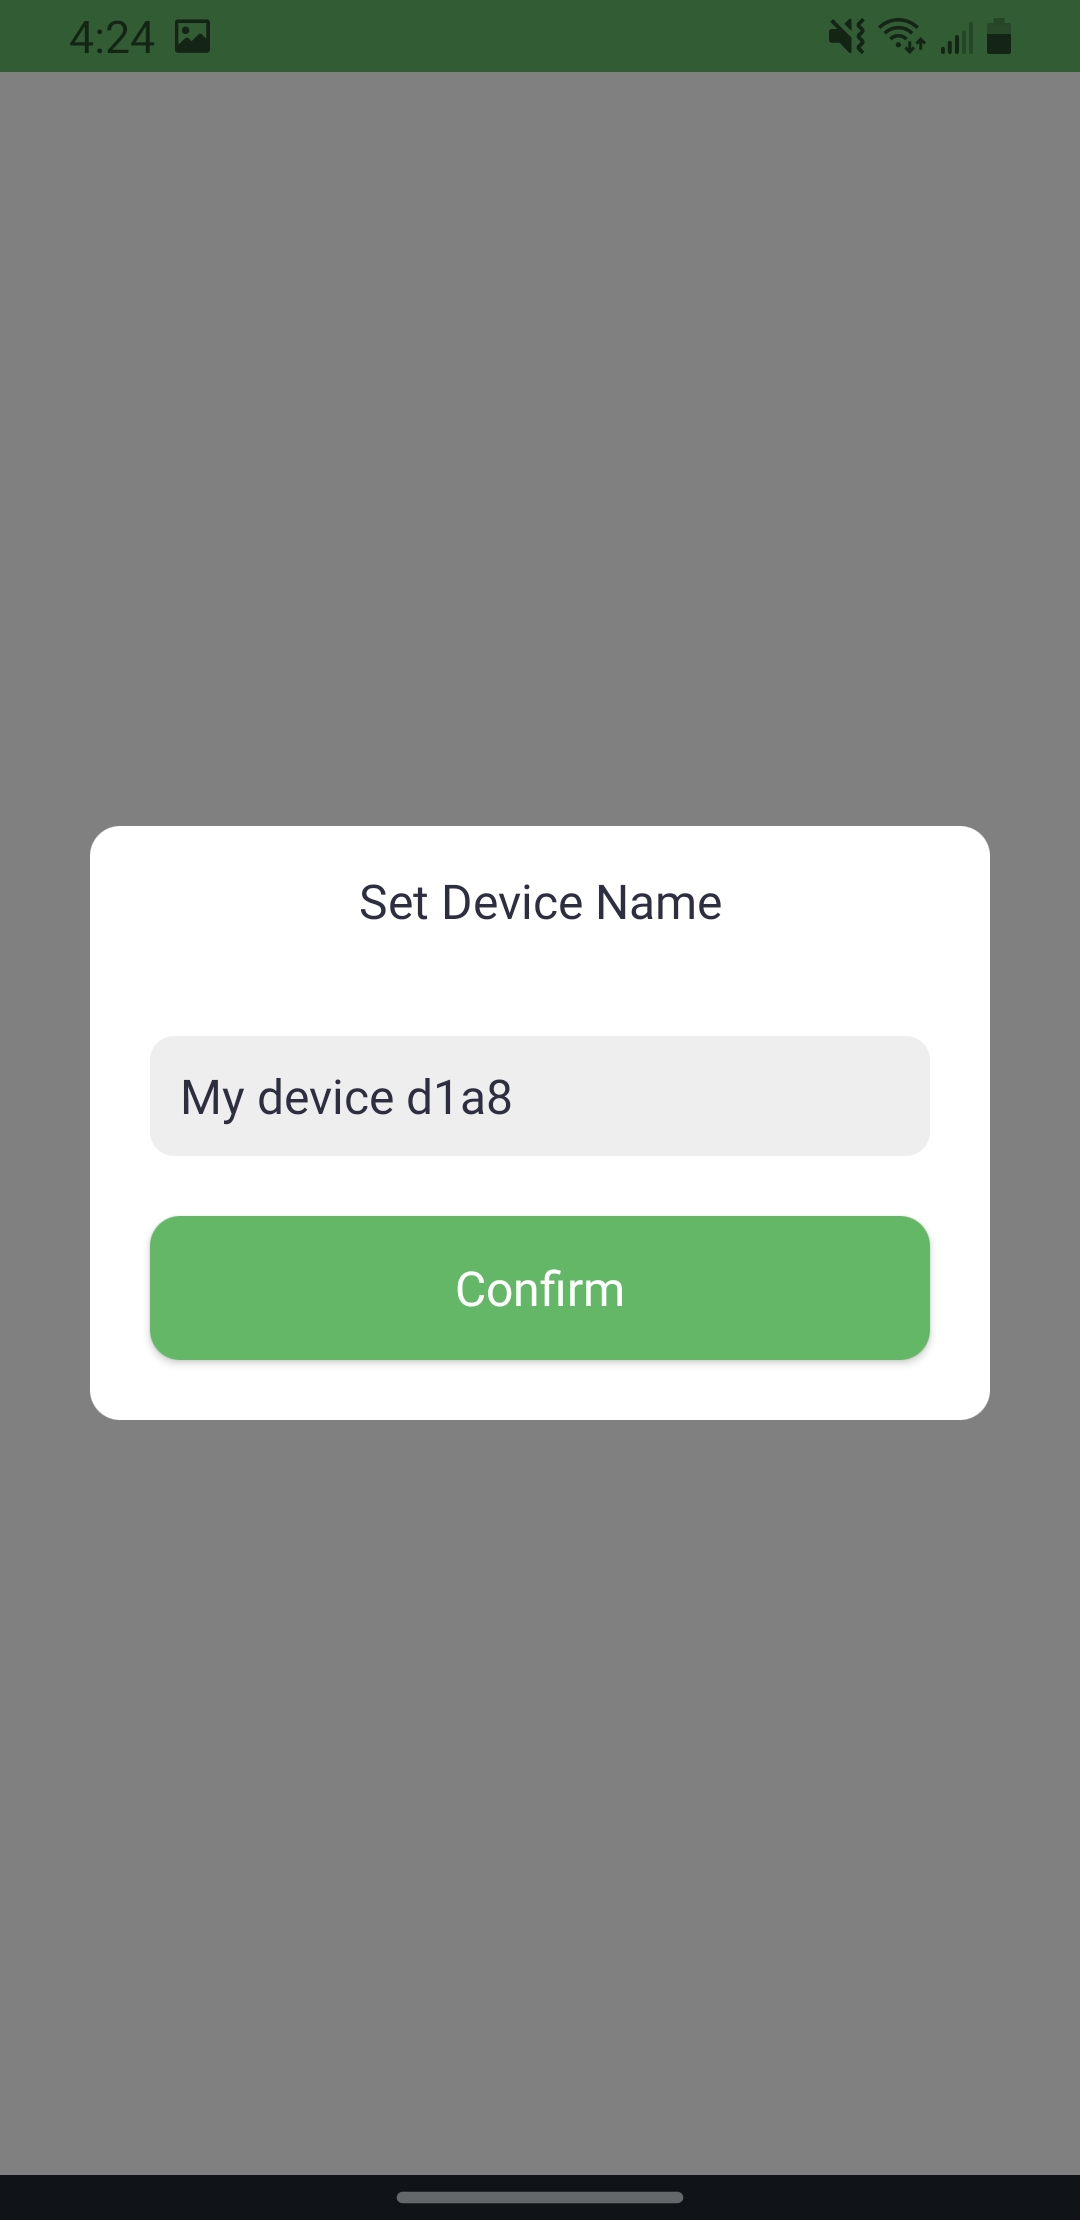
Step3: Set the address and choose a weather station.
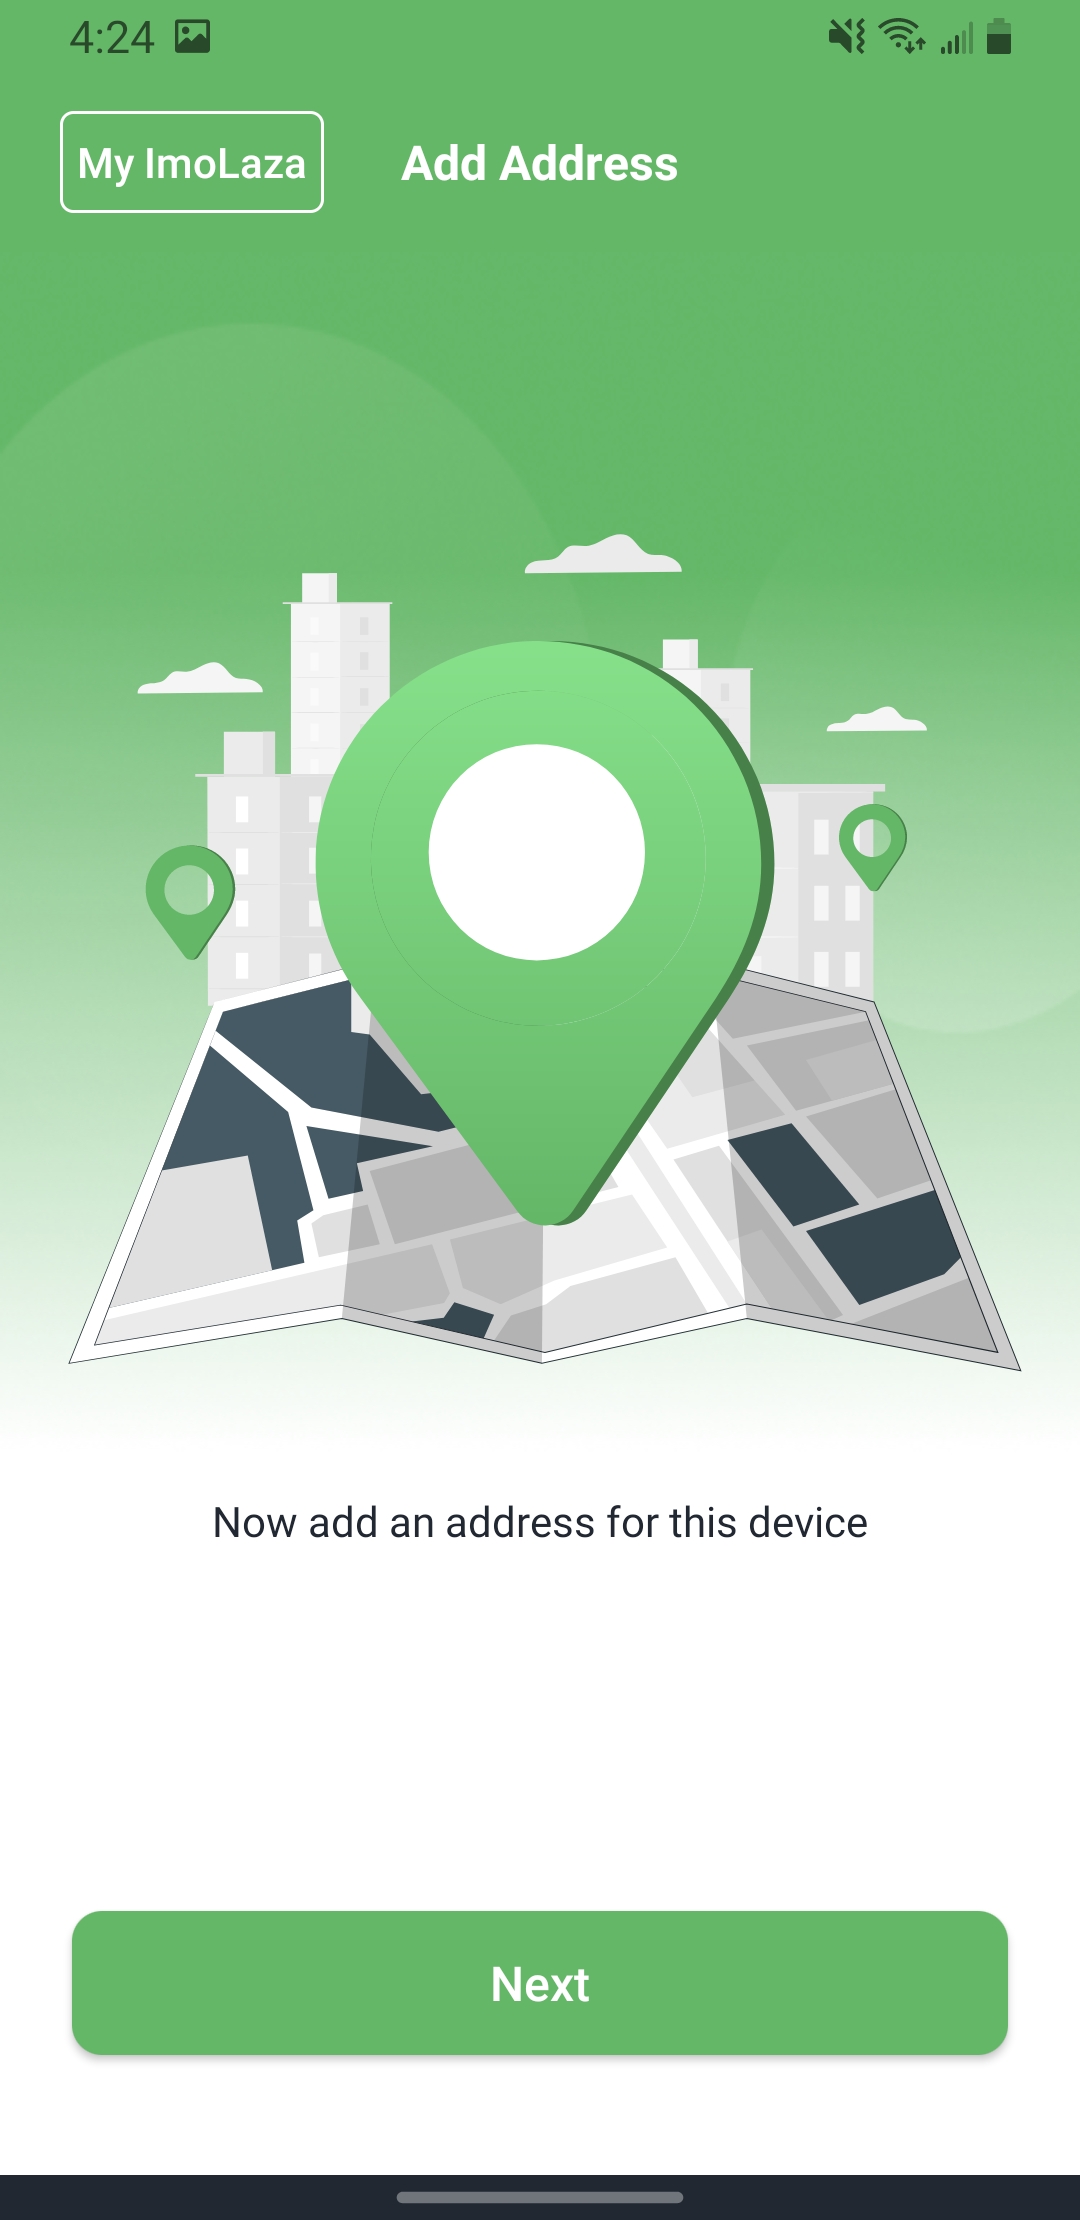
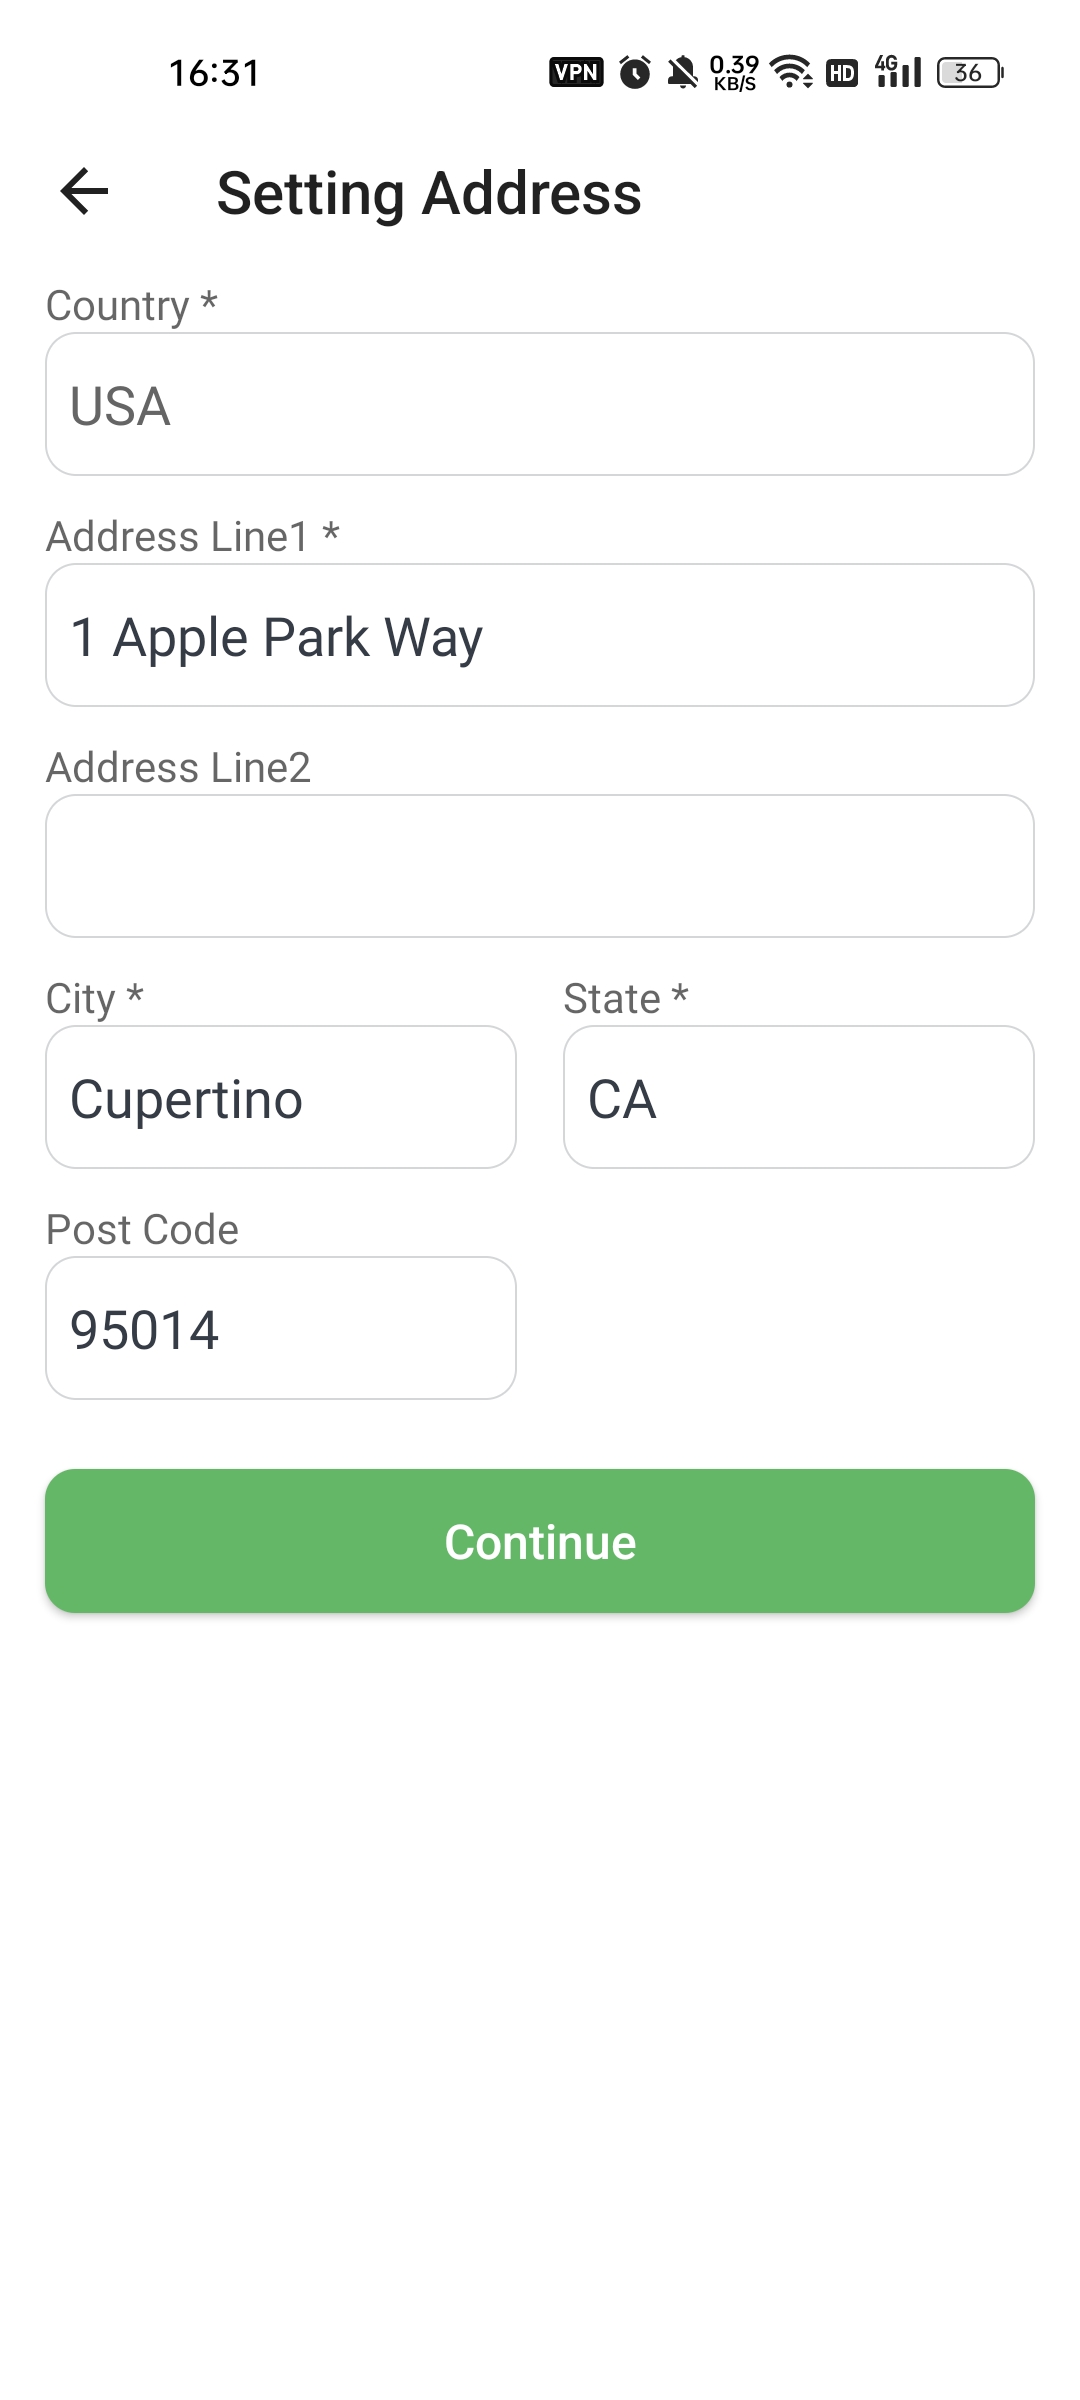
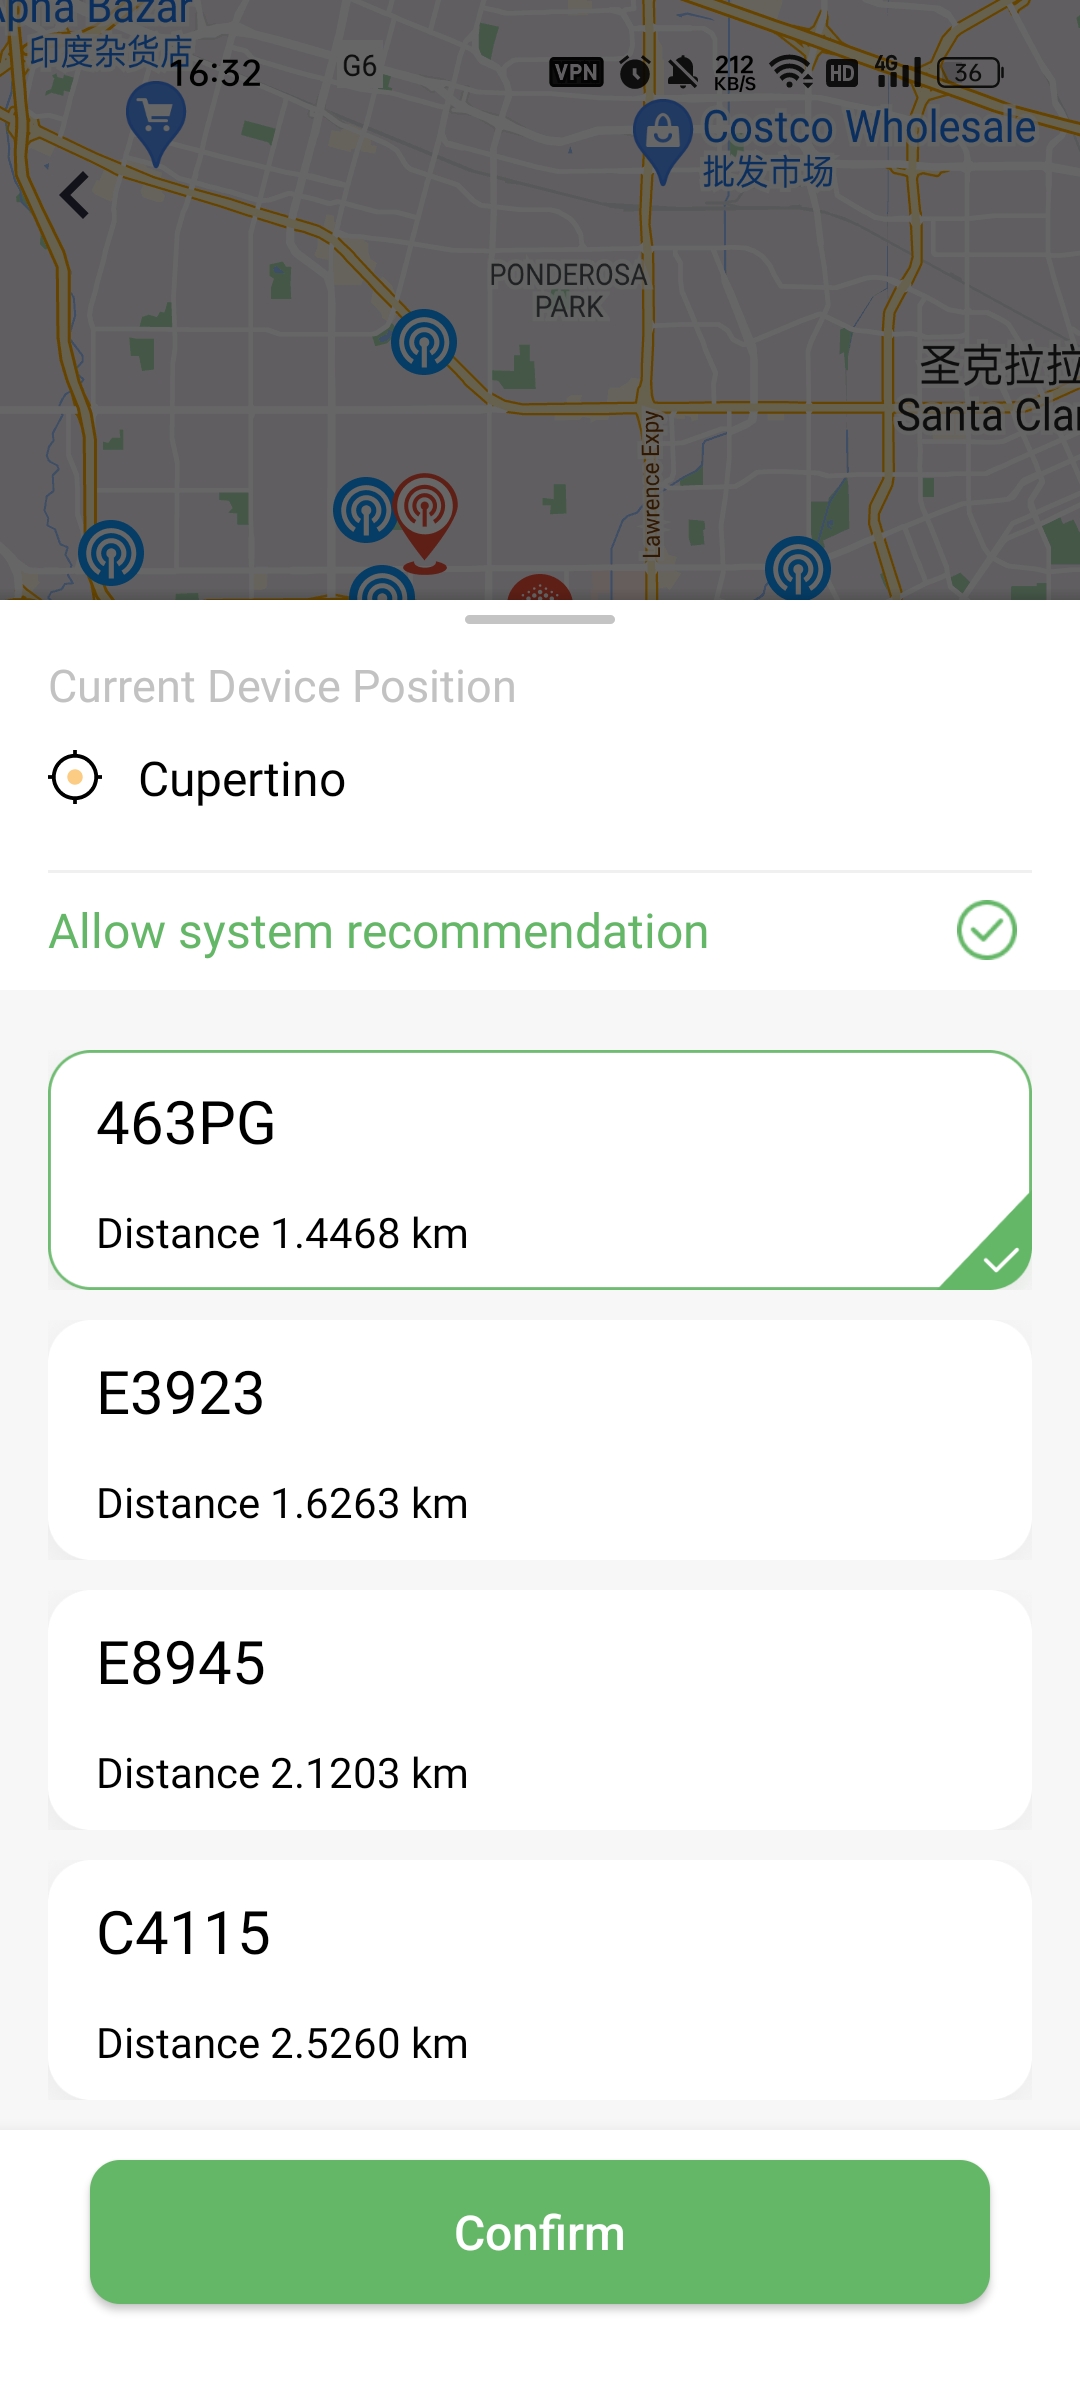
Step4: Job finished.

In case the above method doesn’t work for you, please contact our technical support team directly using the contact information below. We will respond to you by email within 12h after your message reaches us.
Email: Support@imolaza.com
Author: Imolaza
Last update: 2023-07-27 08:53
Introducing the latest enhancement in devices with firmware version 1.6.002! We now offer a new, faster, and more reliable way to add devices through Bluetooth, ensuring a seamless connection experience. With improved success rates, even updating WiFi settings while the device is offline becomes effortless. Allow us to guide you through the steps of using this exciting new connection method to add devices effortlessly. Let's get started!
Step1: Please follow the instructions provided in the application and observe the indicator lights on the controller to complete the reset process.
Power On Reset Match
iOS WiFi Connection
Step2: To connect the device to your home WiFi, please note that it only supports 2.4GHz networks. You can follow these two methods to establish the connection:
2.1 Enable Bluetooth in your phone settings.

2.2 Enable location services in your phone settings under "Privacy & Security" as the controller needs to detect nearby available WiFi networks.

2.3 Scan the QR code or input the MAC address manually.
2.4 Name your controller.
2.5 Manually enter your home WiFi name and password, then click "Next" to initiate the connection.
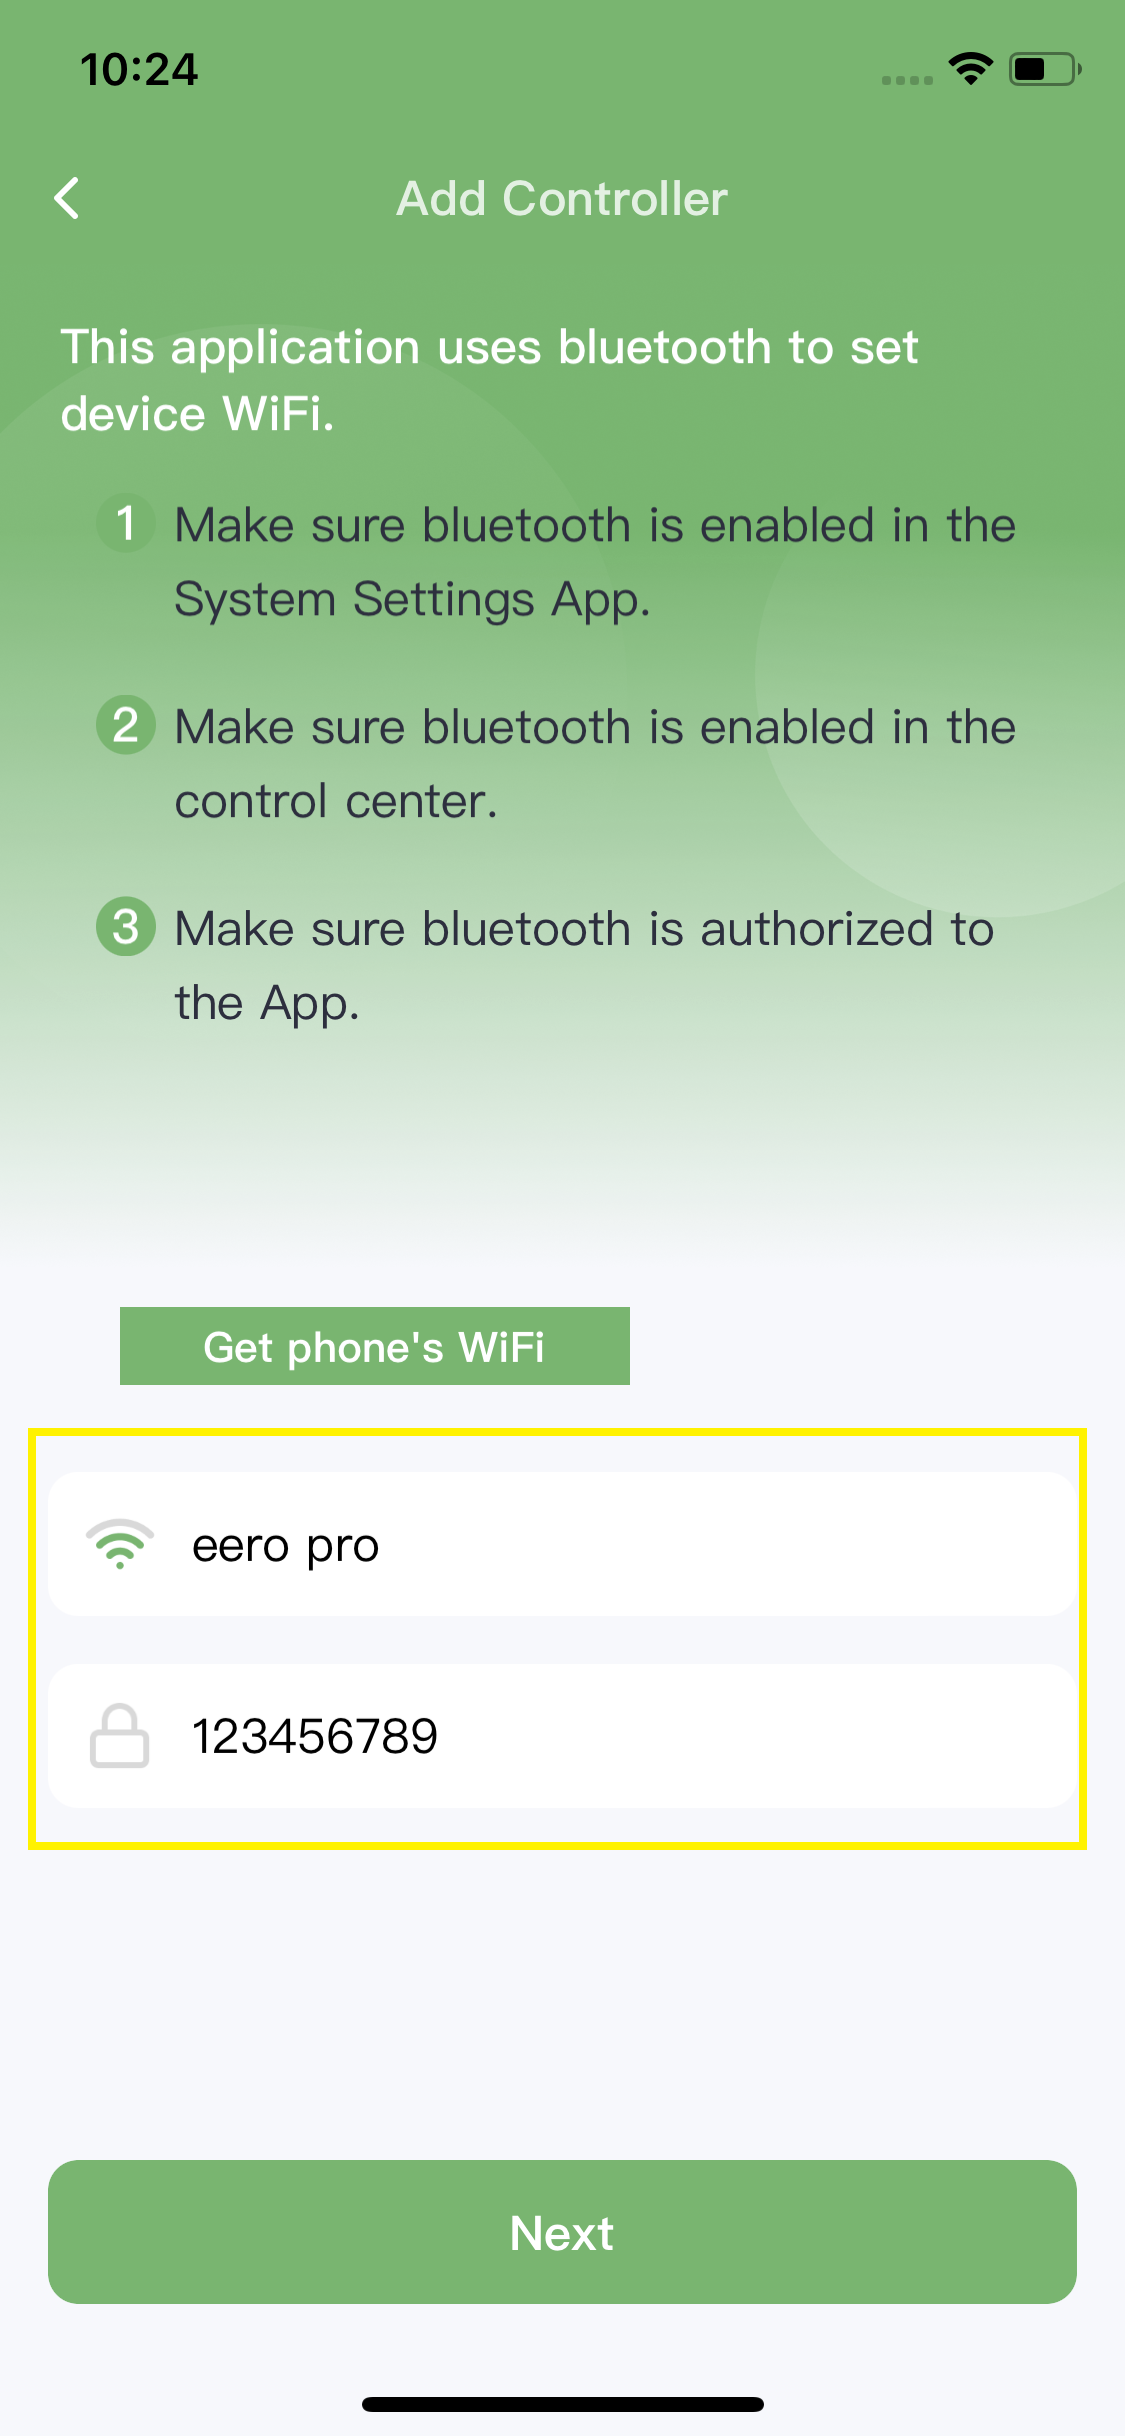
2.6 If your home WiFi name is complex, connect your phone to your home 2.4GHz WiFi first, and then click "Get phone's WiFi" to let the device automatically detect your phone's connection. Enter your home WiFi password, then click "Next" to start the connection.
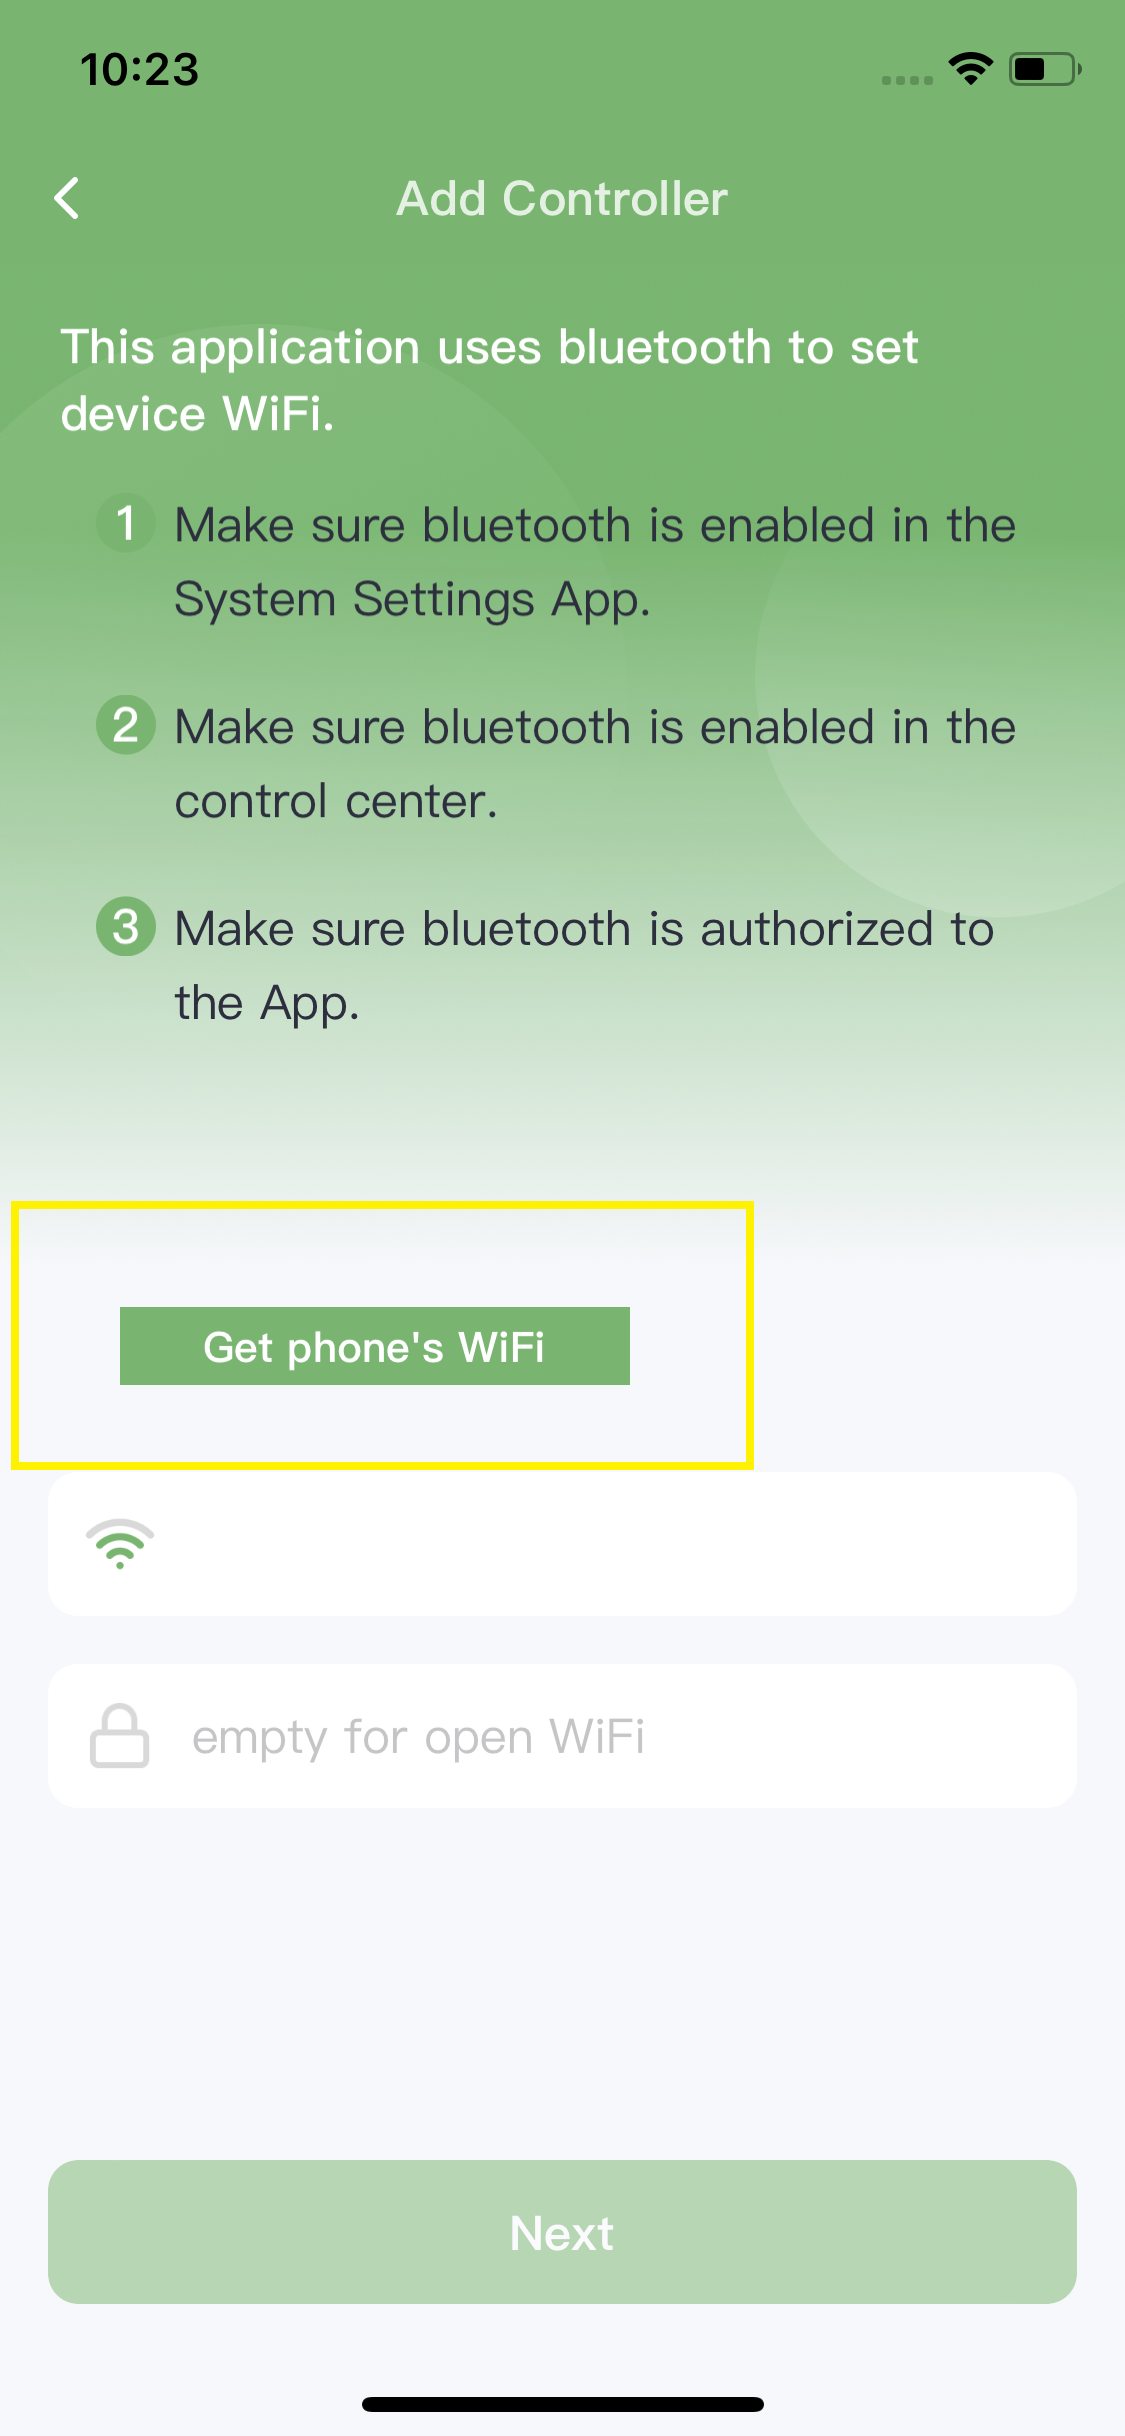
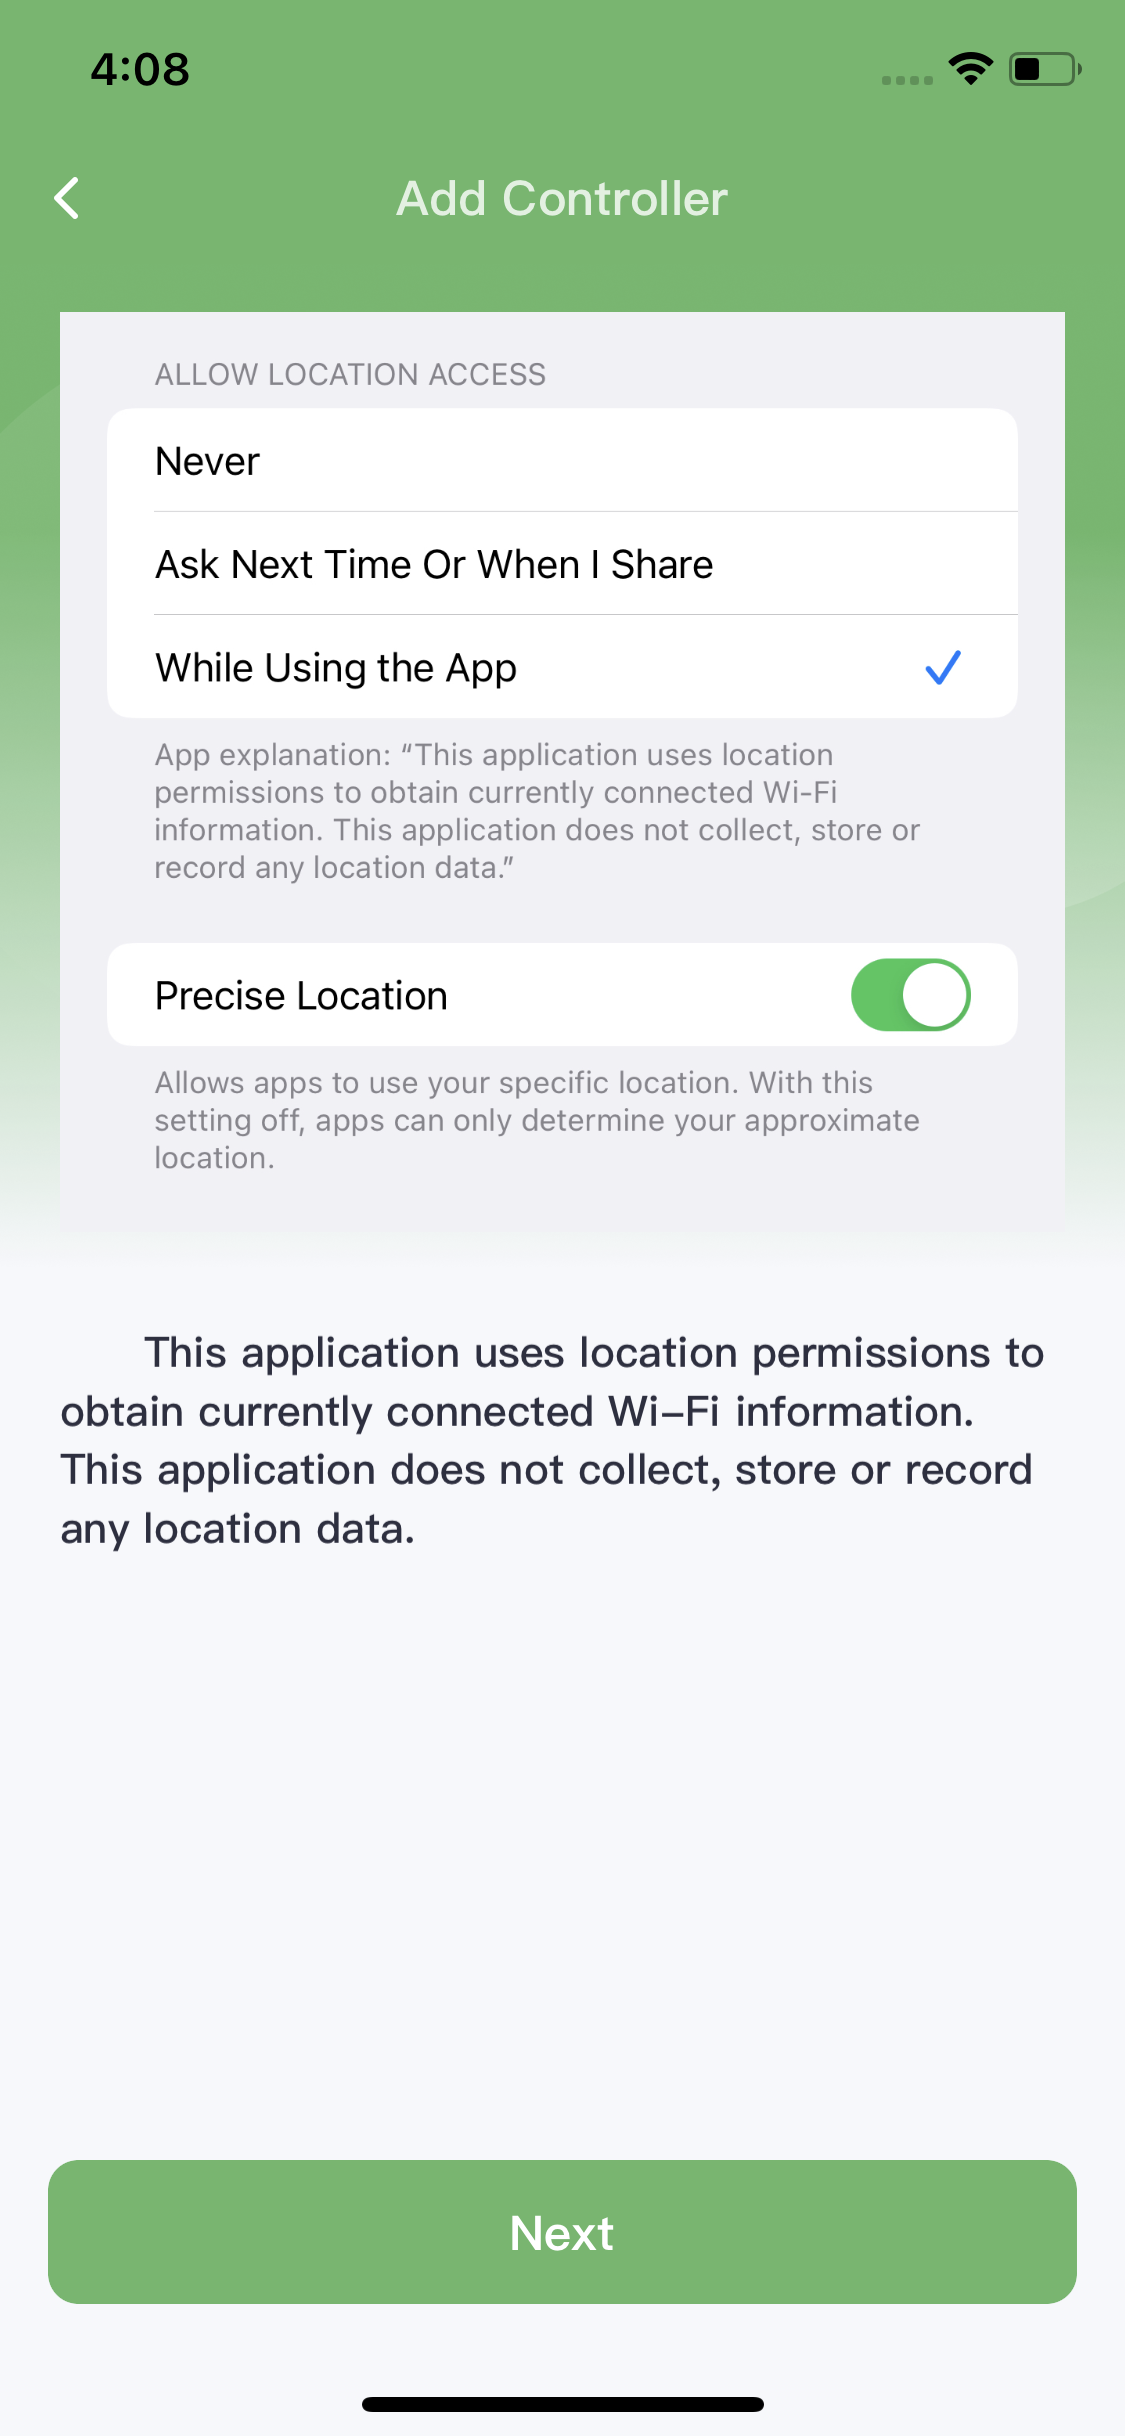
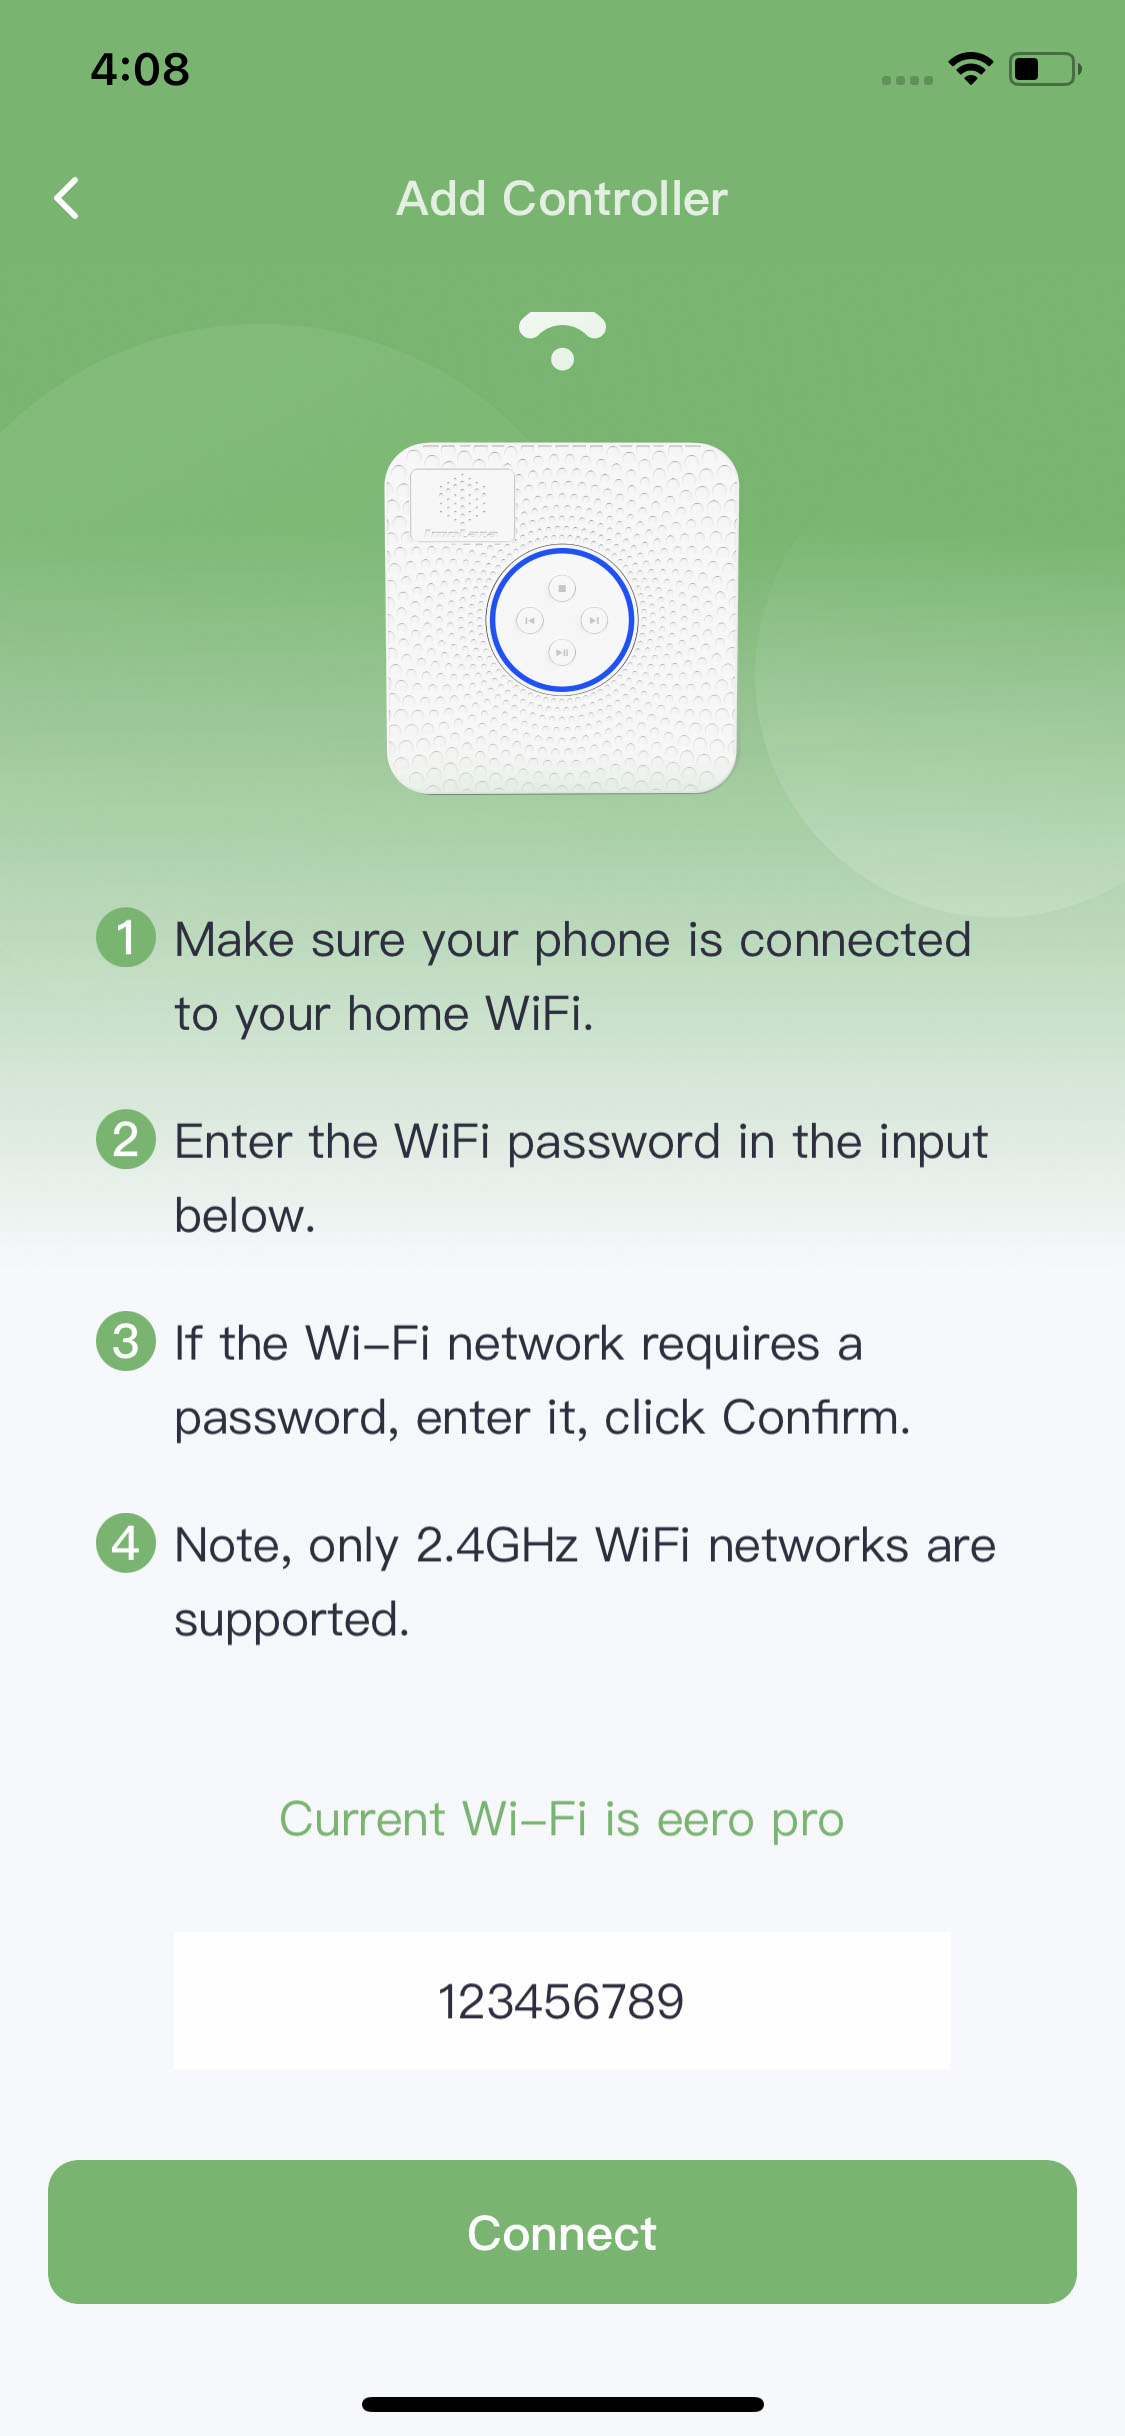
Step3: If you get this screen, it means that you have already added the controller to your account.
Step4: Set the address, the more accurate, the better.
Step5: Please select a weather station. You don't need to actually purchase a personal weather station because we have taken care of that part for you. Simply choose the weather station closest to your location, as its data will guide the execution of the schedule. Additionally, we recommend selecting the option "Allow system recommendation" so that we can automatically switch to other weather stations in case of any malfunction with the chosen station.
Step6: Job finished.
Android WiFi Connection
Step1: Enable Bluetooth and location service in your phone settings.

Step2: Scan the QR code or input the MAC address manually.
Step3: Connecting wifi. If you see the first interface, it means that your phone is currently connected to a 2.4GHz WiFi network. You can directly connect the controller to this WiFi network. If you see the second interface, it means that your phone is connected to a 5GHz WiFi network, which is not compatible with the controller. Please click on "Switch WiFi" and choose another WiFi network from the list. All the networks listed there are 2.4GHz WiFi networks.
2.4GHz 5GHz Switch WiFi
Step4: Name your controller.
Step5: Set the address and choose a weather station.
Step6: Job finished.
In case the above method doesn’t work for you, please contact our technical support team directly using the contact information below. We will respond to you by email within 12h after your message reaches us.
Email: Support@imolaza.com
Author: Imolaza
Last update: 2023-08-10 11:39
During the usage of the controller, to fully enjoy all its features, it's important to enable the location services on your smartphone. This is because some functionalities directly depend on your location information. Specifically, there are two key situations where location services become crucial: firstly, during the device setup process, and secondly, when you're offline but still need to make WiFi configuration changes. In both of these scenarios, two conditions need to be met concurrently: enabling location services and granting the ImoLaza App access to your location services.
To ensure a seamless experience with the controller and to make the most of its features, here are the steps you can follow to configure your location services and grant the required location services access to the ImoLaza App:
For iOS users,
1. Open Settings on your phone and navigate to Privacy & Security
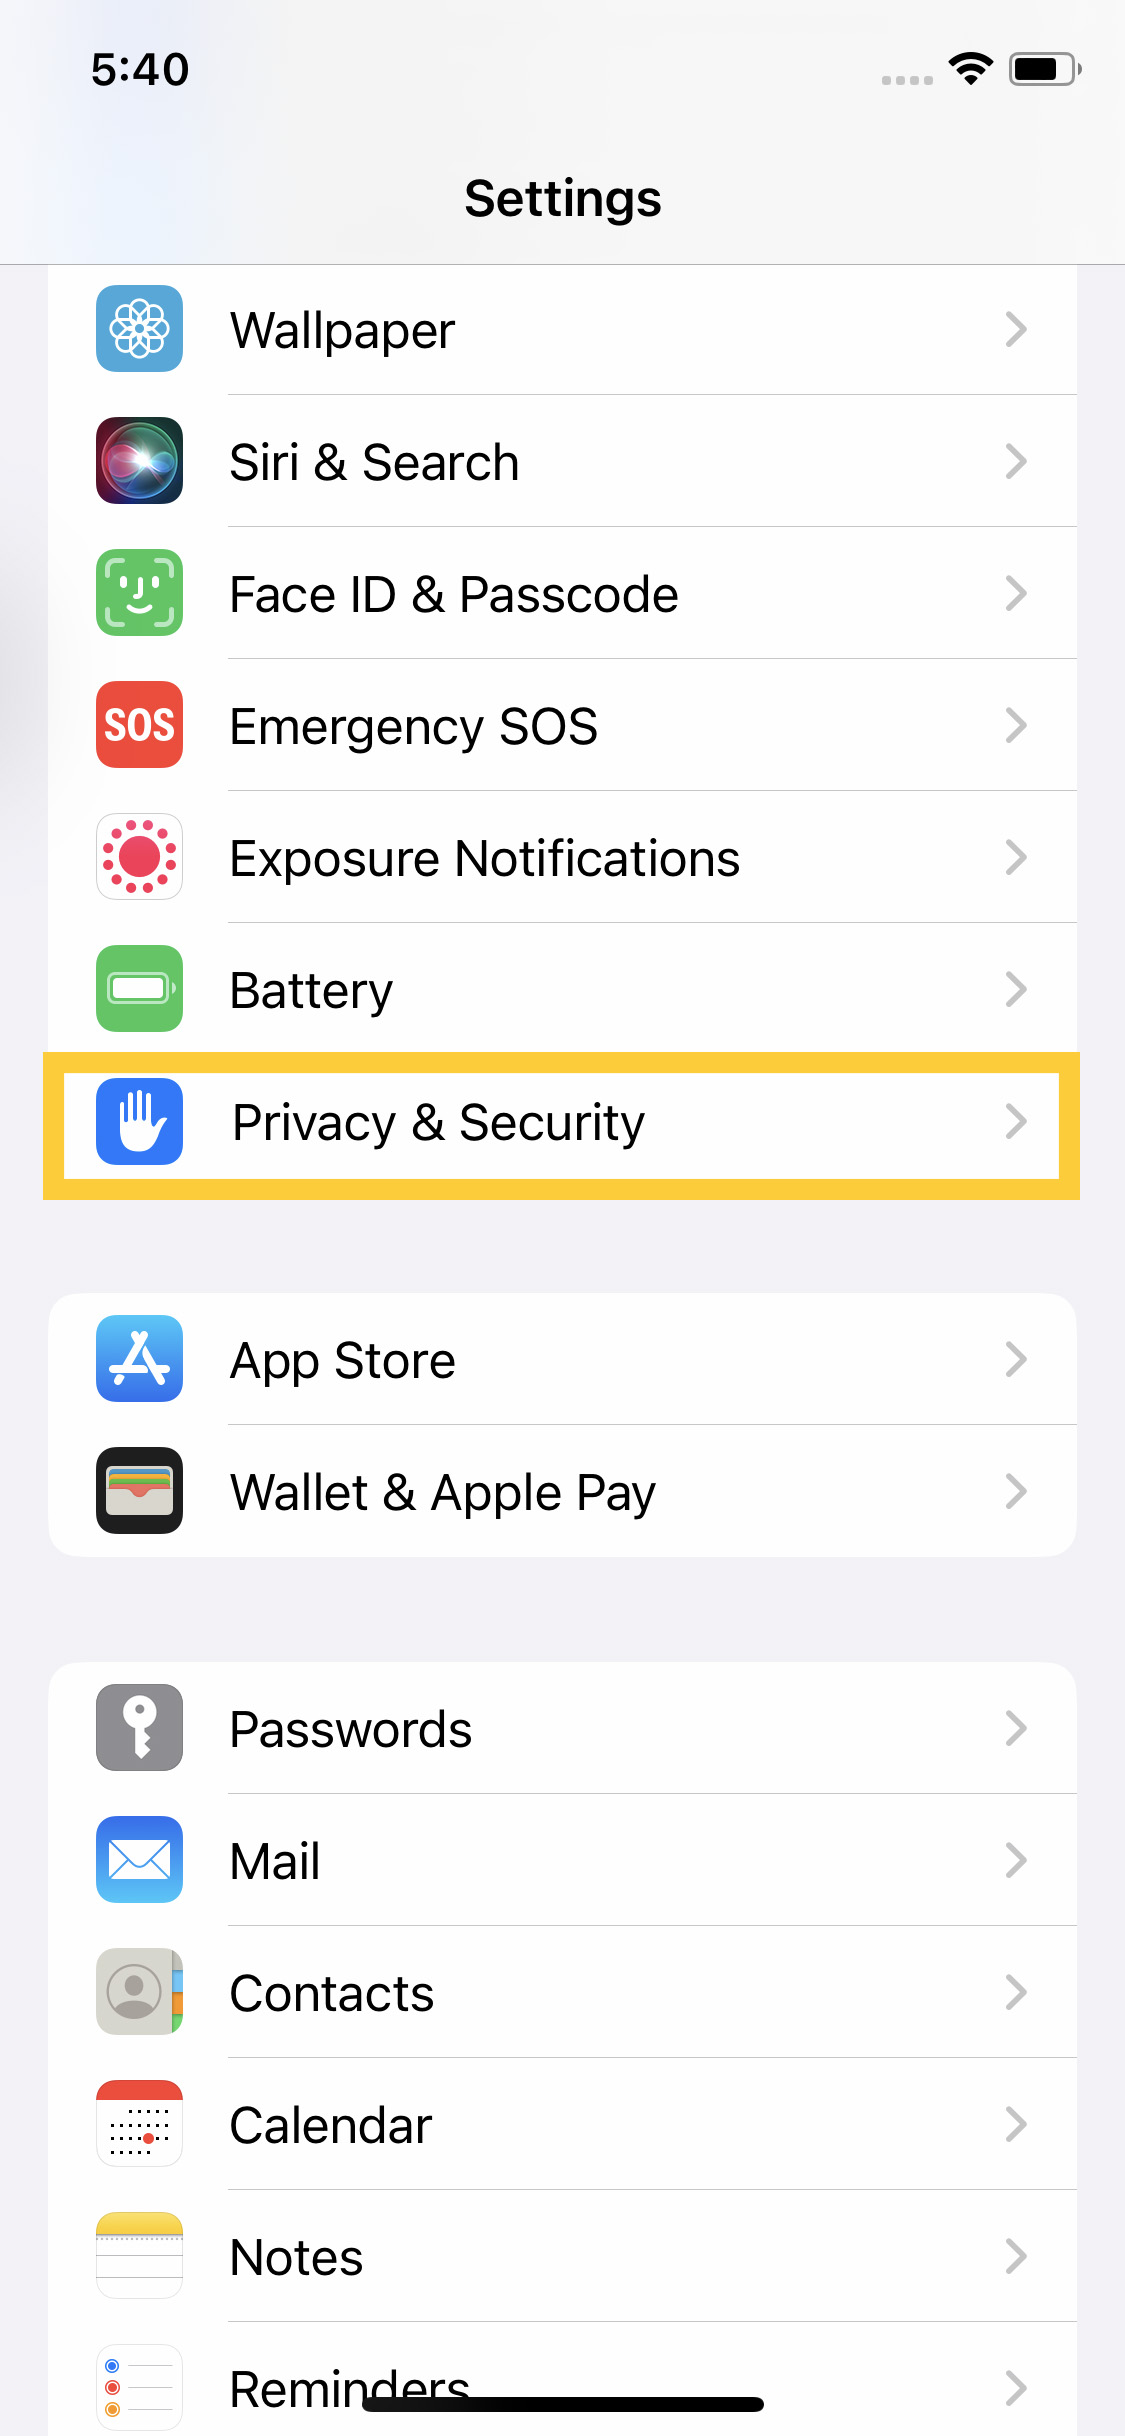
2. Select and turn on Location Service
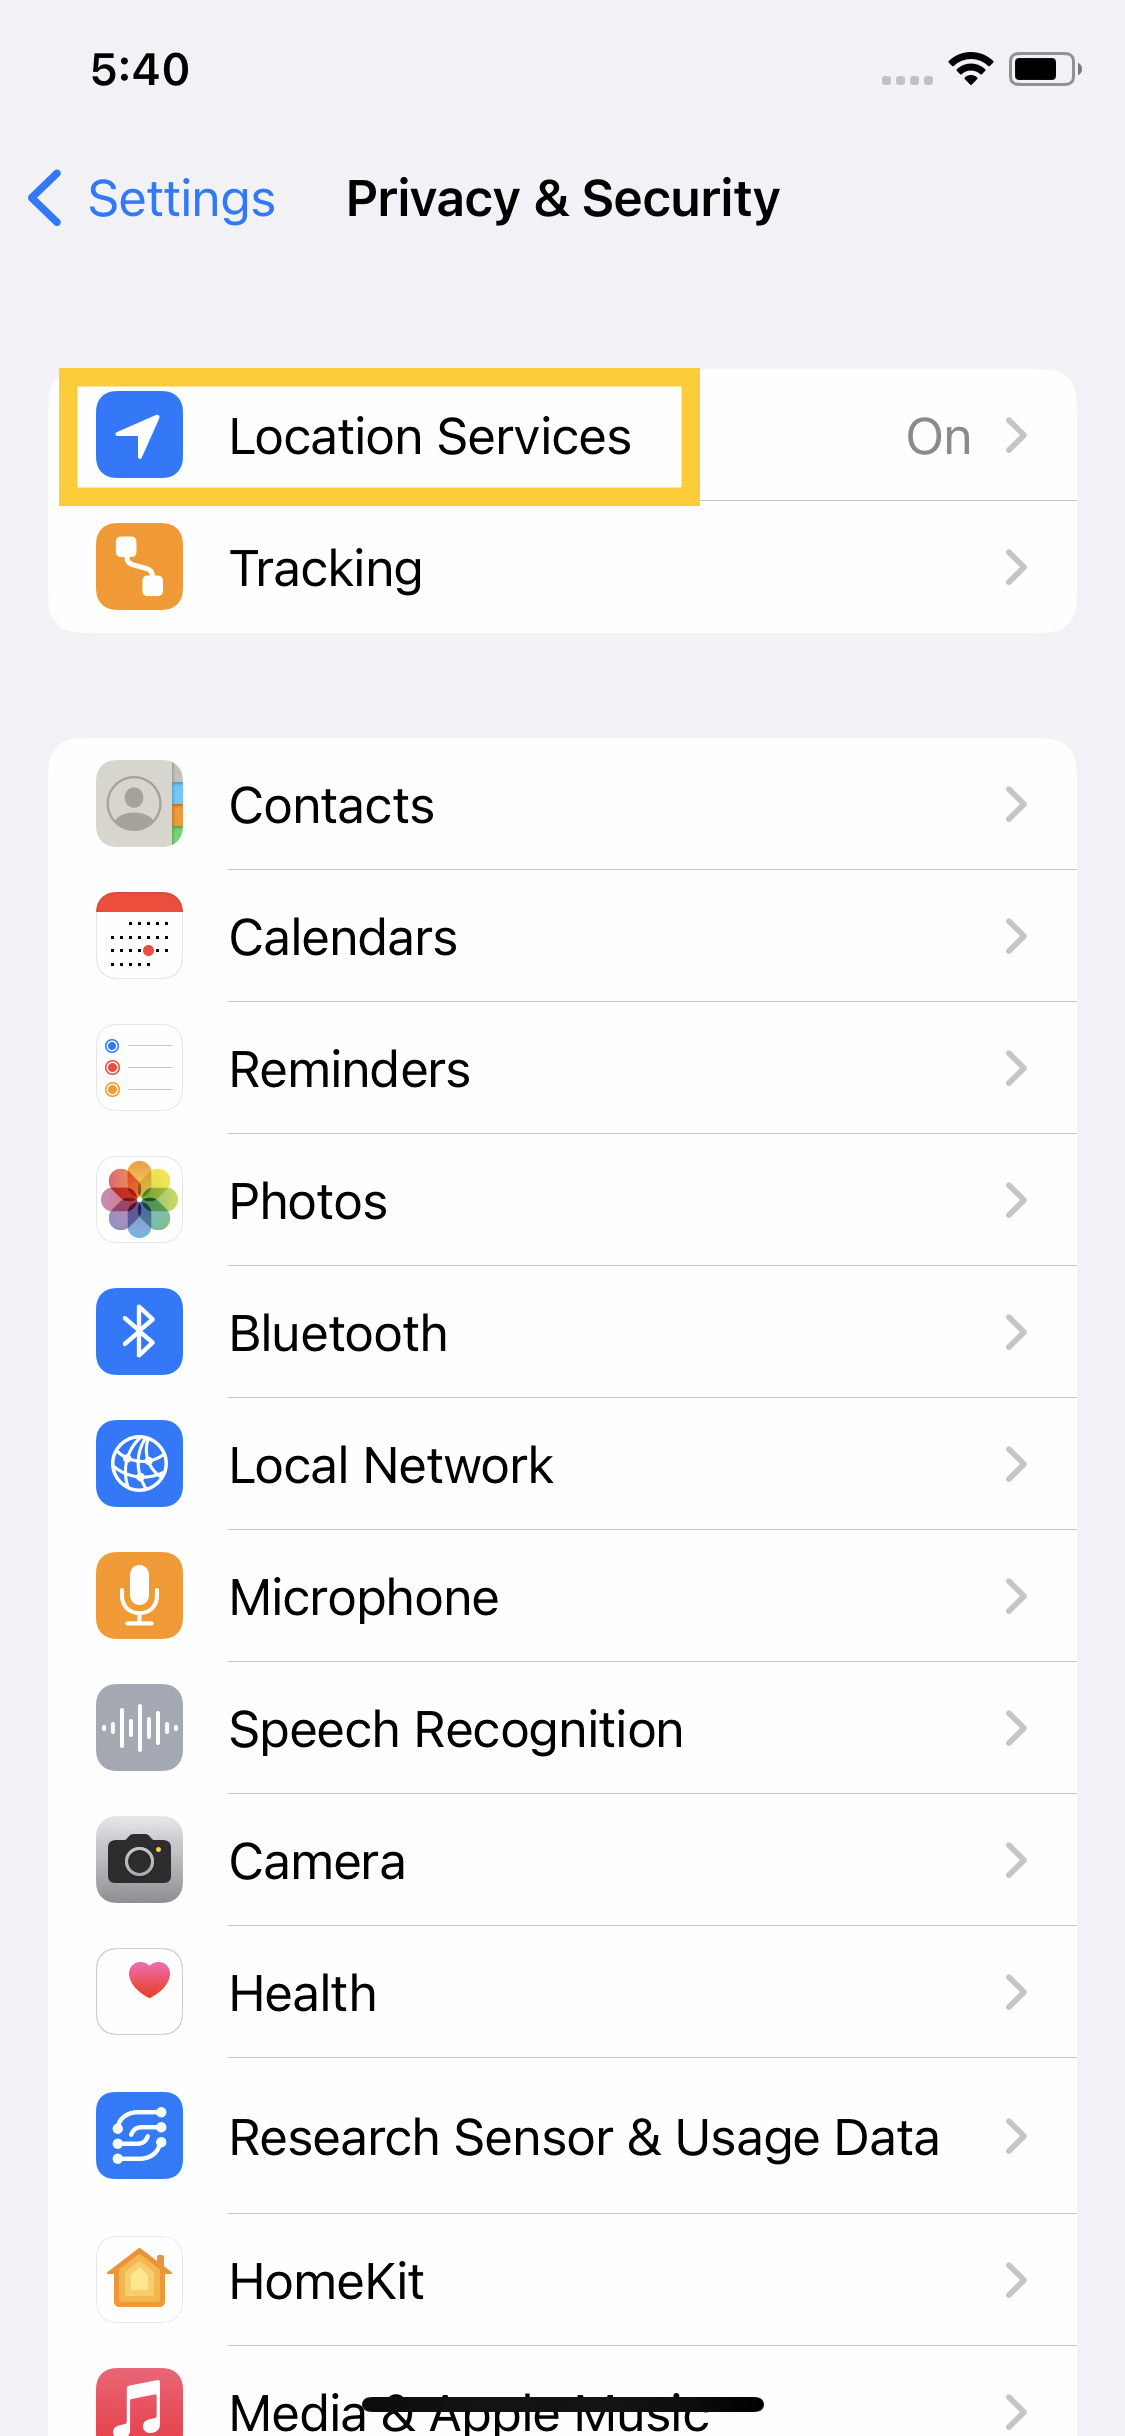

3. Find ImoLaza and check While Using the App
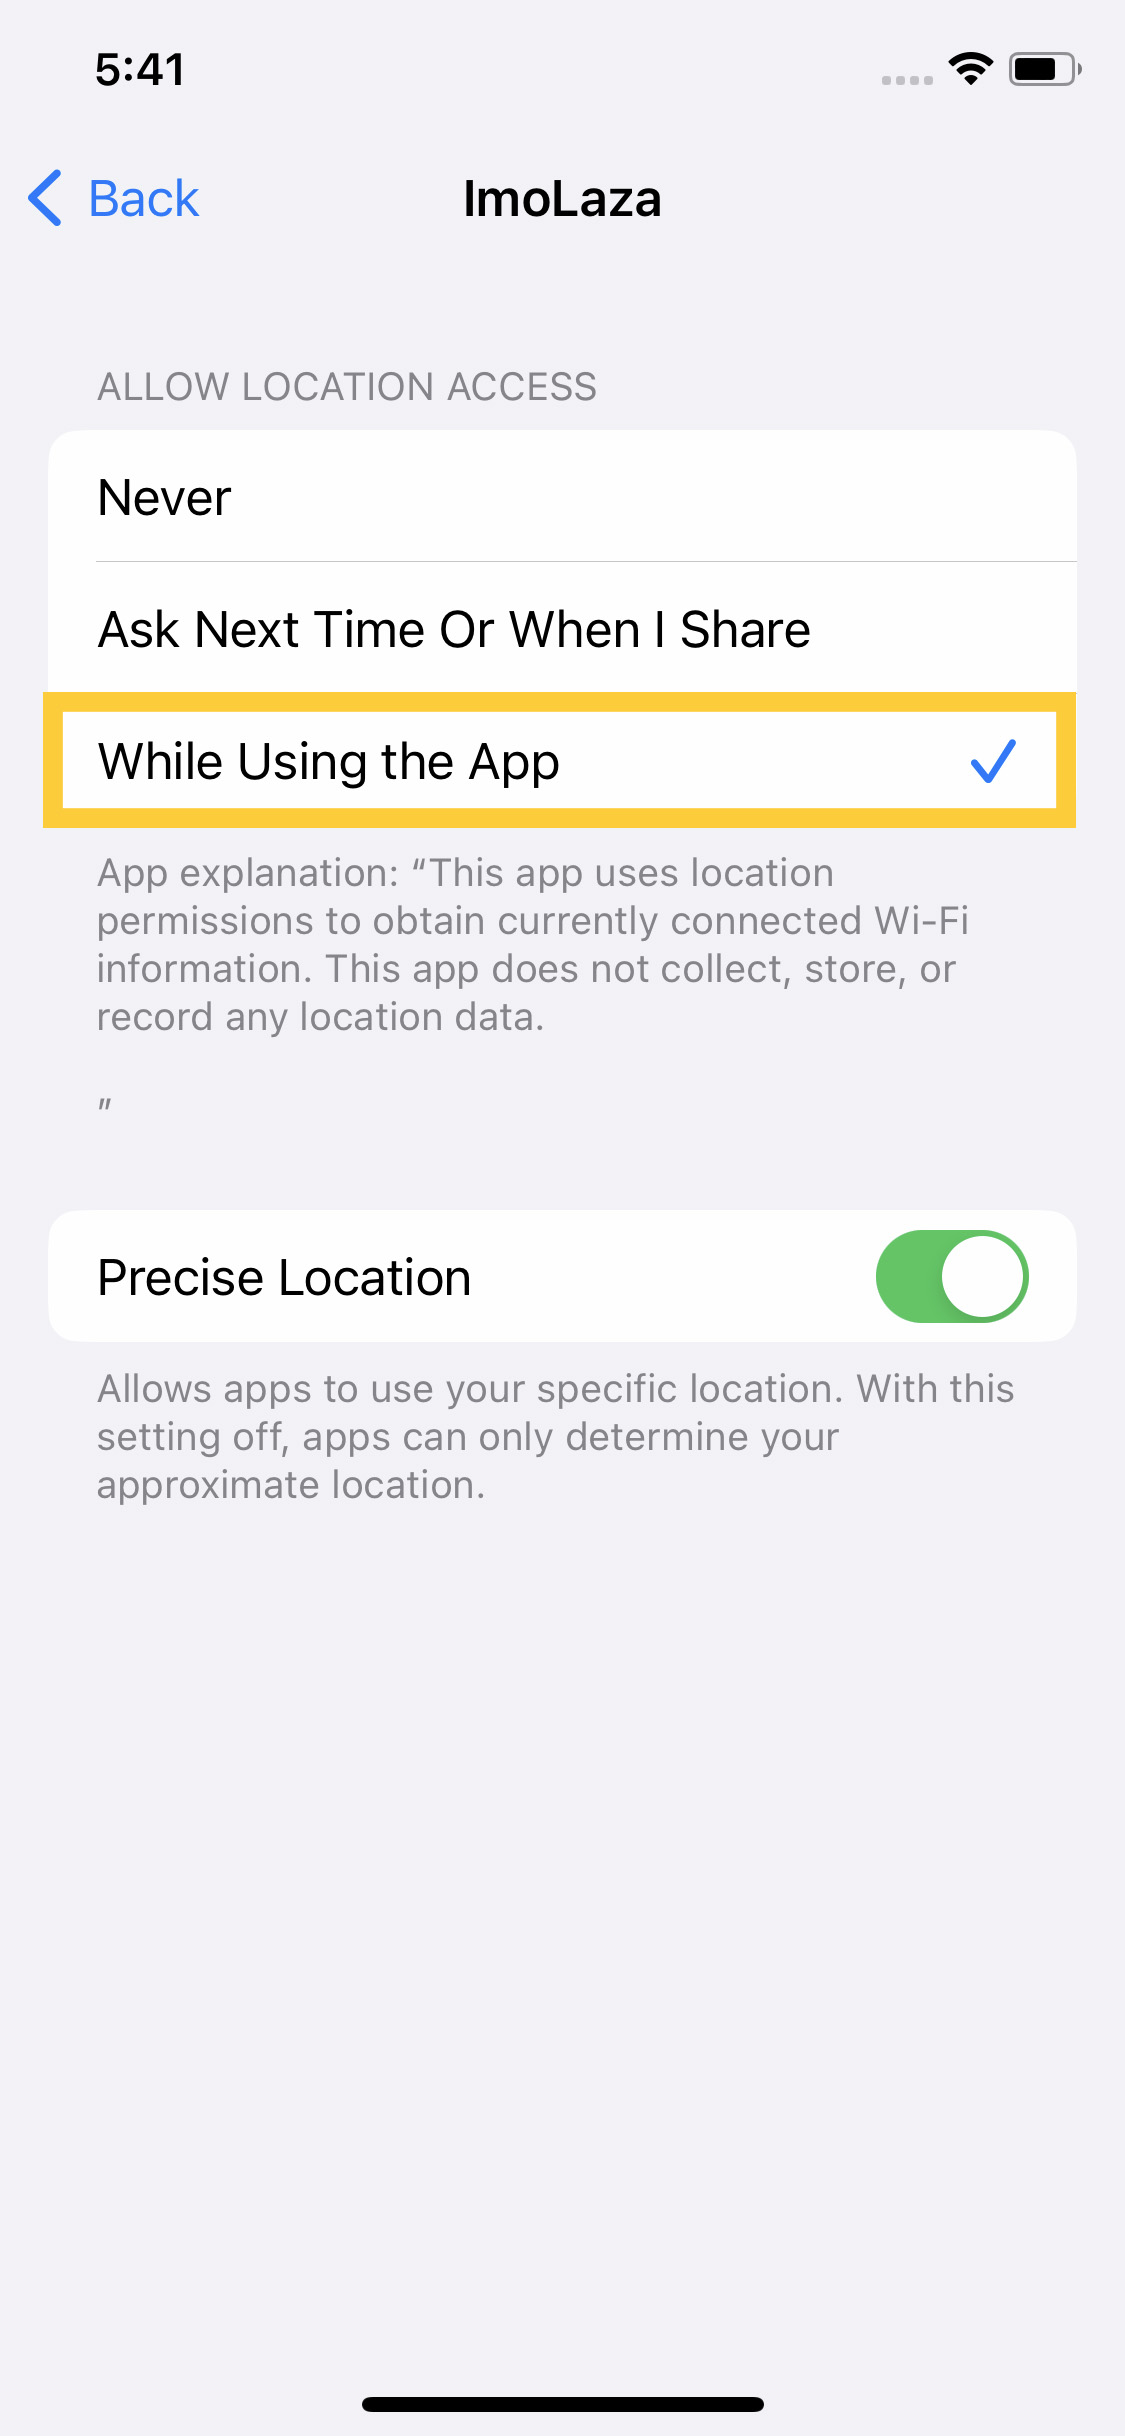
For Android users,
Indeed, there might be slight variations in the operations of Android phones due to their individual designs. The specific steps can differ based on different phone models. The following content is for reference only.
1. Open Settings on your phone and navigate to Location
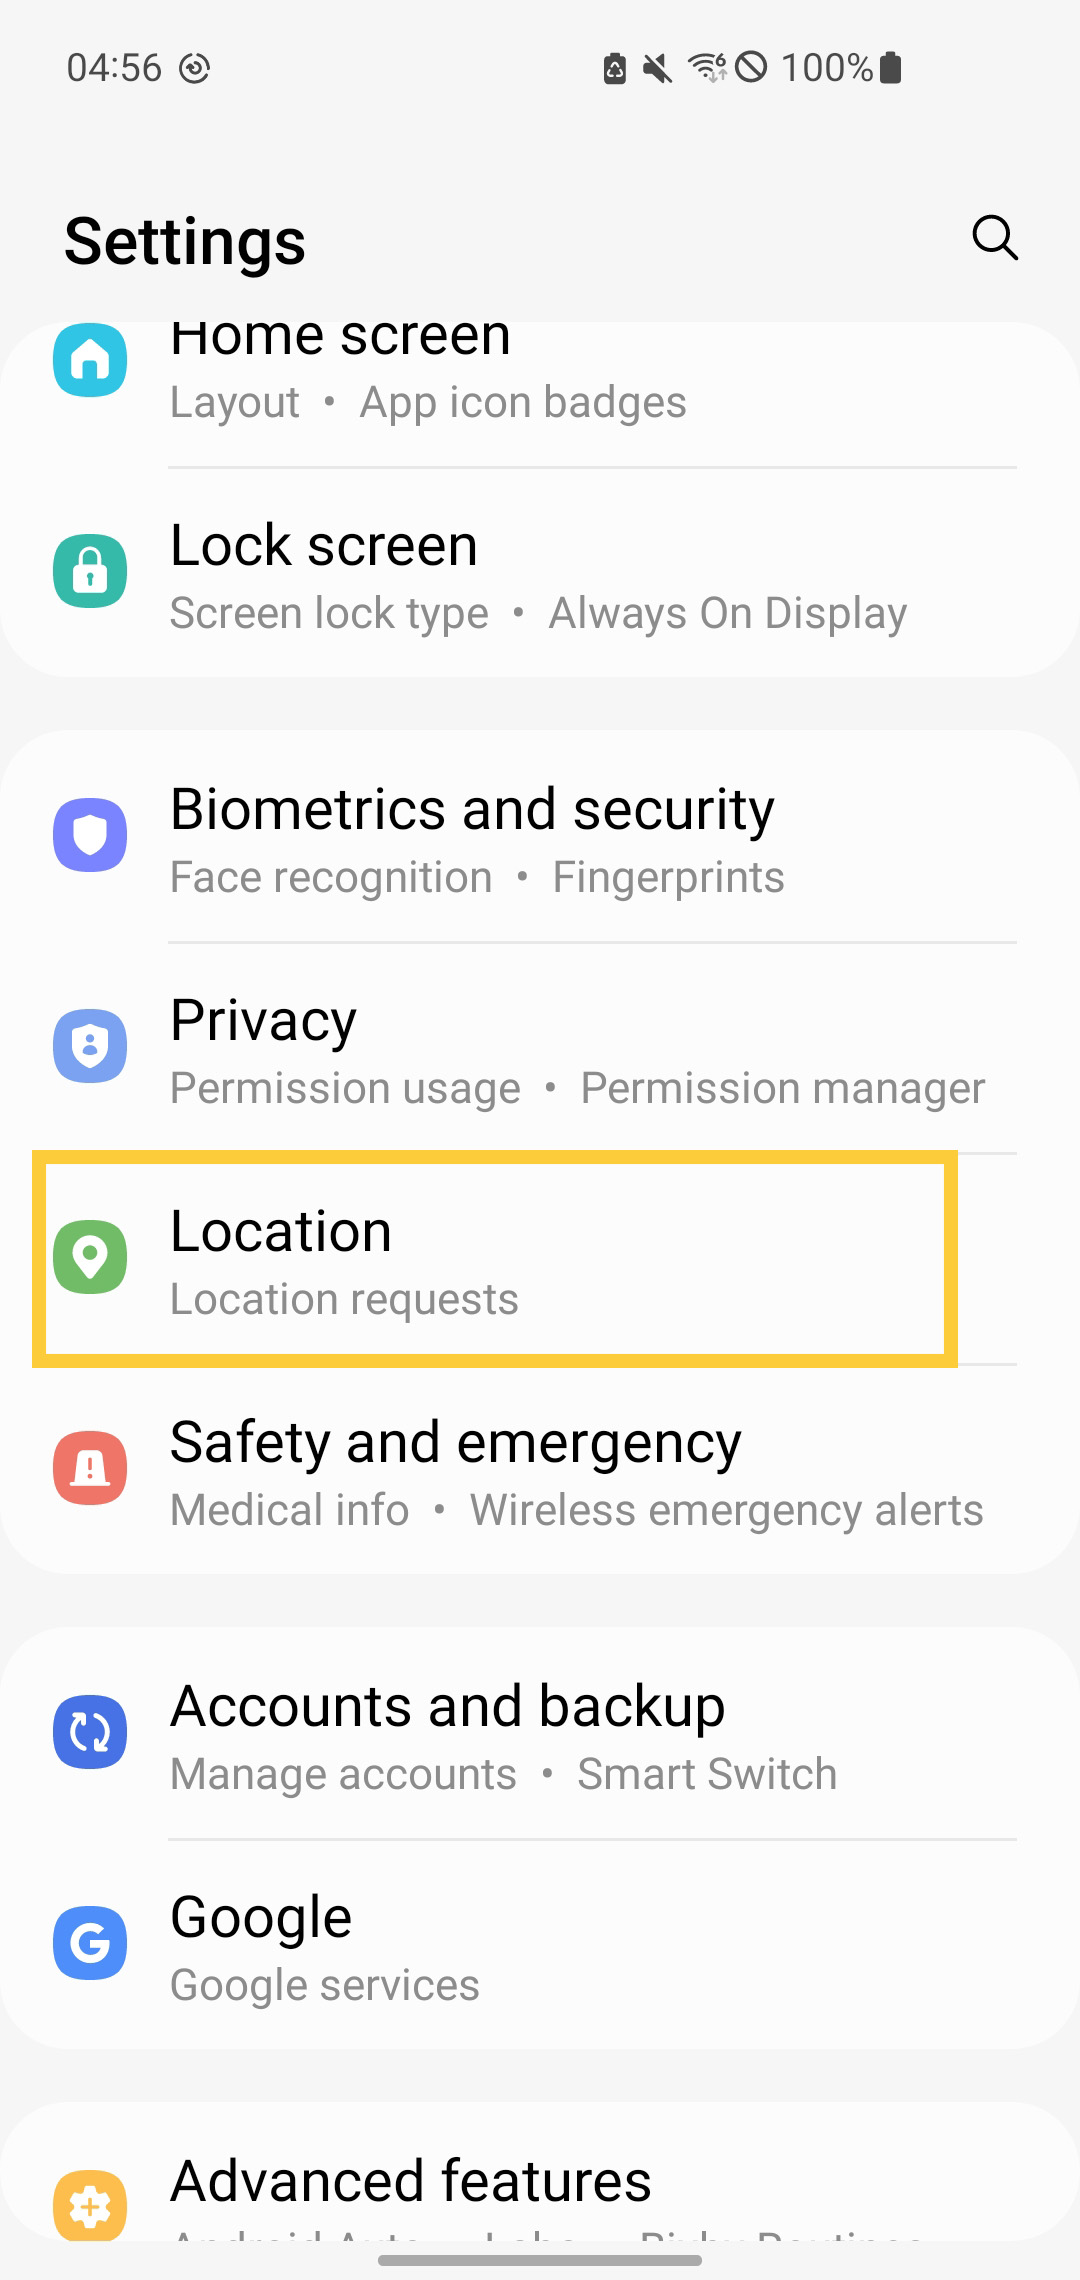
2. Toggle ON.
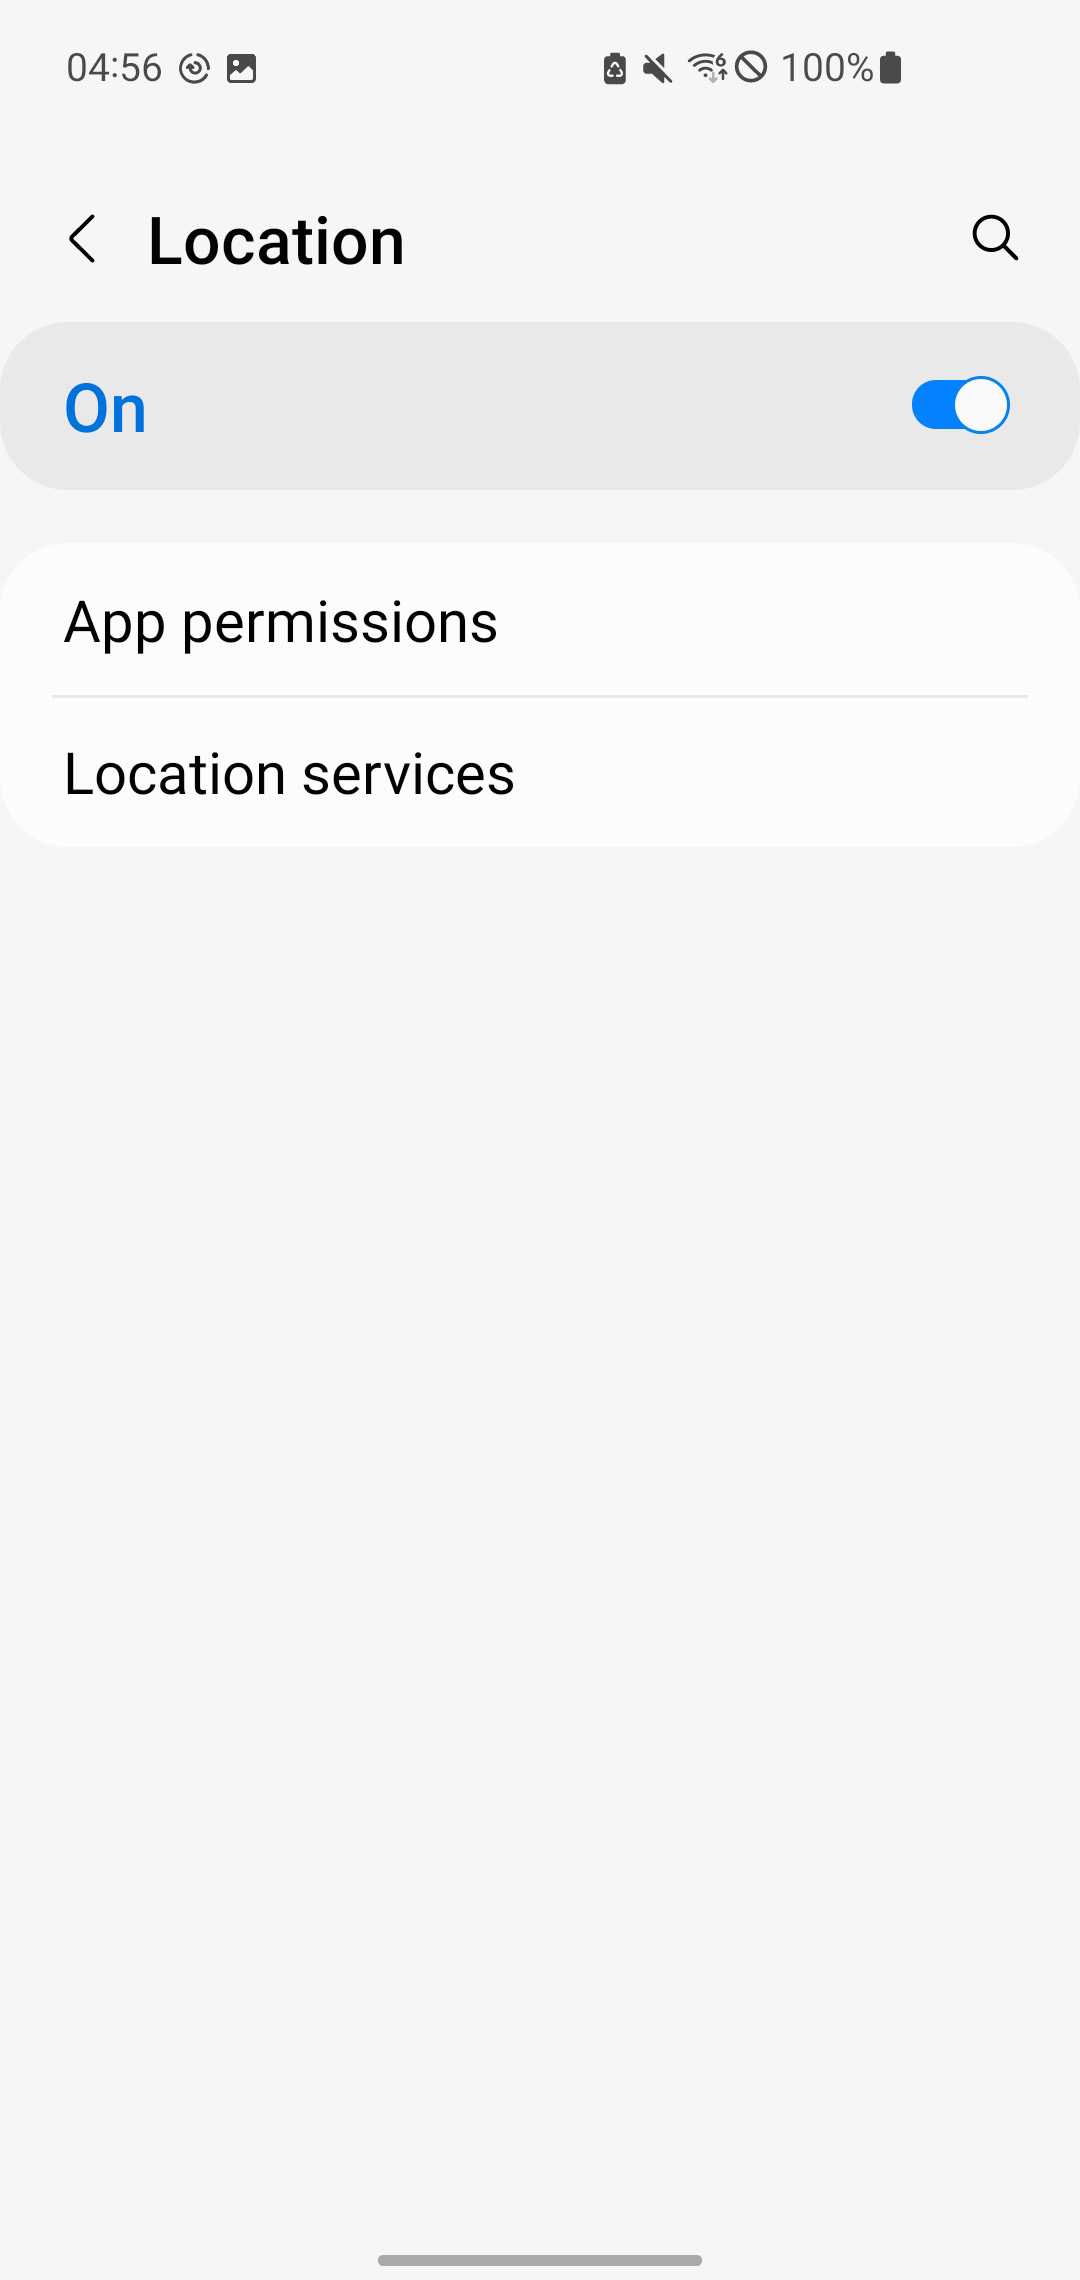
3. Tap App permissions and check Location
Make sure you have enabled it.
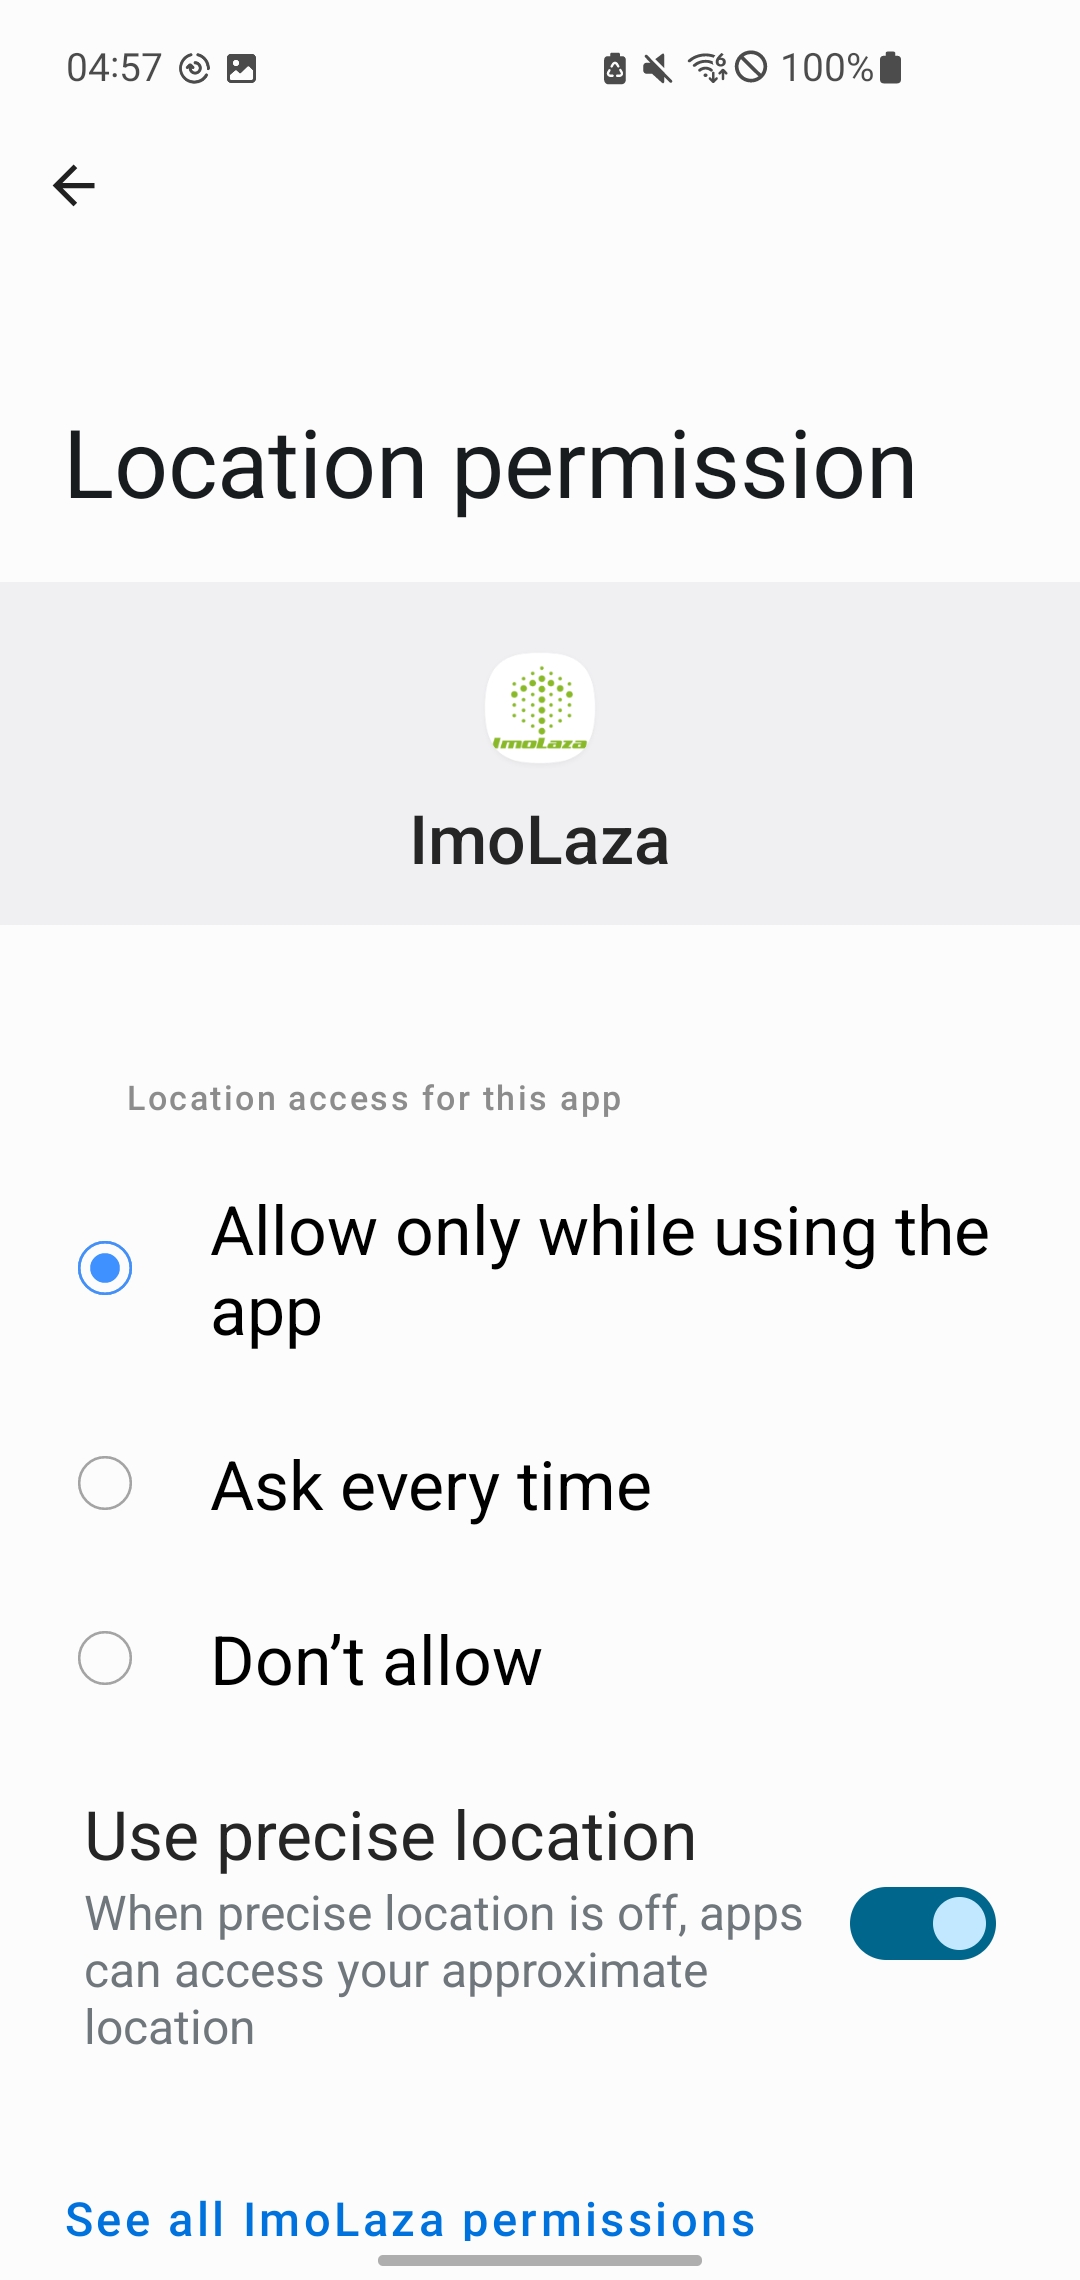
Please note that the method of enabling location services on Android phones may vary depending on the model. Please proceed according to the specific settings on your phone.
In case the above method doesn’t work for you, please contact our technical support team directly using the contact information below. We will respond to you by email within 12h after your message reaches us.
Email: Support@imolaza.com
Author: Imolaza
Last update: 2023-08-28 11:37
Do you know that you can set up an ImoLaza controller in just 3 minutes? Here's a detailed guide to help you through the process. The setup process is simple and consists of two easy steps: preparation and connecting to your home WiFi.
For iOS users:
Let's start with the first step. First, ensure your device is ready and that Location and Bluetooth permissions are enabled. Swipe down from the top of the screen to access the control center, then tap the Bluetooth icon to turn it on.
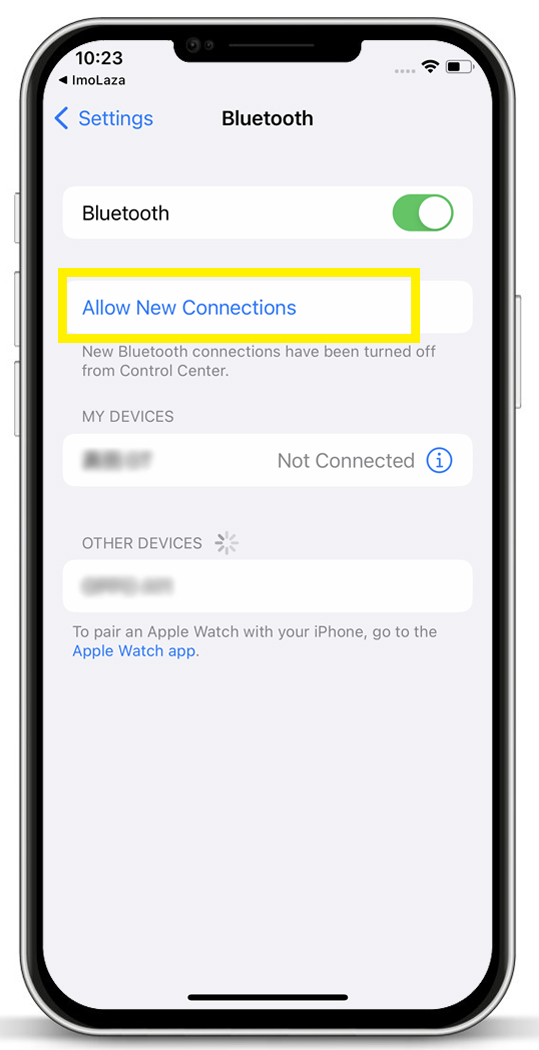
Next, go back to the home screen, tap "Settings," find "Privacy & Security," then tap "Location Services" and make sure it is turned on as well.
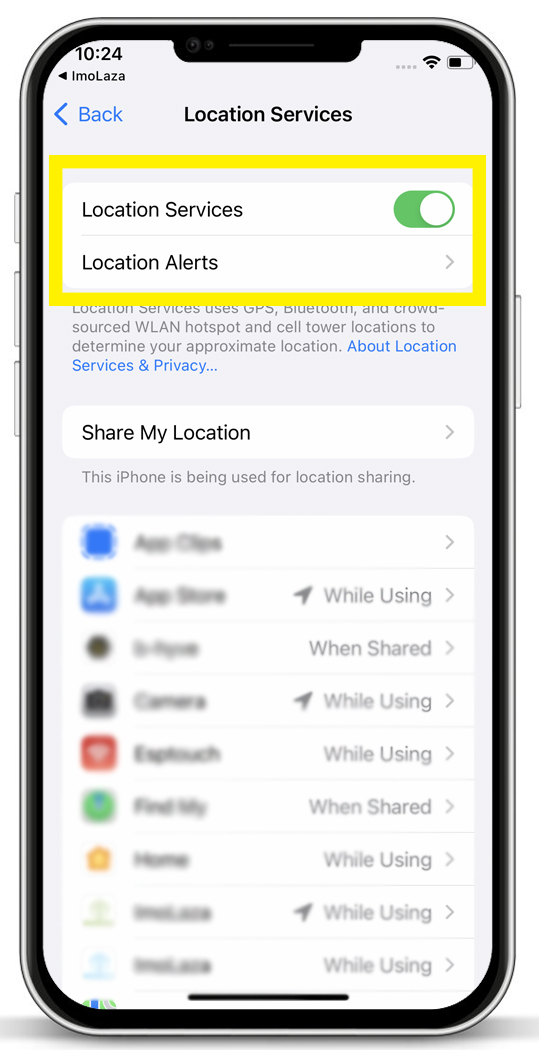
Now, proceed to the second step: connecting the controller to your home WiFi. Place your phone within 10 feet of the device. Wait for the app to scan for the device, then tap on your device when it appears.
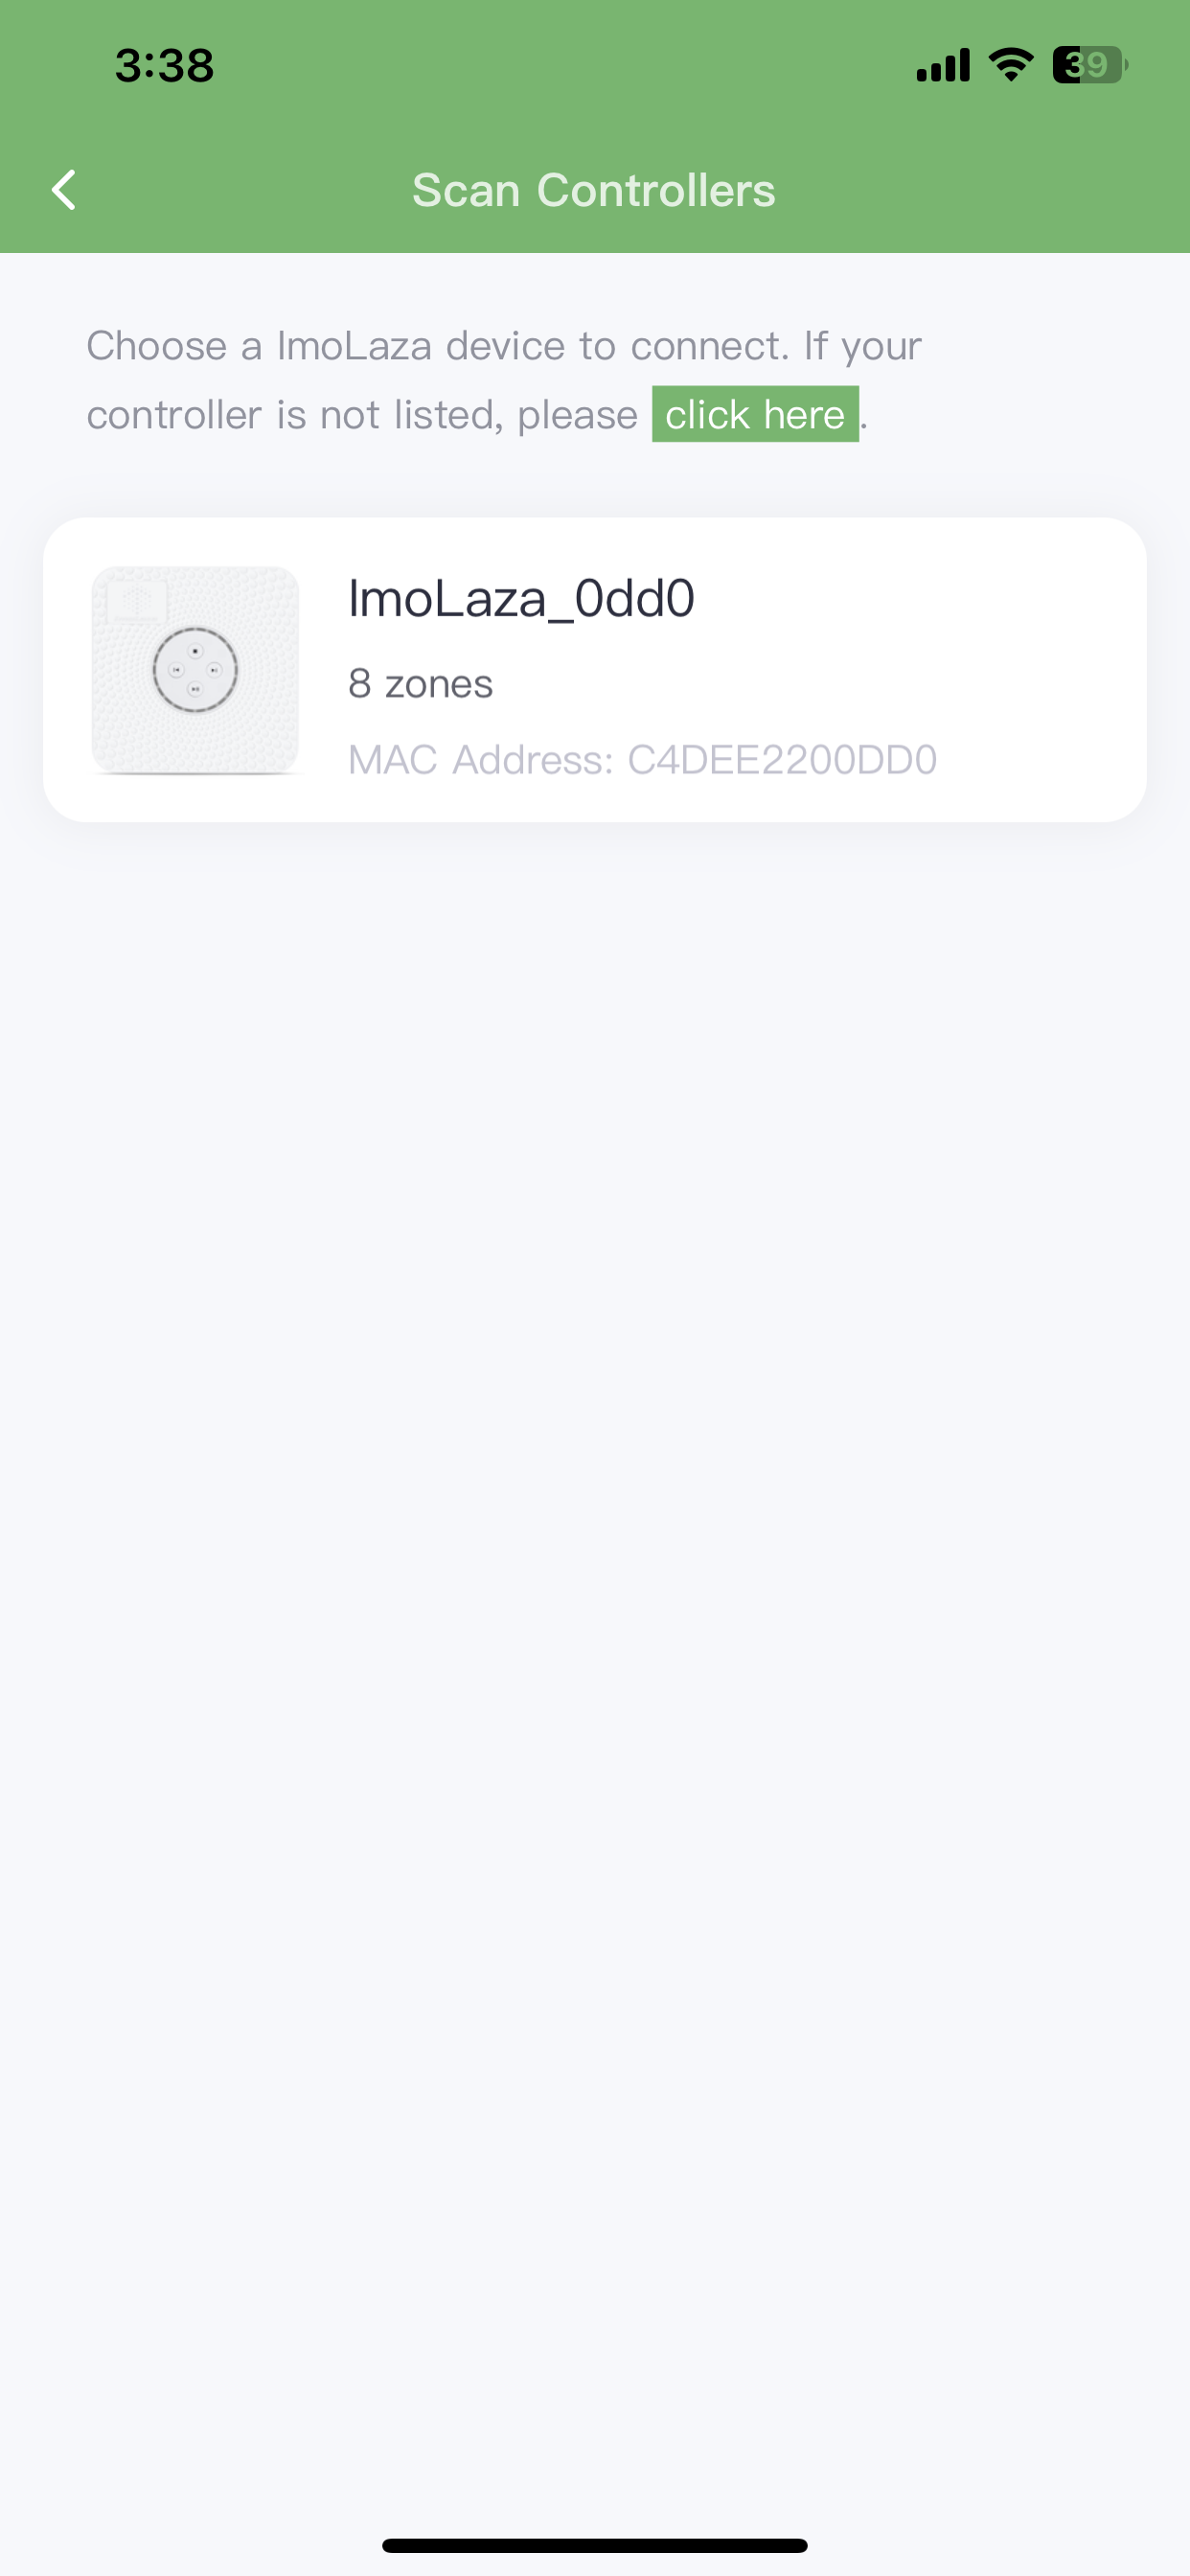
Start by giving your controller an easily recognizable name,
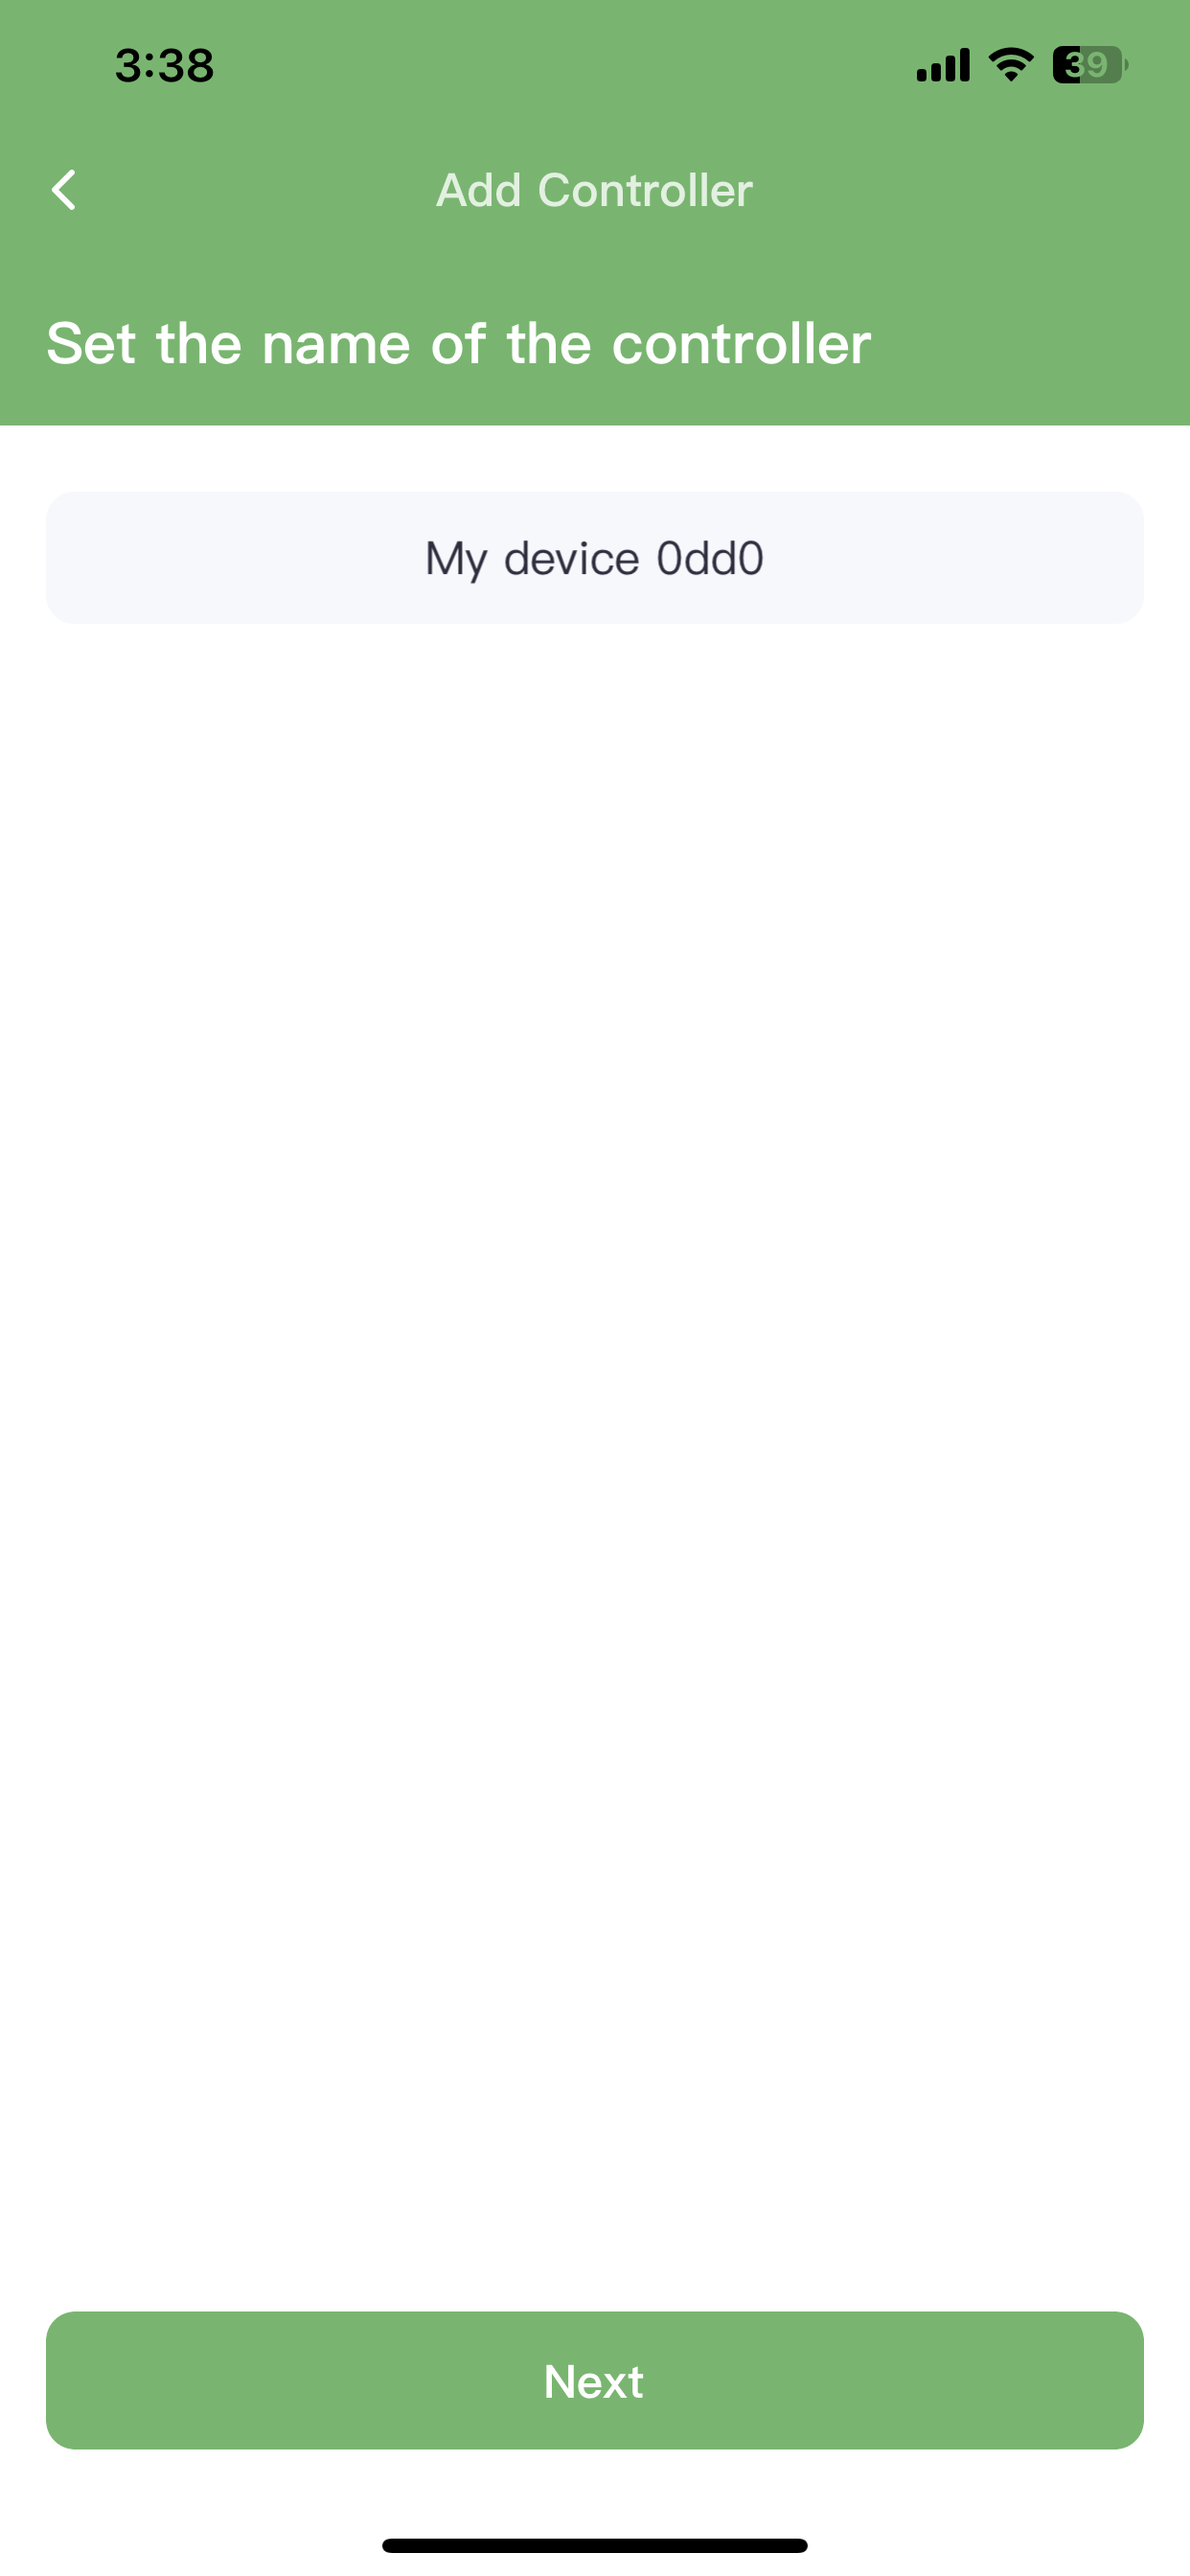
then tap "Get Phone WiFi" to connect to your phone’s WiFi. Note that your phone must be connected to a 2.4GHz WiFi network. Enter the correct WiFi password, then transmit the information to the server. After that, return to the connection screen and tap "Next" to start the connection process.
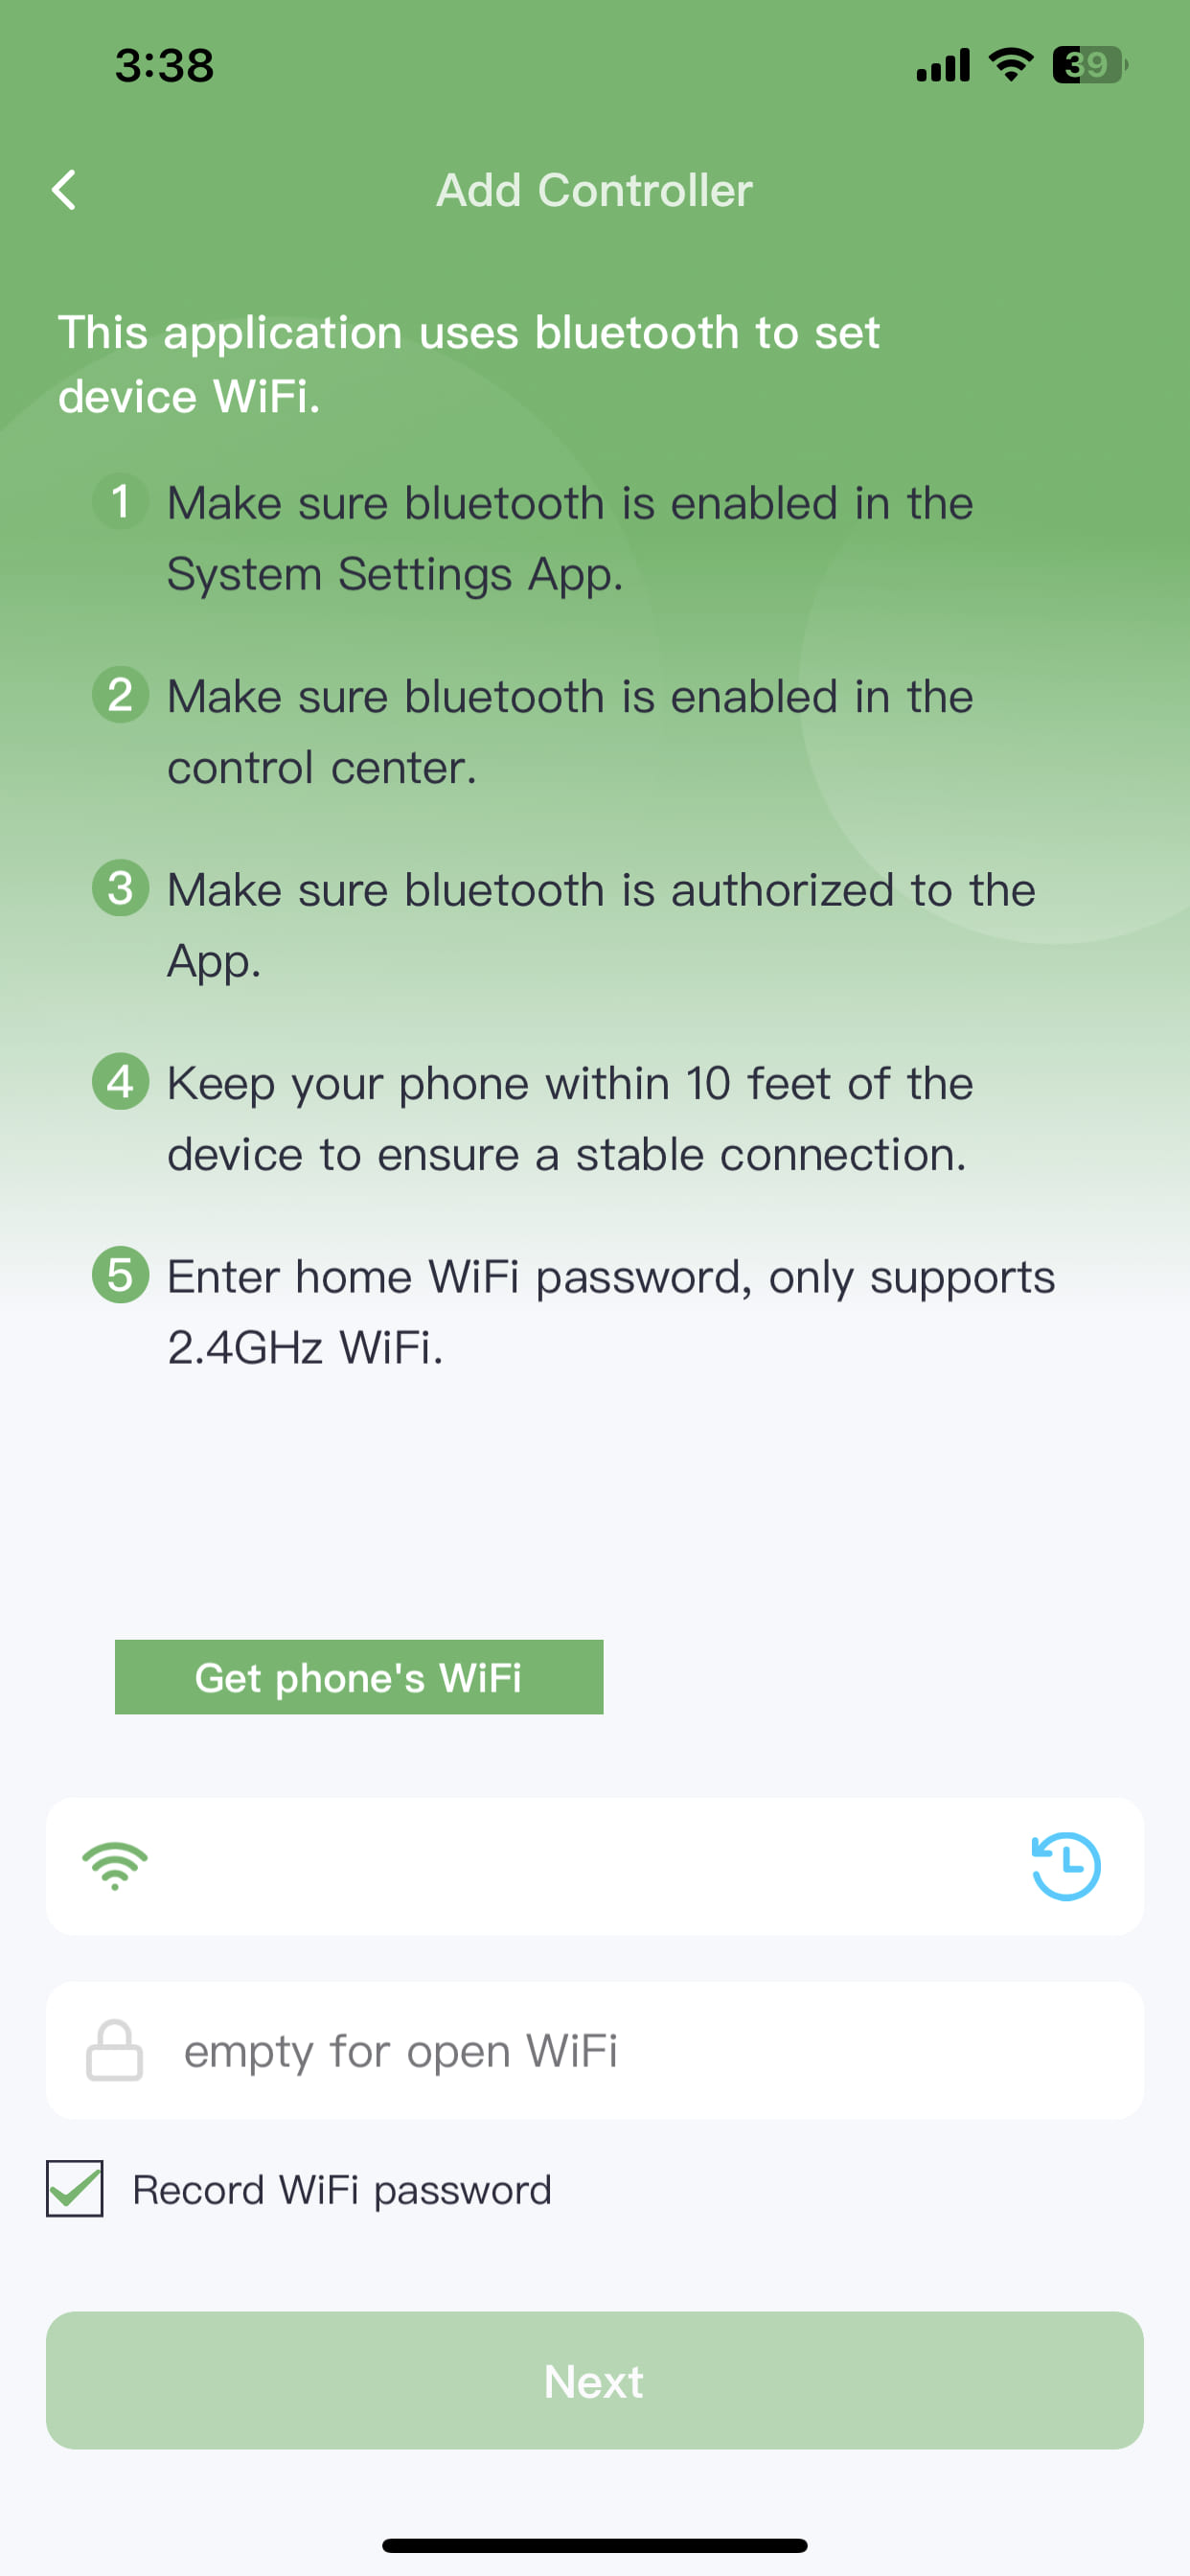
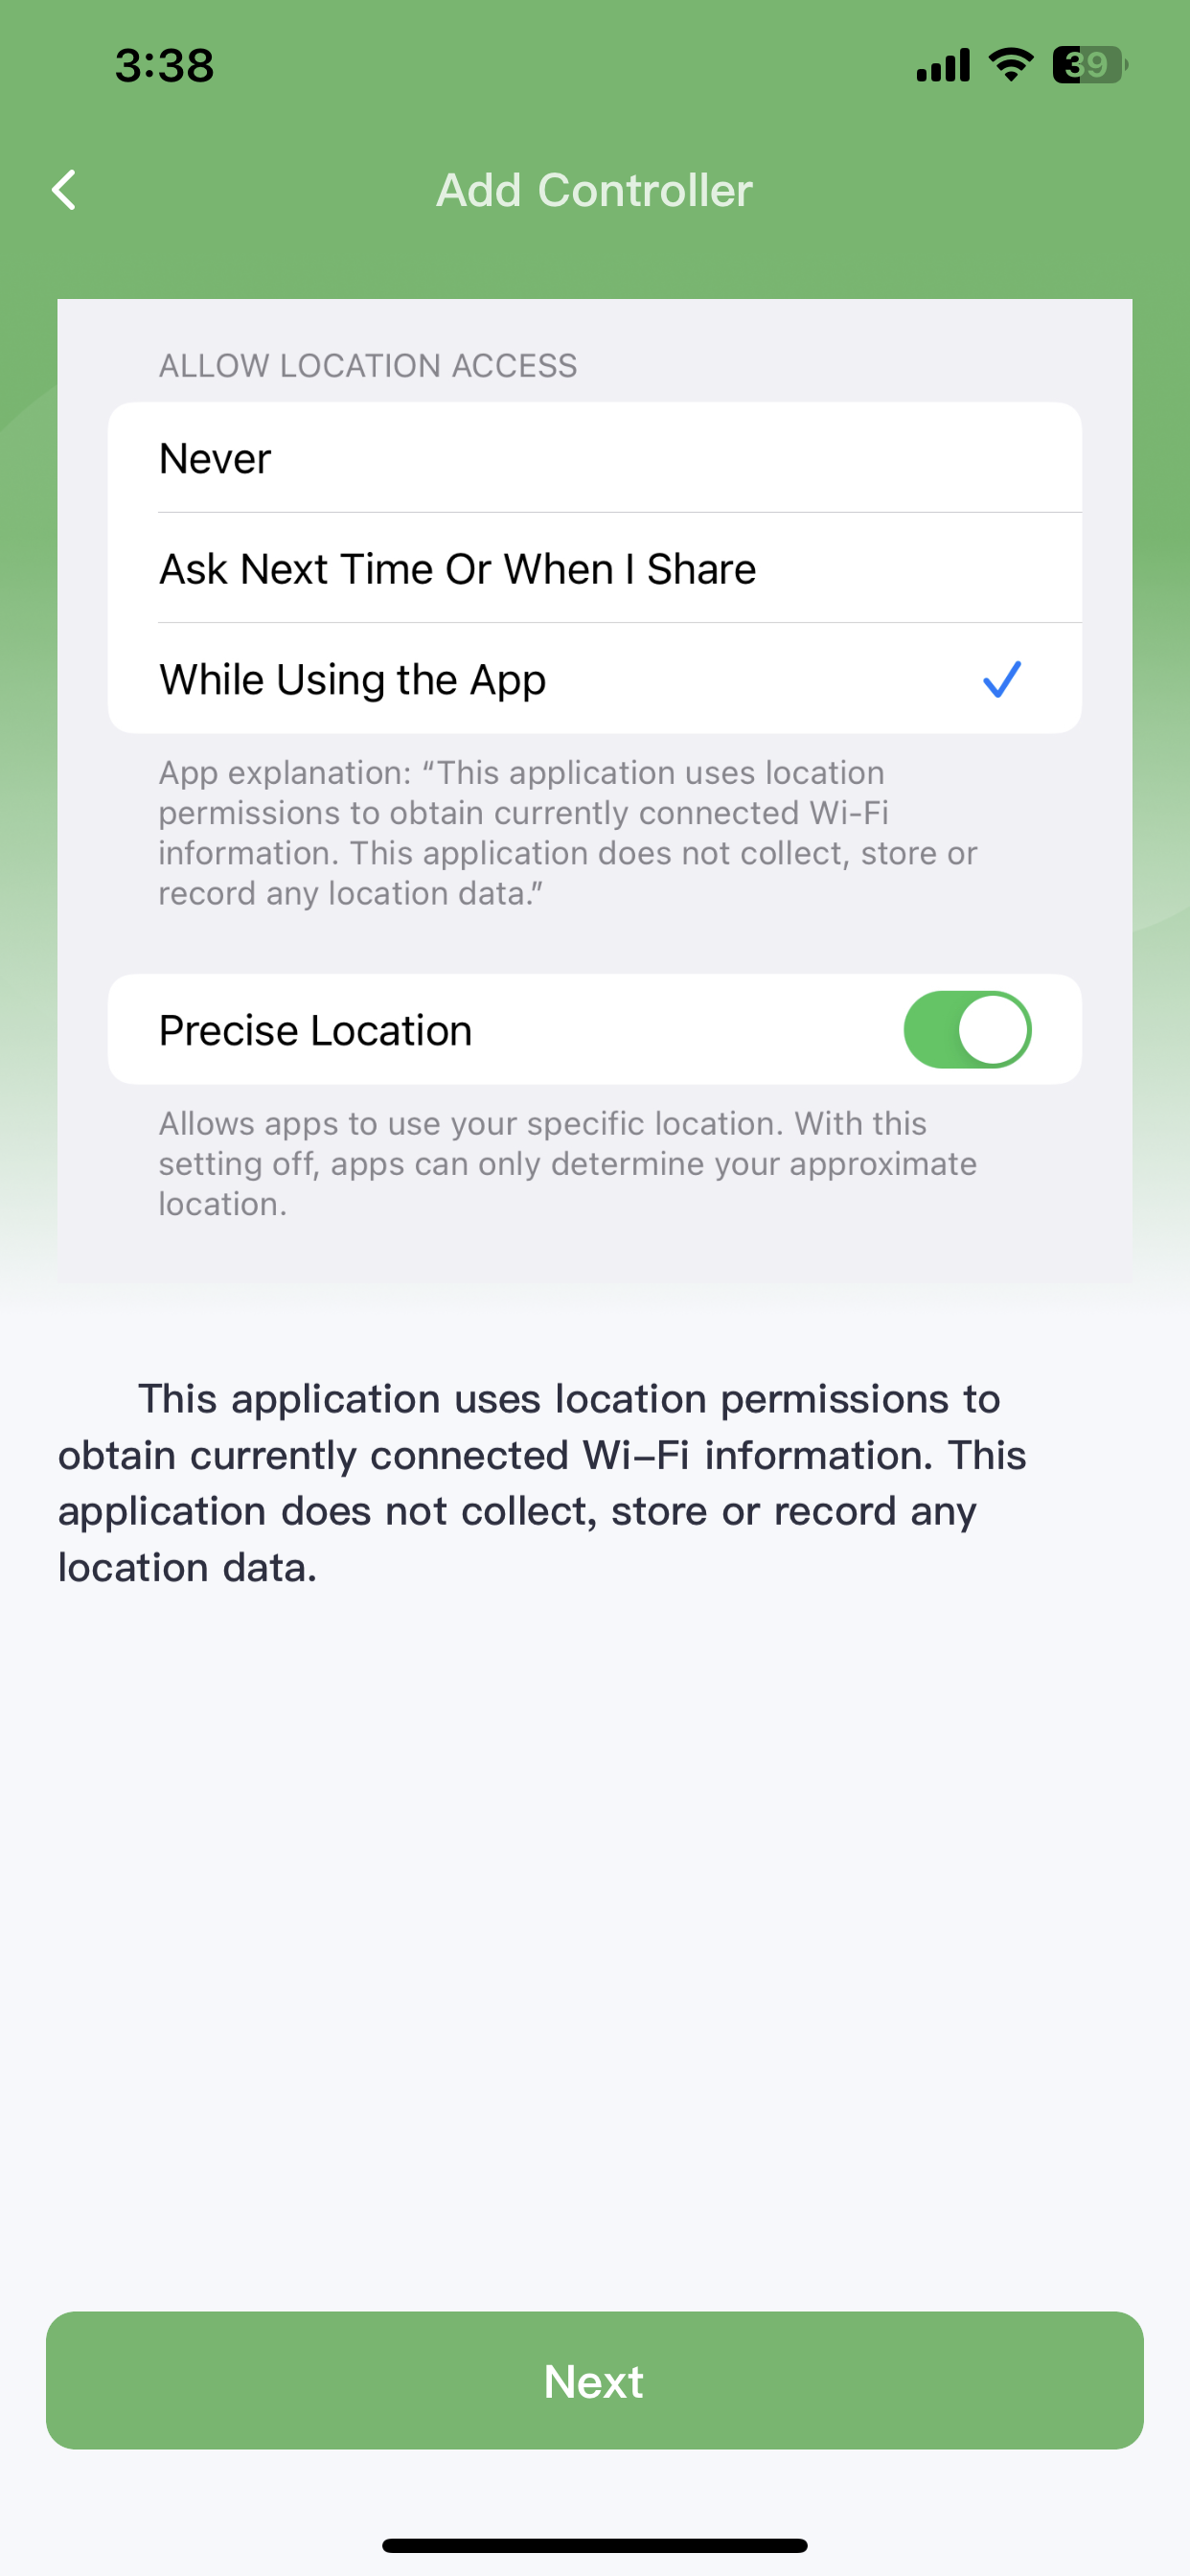
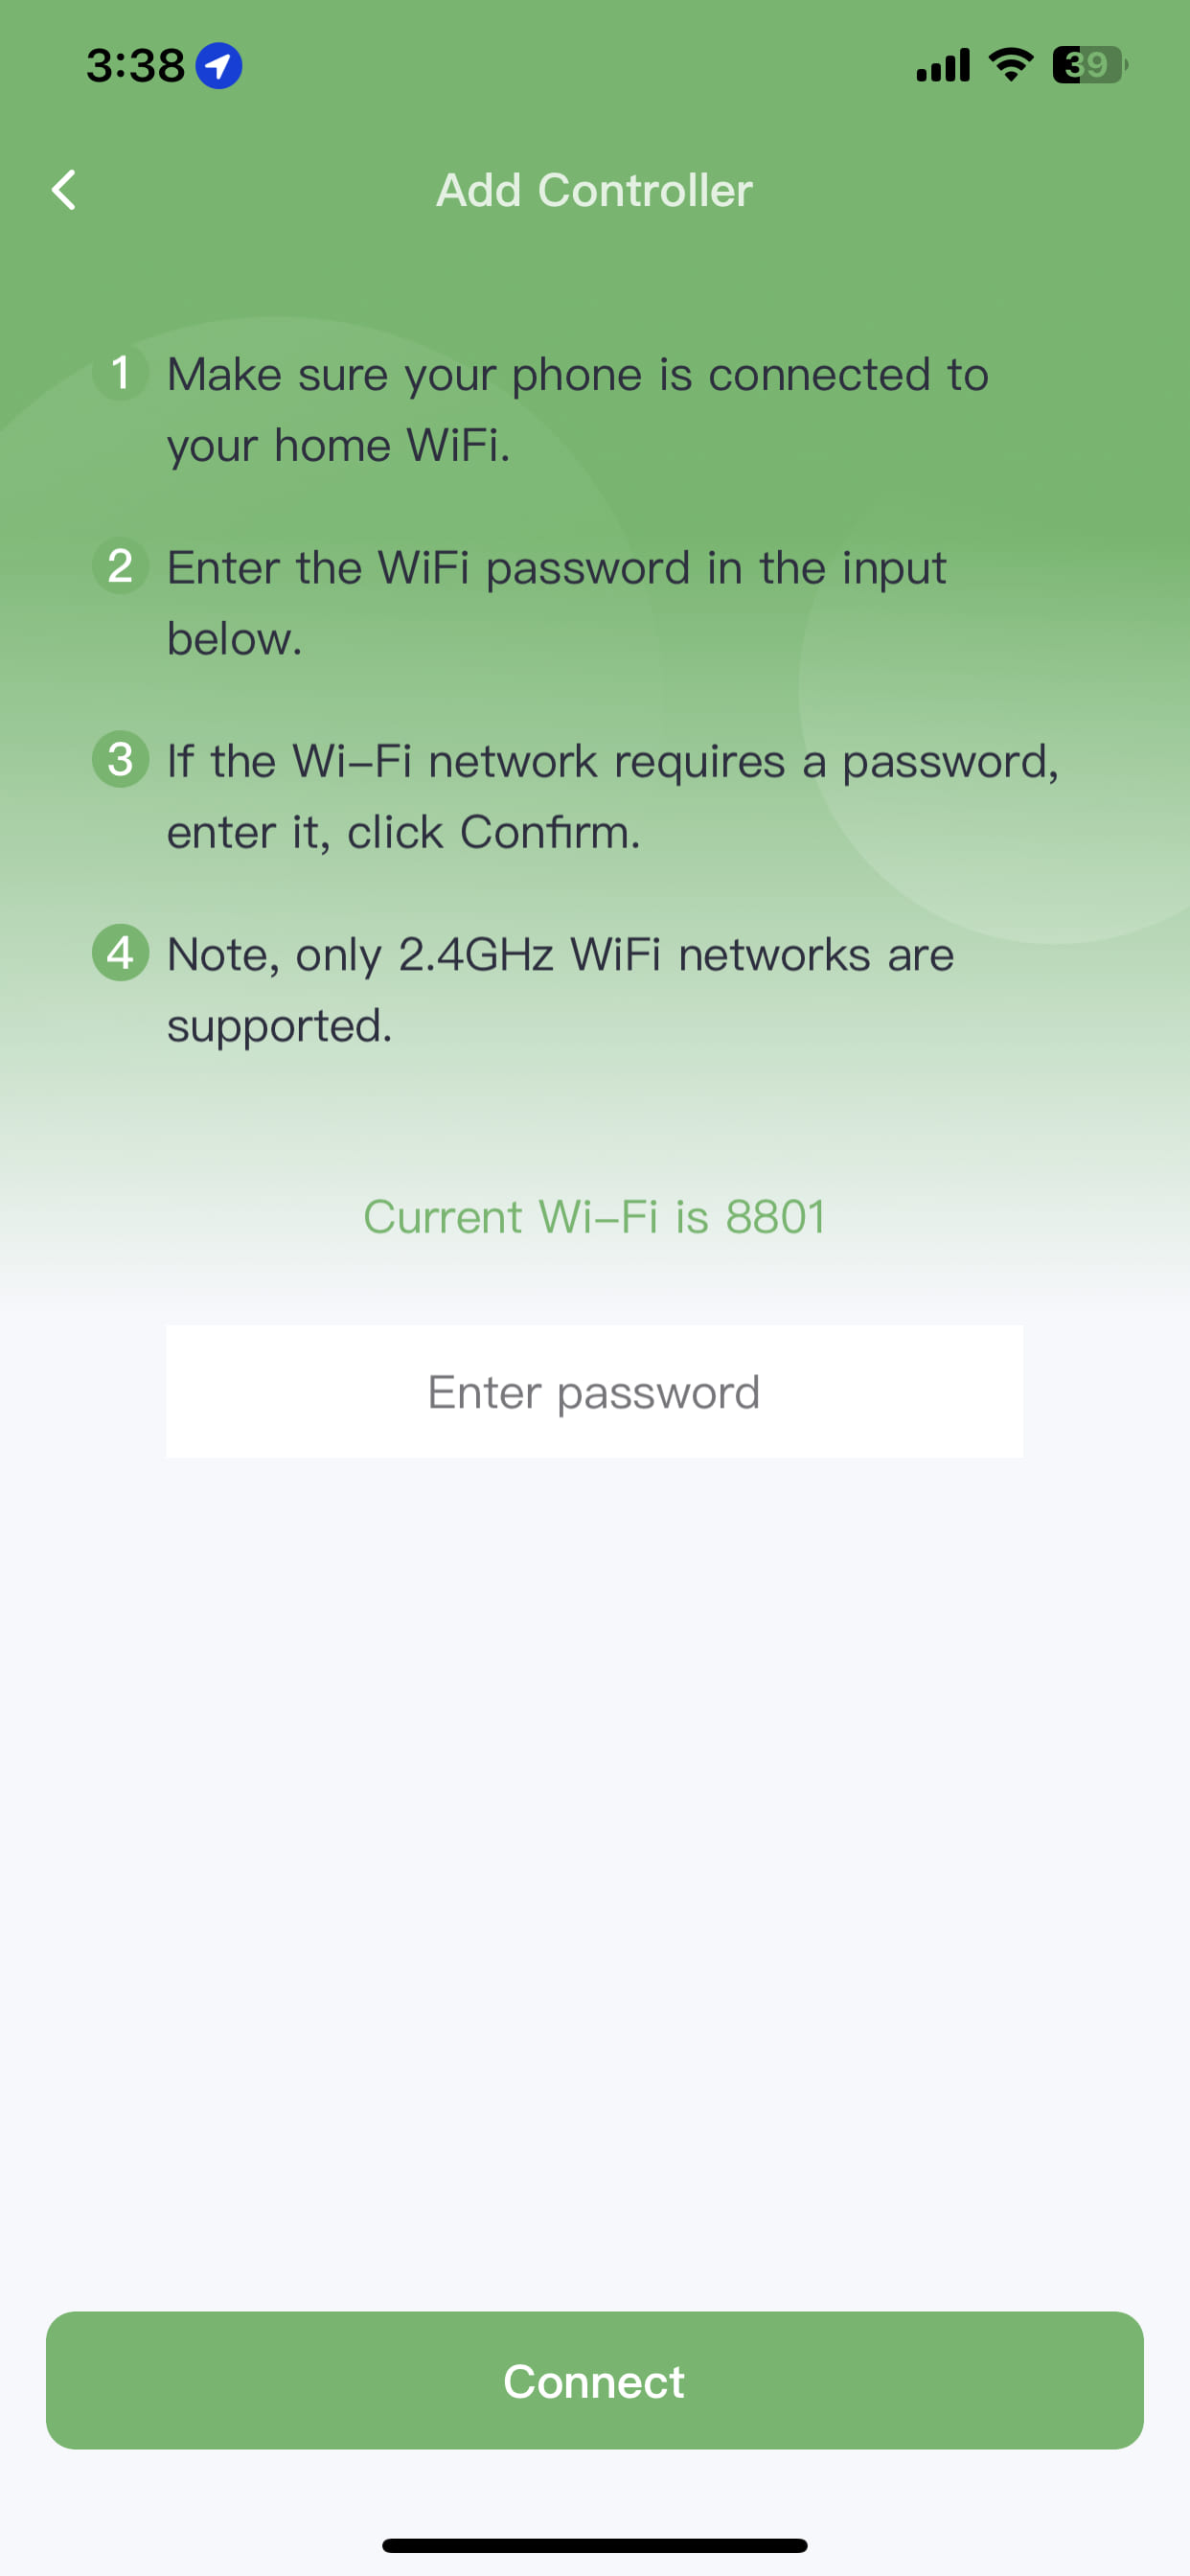
When you see this screen, congratulations, your device has been successfully added!
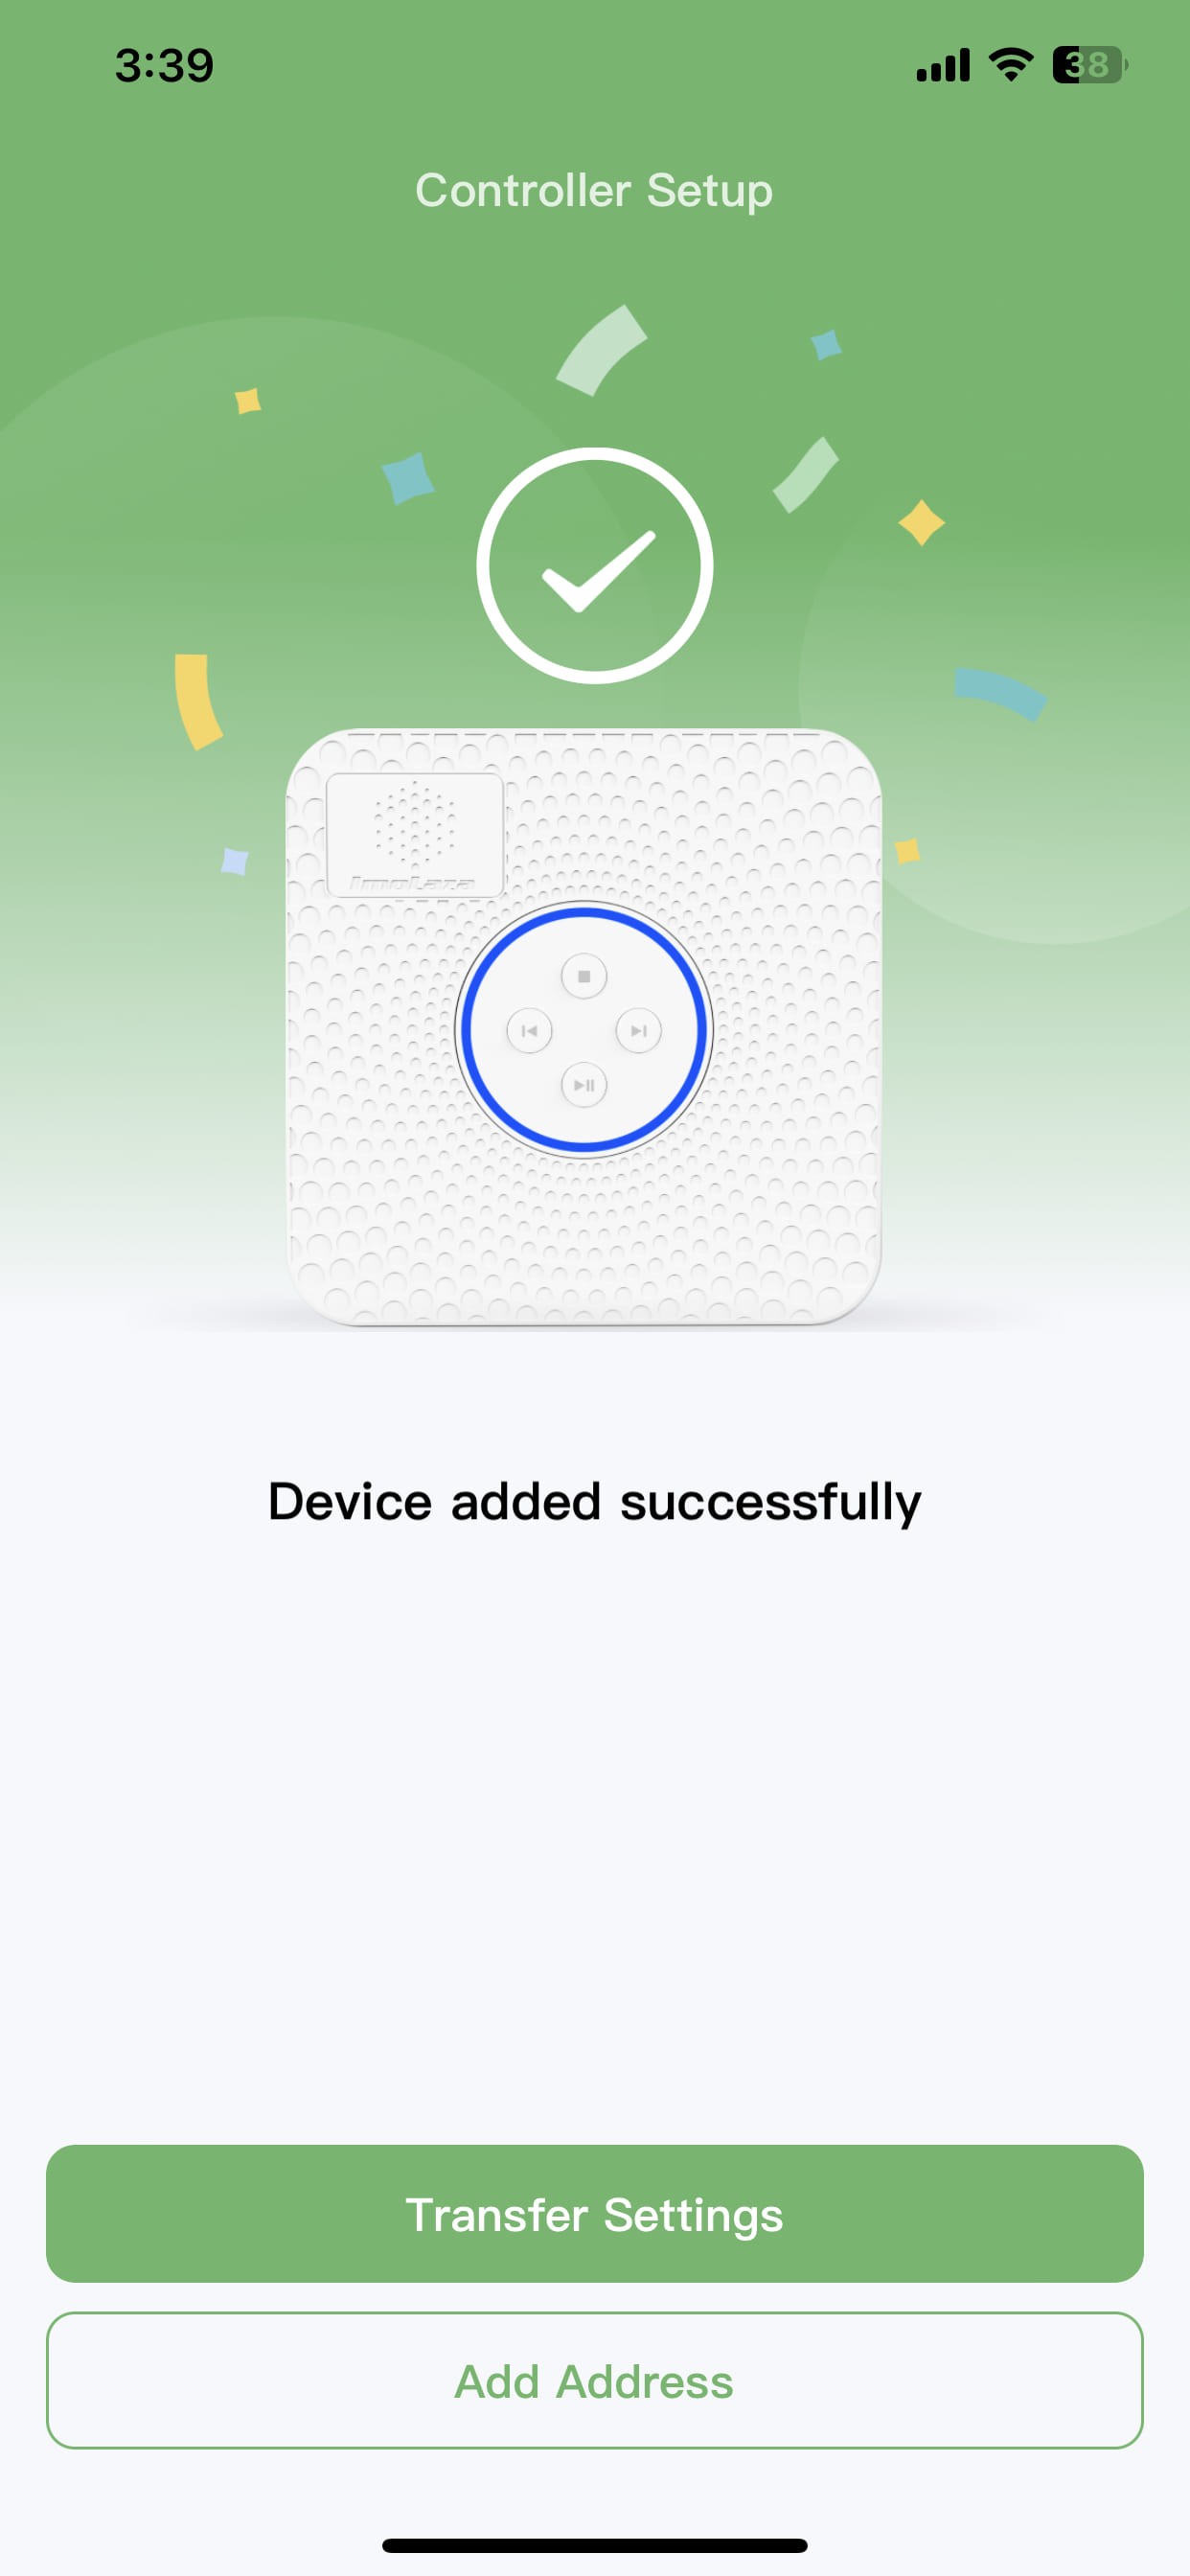
Next, you need to provide the address information for your controller. Simply enter your street address in the input box, and the system will automatically detect your location.
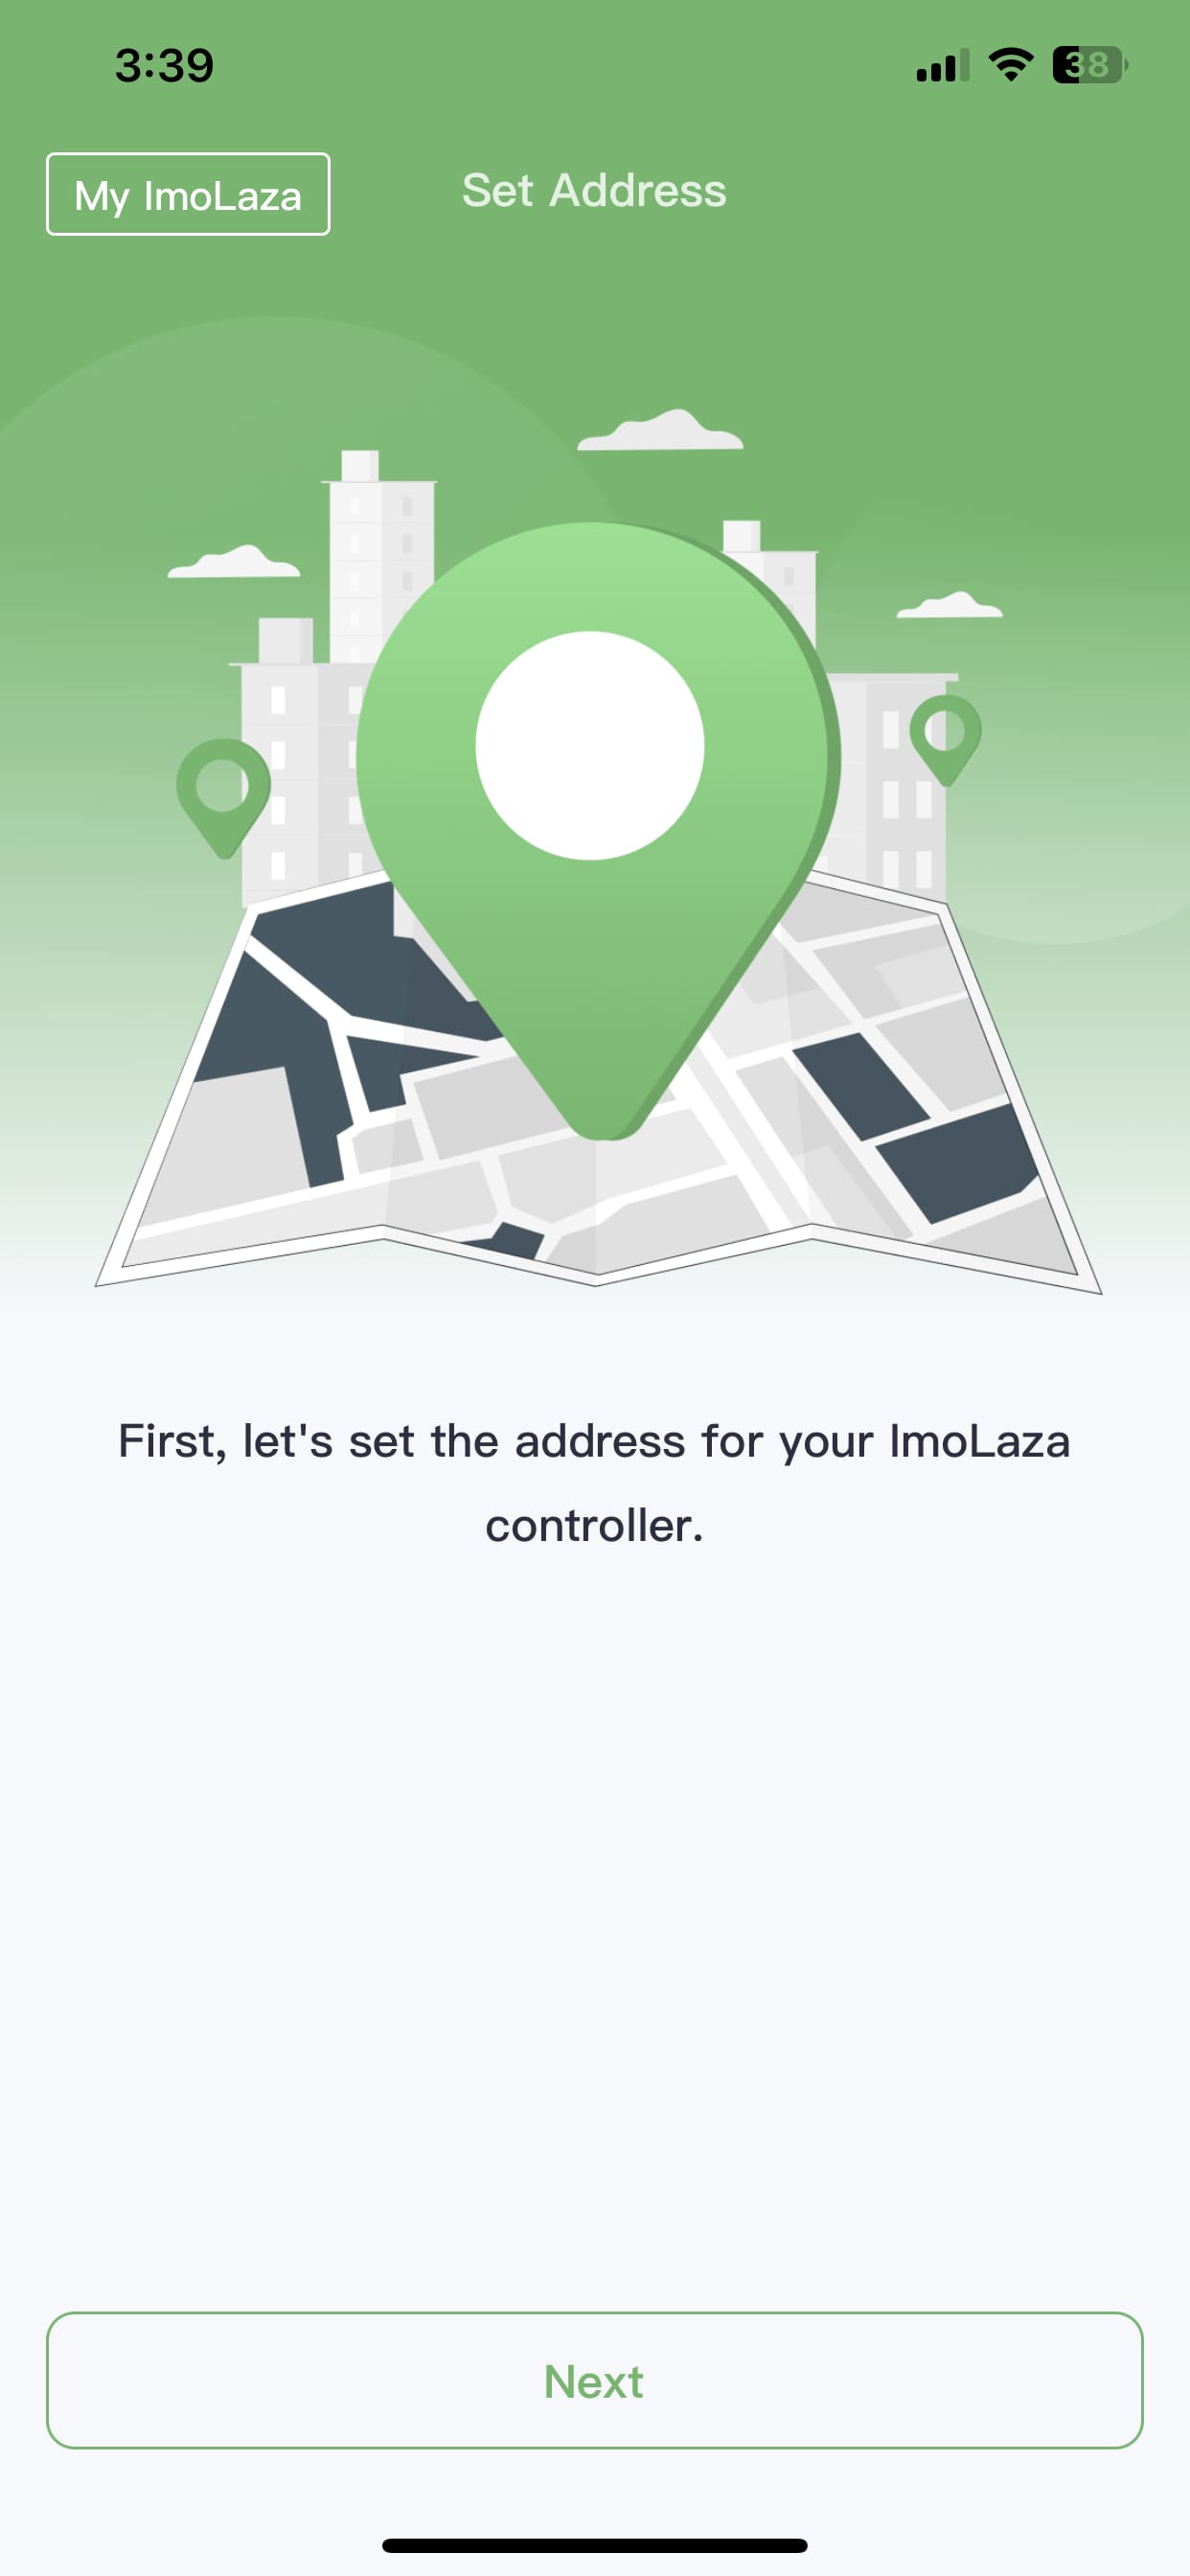
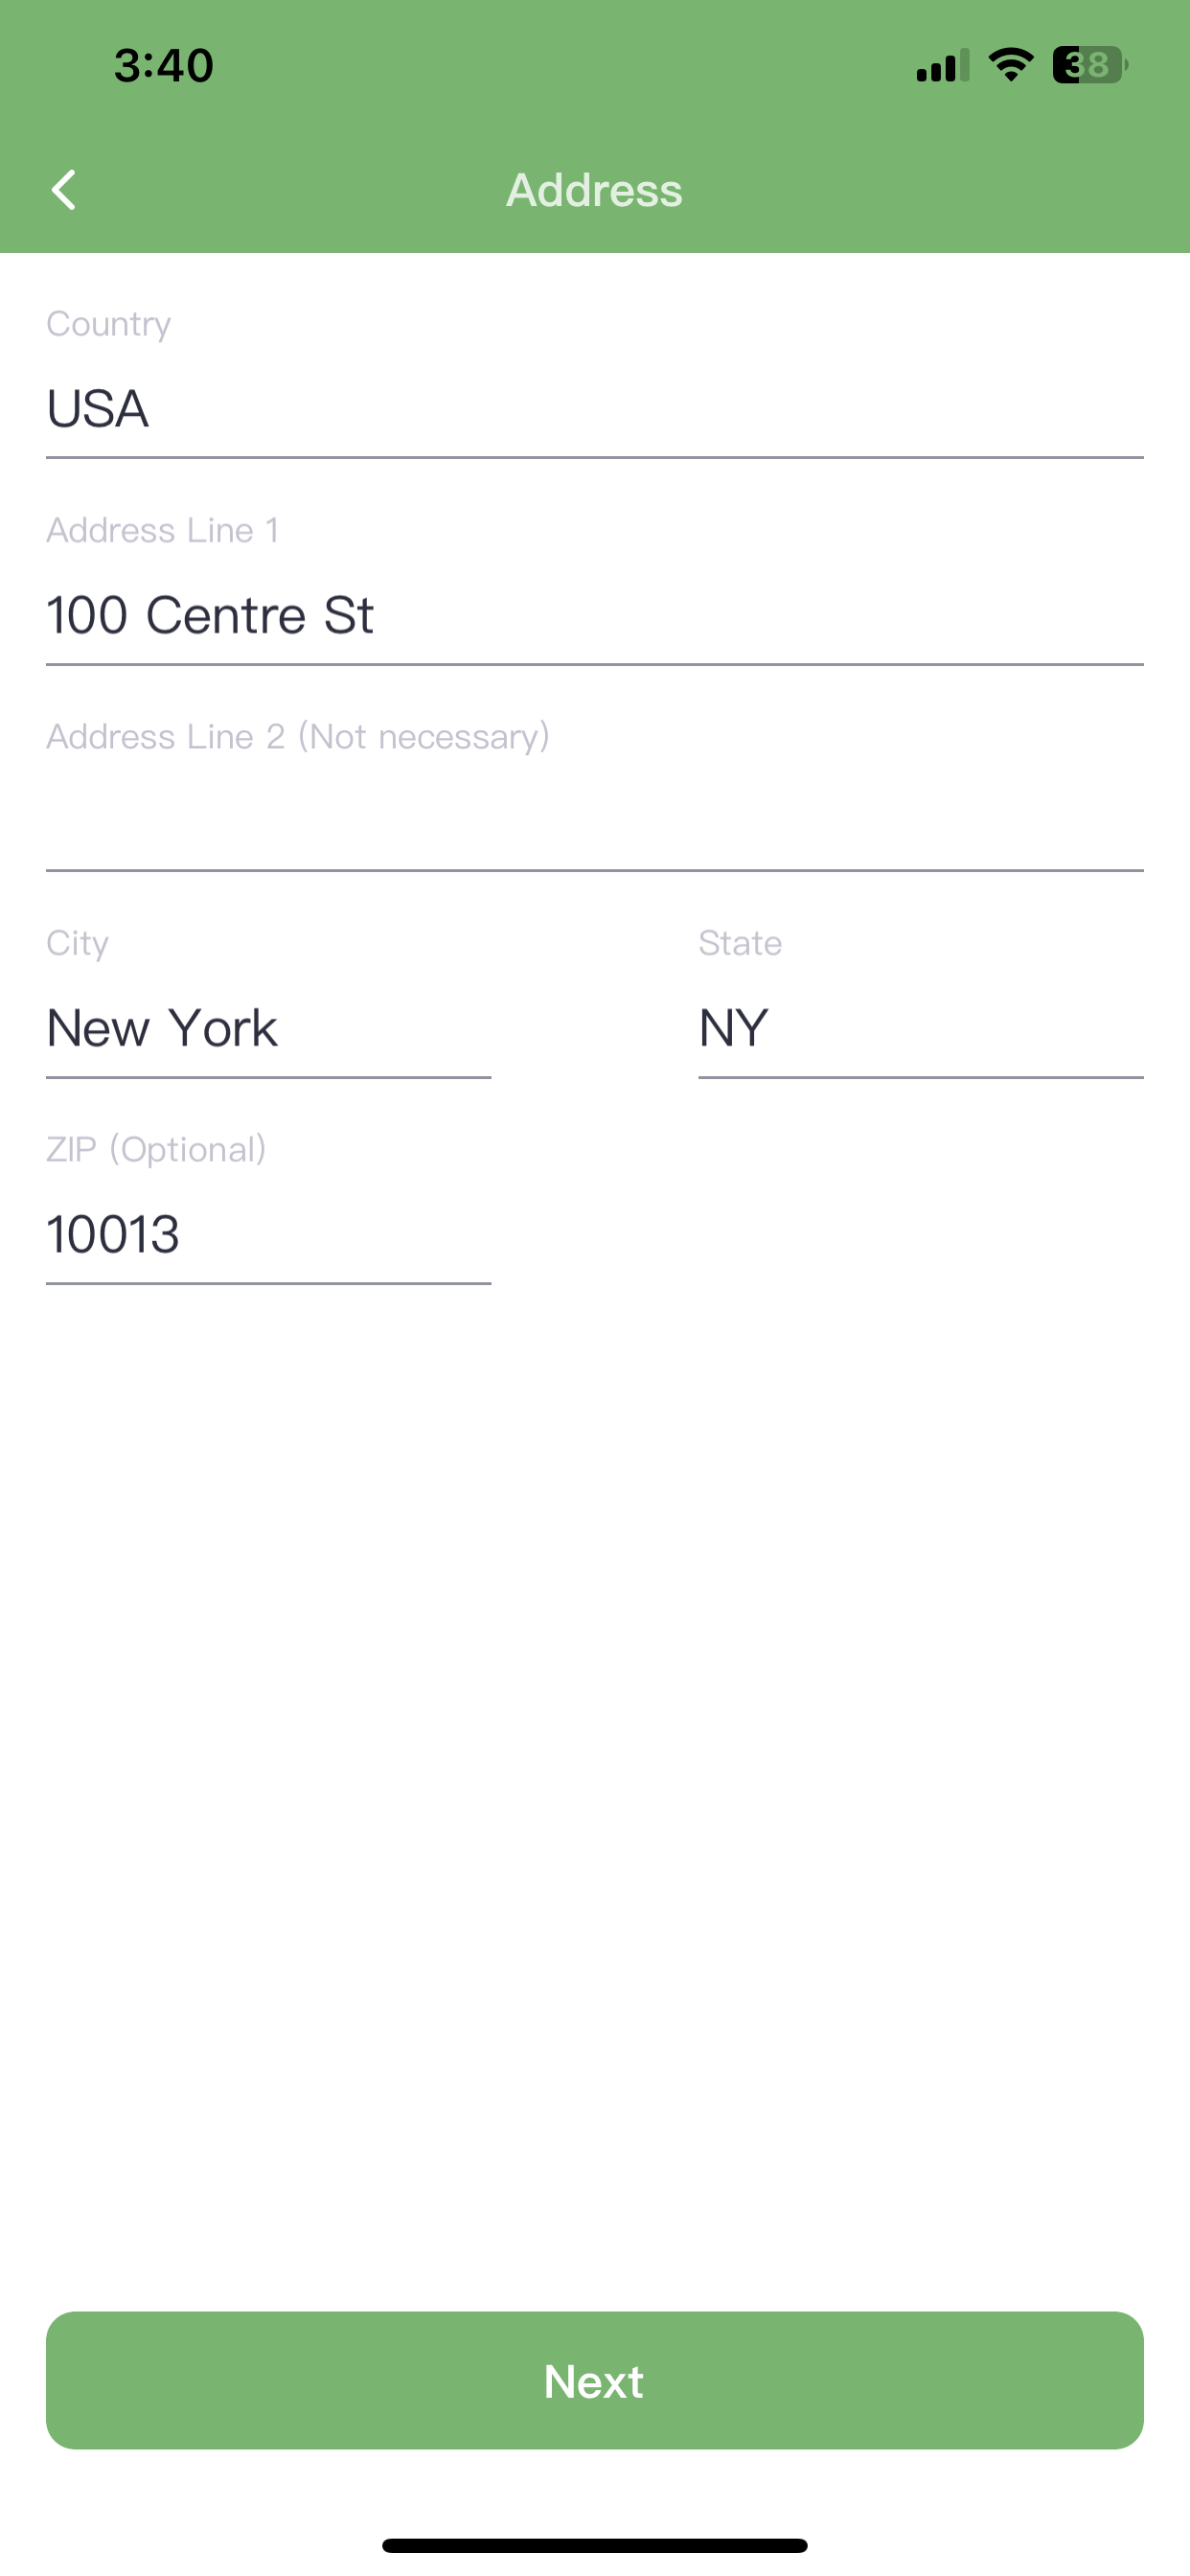
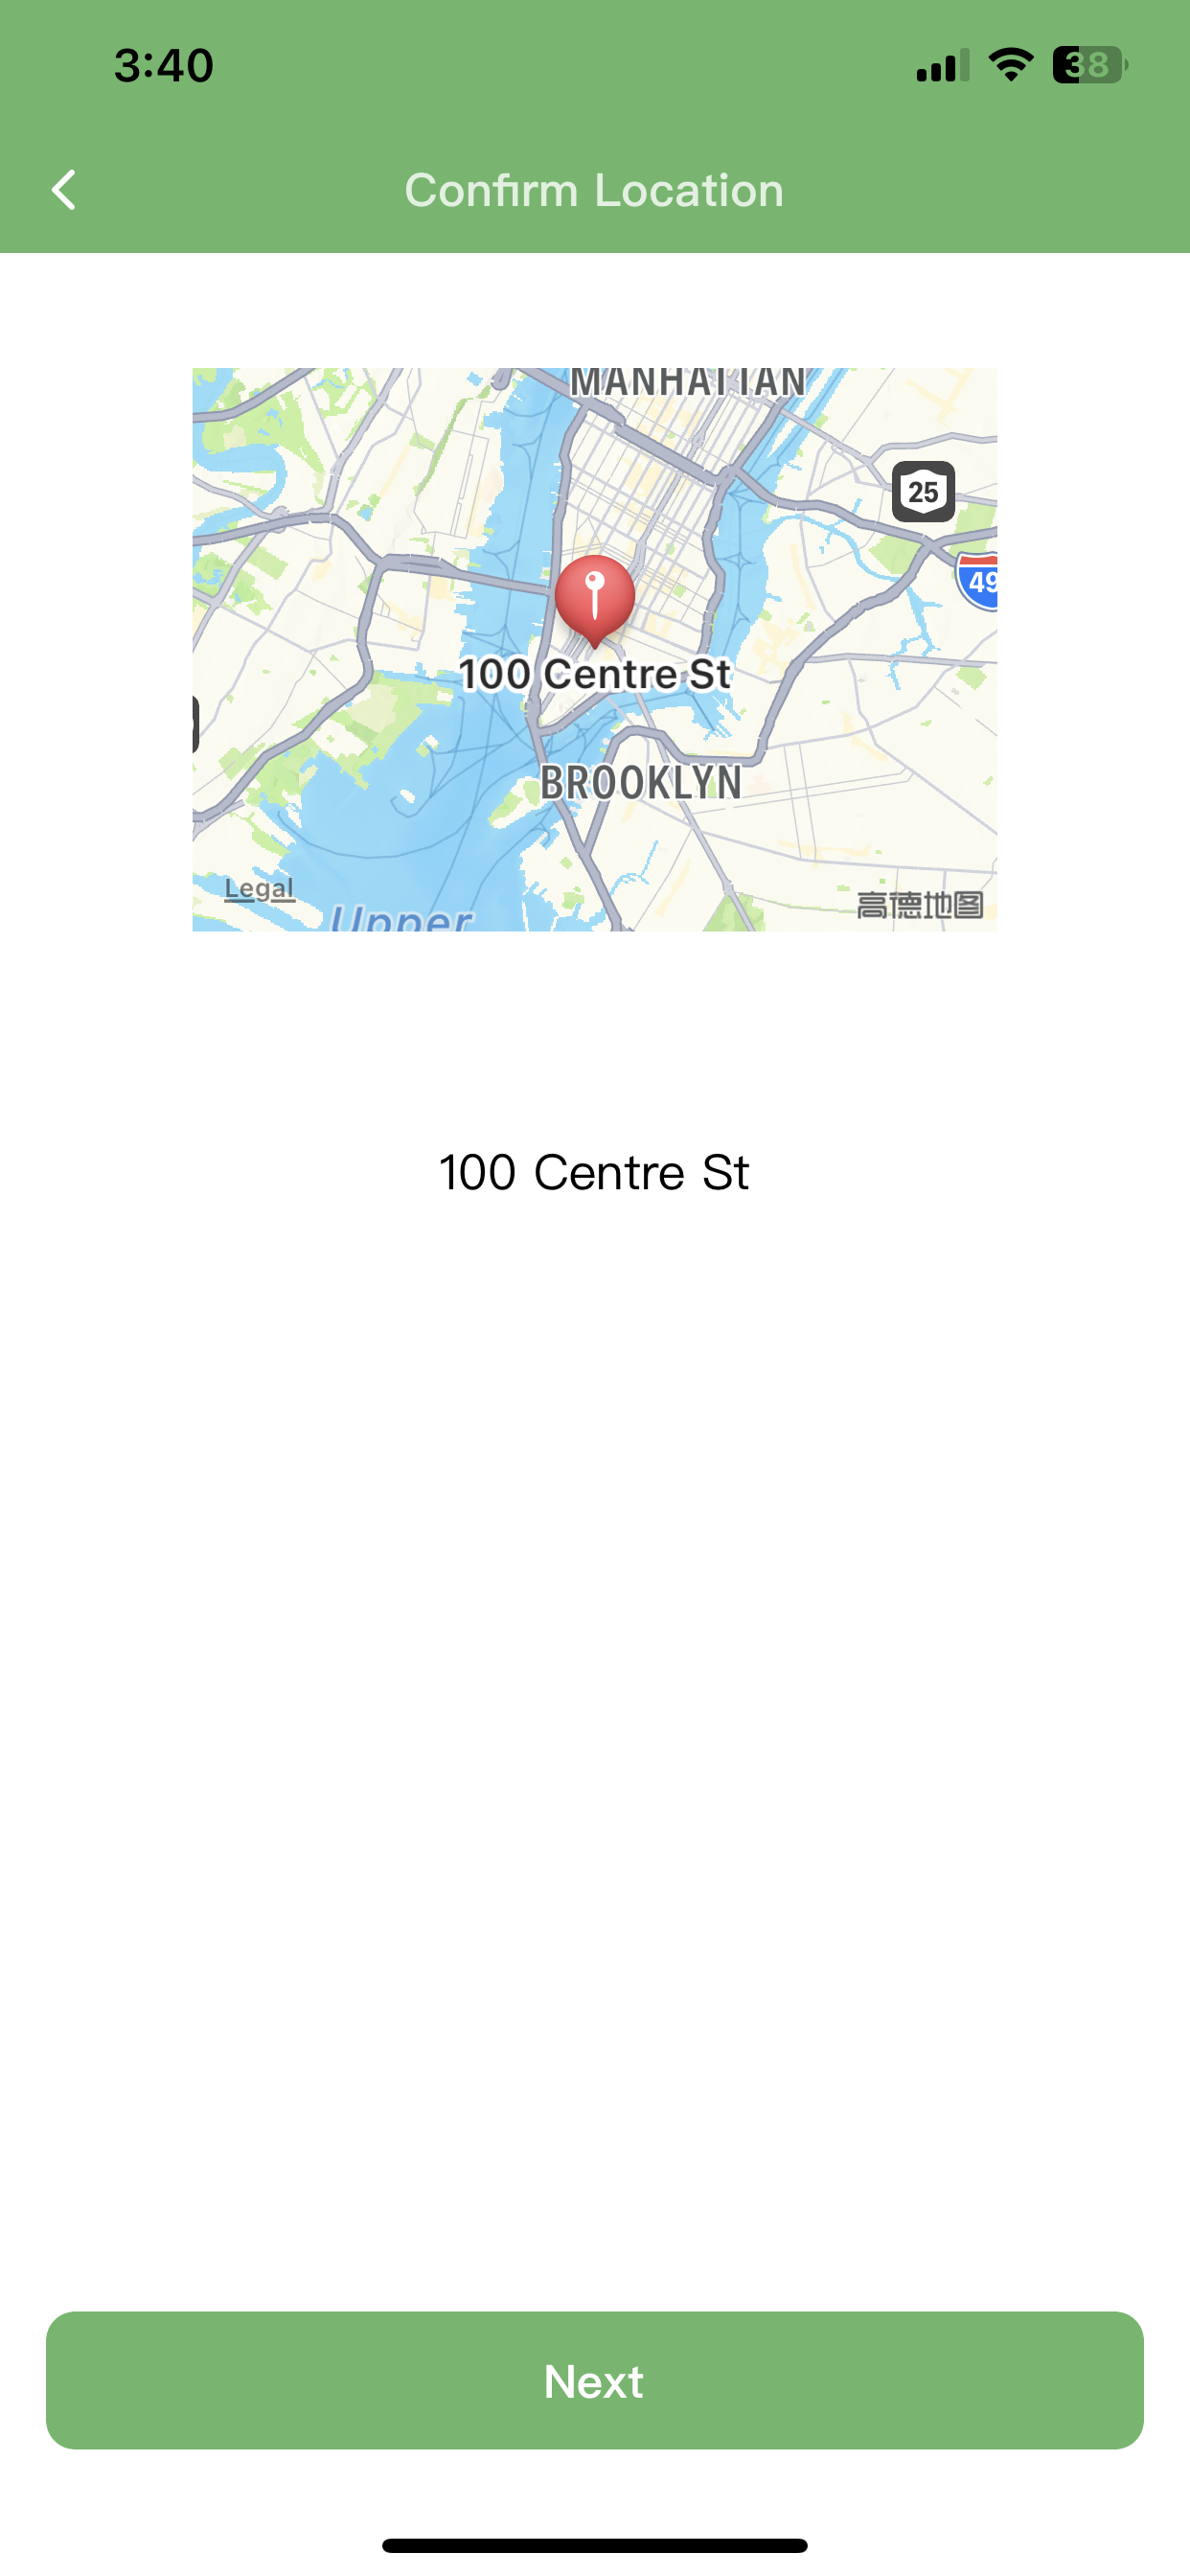
Then, select a nearby weather station to guide your controller’s operation. Remember, the more accurate your address, the closer the selected weather station will be to your location. We recommend checking "Allow system recommendation" so the system can automatically switch to other available weather stations if needed.
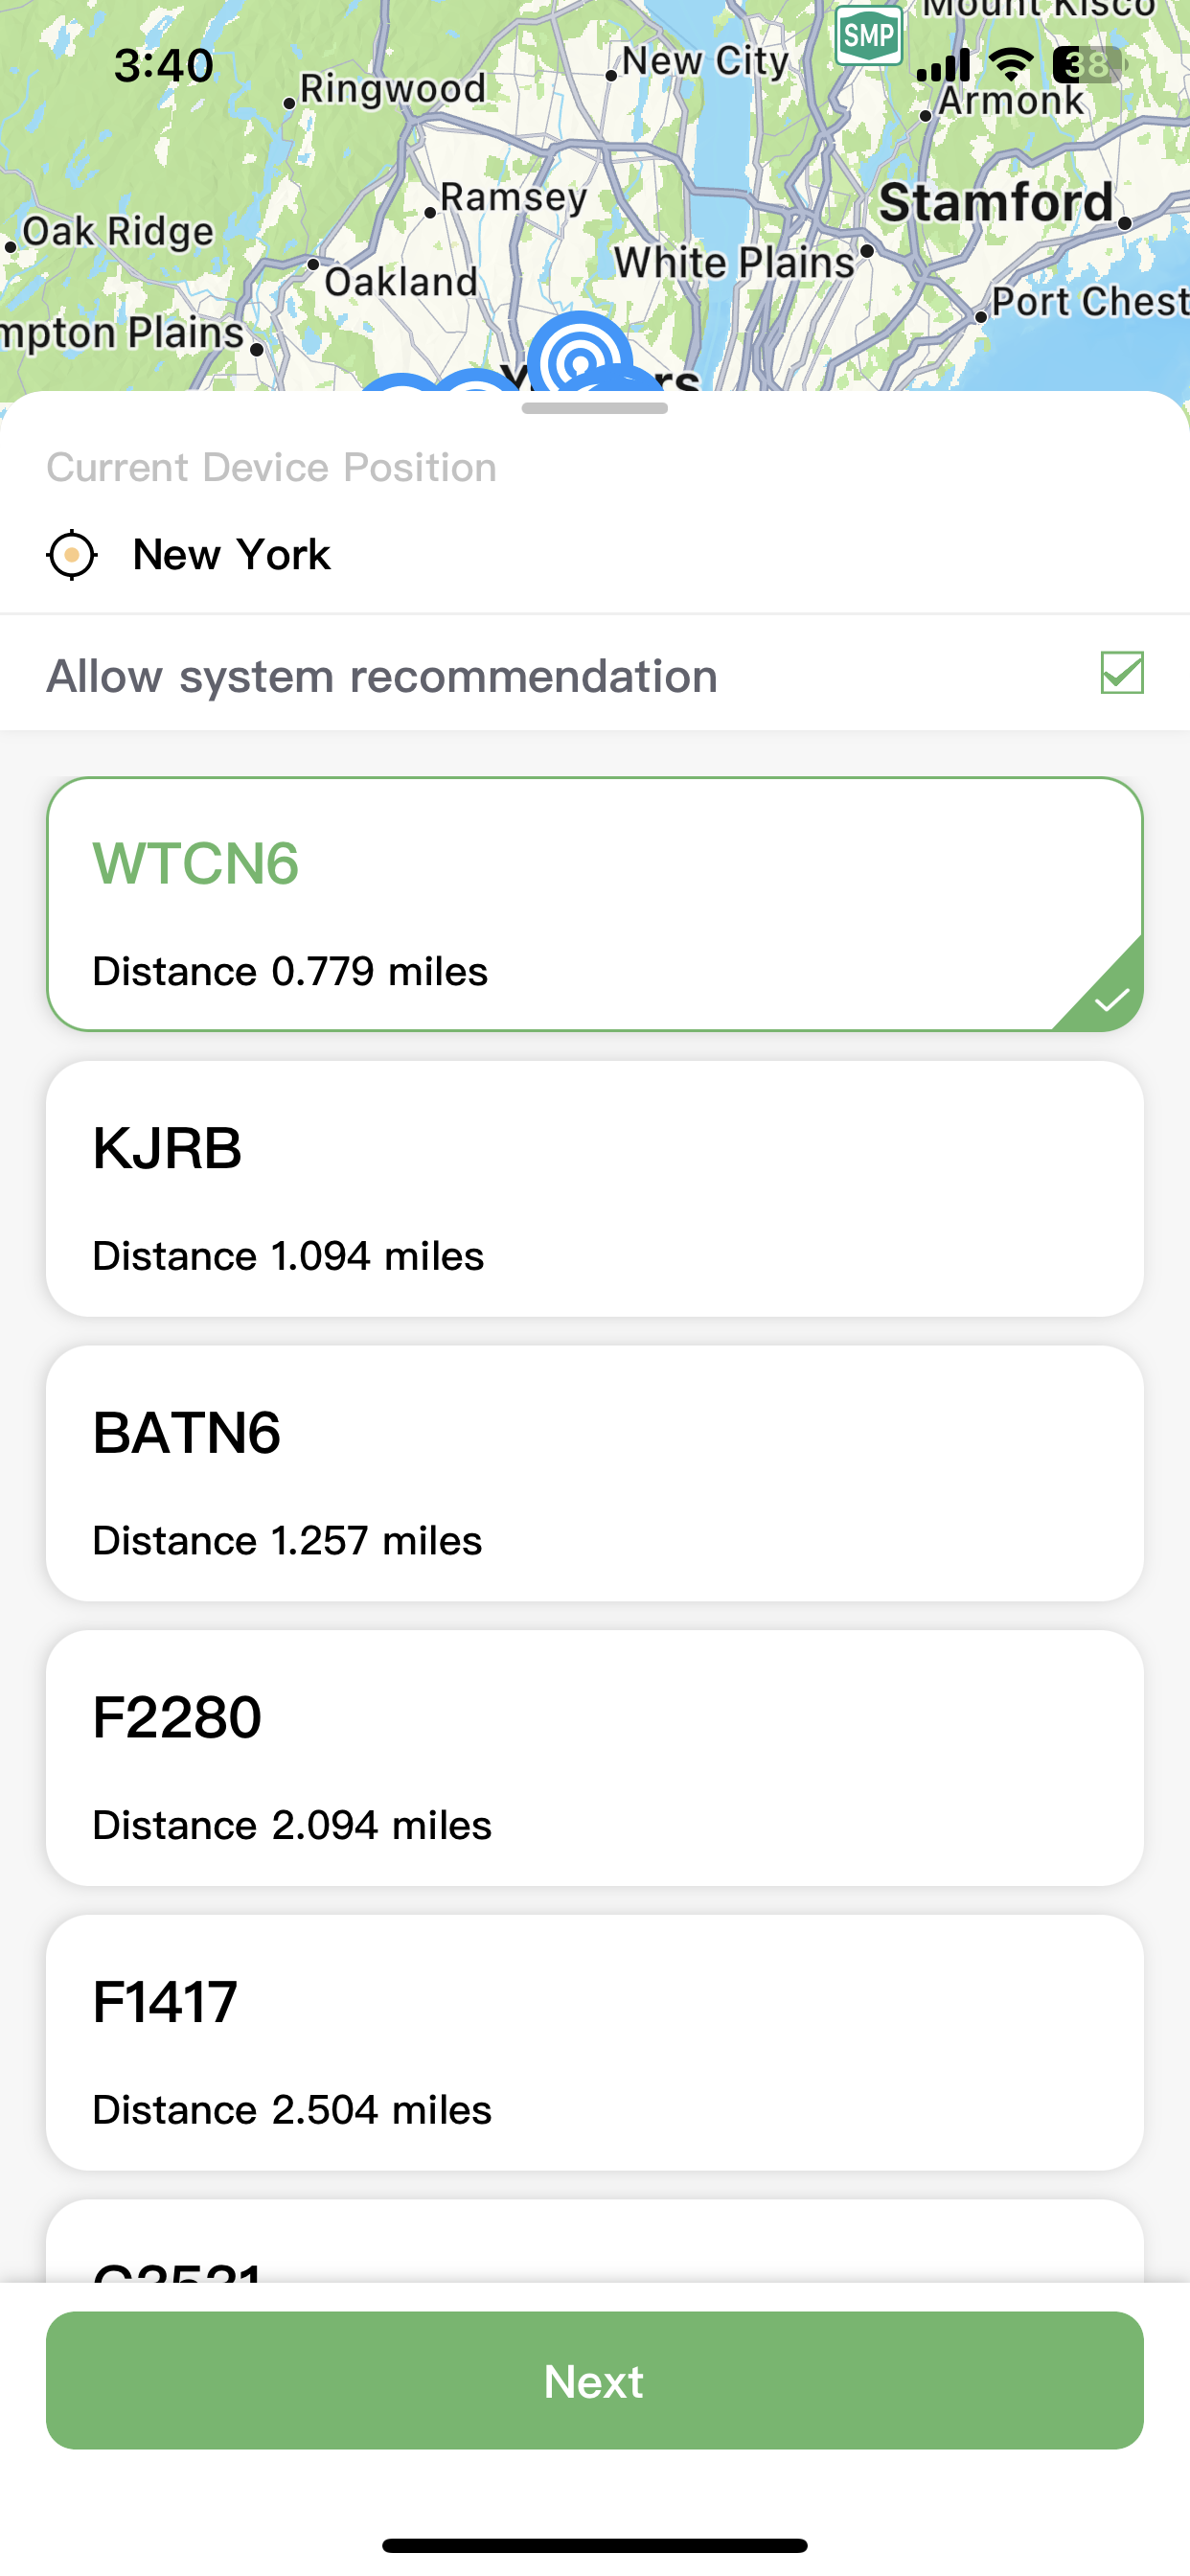
Fantastic! You’ve completed all the steps to add your device.
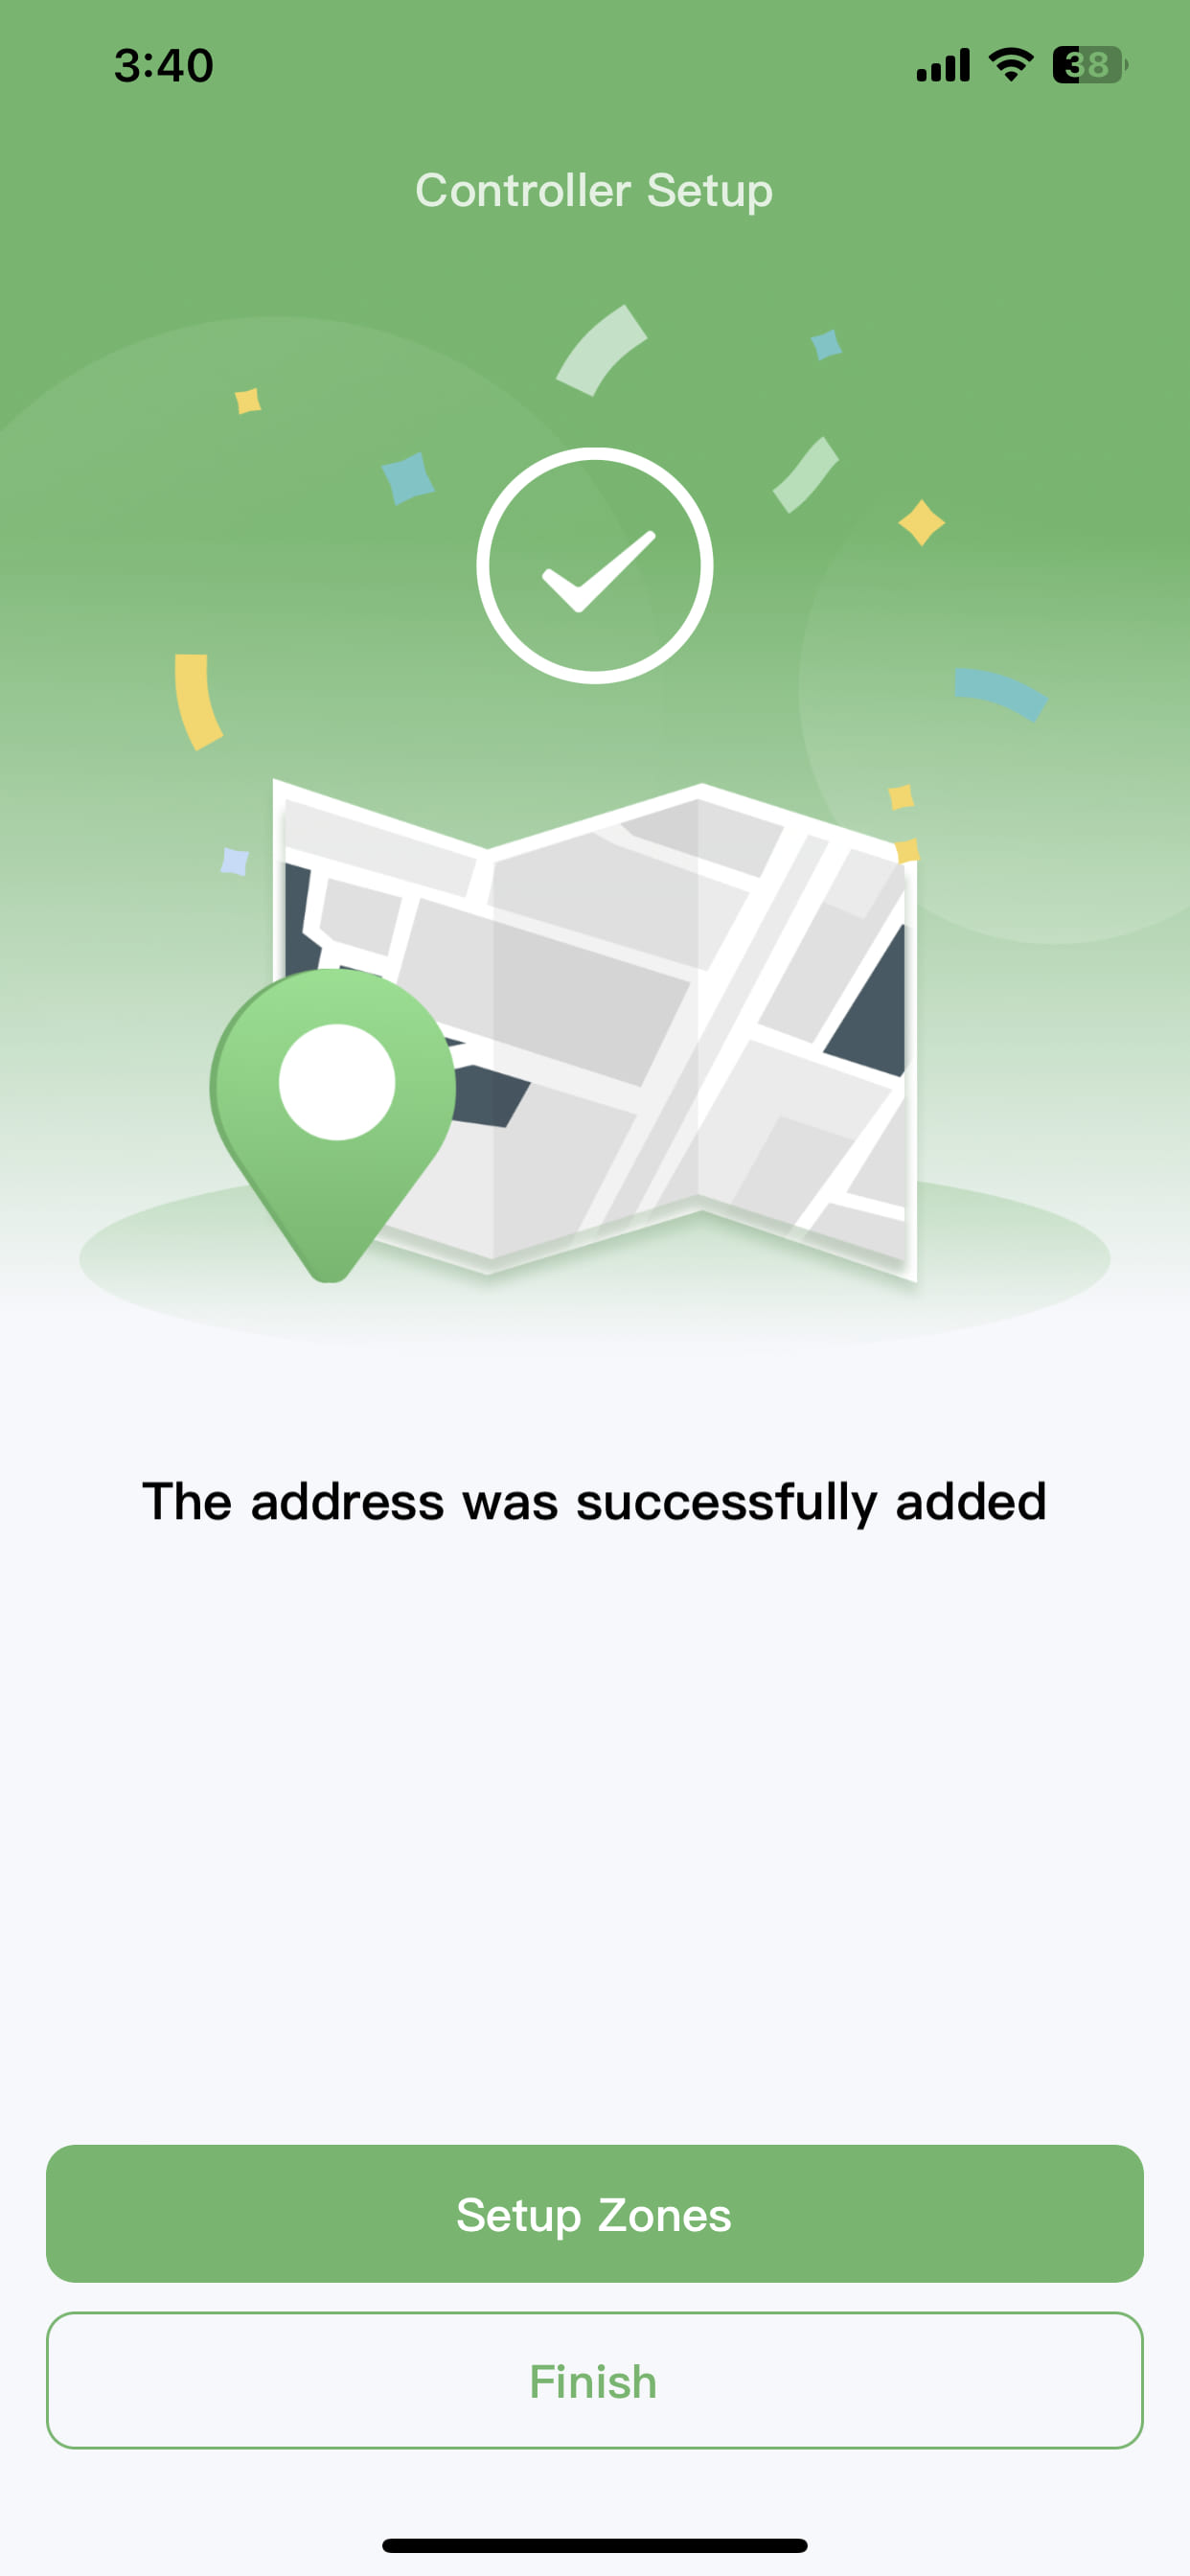
For Android users:
First, make sure your device is ready. To ensure a smooth setup process, make sure your phone has location and Bluetooth permissions enabled. Swipe down from the top of the screen to open the control center, then tap the Bluetooth and location icons to ensure they are both enabled.
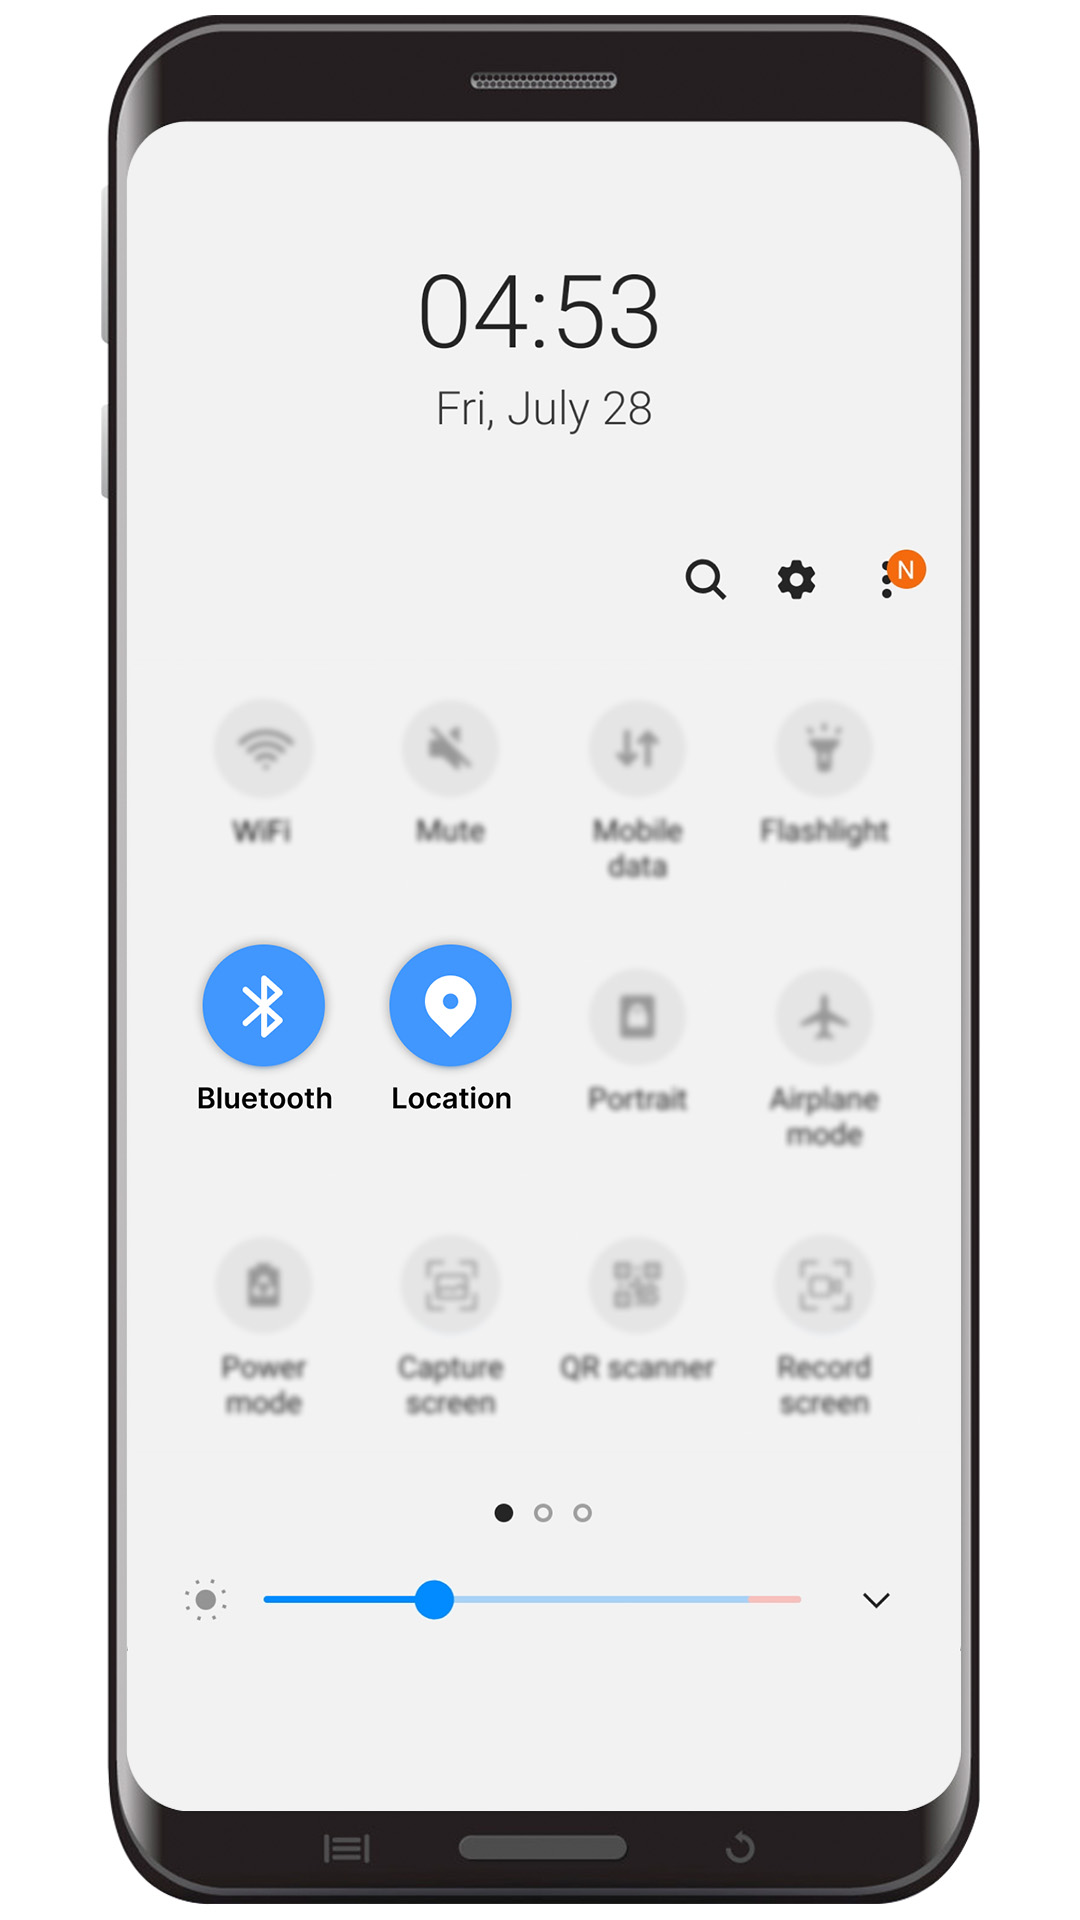
Place your phone within 10 feet of the device. Wait for the app to scan for the device, then tap on your device when it appears.
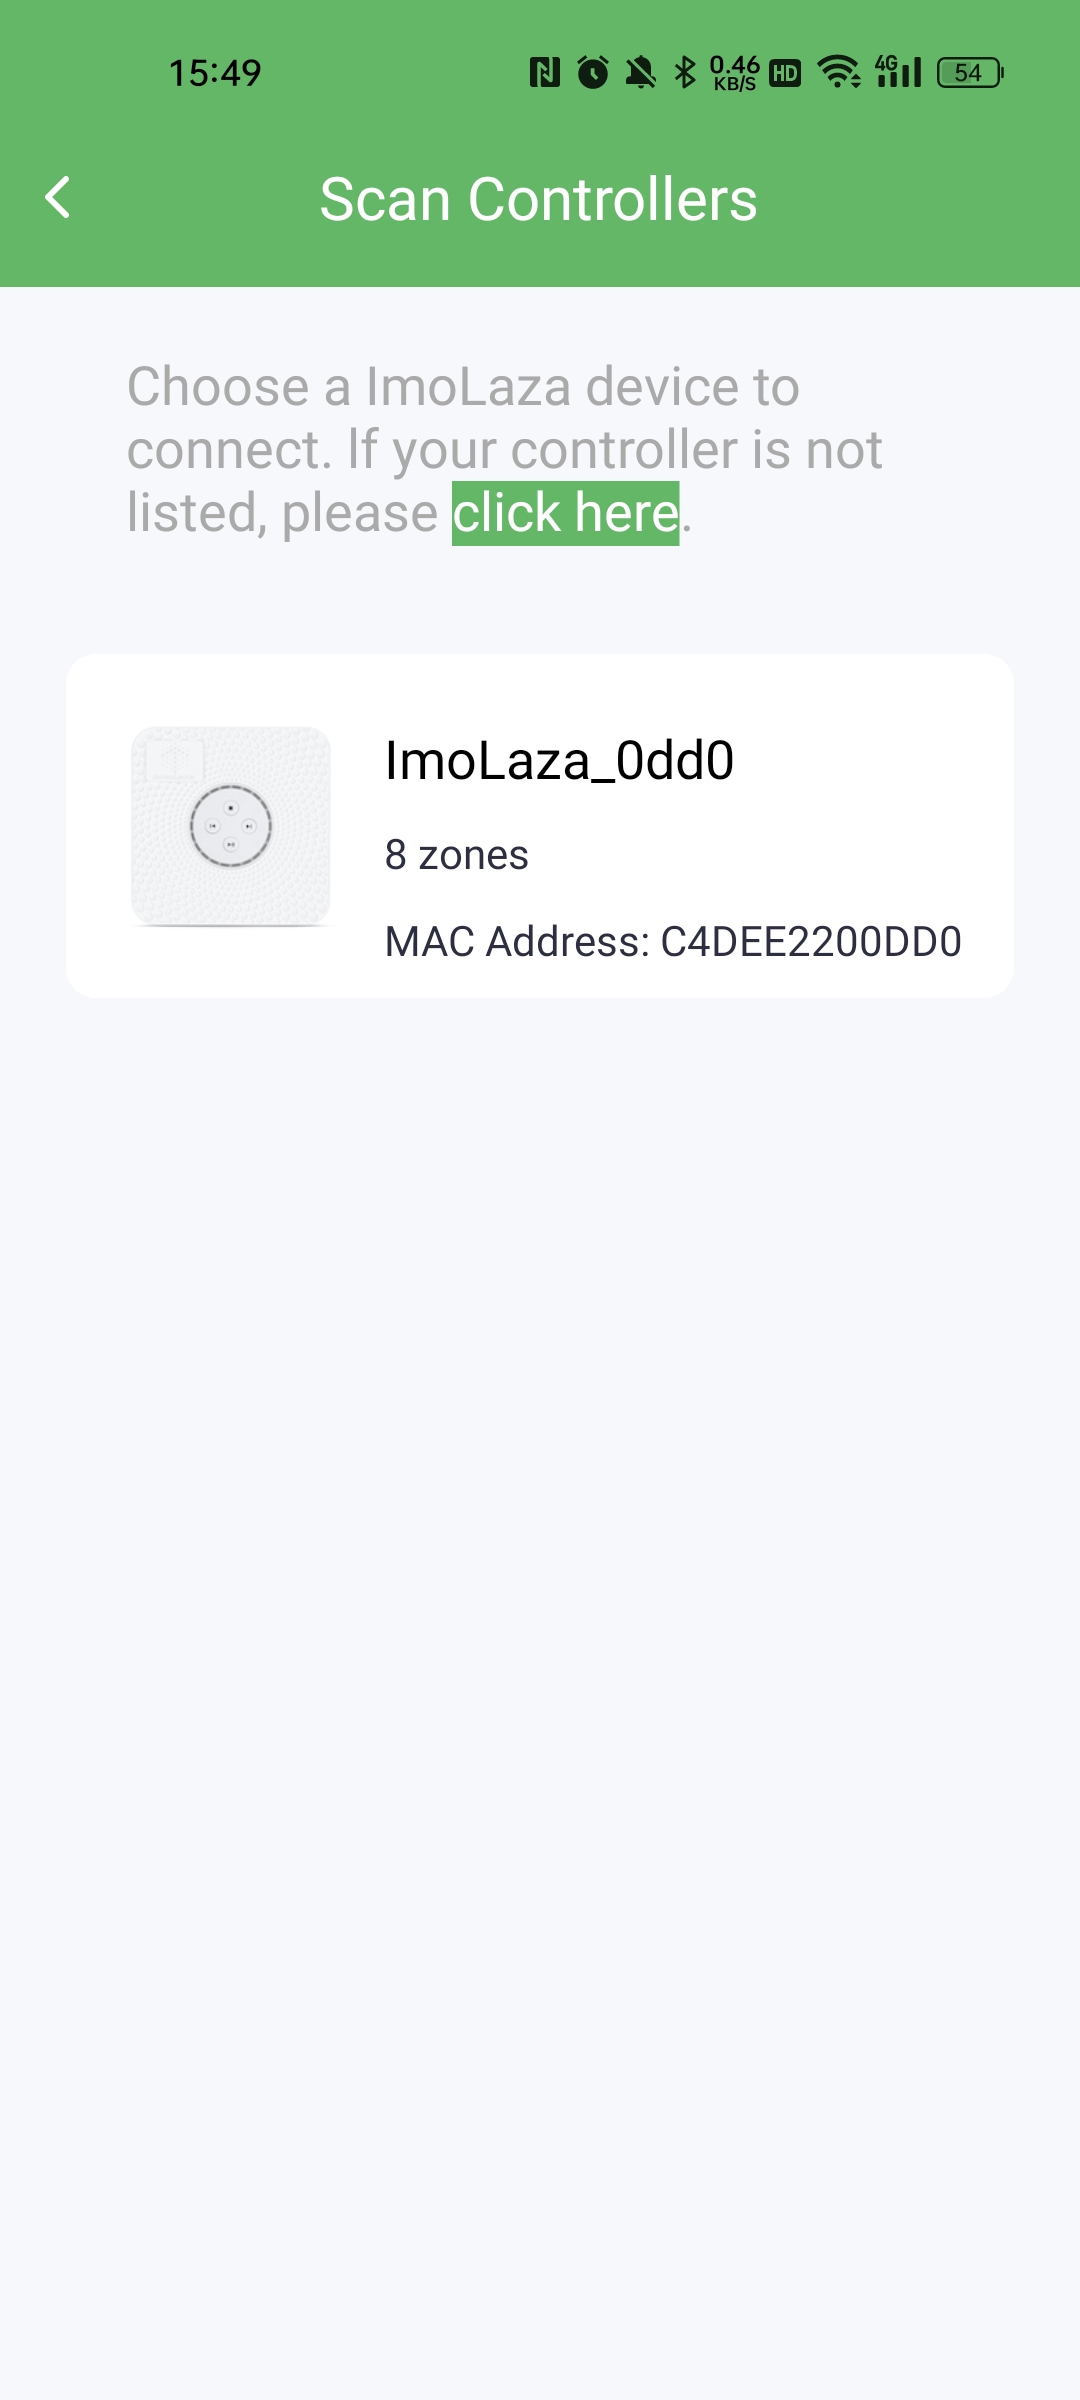
Next, tap the "Switch WiFi" button on the right to get a list of all available WiFi networks, and select the 2.4GHz WiFi network your controller will connect to. Enter the correct WiFi password, then tap the "CONNECT" button at the bottom to start the connection.
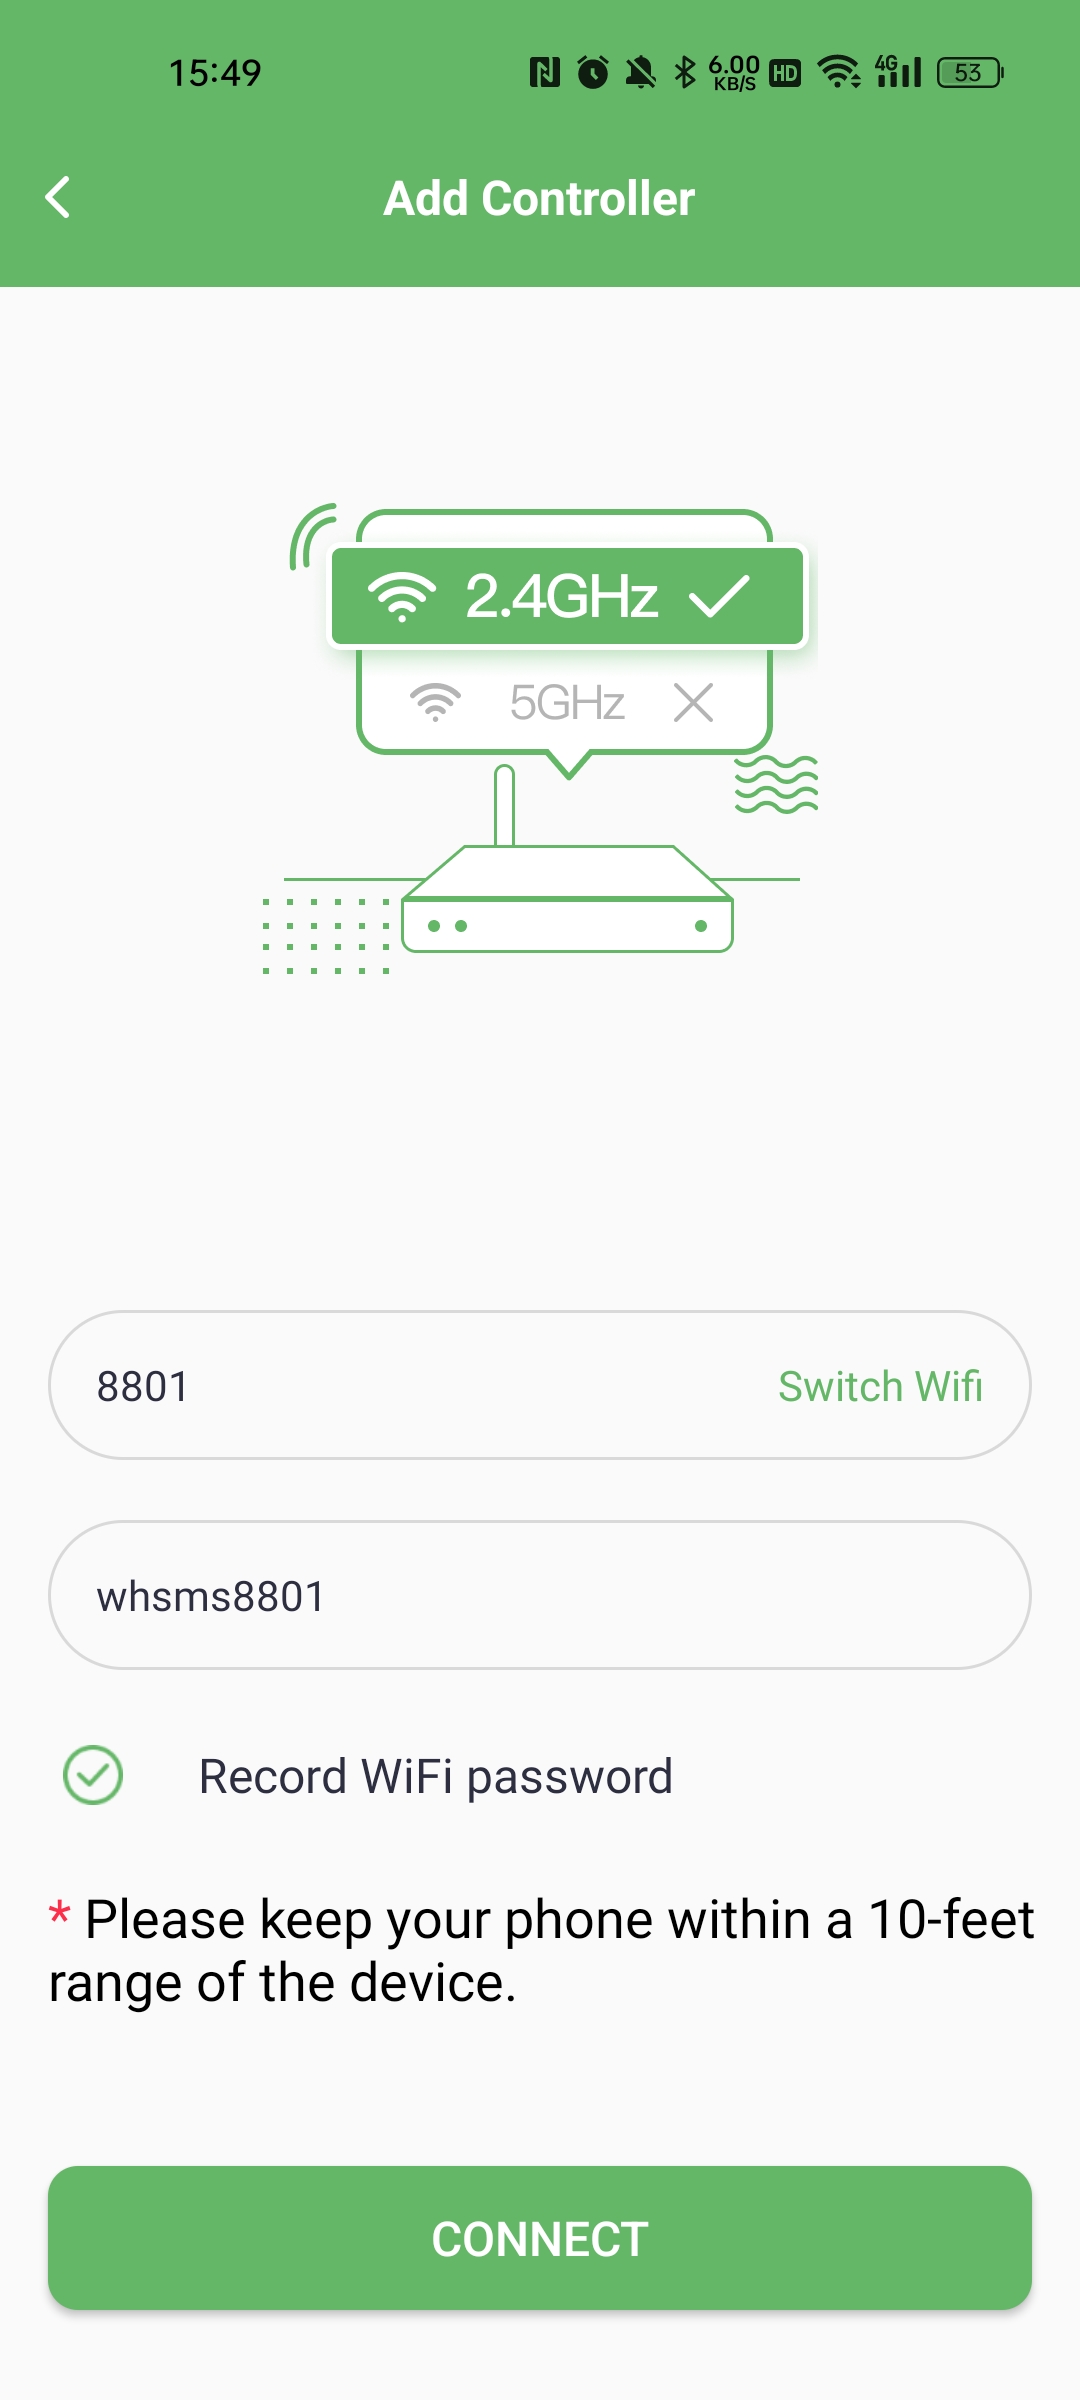

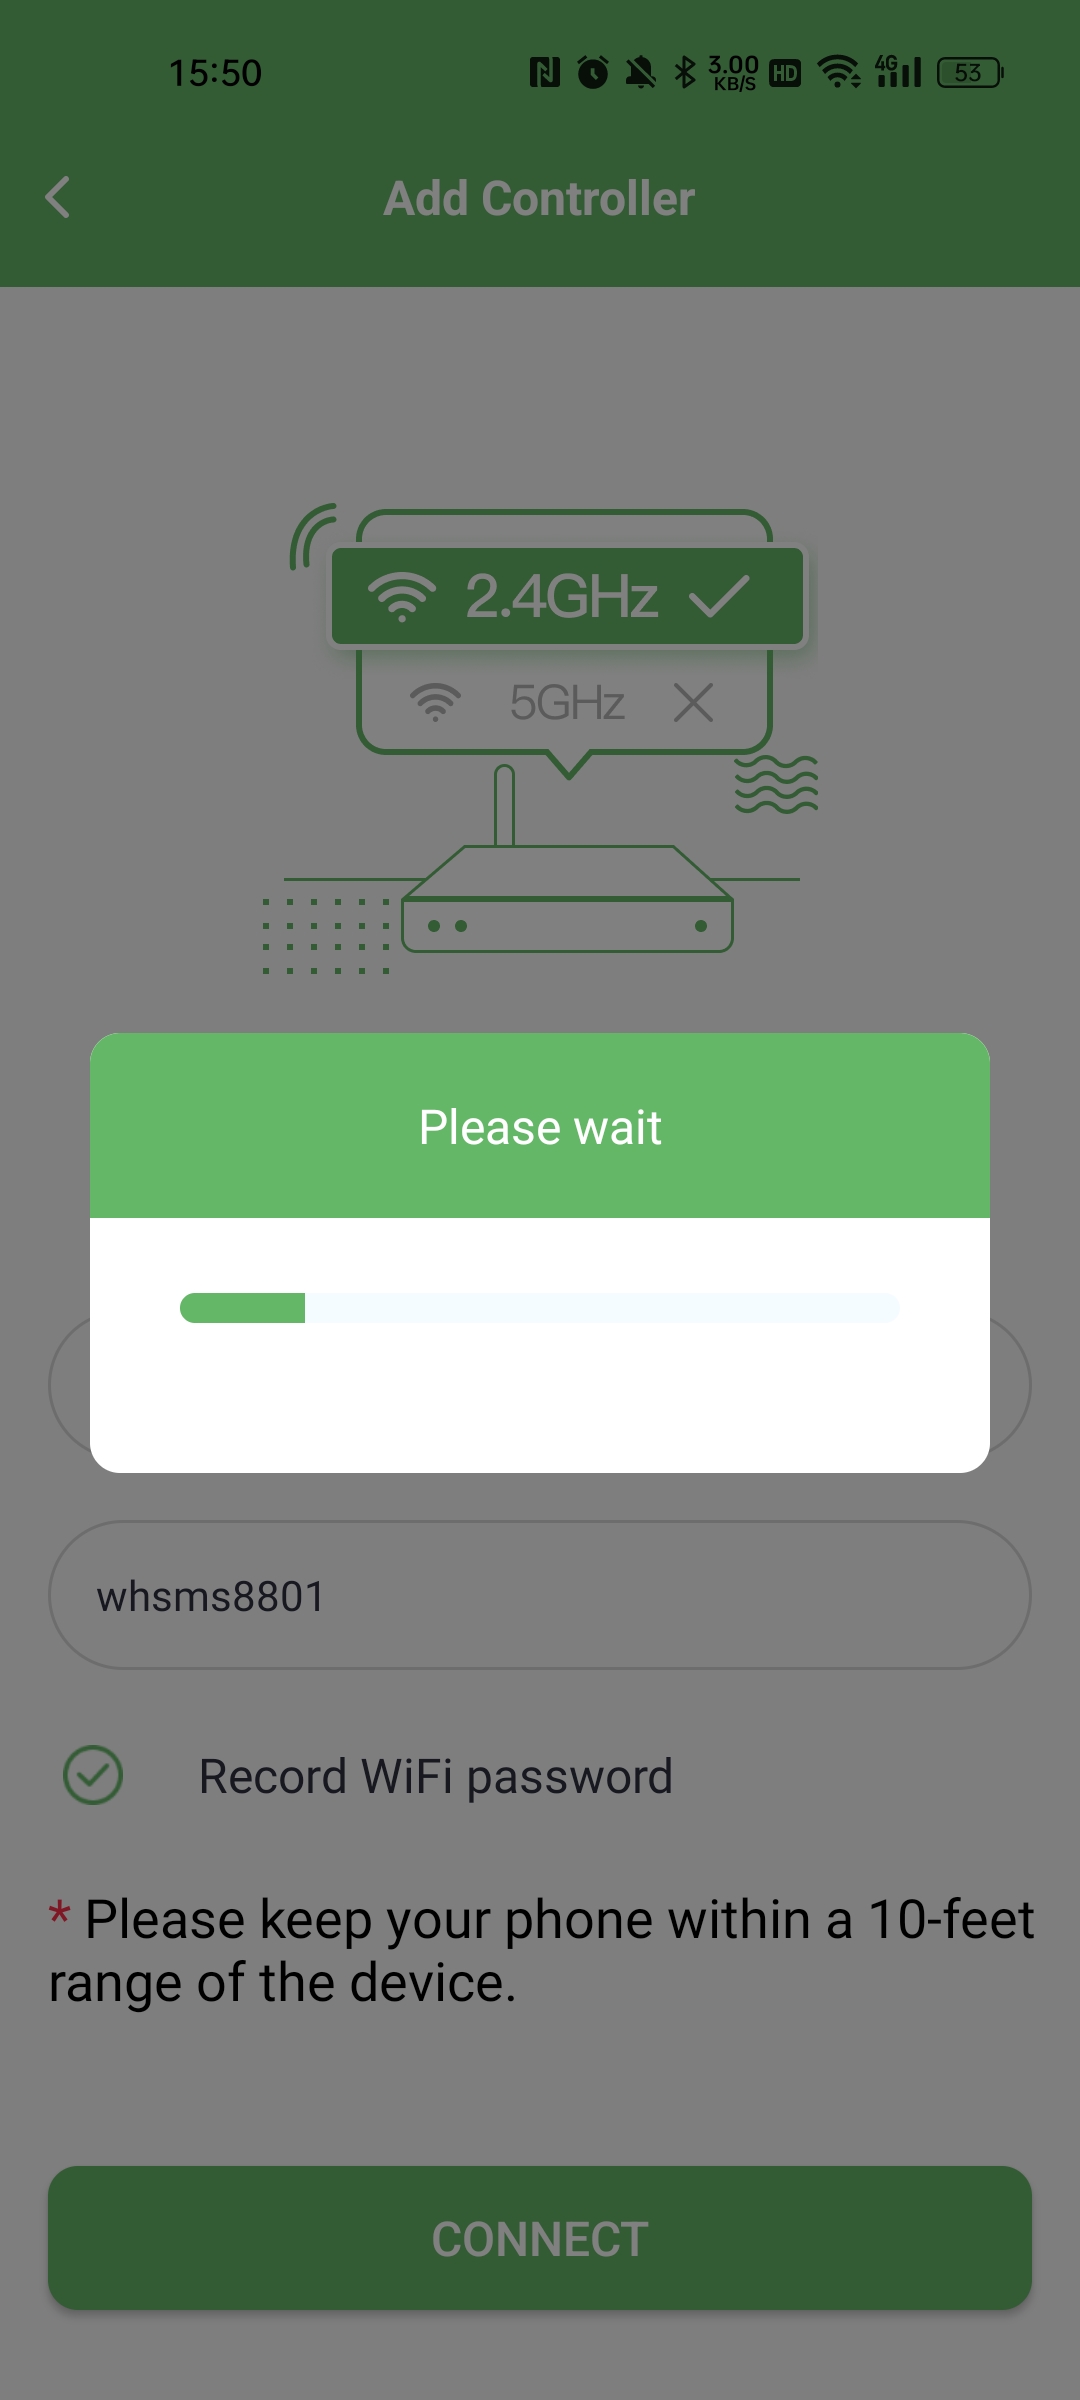
Next, give your controller a personalized name.
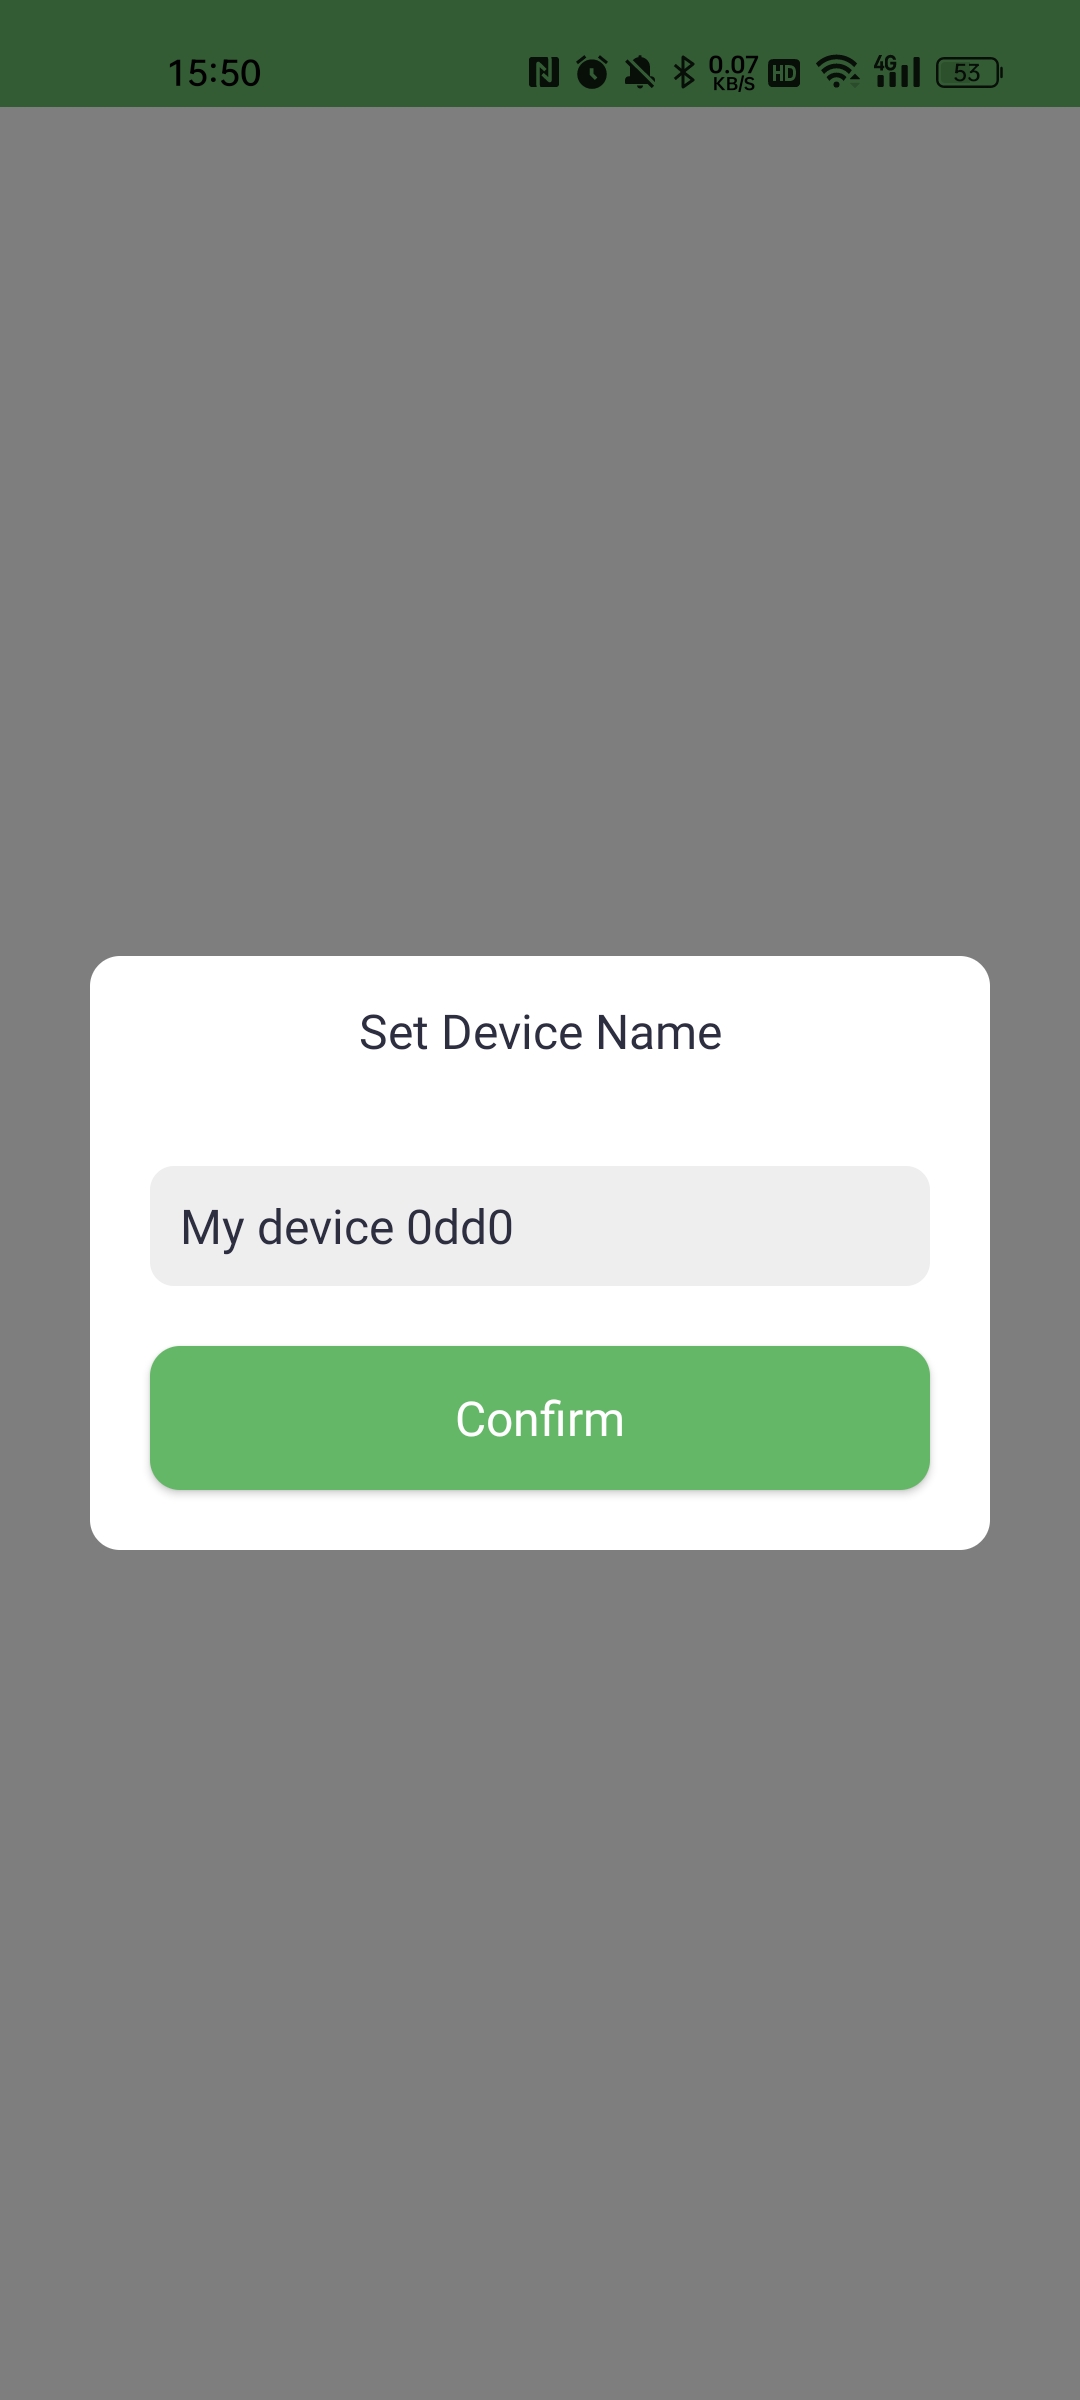
Awesome! You have successfully connected the device to your home network. Now, let’s continue by adding information to the device.
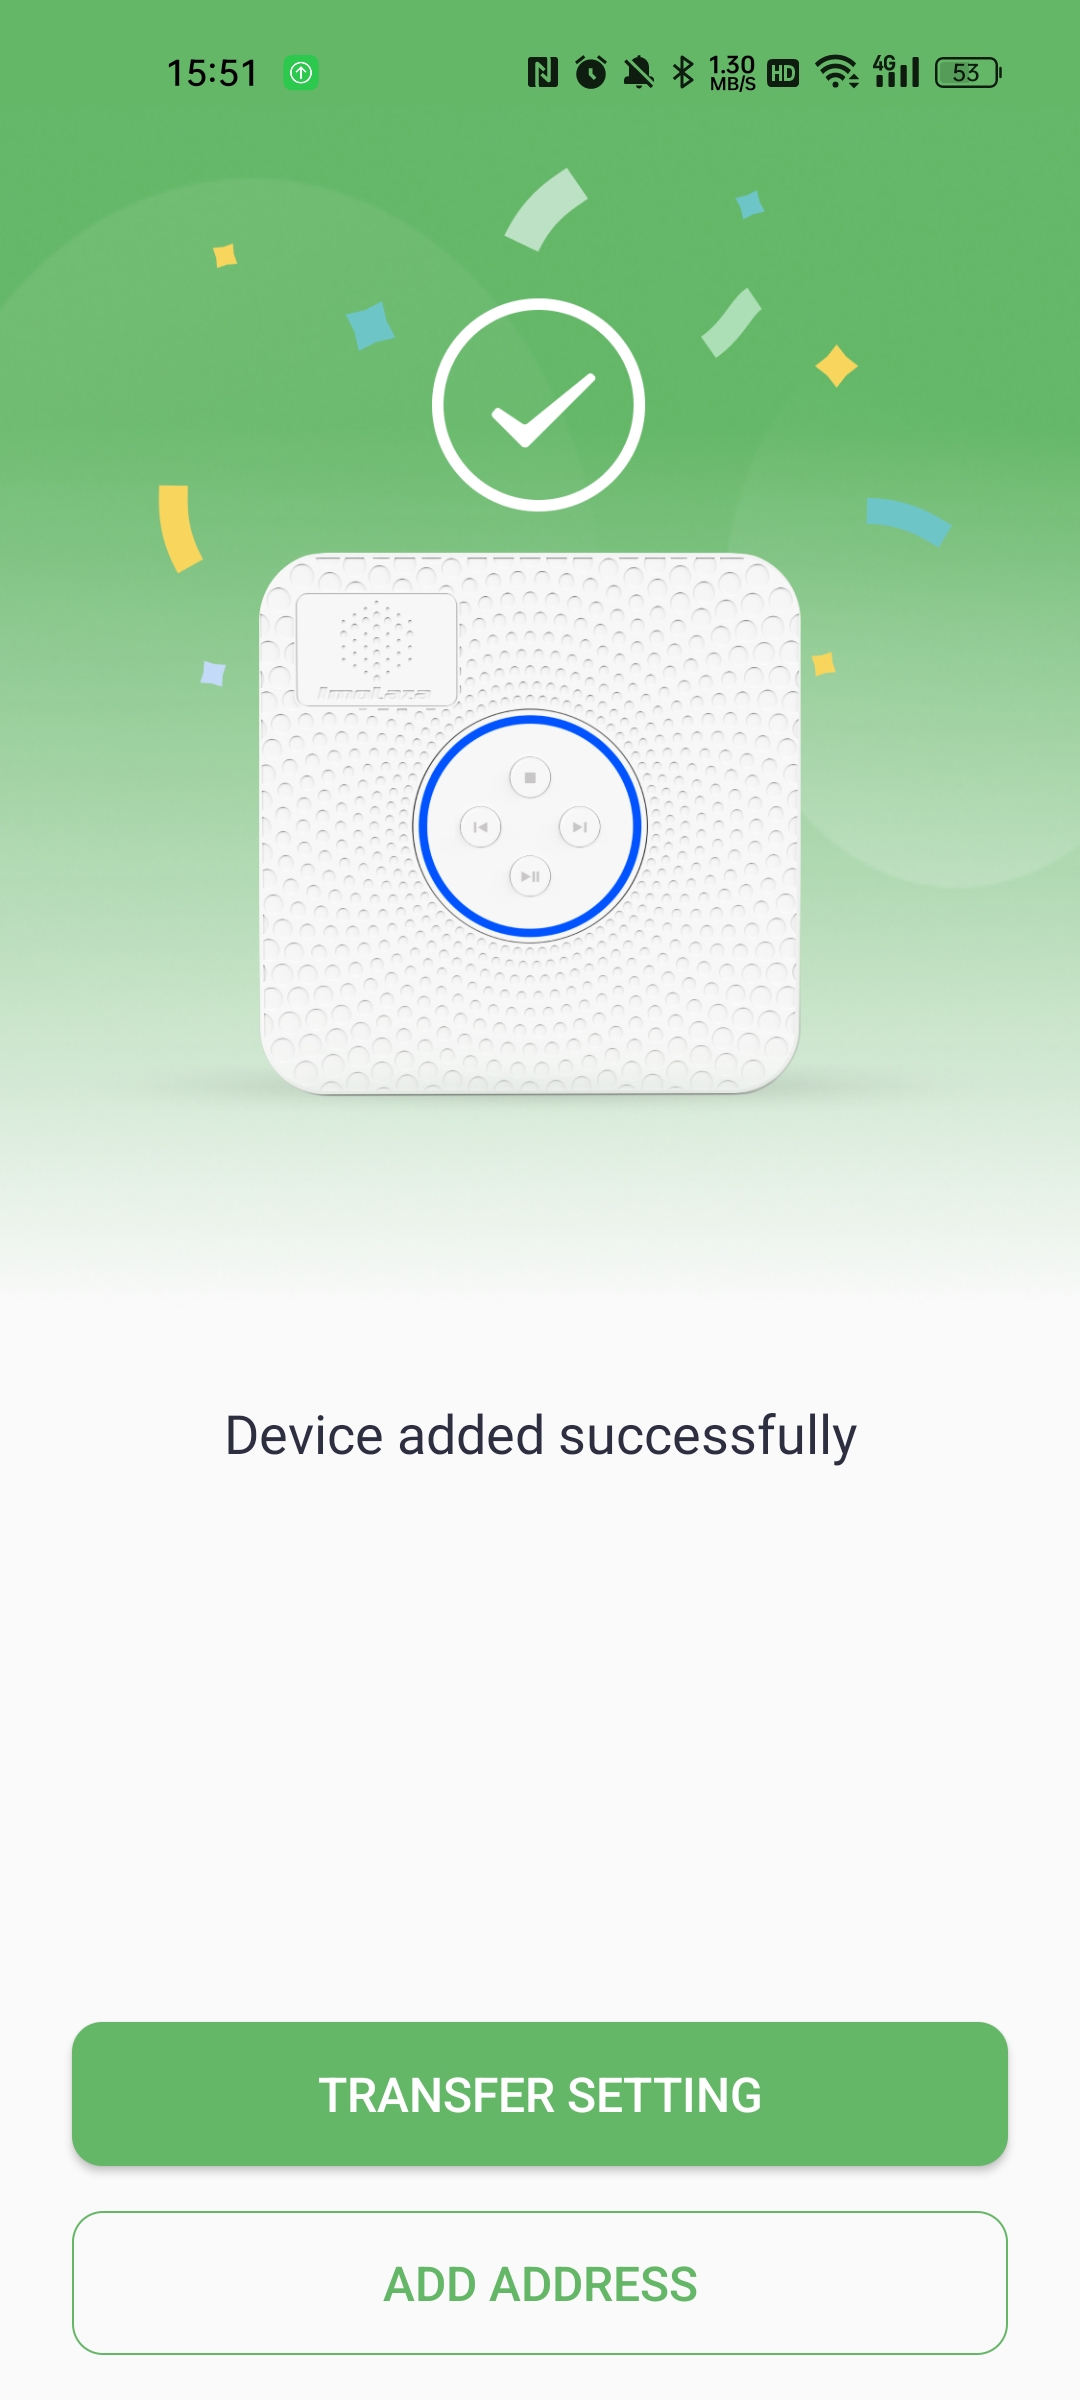
Tap the "ADD ADDRESS" button at the bottom to start setting up the address information. Enter your street address as detailed as possible, as this will affect the weather station you select. We recommend checking "Allow system recommendation" so the system can automatically switch to other available weather stations if needed.
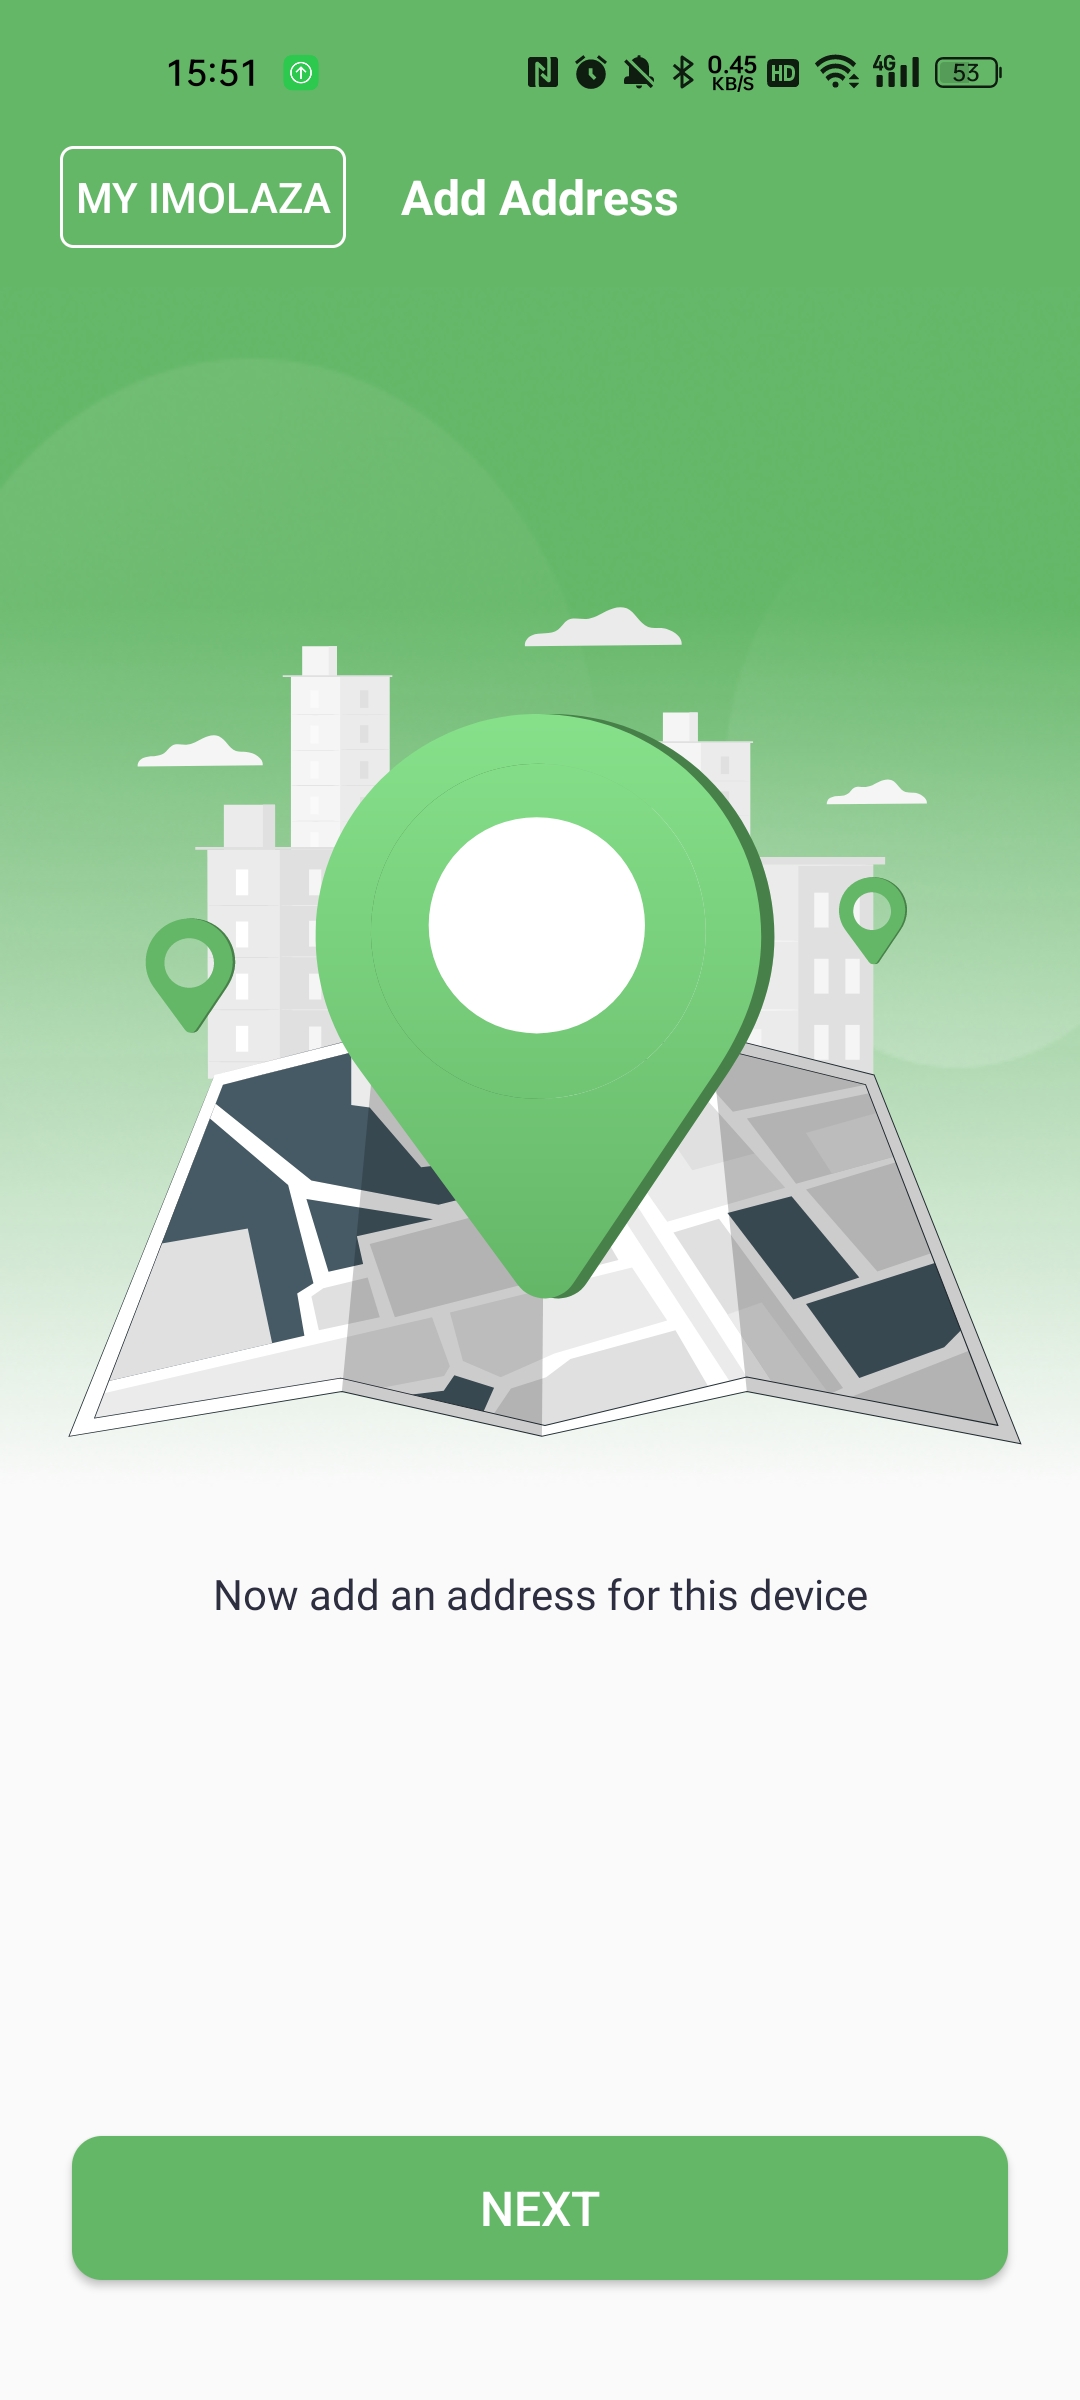
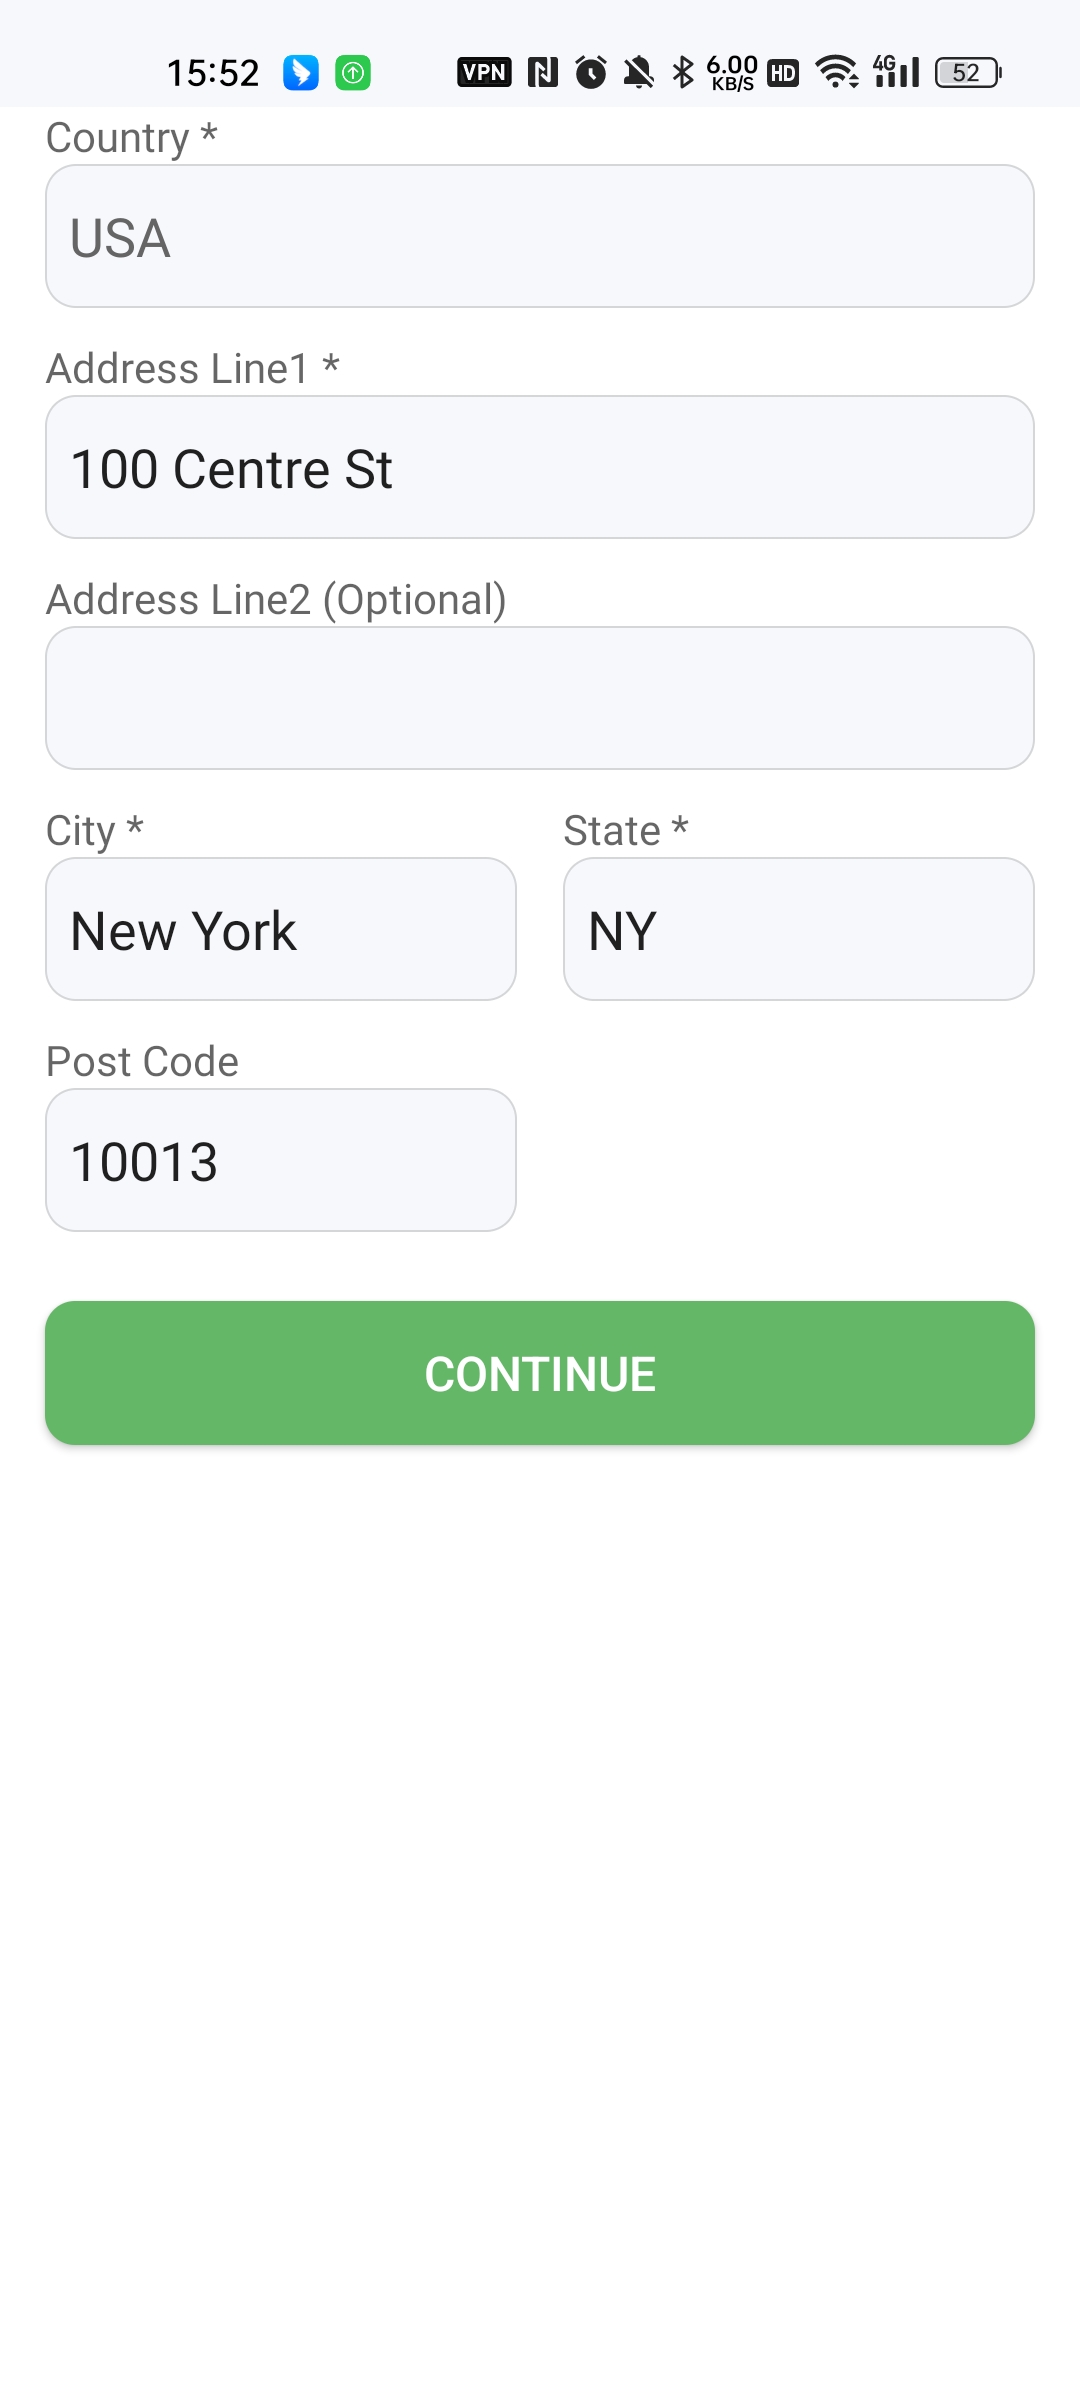
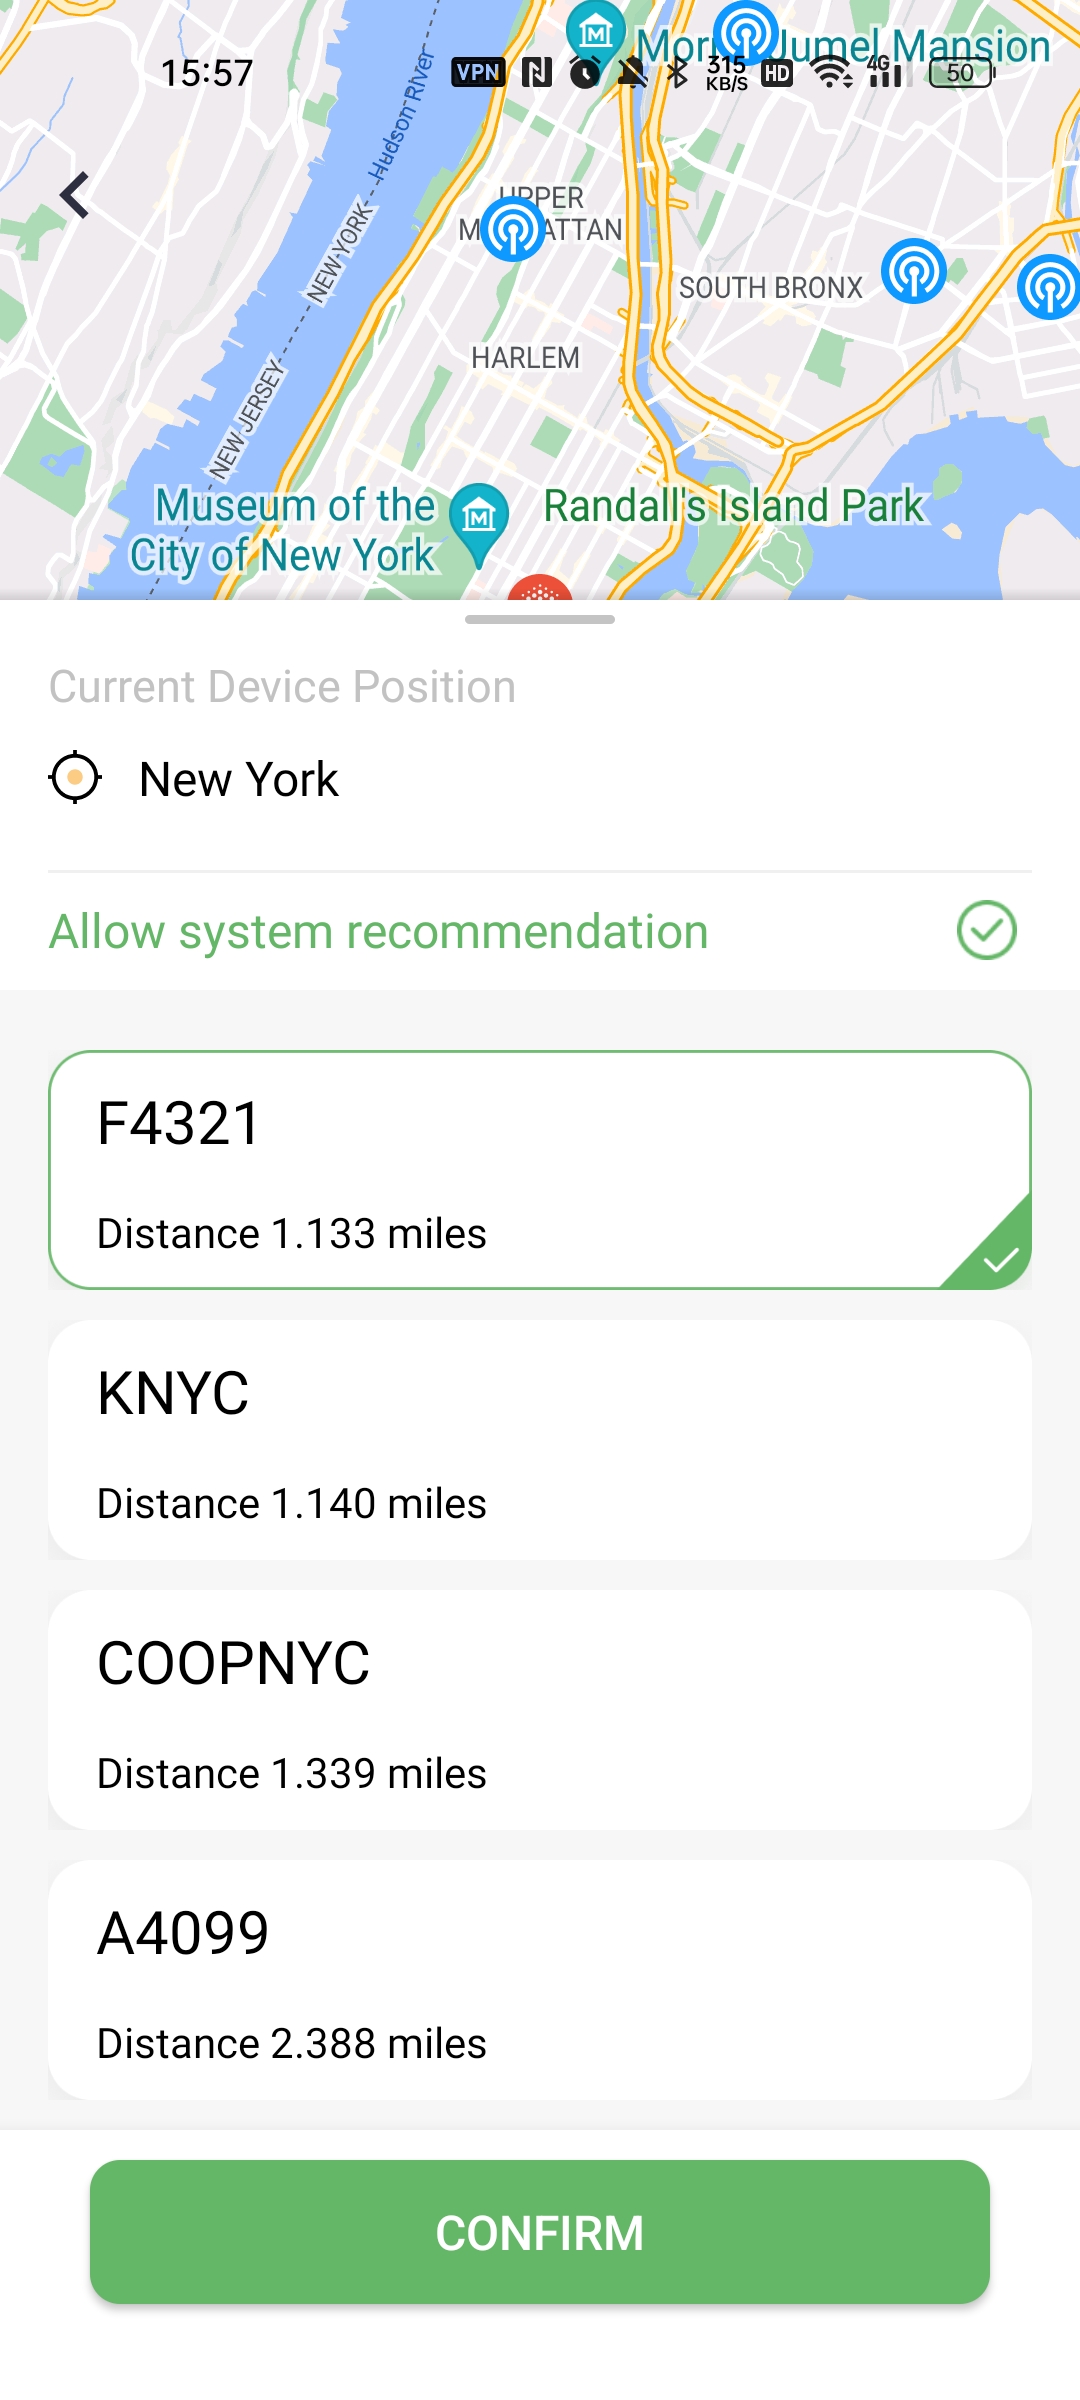
Fantastic! Now you're good to go.

Still need help?
In case the above method doesn’t work for you, please contact our technical support team directly using the contact information below. We will respond to you by email within 12h after your message reaches us.
Email: Support@imolaza.com
Author: Imolaza
Last update: 2024-07-31 05:14
ImoLaza Irrigation System Alert Guide
ImoLaza offers a comprehensive monitoring and alert system for your irrigation setup, ensuring optimal performance and rapid problem detection. Our advanced technology continuously monitors various components of your irrigation system, alerting you to potential issues before they escalate into significant problems.
Accessing Alert Settings
To configure your alert preferences:
1. Navigate to "Settings"
2. Choose "Events & Alerts"
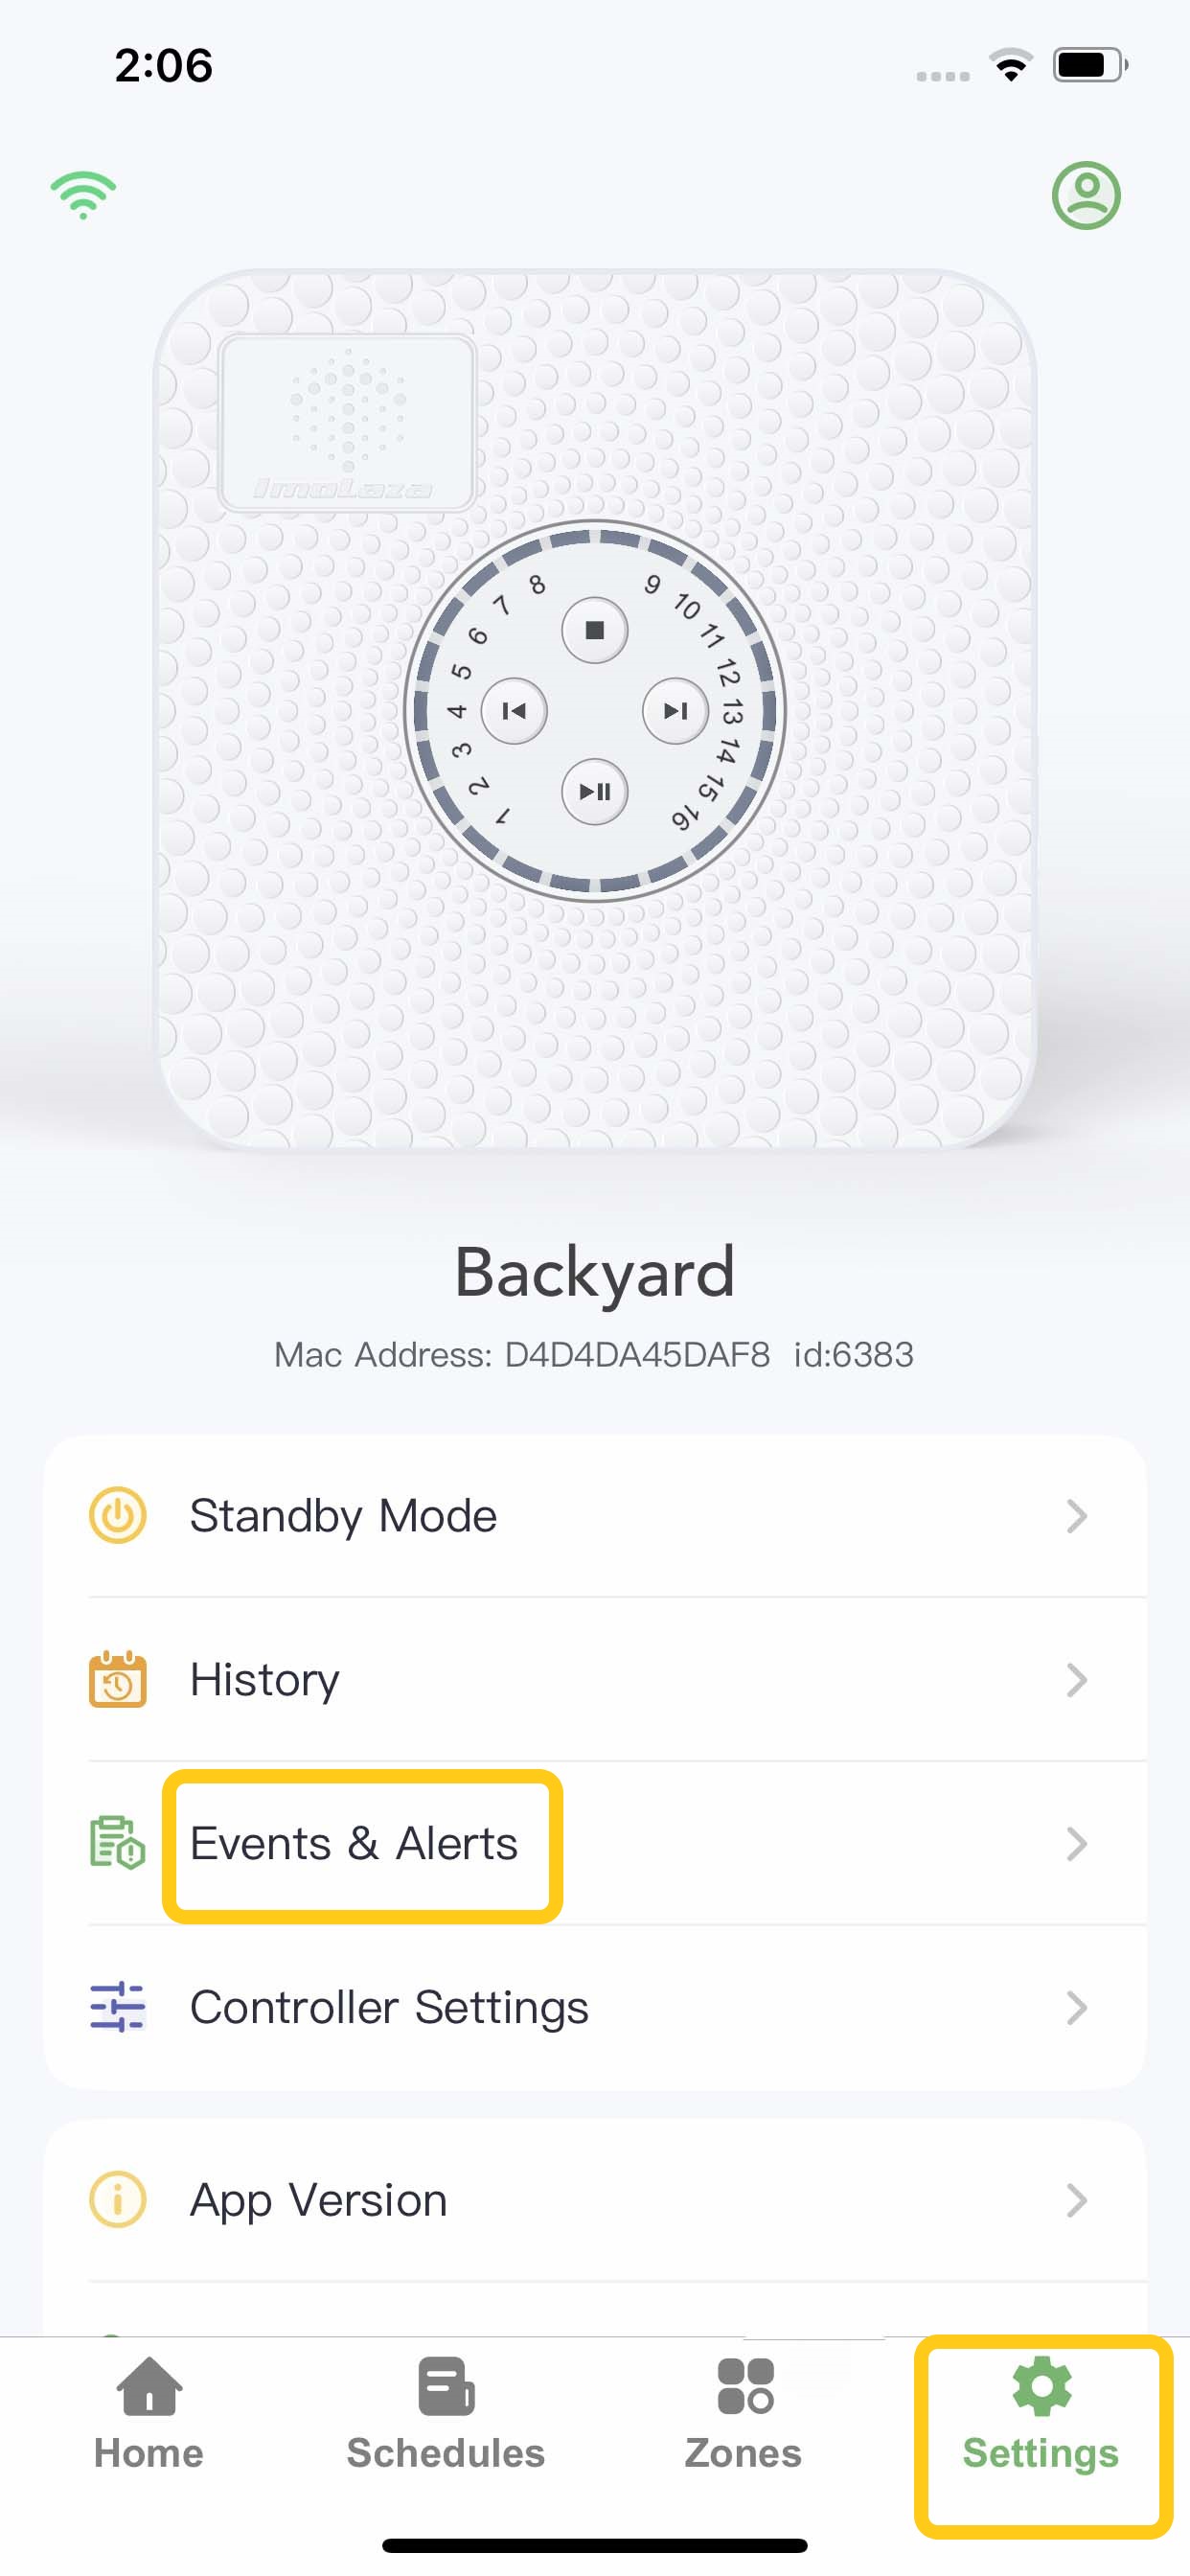
Here, you'll find three main sections: Events, Alerts Settings, and Run Status.
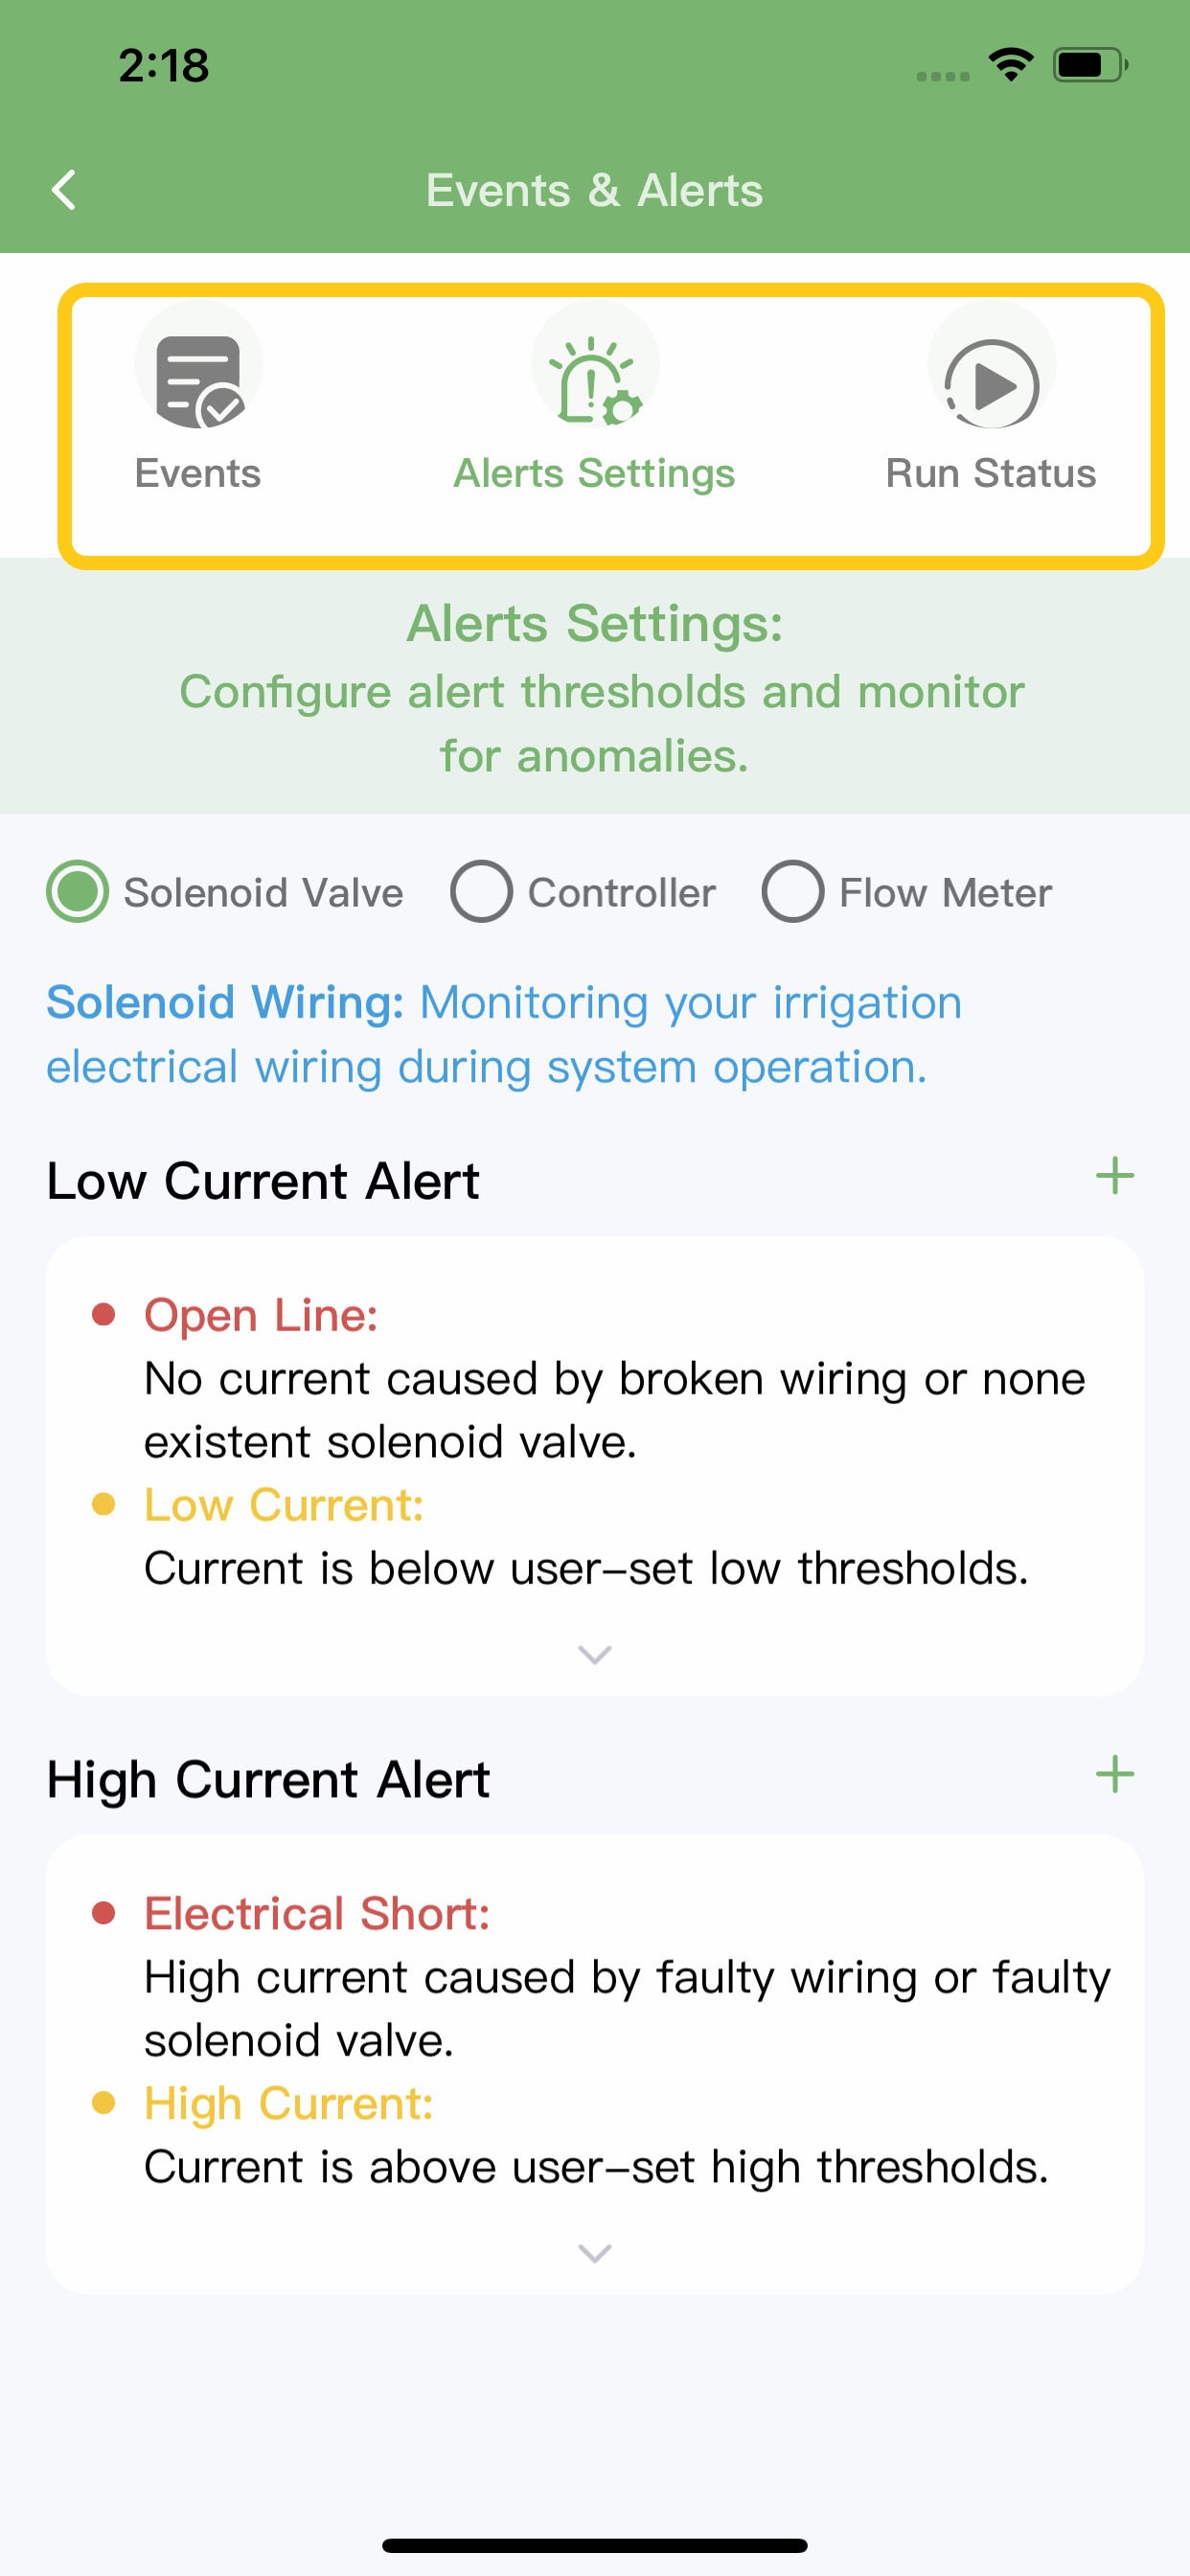
Alert Settings
1. Solenoid Valve Monitoring
ImoLaza precisely monitors the current flowing through each solenoid valve. If the current deviates from the normal range (1000mA), you'll receive an immediate notification.
Alerts include:
- Low Current Alert
- High Current Alert
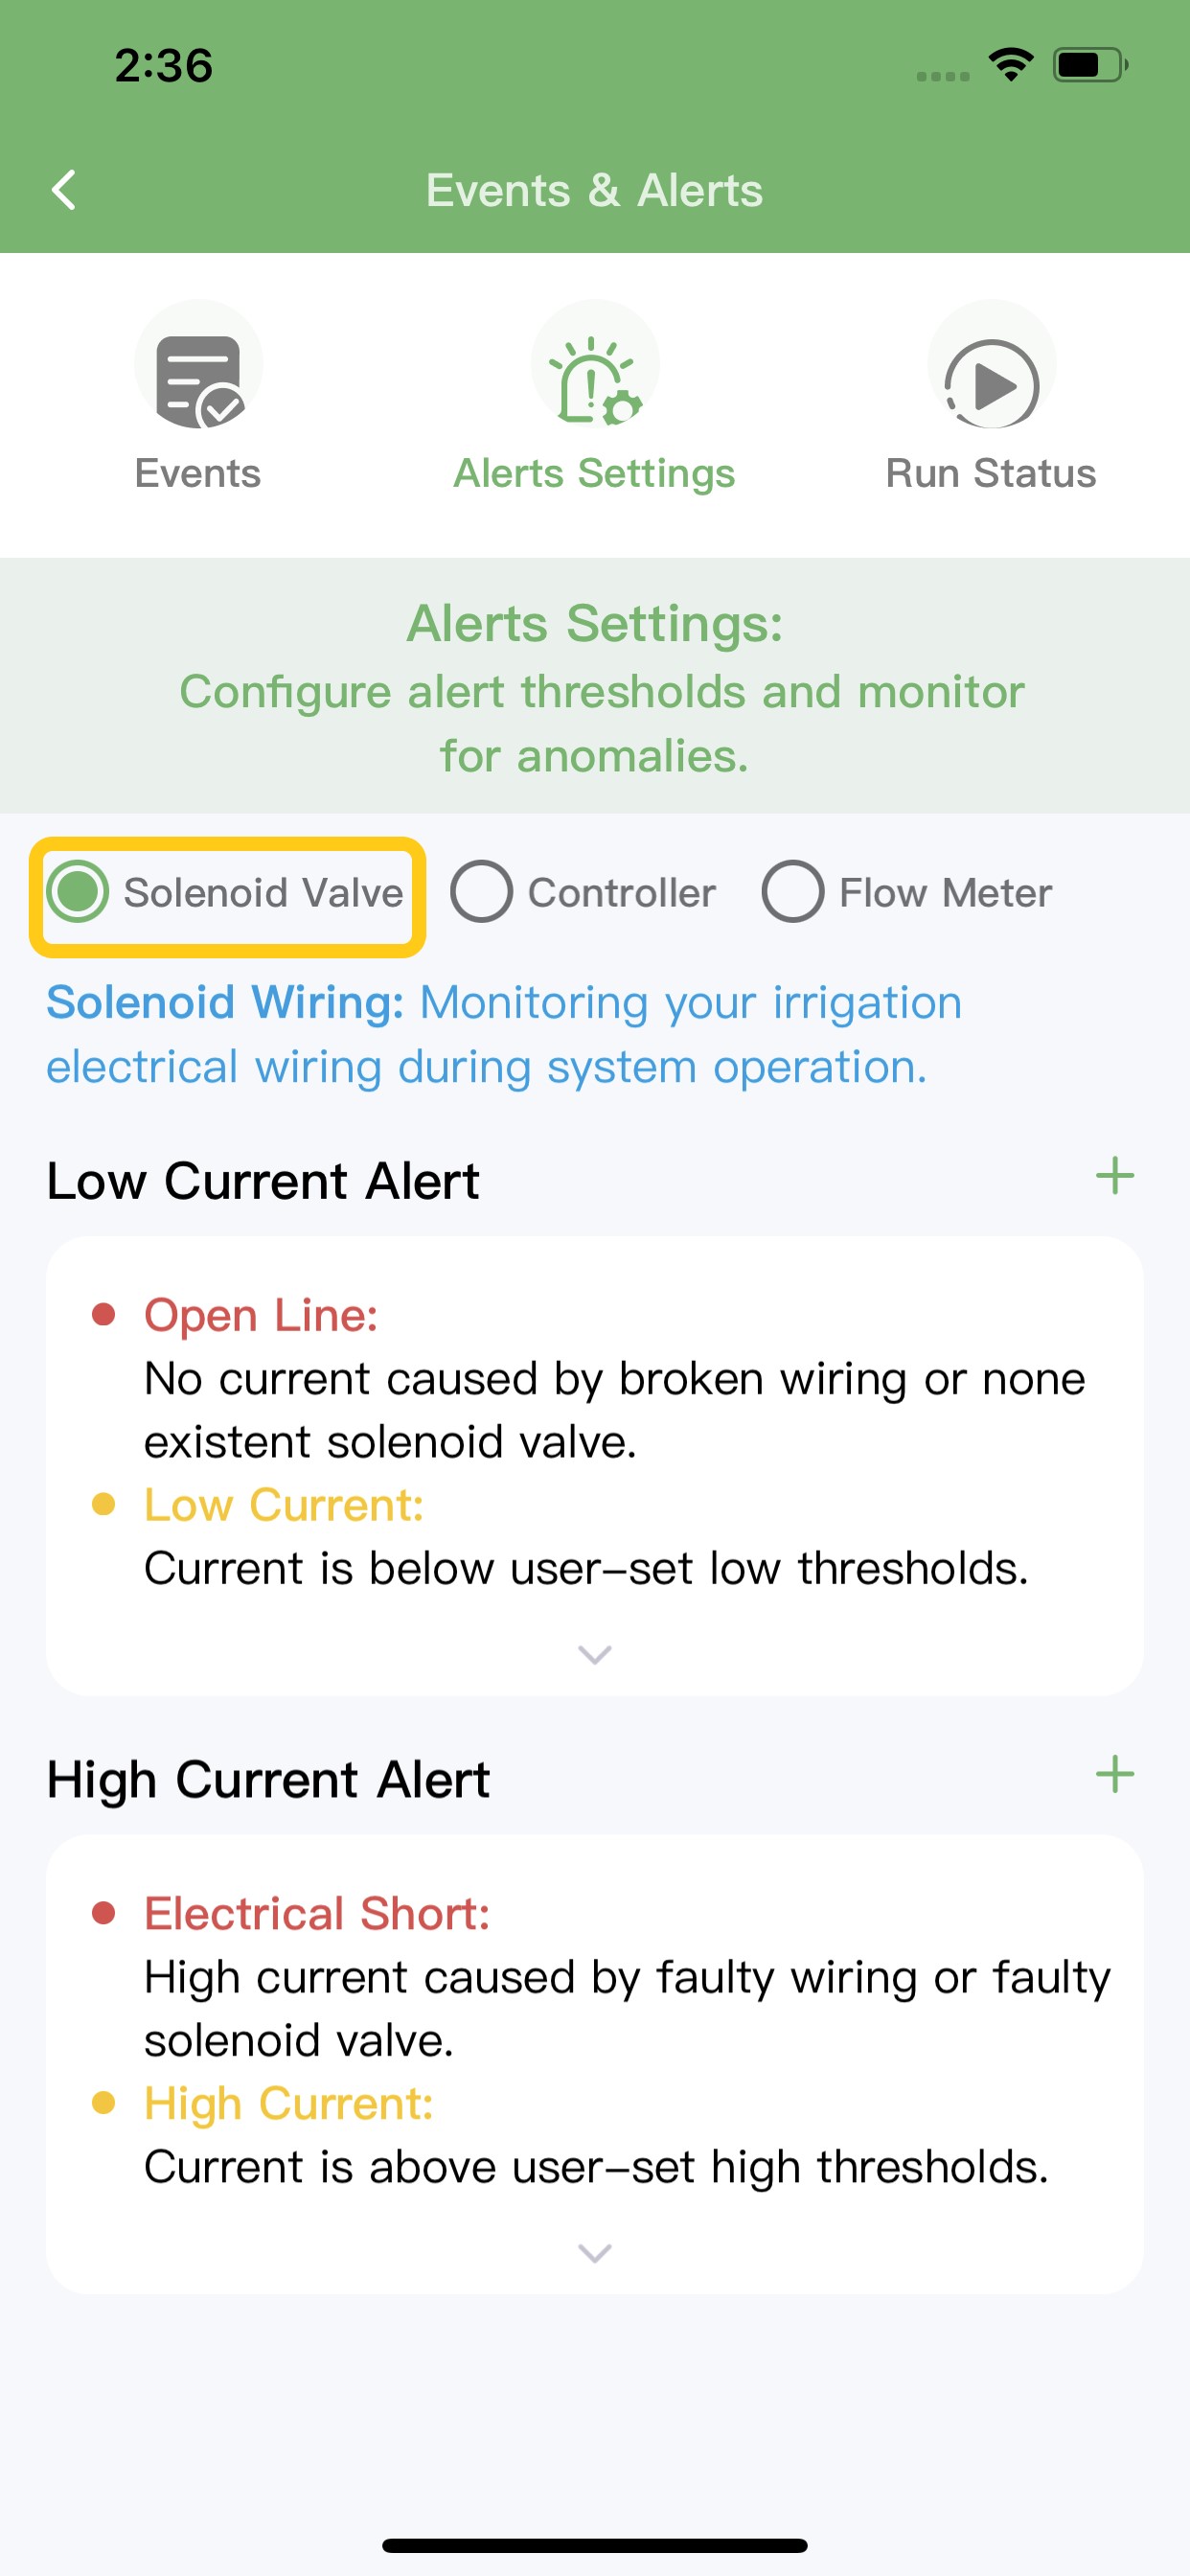
Visual indicators include:
- A red triangle icon in the Zone menu section
- A red triangle icon on the specific Zone page
This makes it easy to pinpoint the exact location of any issue.
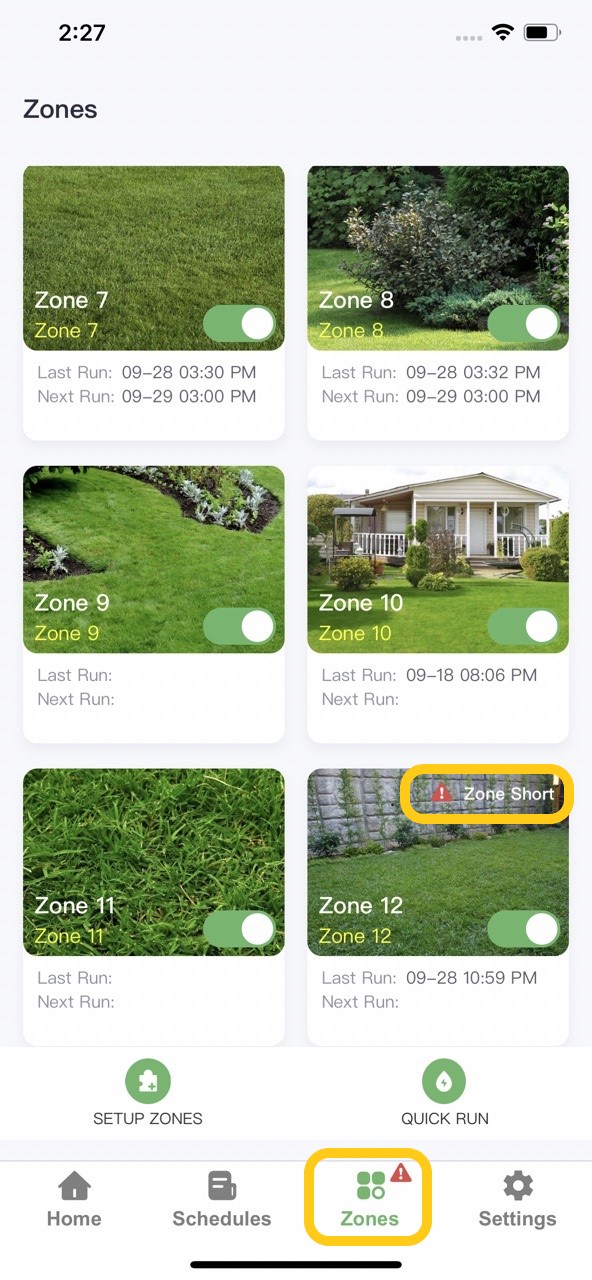
2. Controller Status
The system also keeps a vigilant eye on the controller itself. To set up these alerts, tap the green '+' icon in the top right corner of the Controller section.
Monitored situations include:
- Controller Offline Alert
- Weather Station Data Abnormal
- Rain Sensor Status Alert - No Signal
- Rain Sensor Status Alert - Continuous Signal
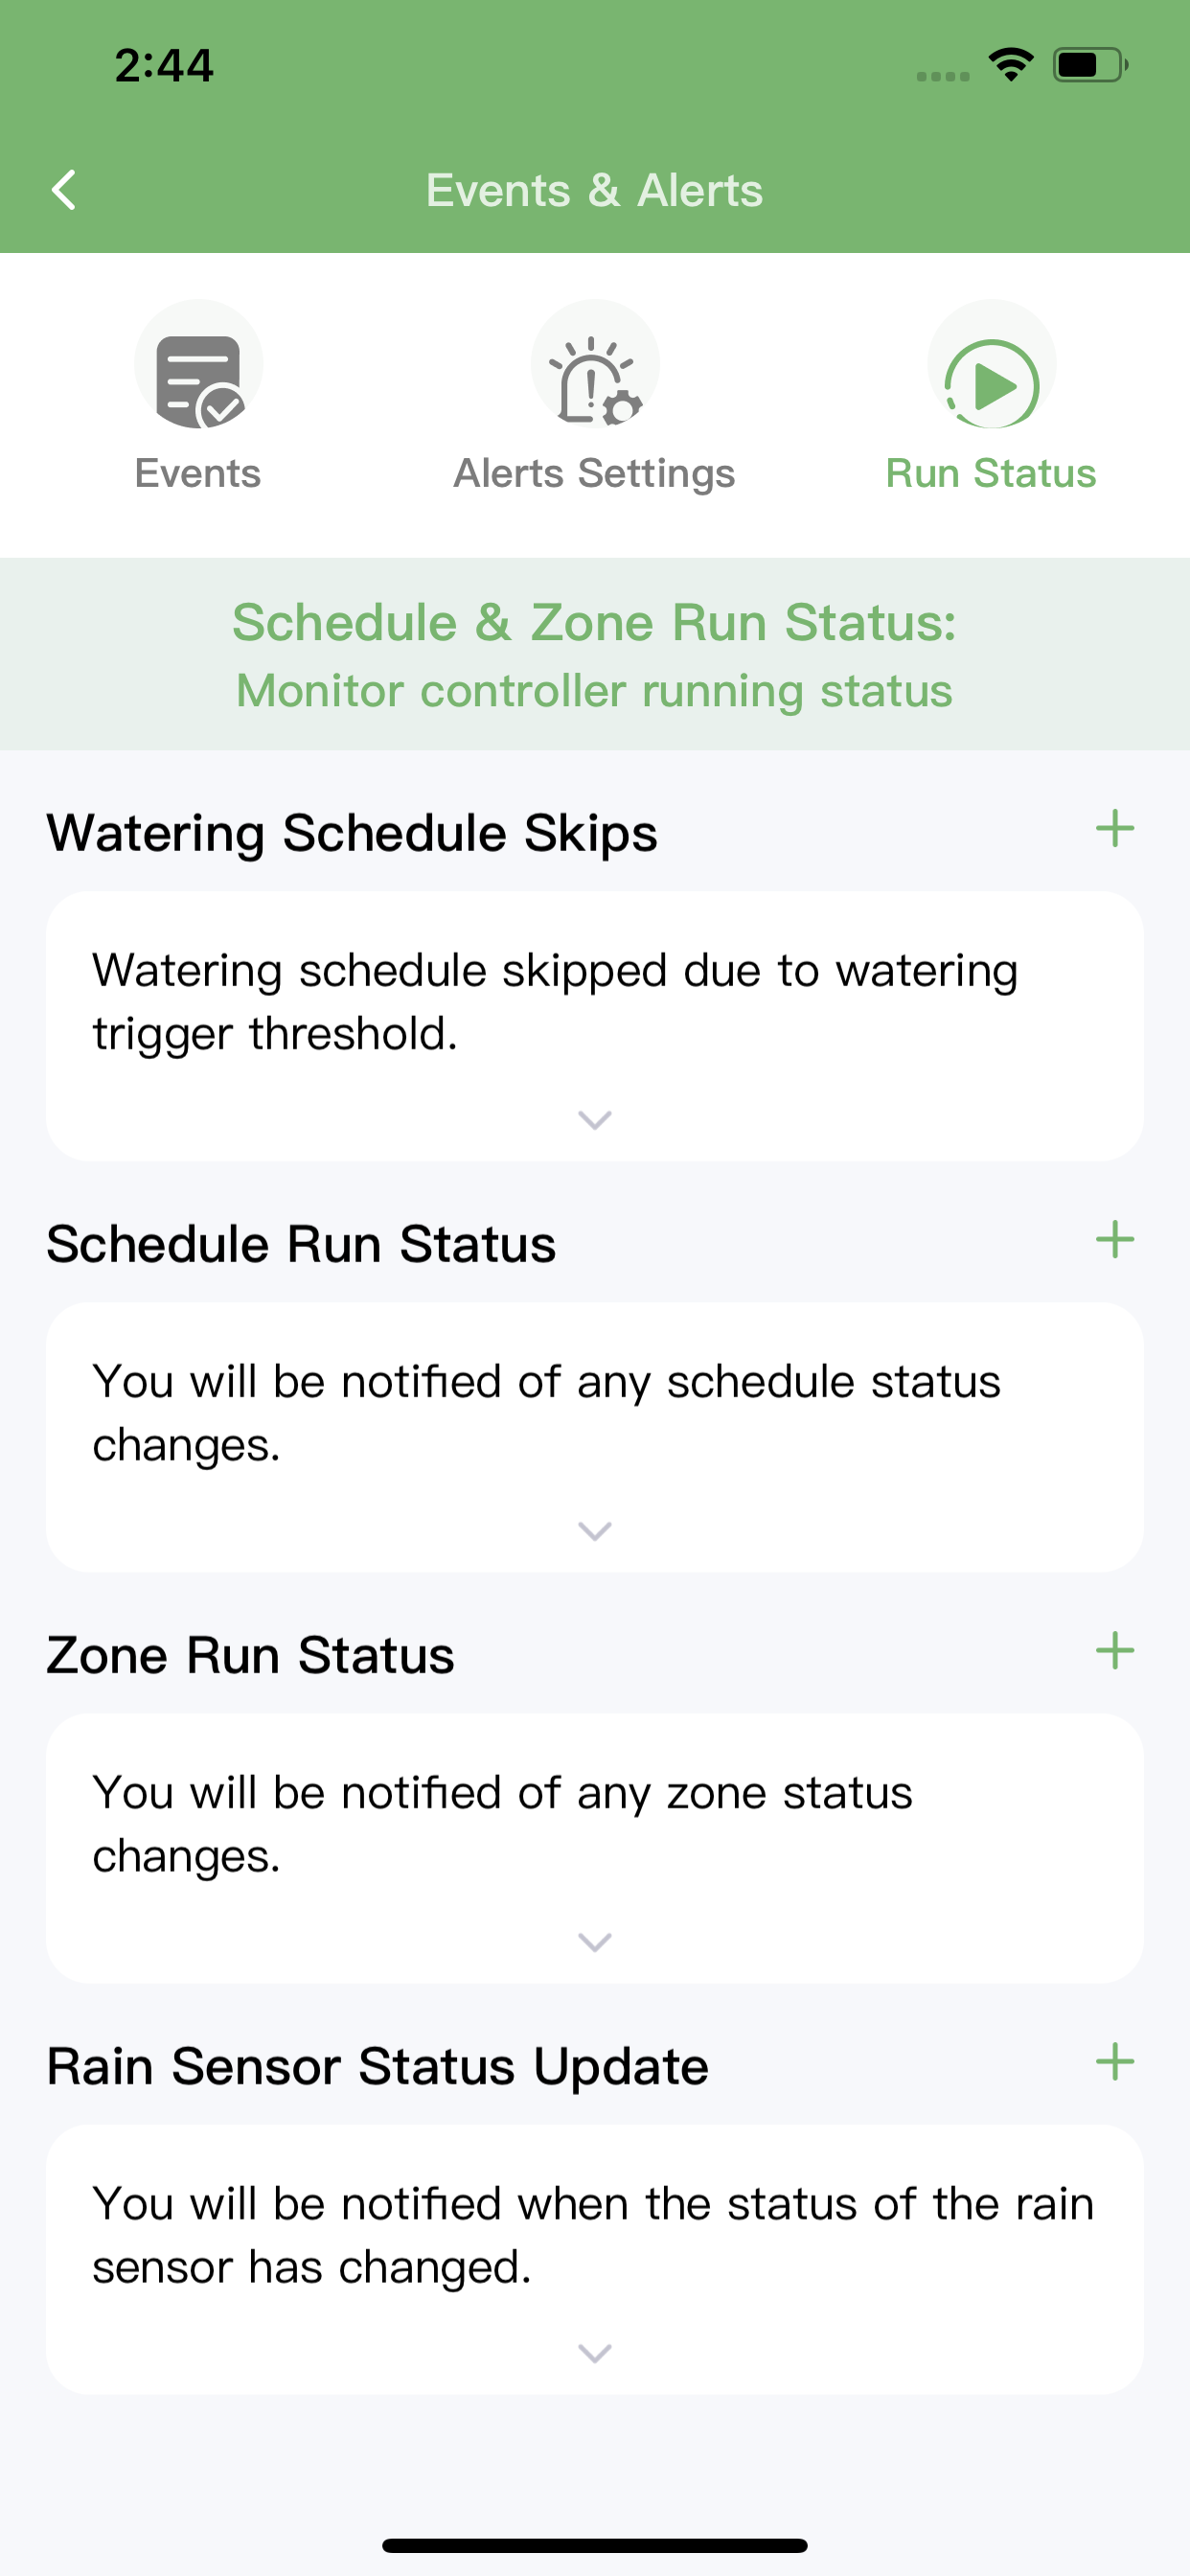
3. Flow Sensor Integration
For systems equipped with a flow sensor, ImoLaza provides advanced flow-based alerts:
- High Flow Alert
- Low Flow Alert
- High Leak Detected
- Slow Leak Detected
These alerts help you quickly identify and address any unexpected changes in water flow, potentially saving water and preventing damage.
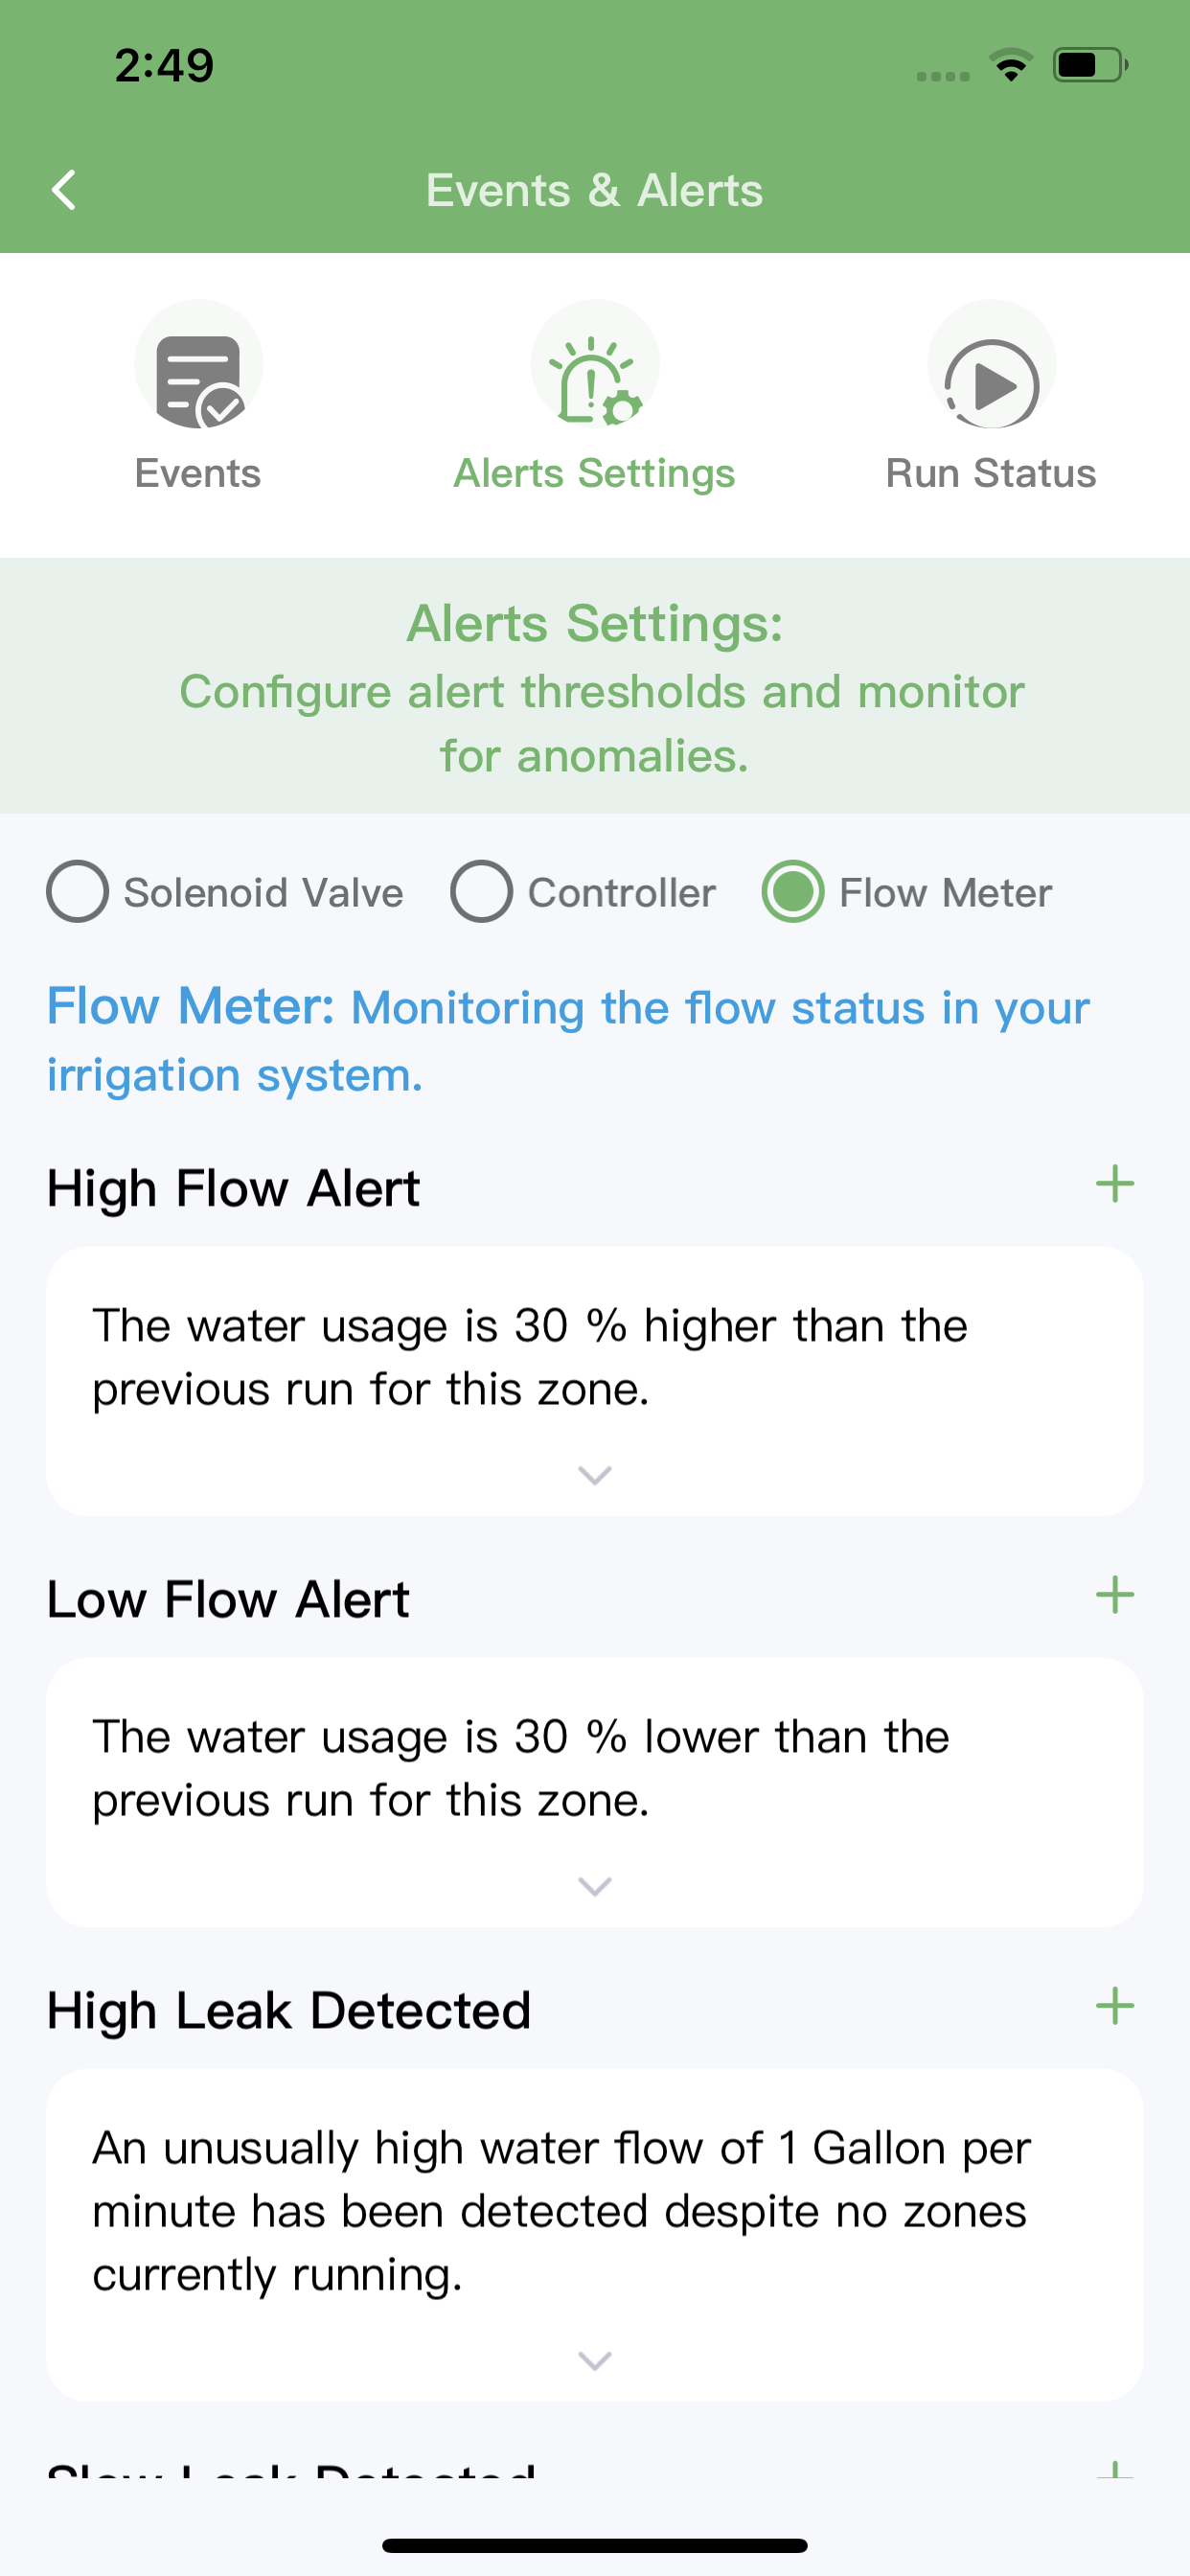
Run Status
ImoLaza tracks the operational status of your irrigation system, focusing on:
1. Watering Schedule Skips
2. Schedule Run Status
3. Zone Run Status
4. Rain Sensor Status Updates
This comprehensive monitoring ensures that your irrigation system operates as intended, adapting to environmental changes and system performance. Also, here is where you turn on/off the notification. Tap the "+" on the right to set the notifying method, and remove the notification as well.
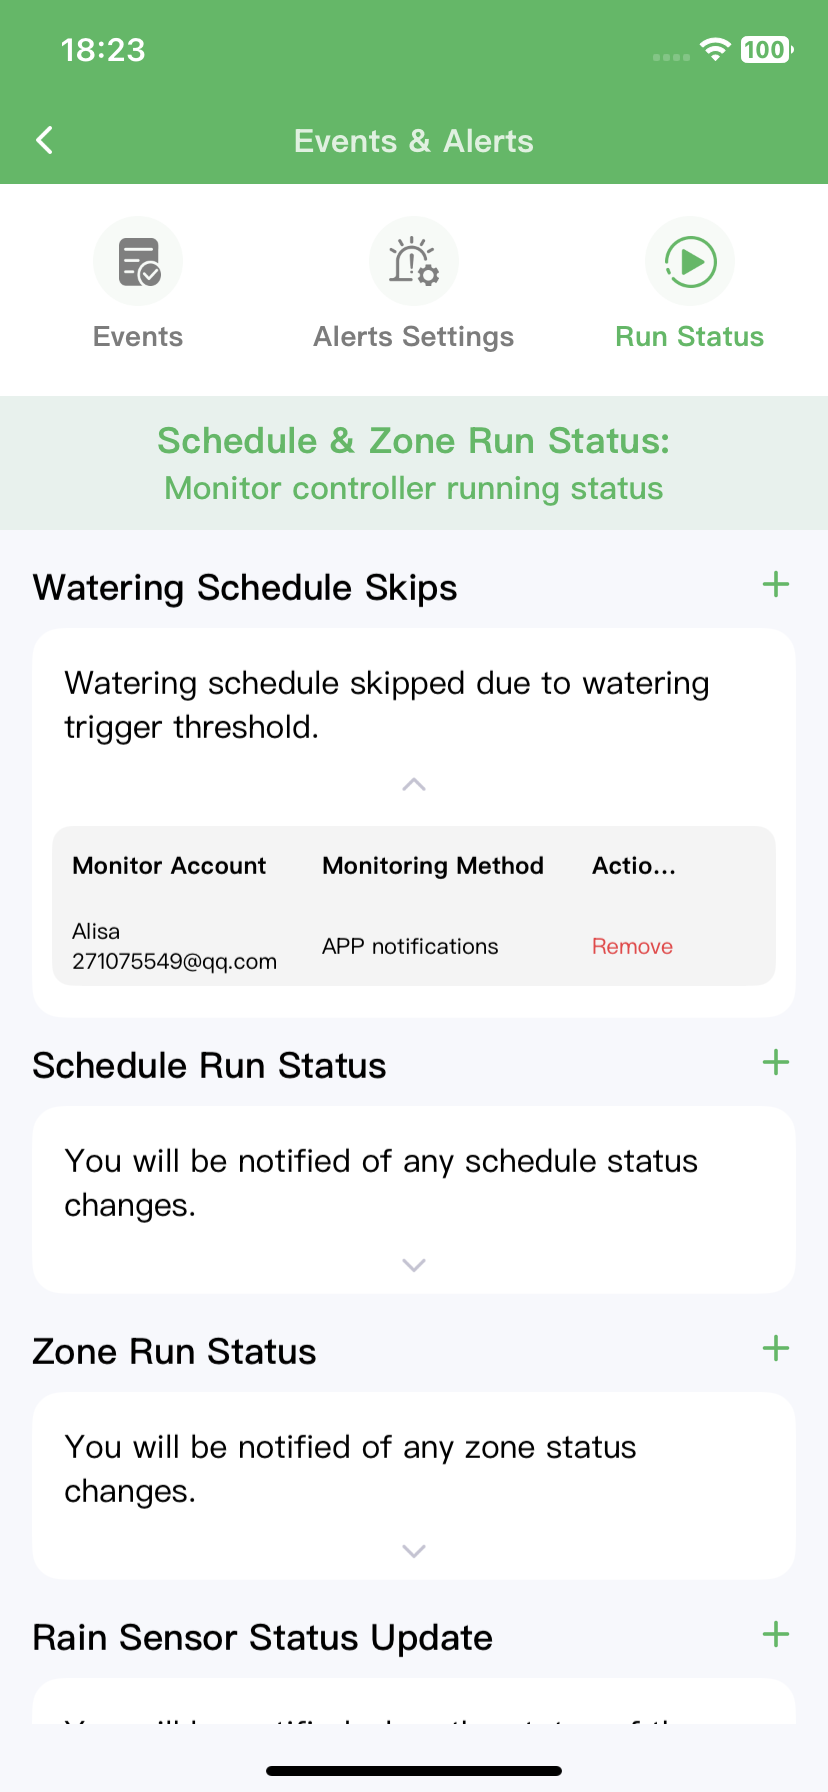
Event Logging
All system events, alerts, and status changes are meticulously logged in the Events section. This historical data provides valuable insights for system maintenance and troubleshooting.
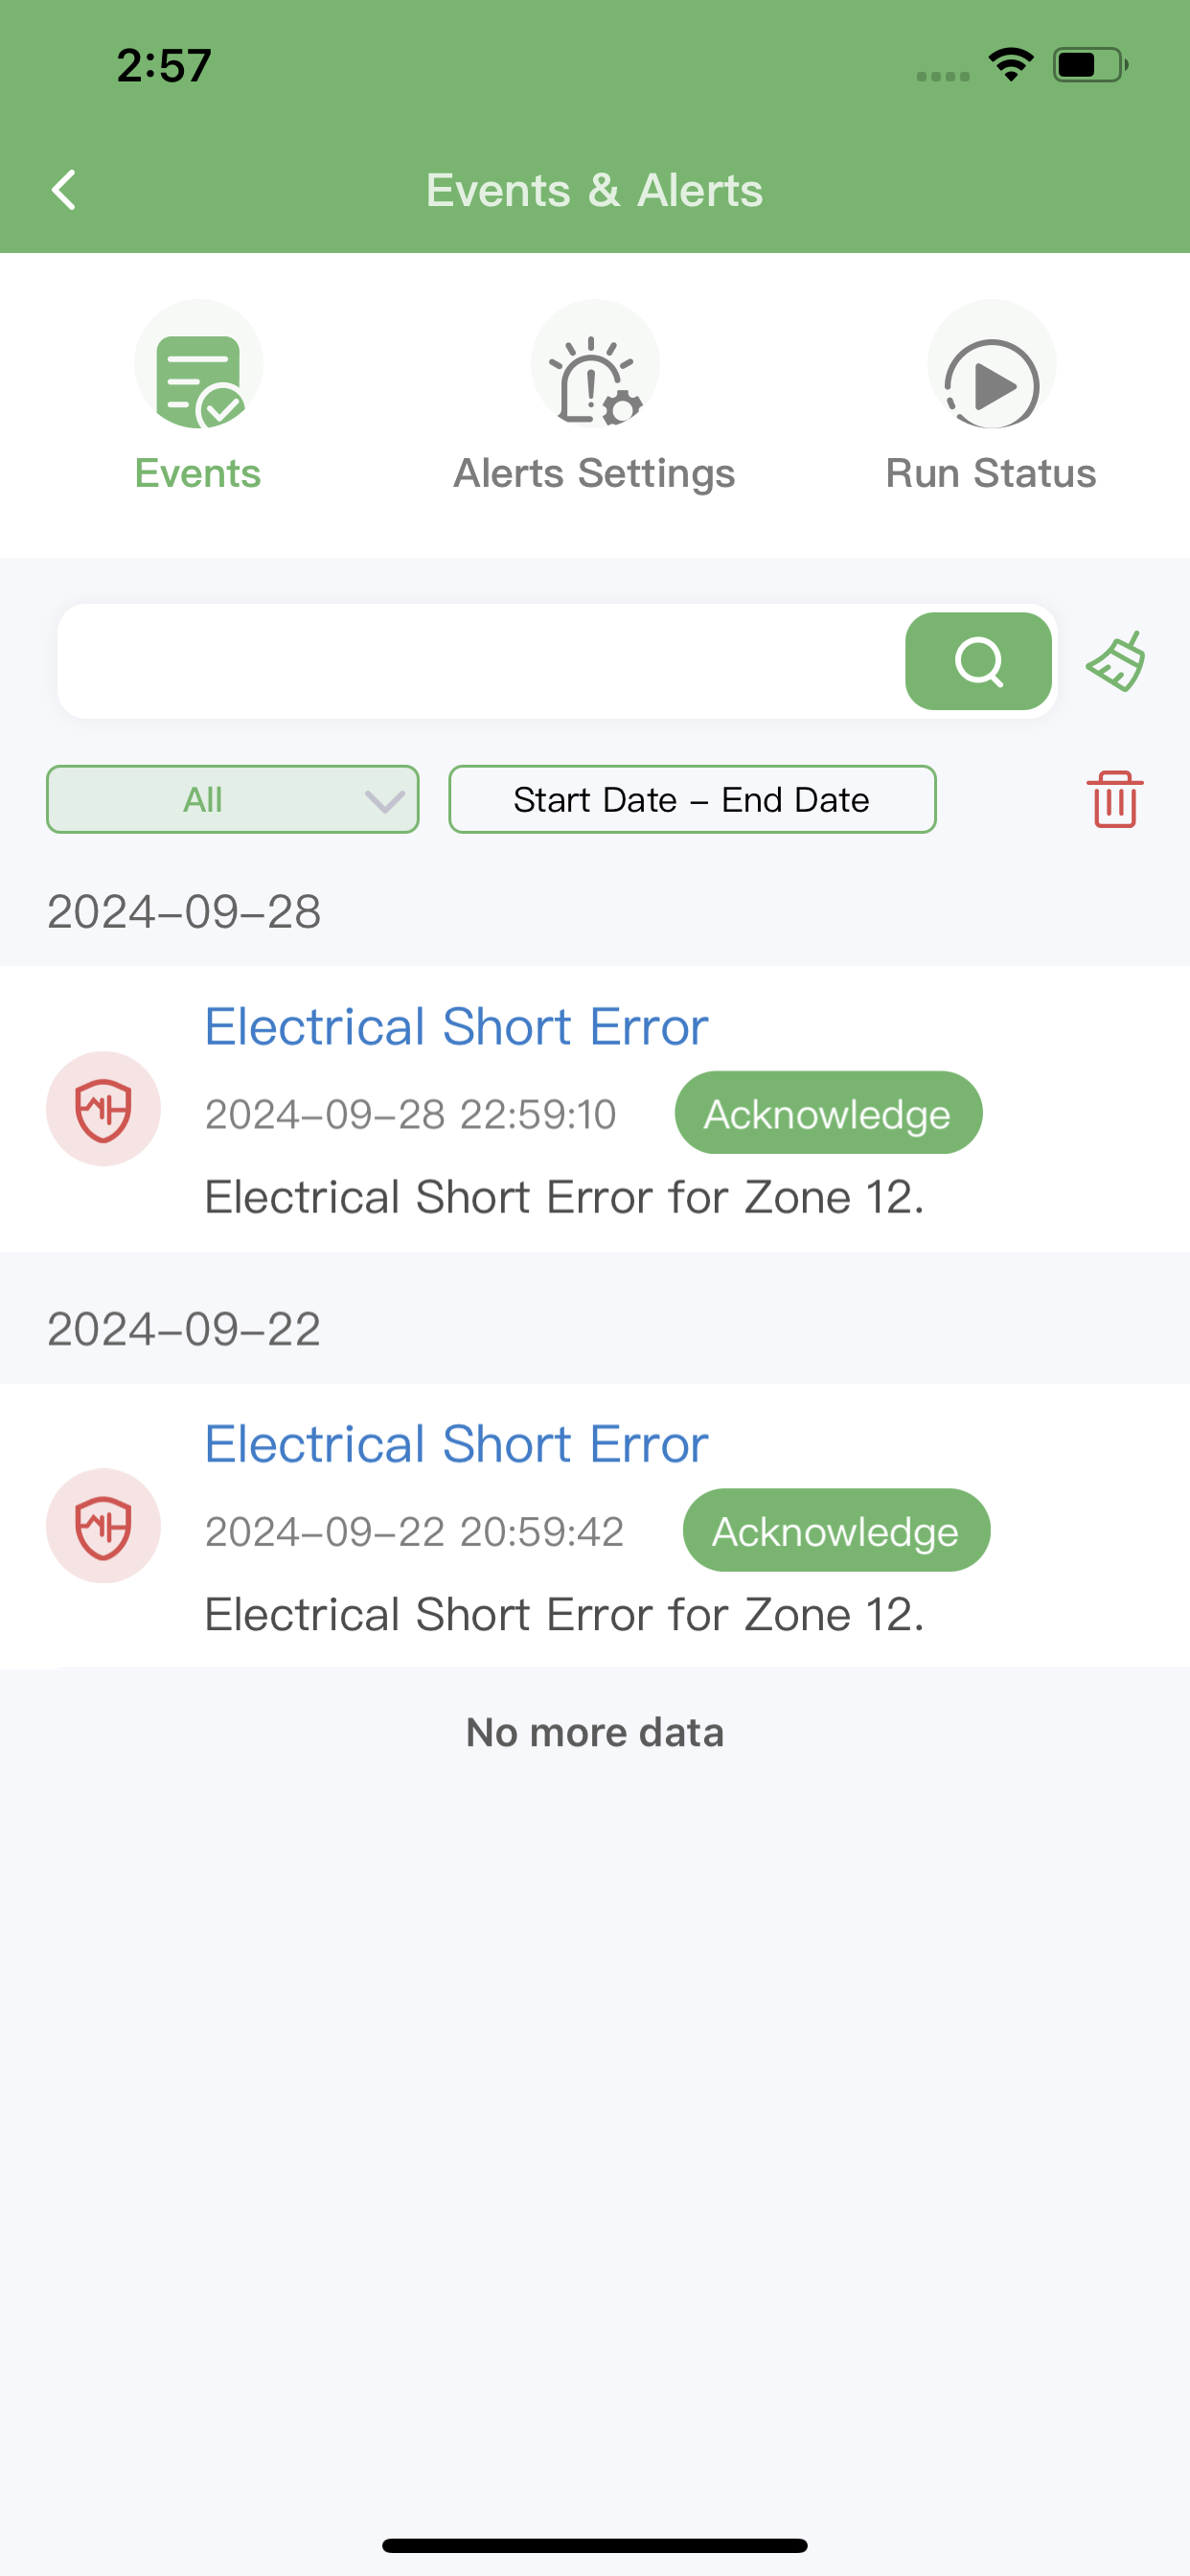
Conclusion
By leveraging ImoLaza's advanced alert system, you can ensure the efficient operation of your irrigation system, minimize water waste, and quickly address any issues that arise. Regular monitoring and prompt responses to alerts will help maintain the health of your landscape while optimizing resource use.
Still need help?
In case the above method doesn’t work for you, please contact our technical support team directly using the contact information below. We will respond to you by email within 12h after your message reaches us.
Email: Support@imolaza.com
Author: Imolaza
Last update: 2025-02-06 03:30
If multiple zones are turned on at the same time and your system isn’t designed to handle that load, it can lead to a few potential problems that could damage components, especially the valves and overall system:
. Increased Wear: The valves in your irrigation system control the flow of water to each zone. When you turn on multiple zones simultaneously, the valves are forced to work harder than usual to maintain proper flow. This constant strain can lead to premature wear, causing leaks or valve failure over time.
. Valve Burnout: Some valves are designed to handle specific pressure ratings. If there’s a sudden surge in pressure when multiple zones are activated, it could cause internal components of the valve to wear out or even burn out.
. When multiple zones are activated at the same time, the available water pressure gets divided between all the active zones. If the system is not designed to handle simultaneous activation, it may result in low water pressure across the entire system.
. In severe cases, pressure surges or drops could damage not just the valves, but the pipes and sprinklers themselves, causing leaks or ruptures. If pressure is too high, it might even result in burst pipes.
. Sprinklers in different zones are often calibrated for specific flow rates. If you run multiple zones simultaneously and the flow rate drops due to low pressure, sprinklers might not get the right amount of water, causing uneven watering or clogging over time.
. Low pressure can also cause water hammer (a sudden pressure surge when a valve shuts off), which could stress and damage the internal components of the sprinkler system, including the valves, pipes, and connectors.
. In systems with electrical control valves, turning on multiple zones can draw more current than the system’s wiring and controller can handle. This could lead to short-circuiting, burnt-out circuits, or even the complete failure of the control system, which would be costly to repair.
. Controller Overload: The system's controller (especially if it’s a smart system like yours) may also be overwhelmed if it tries to manage too many zones simultaneously. It could cause system errors or even malfunction.
. In systems with a pump, trying to operate multiple zones at once can cause the pump to overheat due to higher demands on its power output. If the pump runs for extended periods under this strain, it could fail entirely, potentially requiring a complete replacement.
. If your system uses a pump, the pump will have to work harder to maintain the required pressure for all active zones. This added workload can lead to overheating, increased energy consumption, and wearing out faster than if zones are activated sequentially.
. Similarly, pressure regulators could fail to manage the water pressure effectively, causing excessive pressure in some zones and not enough in others, leading to system imbalances and potential damage to the entire irrigation setup.
The key is ensuring that your irrigation system is properly designed to handle the simultaneous activation of multiple zones. If it’s not, you're risking damaging the valves, pump, pipes, and even the entire controller system. If your system is underpowered for multiple zones, it's best to schedule or stagger zones, which helps maintain optimal pressure and protect the integrity of all components. If you're noticing issues, it might be worth checking the water pressure, valve ratings, and controller capacity to ensure everything is running smoothly.
Still need help?
In case the above method doesn’t work for you, please contact our technical support team directly using the contact information below. We will respond to you by email within 12h after your message reaches us.
Email: Support@imolaza.com
Author: admin
Last update: 2025-02-27 08:40
To more accurately predict weather changes, you can access rain sensors. Our devices support all normally closed rain sensors, both wired and wireless. This article will teach you how to access rain sensors.
What is a rain sensor?
There are two types of rain sensors, normally open and normally closed. Our devices support normally closed sensors only for the time being (Don't worry, 90% of rain sensors on the market are normally closed-type rain sensors). It is a device that communicates with your sprinkler controller regarding the amount of rainfall. If enough rainfall falls, the sensor lets the controller know to skip the next cycle without running.
Smart Weather Genius or rain sensor
There is no conflict between the operation of the Smart Weather Genius and the rain sensor, the rain sensor can be used as a supplement. The rain sensor is useful as an "insurance policy" against inaccurate data from local weather stations. Avoid over-watering.
How to connect the rain sensor to the controller?
1. Switch off the power to the controller
2. Connect the sensor terminals correctly
Wired sensor wiring

Wireless sensor wiring
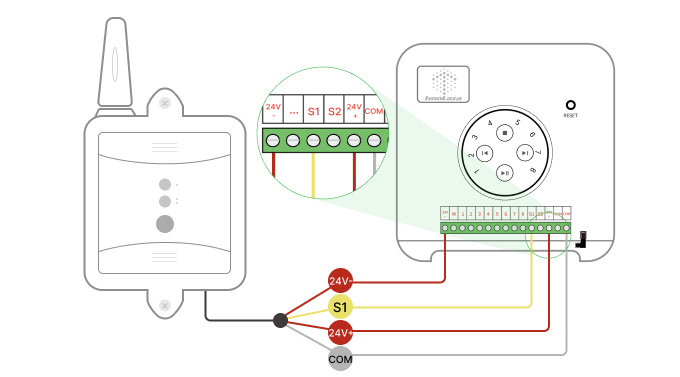
3. Reconnect the power to the controller
4. Find the "Sensor" tab in the "Controller Settings" of the app and open the corresponding sensor port
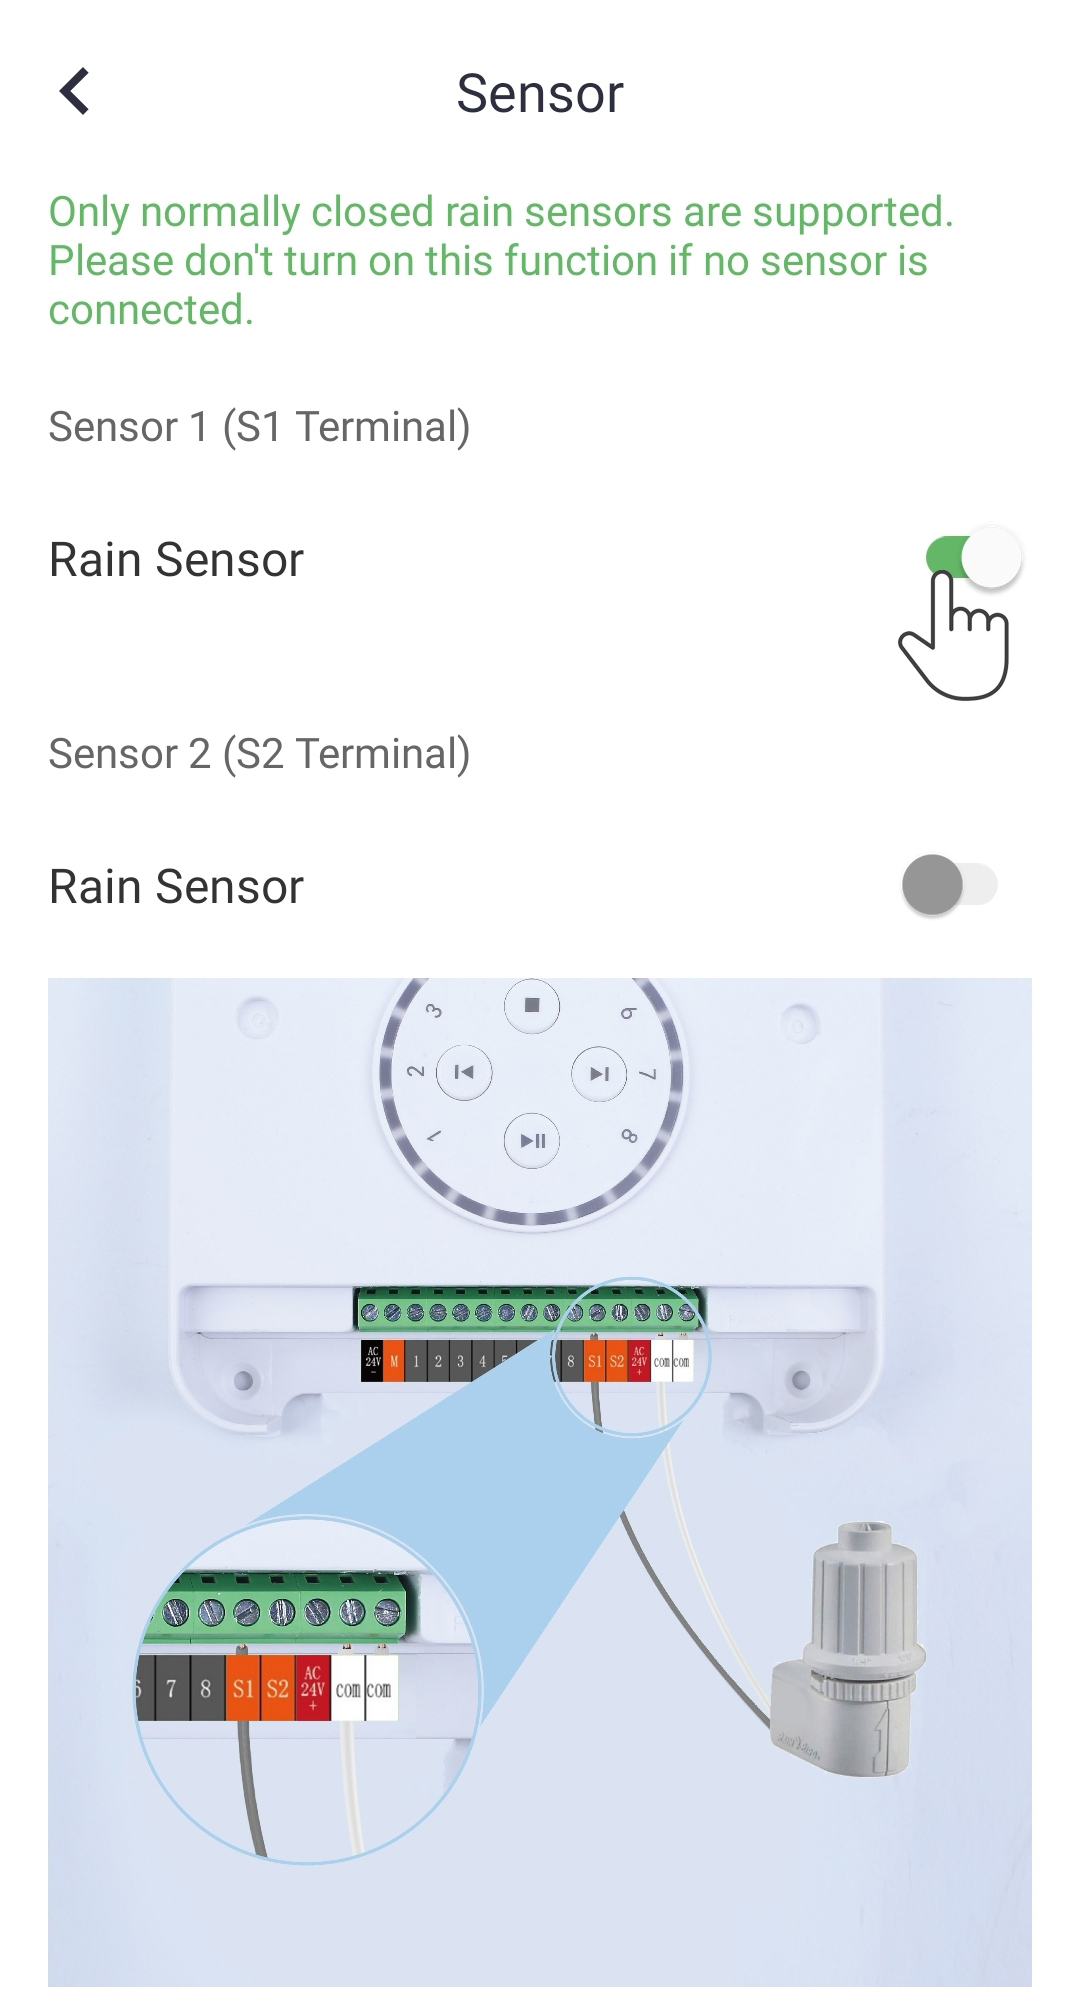
If you are still not sure how to wire the sensor, please tell us the make and model of your sensor and we will guide you through the installation.
Note: Be sure to enable the switch in the App, otherwise the controller remains in an unenabled state.
Still need help?
In case the above method doesn’t work for you, please contact our technical support team directly using the contact information below. We will respond to you by email within 12h after your message reaches us.
Email: Support@imolaza.com
Author: Imolaza
Last update: 2024-04-22 12:02
Winter can be a dangerous season for your irrigation system. The extremely low temperatures are uncomfortable, and so is your irrigation system. The water in your pipes can freeze due to the low temperatures, and the pipes would freeze and burst. Therefore, freeze protection is necessary, and this article will teach you how to protect your irrigation system during the winter.
Please refer to this chart to determine when you need to start preparing for winter in your area.

Step1: Turn off your water supply
This is undoubtedly the first step, you need to turn off the water supply to prepare for the well blowout later. Turning off the water source will also prevent waste caused by leaks. So, turn off the valves on the pipes that supply water to your irrigation system. If you don't know where this valve is, find the location of your water meter and turn off the main valve near the meter.
Step2: Drain the water
It's not enough to prevent water from coming in; you need to drain any water that remains in the pipes. If you have an air compressor, you can do this work yourself and save on service charges.
Manual Draining
Some sprinkler systems may allow you to drain the water manually. These systems have shut-off valves at low points or ends of the piping. Make sure to wear eye protection while completing this step because the water supply in the system is under pressure. Slowly open the valves one at a time and let the water run out, then close them when finished.
Automatic Draining
Other systems have components that will automatically drain the water once the main valve is shut off and the water pressure drops. You can usually activate the system by running one of the sprinkler heads with the water supply off. However, there will still be some water trapped within the valves themselves. Locate the solenoid on each valve—a plastic cap with wires coming out of the top—and loosen it. This will allow air to flow into the system and water to flow out.
Blow-Out Draining
Some sprinkler systems allow you to hook an air compressor up to the pipes to force the remaining water out of the sprinkler heads. However, this method is destructive and even dangerous when tried on a sprinkler system that isn’t built for it. Additionally, it’s worth mentioning that a typical DIYer’s air compressor might create the 50 PSI (pounds per square inch) of pressure needed to clear out PVC piping. However, at-home machines can’t usually generate the 10 CFM (cubic feet per minute) of volume needed to quickly and completely blow out the water. For these reasons, we don’t recommend attempting the blow-out draining method on your own. Even if you don’t damage the system, you might not get the job done completely, and even a little water left in a sprinkler system over the winter can cause problems. Hiring a professional for this job is a once-a-year cost that’s well worth it. ImoLaza recommends hiring an irrigation professional to perform well spraying. Without specialized equipment and expertise, this process can be very time-consuming and may even result in damage to the system.
Step3: Enable the Standby Mode
You can enable standby mode on the controller to disable the irrigation schedule throughout the entire winter season.
How to enable the standby mode?
Step4: Isolate above-ground components
Finally, ensure that all above-ground components of the sprinkler system are properly isolated from the weather. The main shutoff valve and any exposed piping or backflow preventers should be wrapped with a foam cover or insulating tape. On backflow preventers, make sure not to block any vents or drains.
Still need help?
In case the above method doesn’t work for you, please contact our technical support team directly using the contact information below. We will respond to you by email within 12h after your message reaches us.
Email: Support@imolaza.com
Author: Imolaza
Last update: 2023-05-20 05:09
If you find your controller shuts down and the app shows offline, or notice the controller flashes red while running a schedule. Then there might be a shortage in your irrigation system. Please troubleshoot with the following solutions.
In the first case, you see a specific part on the controller flash red, then there is a short circuit. Replace the valve in that specific zone and run it again.
In another case, the controller shuts off, and the app shows offline. Follow the steps below.
Step1: Power Cycle the Controller
You need to verify whether there is something wrong with the controller itself first.
Unplug the power cord for 30 seconds, then plug it back in. If Imolaza's indicator blinks again, it means that the controller is not the problem. Continue the process with step 3. If the indicator still not blinks, Try step 2 below.
Step2: Quick Run Zones
Select zones manually on the controller to run, if the indicator is still dark but the nozzle is watering. There might be something unexpected happened to the indicator only. Please contact us immediately and we will give you a free return.
If the indicator is still dark and the irrigation system strikes, the controller would take responsibility for this. Please contact us in time, we will solve it for you.
Step3: Check the Solenoid Valve
Reboot the controller and it blinks again, let's dive into the irrigation system. Select zones to run in sequence on the controller, and switch to the next zone after each zone has run for 10 seconds. If the controller indicator suddenly goes off when switching to a certain zone, such as zone 3. Then it is possible that the sprinkler valve controlling three zones has a short circuit problem. We recommended that you call the service provider who installed your irrigation system and request a home repair.
Still need help?
In case the above method doesn’t work for you, please contact our technical support team directly using the contact information below. We will respond to you by email within 12h after your message reaches us.
Email: Support@imolaza.com
Author: Imolaza
Last update: 2024-07-31 08:45
During the use of the controller there may be areas that are not poured, here are a few troubleshooting methods listed. Users can check by themselves according to the following methods.
1. Check the Water Supply
The water could be been shut off to the zone valves. Go to the zone valve and give the solenoid (where the wires are connected) 45 degrees to 90 degrees counterclockwise.
If there is still no water out, there may be a leak or a broken pipe, the main valve has a problem, or something stuck.
If the valve has water, the sprinklers will come on even without the controller. it may be a problem with the solenoid valve of the sprinkler valve, check whether the diaphragm is rebound, and consider replacing the solenoid valve.

2. Check Controller Voltage
It is possible that the voltage is not enough to drive the solenoid valve
Use a voltmeter to check the screw port voltage, first, run the zone to be tested. Use a volt meter to confirm there is 24–30 VAC at the screw terminals marked "COM" and the corresponding station screw terminal (e.g. "COM" and "3").
Then detect the voltage of the same two wires on the sprinkler valve(refer to the hot spot in the illustration below) to see if there is voltage; if there is no voltage or very low voltage, there may be a problem with the wire or poor contact between the wire and the controller.
If the voltage is normal, then you need to replace the solenoid valve.

3. Check the Sensor Switch
ImoLaza is compatible with NC(normally closed) rain sensors only, no matter wired or wireless.
If you have not connected the rain sensor, but accidentally enabled the rain sensor switch in the app. Then the controller would skip all the schedules you set. You will find that your lawn never watering. Please disable the sensor switch in the Imolaza App.
If you connected the rain sensor and enabled the switch, still no water comes from the nozzles. Verify that you enabled the right switch, you will need to turn the "S1" switch on if you connected the rain sensor to the terminal "S1". Be sure not to make it wrong.
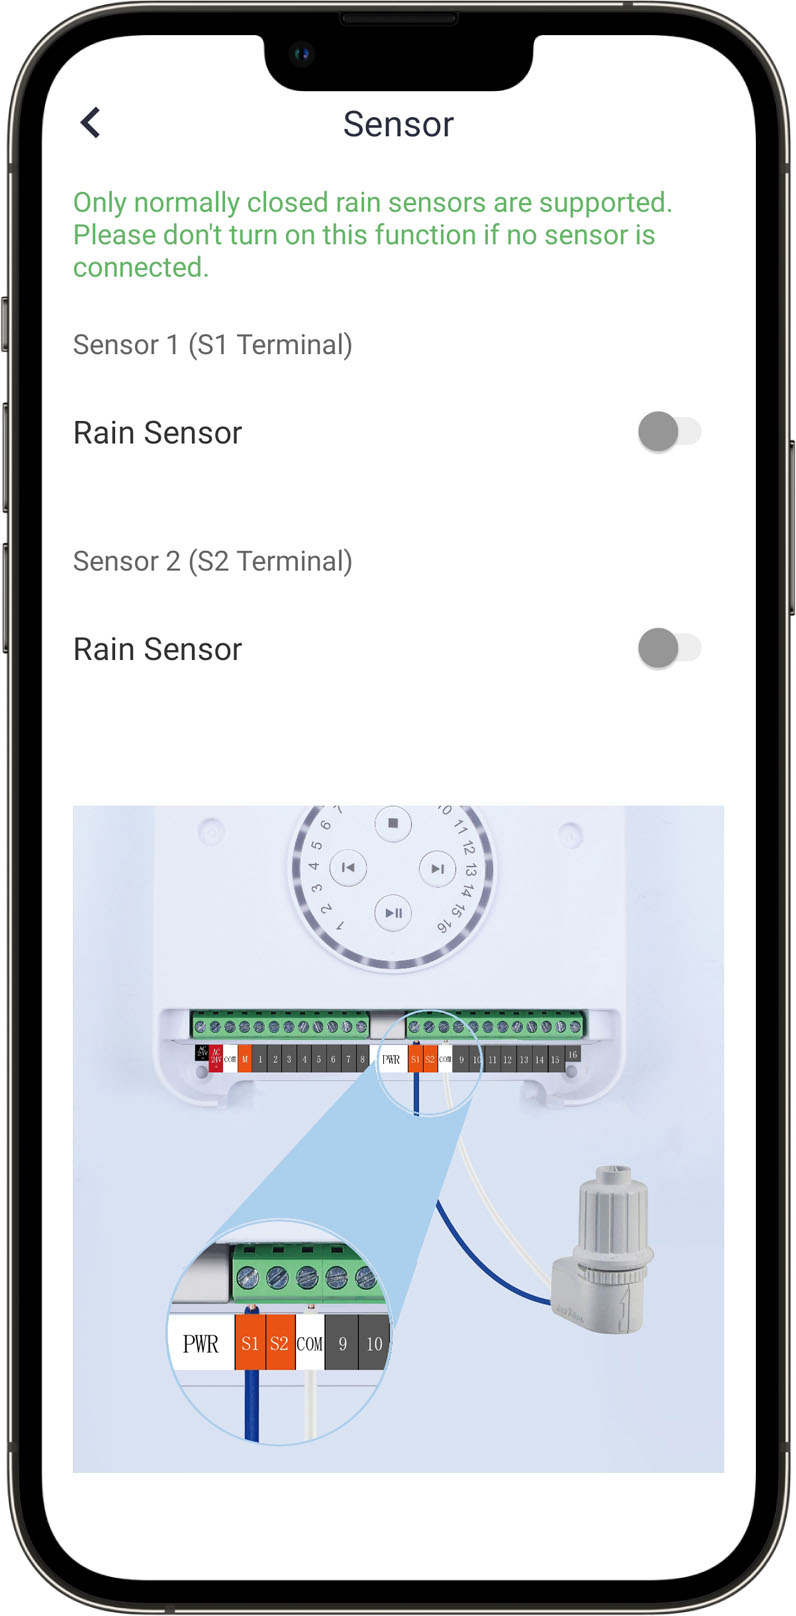
4. Check Wi-Fi Connection
If the Wi-Fi connection is poor, the smart schedules may not be executed.
Check the Wi-Fi signal strength by SSID in Device Info, if the signal is too poor, you need to place the router closer to the controller or get a repeater.

There are other conditions that would cause this issue, please see the list below.
. The backflow may be off. If the handle on your backflow valve gets inadvertently shut off, it restricts any water from flowing past the backflow and to the sprinkler system valves.
. A wire might have been cut.
. Sprinkler heads might be adjusted
......
Still need help?
In case the above method doesn’t work for you, please contact our technical support team directly using the contact information below. We will respond to you by email within 12h after your message reaches us.
Email: Support@imolaza.com
Author: Imolaza
Last update: 2023-10-20 11:52
Author: Imolaza
Last update: 2023-05-12 11:47
Starting up an irrigation system in the spring is an important task to ensure that your plants and lawn receive the proper amount of water they need to thrive. Here are some steps to follow as a guide to get your irrigation system up and running for the spring season:
1. Check your lawn for frozen ground
You don't wanna take steps before your lawn agrees that the winter is over. Dig at least one foot into the soil in an inconspicuous part of your lawn. If you strike frozen ground, you’re too early and should wait for one to two weeks before activating the system.
Starting your sprinkler system while the soil is still frozen can result in broken water lines during the startup process or even hours later, if the ground is cold enough to freeze the water in the lines.
2. Inspect the system
Before turning on the water, take a walk around your property and check for any visible damage to the system. Look for broken sprinkler heads, leaks, or other issues that may have occurred over the winter.
If the nozzle is damaged, unscrew it from the head and buy a replacement at your local lawn care center. If there’s more extensive damage to the entire head assembly, the repair can be a bigger project that you might want to outsource to an irrigation maintenance professional.
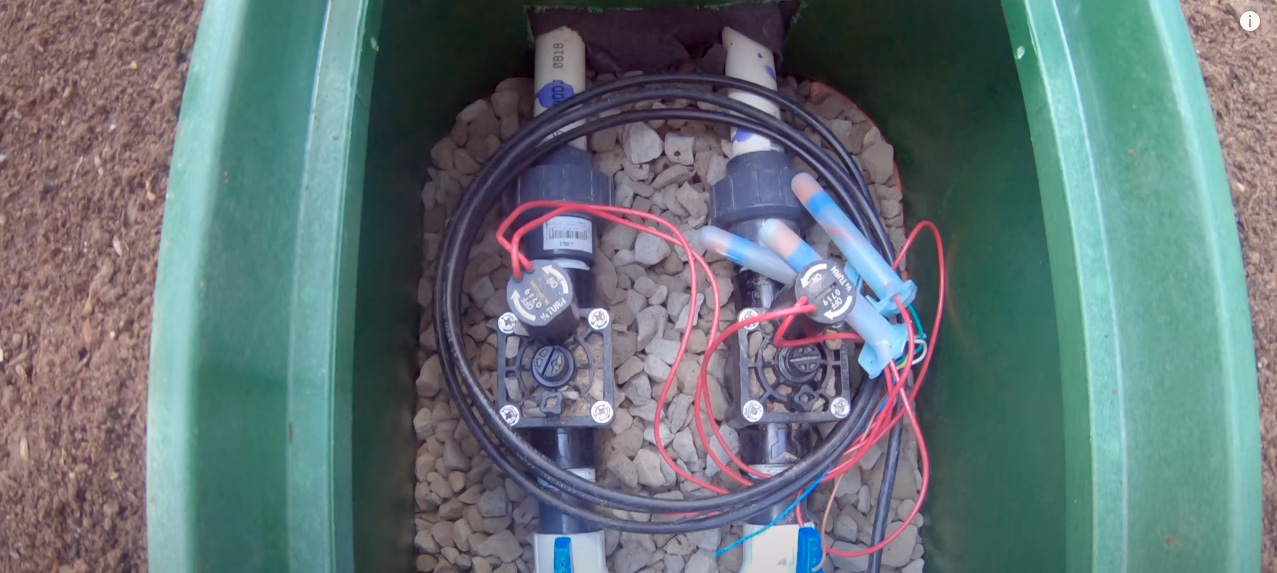
3. Check the water source
Make sure that the water source for your irrigation system is turned on and functioning properly. This may be a well, a municipal water supply, or another source.
Open the system main water valve slowly to allow pipes to fill with water gradually. Opening the valve too quickly sends a rush of water and air through the system, creating an effect called a “water hammer”. This surge of pressure can crack pipes, break valves and even send sprinkler heads rocketing into the air.
5. Exit standby mode
If you enabled standby mode during winter and need to reactivate your controller in spring, you'll first need to exit standby mode. You can do this by navigating to the 'Standby Mode' tab in the settings interface and disabling it.
ImoLaza Standby Mode: What is it and Why is it Useful?
6. Run a manual test
Quick run zones one by one, then go watch your sprinklers at work. If the spraying range of a particular nozzle is significantly smaller than the other nozzles, that’s often a sign of a water line break or leak. It's possible that something is stuck in the nozzle or the valve. Watch for soggy spots to develop in your soil to pinpoint the area of the break. Clean the nozzles thoroughly, an old toothbrush helps with this job.
7. Adjust the system as needed
As the spring weather changes, you may need to make adjustments to your irrigation system to ensure that your plants are receiving the right amount of water.
In case the above method doesn’t work for you, please contact our technical support team directly using the contact information below. We will respond to you by email within 12h after your message reaches us.
Email: Support@imolaza.com
Author: Imolaza
Last update: 2023-07-20 04:48
If you find water continuously flowing at full pressure from the valve, please follow these steps:
1. First, confirm that the valve is installed in the right direction. The flow direction arrow on the valve should point in the direction of the water flow.
2. If the valve is installed correctly, make sure the bleed screw of the valve is closed.
3. If the valve is manually closed, shut off the water source and remove the solenoid valve. Ensure that there is a valve core inside the solenoid valve and that it can move up and down easily. Reinstall the solenoid valve, and screw down finger only.
4. If the valve remains open, check if there are any impurities on the diaphragm. Also, check if the diaphragm is noticeably deformed or pitted. If there are impurities, clear them and rinse the diaphragm with cold water. Replace the diaphragm and test the valve. If the problem persists or if the diaphragm is visibly damaged, it needs to be replaced.
5. If you find water leaking from the lowest sprinkler head, you will need to replace the diaphragm in the valve.
If you encounter this issue, it's important to note that if your valve cannot be closed, you can try unplugging or cutting off the power to the controller. If the water stops flowing, it indicates that the controller is still sending a voltage signal to the valve, please contact us and we will take care of it. If the water continues to flow, the problem lies within the valve itself.
In case the above method doesn’t work for you, please contact our technical support team directly using the contact information below. We will respond to you by email within 12h after your message reaches us.
Email: Support@imolaza.com
Author: Imolaza
Last update: 2023-10-16 10:28
Being an important part of your irrigation system, solenoid valves control the flow to water your lawn. It receives the signal from the controller to start or end your watering schedules. This article helps you to know more about the solenoid valve and how the controller works with it.
1. What is a solenoid?
What’s a solenoid? Every valve has one — a coil component that uses electrical signals from the irrigation controller to open and close each valve, letting water move through the system.
2. What Causes Solenoid Valve Failure?
2.1 Incorrect Voltage
An excessive voltage running through your solenoid valve can easily burn and short it out, which would cause unrepairable damage. Make sure the voltage allowance matches the voltage output of your irrigation system.
2.2 Liquid Contact
Any electrical appliance should stay away from liquid to maintain in good condition, so does the solenoid valve. O-rings would help to create watertight seals to prevent the flowing water, but water from the outside like rain is unpreventable. Check your valve box.
2.3 Sediment Damage
There is a very small possibility that sediment can get into the pipe and finally get stuck in the valve, but sometimes, it does. Those sediments would lead to significant issues, causing the system to overheat, damaging the components within the valve. In some cases, you'll need to disassemble the valve and clean it up, and finally, put it back together.
2.4 Excess Water Pressure
Excessive water pressure in an irrigation system can lead to the failure of the solenoid valve and the need for replacement of substantial sections of the system. It is imperative to thoroughly verify the pressure capabilities of all elements within the irrigation setup prior to implementation.
2.5 Temperature Changes
Damage to solenoid valves can also be caused by significant temperature changes. Solenoid valves are only designed to withstand a specific temperature range, and extreme hot or cold weather can cause wear and tear, leading to the need for replacement.
3. How Do You Diagnose A Faulty Solenoid Valve?
There are three common signs that your sprinkler valve solenoid has gone bad:
Diagnosing issues with solenoid valves are usually straightforward due to their simple design. However, it's important to keep in mind that other factors besides the solenoid can cause problems. To accurately identify the issue, it's best to inspect the solenoid first. If you're not confident in your abilities, consider contacting an irrigation expert. Alternatively, you can inspect it yourself if you have the necessary expertise.
4. Common Solenoid Valve Problems.
4.1 Valve not closing
An irrigation solenoid valve that won't close is likely caused by a faulty plunger, which can be a result of mismatched voltage. To resolve this issue, first turn off the water source. Then, check for any electrical damage and test the voltage of your irrigation system to ensure it matches the valve's tolerance. If there is a power spike, installing surge protection may be necessary.
4.2 Valve not opening
If your irrigation solenoid valve isn't working, it's usually because there's some blockage in the valve that's preventing it from opening. The solution is to take apart the valve and remove the debris to fix the problem.
4.3 Valve leaking
A leak in irrigation solenoid valves and sprinkler systems can be caused by various factors such as broken o-rings, seals, high pressure, damaged valves, and clogged distribution lines. To fix the issue, one may need to replace the damaged parts, clear blockages, or install a pressure regulator.
The best way to avoid leaks is to regularly maintain the system and take preventative measures such as installing an irrigation filter, properly winterizing the system, and using high-quality manifold fittings with thicker o-rings.
4.4 Solenoid Getting Hot
If your solenoid valve feels hot, it could be due to an electrical problem or blockage in the mechanism. To determine the cause, you should inspect the valve. If there's sediment or debris inside, it may be causing the overheating. On the other hand, if the issue is electrical, inspecting the circuit will reveal the problem.
5. What can I do if the valve is not working?
5.1 Check for blockages
. Look for any blockages caused by sand or rocks within your solenoid valve
. Removing any debris will usually fix the issue
5.2 Inspect for damage
. Check for damage such as ruptures, melted plastic, or burnt-out coils or electronics
. If any damage is found, a replacement solenoid valve is needed
5.3 Consult with a professional
. If replacement or repair is needed, talk to your irrigation contractor
. Find out what caused the damage and what steps can be taken to prevent it in the future
Still need help?
In case the above method doesn’t work for you, please contact our technical support team directly using the contact information below. We will respond to you by email within 12h after your message reaches us.
Email: Support@imolaza.com
Author: Imolaza
Last update: 2023-05-12 11:07
You will require a screwdriver as the only tool. It is imperative to ensure the safety of the process by turning off the main water supply beforehand. The main shut-off can be accomplished by turning the ball valve or any other equivalent device.
Locate the valve causing the issue and loosen all the screws on its bonnet, then carefully remove the bonnet. Check the diaphragm for any signs of damage, such as tears or rips, which could result in improper closure of the valve. If the diaphragm is not in a suitable condition, replace it. Next, take out the support ring and inspect it for any rocks that may be hindering the valve from closing. Remove any rocks found and clear the valve of any debris.
Reinsert the support ring and diaphragm, making sure they are in their proper place. Then, place the bonnet back on the valve and tighten all screws to secure it in place. Finally, turn the main water supply back on, close the valve lid, and your valve should now be functioning correctly.
Still need help?
In case the above method doesn’t work for you, please contact our technical support team directly using the contact information below. We will respond to you by email within 12h after your message reaches us.
Email: Support@imolaza.com
Author: Imolaza
Last update: 2023-05-12 11:06
Author: Imolaza
Last update: 2023-02-07 04:11
Connecting a sprinkler system controller is a simple process that involves matching the wires of your system to the appropriate terminals. However, in more complex systems, there may be more wires than zones, which could be due to the inclusion of features such as Master Valves and Pump Start Relays. For such cases, advanced wiring is required, which involves some additional configuration. Nonetheless, the following instructions should provide guidance for most wiring scenarios.
With a Master Valve in your system?
If you have a master valve, connect it to the "M" terminal in the ImoLaza wiring bay, and then activate it through the ImoLaza App.
To access the "Master Valve" setting in the ImoLaza App, follow these steps: First, click on "Settings," then select "Controller Settings," and finally, click on "Advanced Wiring (M Terminal)." From there, choose the "Master Valve" option located at the top of the screen.

Pump Start Relay Wiring
A Pump Start Relay (PSR) functions as an electrical switch that turns on the 110 - 220VAC power supply to the pump when the master valve is enabled on the ImoLaza Smart Sprinkler Controller. Since the ImoLaza controller outputs 24VAC, it cannot directly operate a pump. Therefore, a PSR is necessary when using a pump with the ImoLaza.
PSR has the same wiring as the master valve, wires it to the "M" terminal and enables the "Well/Pump Start Relay" in the app.
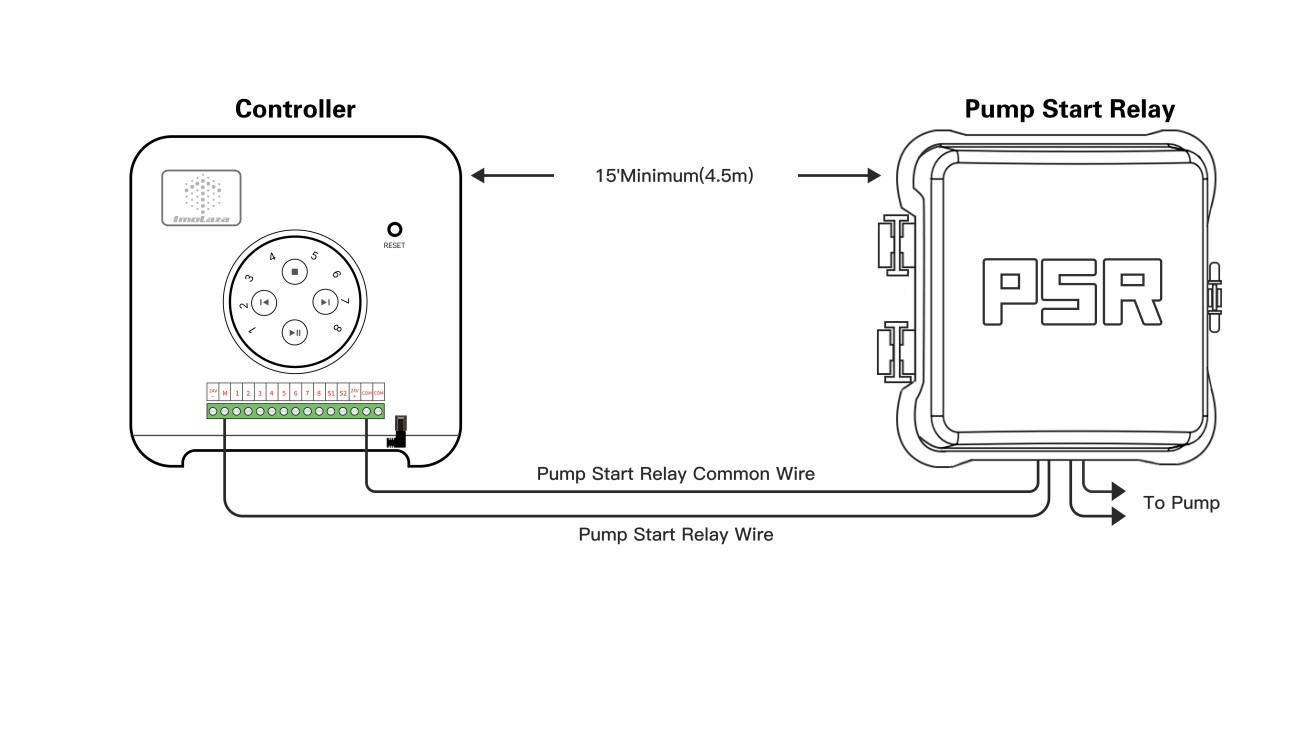
Still need help?
In case the above method doesn’t work for you, please contact our technical support team directly using the contact information below. We will respond to you by email within 12h after your message reaches us.
Email: Support@imolaza.com
Author: Imolaza
Last update: 2023-10-20 11:35
If you are unable to distinguish all the irrigation wires, you can differentiate them through the following steps.
First, power up the controller. If the irrigation system has a main valve, loosen the main valve in advance to ensure water flows normally. Then, randomly select two wires and make contact with the 24V AC +/- terminals(in either order) on the controller. Compare the results with the table below.
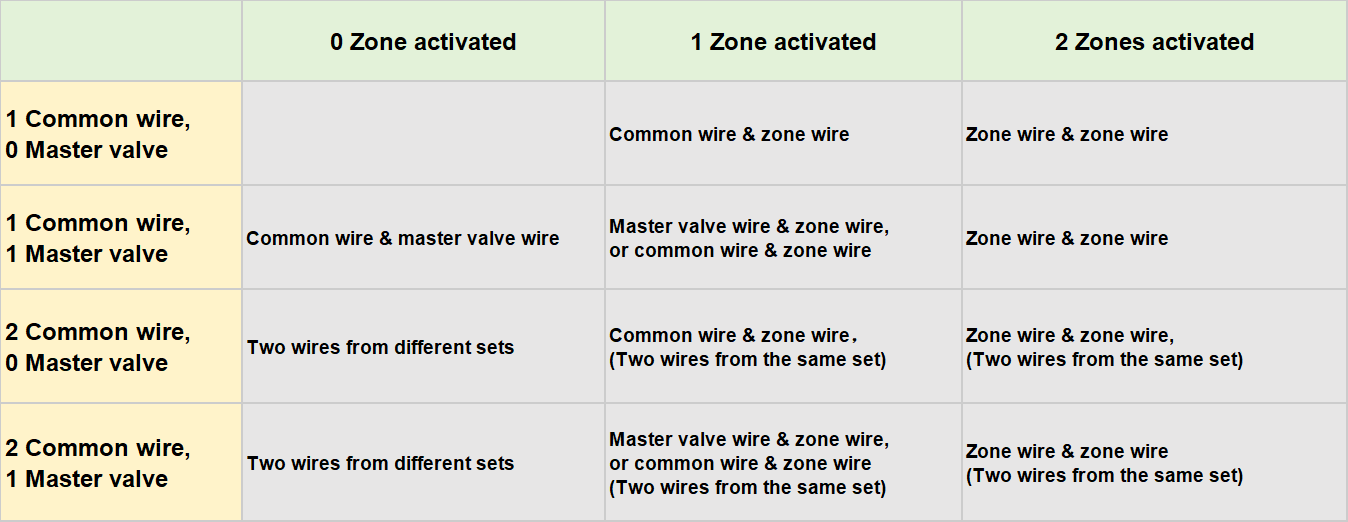
If your irrigation system doesn't have a main valve, alternate contact between irrigation wires and the 24V AC terminals. Identify the common wire first, then determine individual zone wires based on the sequence of sprinkler activation.
If your irrigation system includes a main valve, alternate contact between irrigation wires and the 24V AC terminals. Identify individual zone wires based on the sequence of sprinkler activation. Tighten the main valve. Simultaneously, contact the remaining wires and one zone wire with the 24V AC terminals to identify the common wire and control wire for the main valve, referring to the provided table.
Still need help?
In case the above method doesn’t work for you, please contact our technical support team directly using the contact information below. We will respond to you by email within 12h after your message reaches us.
Email: Support@imolaza.com
Author: Imolaza
Last update: 2024-06-13 05:16
Flow sensors monitor actual water consumption through pipes. Connecting a flow sensor to a sprinkler controller provides accurate water usage data. For more precise measurements, you can install one on your ImoLaza system. This article will guide you through the process.
Compatible Flow Sensor
Badger
. Badger 228PV15
. Badger 228PV20
. Badger 228PV30
. Badger 228PV40
Toro
. Toro TFS-050
. Toro TFS-075
. Toro TFS-100
. Toro TFS-150
. Toro TFS-200
. Toro TFS-300
. Toro TFS-400
CST
. CST FSI-T10
. CST FSI-T15
. CST FSI-T20
Everydrop 1004/1104
Flomec
. Flomec QS200-10-SCH40
. Flomec QS200-10-SCH80
. Flomec QS200-15-SCH40
. Flomec QS200-15-SCH80
. Flomec QS200-20-SCH40
. Flomec QS200-20-SCH80
. Flomec QS200-30-SCH40
. Flomec QS200-30-SCH80
. Flomec QS200-40-SCH40
. Flomec QS200-40-SCH80
. Flomec QS100-40
. Flomec QS100-80
Hunter
. Hunter HC-075-FLOW-B
. Hunter HC-100-FLOW-B
. Hunter HC-150-FLOW-B
. Hunter HC-200-FLOW-B
Note: If what you got is not in the list,
How to make it functional?
Wiring:
Get the two wires from the sensor connected to the S2 terminal and 24V AC- terminal in either order.
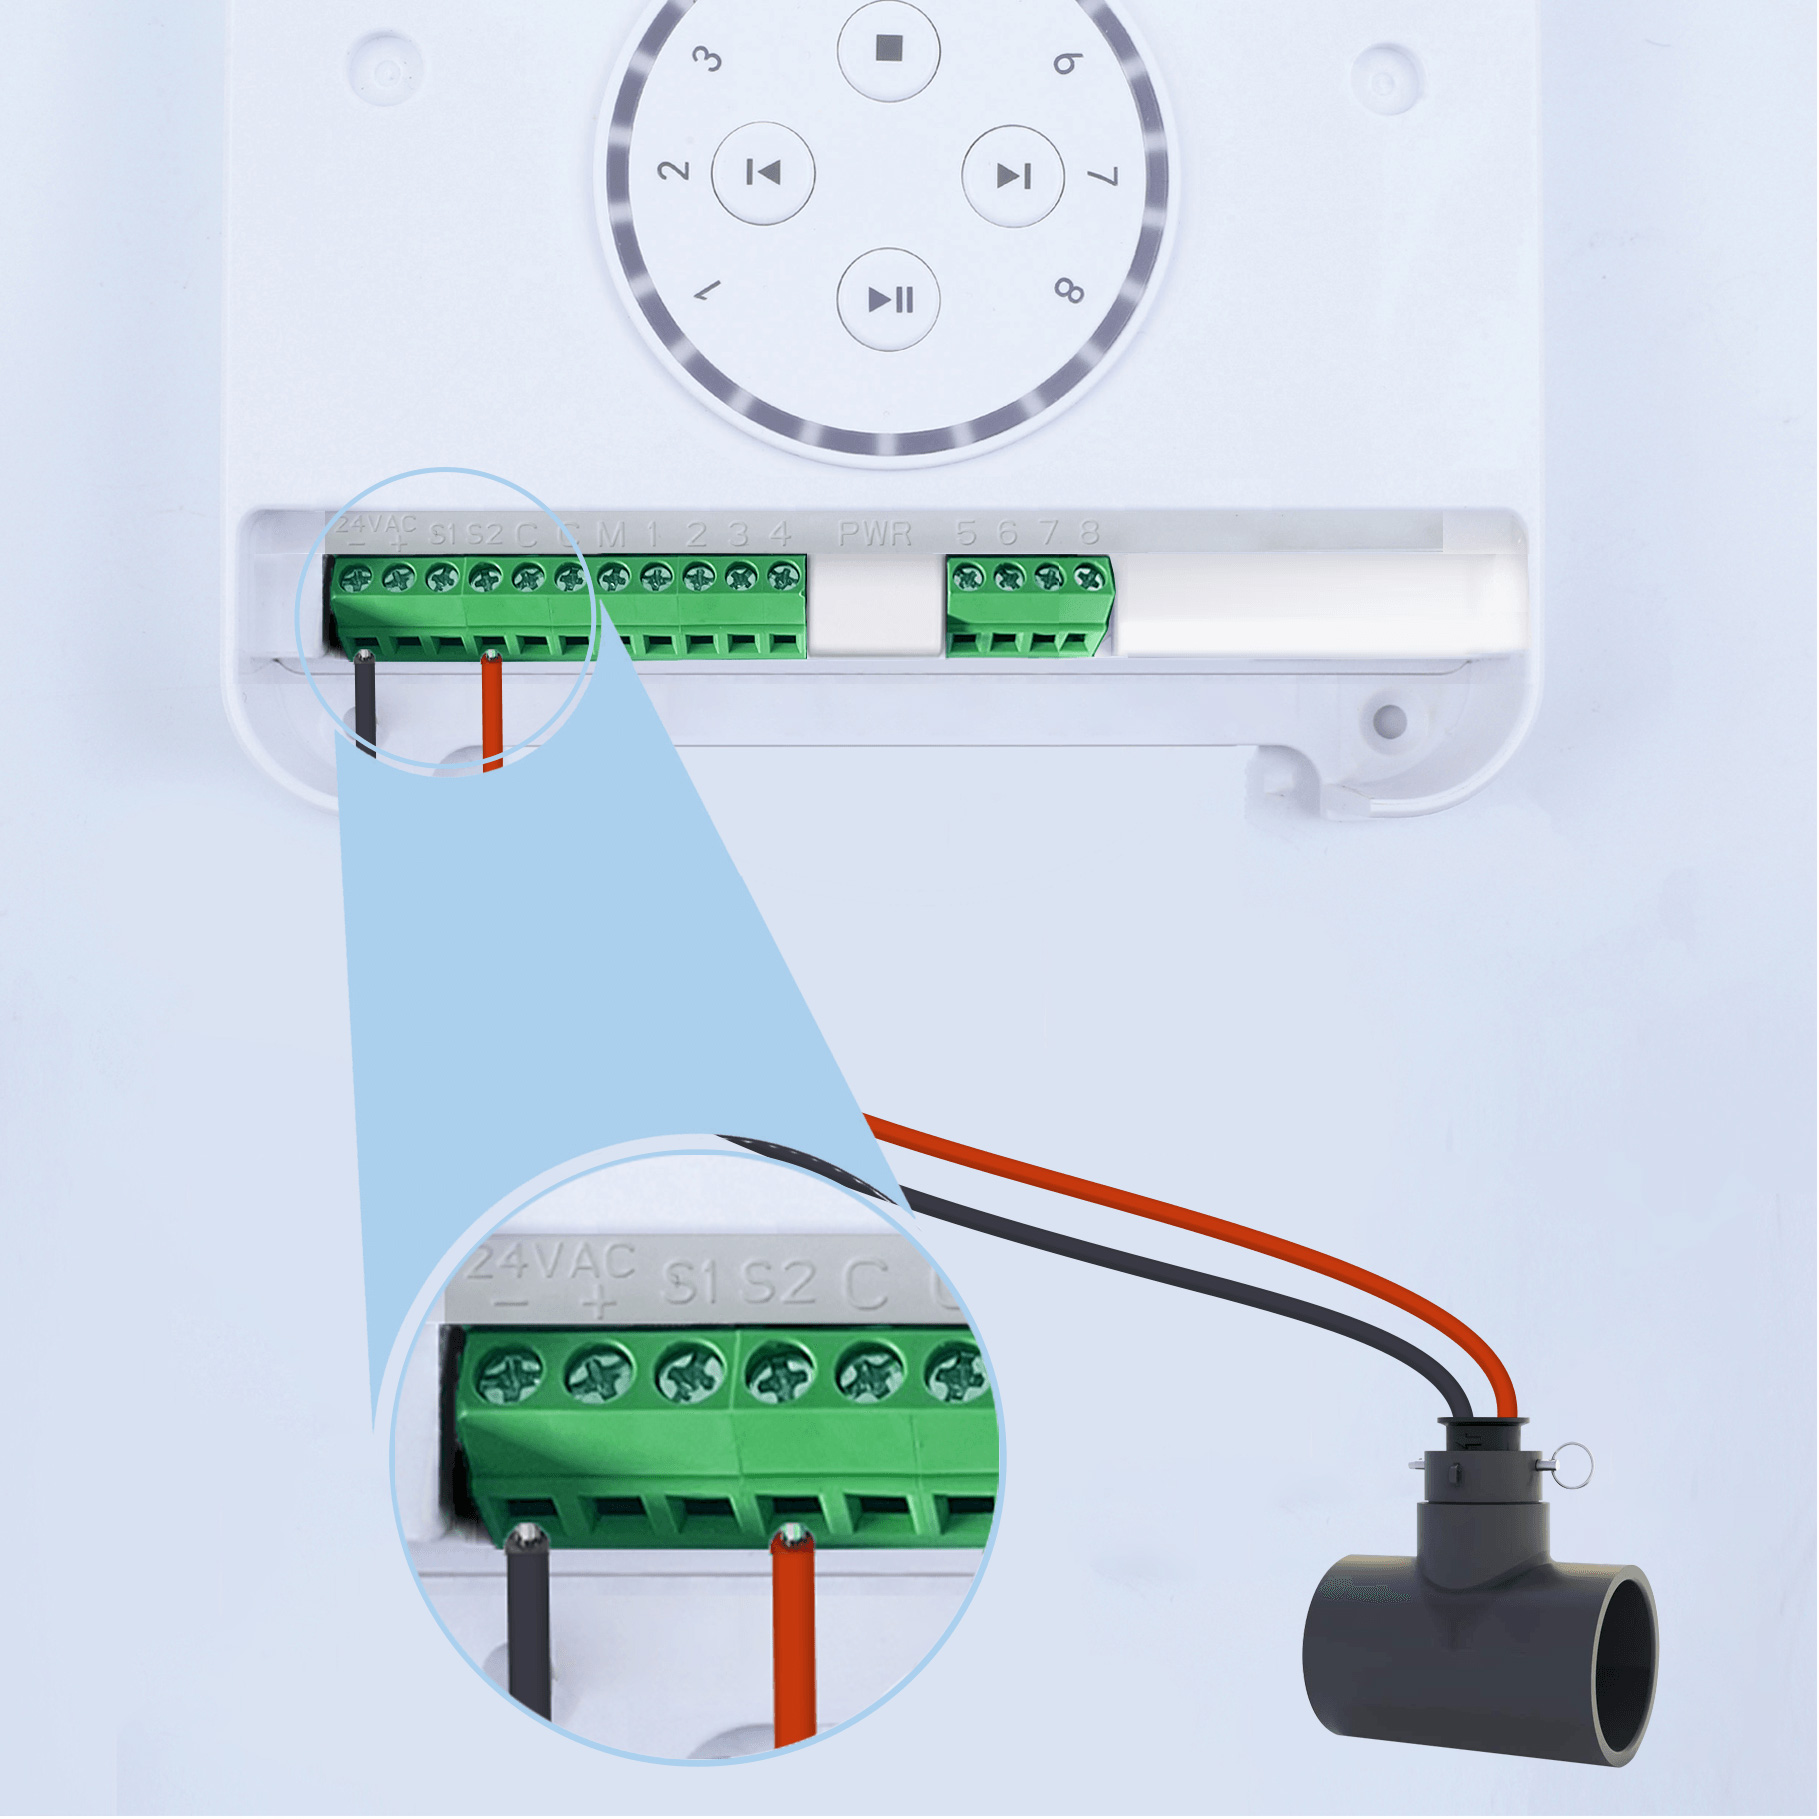
App Setting:
Navigate to "Settings" - "Controller Settings" - "Sensor", enable the S2 terminal, and choose the sensor type that you have; If it is not listed here, then choose Other and set the three parameters accordingly.
Then the flow sensor would work its magic.
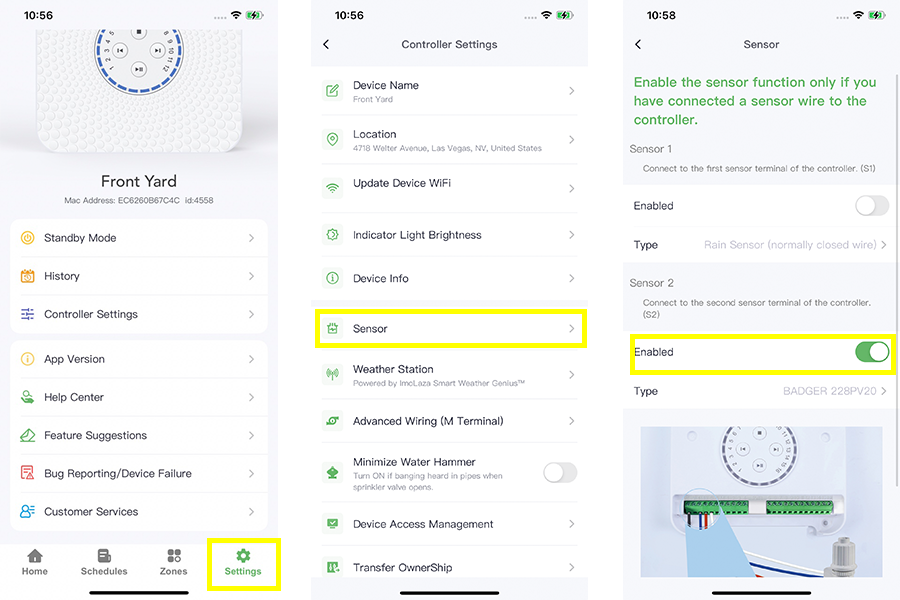
Still need help?
In case the above method doesn’t work for you, please contact our technical support team directly using the contact information below. We will respond to you by email within 12h after your message reaches us.
Email: Support@imolaza.com
Author: Imolaza
Last update: 2024-09-10 05:11